
The first step to understand which customizations are needed is to do a gap analysis between the existing functionality and the desired functionality.
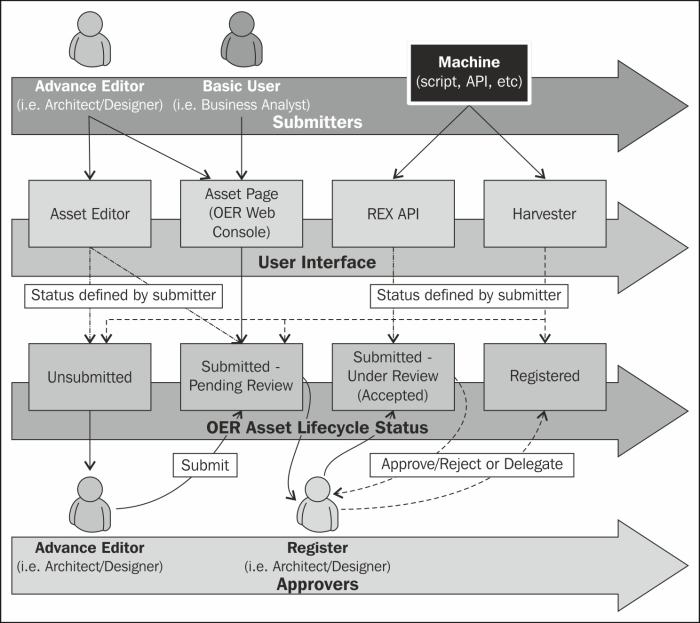
Let's start by understanding how the standard approval process works in OER by default:
- When an Asset is submitted through the Harvester or REX API, the status of the Asset can be defined as desired. However, note that the user provided when executing the Harvester or REX API must belong to the relevant role, as otherwise, the Asset submission will fail.
- When an Asset is submitted through the Asset Editor by any user with role Advance Editor, the status of the Assets is set to Unsubmitted. The Asset then needs to be approved by a user with the role of Advance Editor in order for the Asset to change its status to Submitted – Pending Review.
- When an Asset is submitted through the web console by any user that has the role Basic User, the status of the Asset is set to Submitted – Pending Review. The Asset then needs to be approved by a user with the role Registrar in order for the Asset to change its status to Submitted – Under Review.
- When an Asset changes to the status Submitted – Under Review, it can then be registered by any user with Registrar role. Note that the registrar may decide at this point to delegate to another user registration of the Asset.
Although this functionality might be useful for some customers, in many other implementations the default behavior of the workflow functionality within OER needs to be customized in order to fit the customer needs. Furthermore, when the status of any Asset changes, it is possible to configure the Event Manager and BPM Workflows functionality of OER to automate or customize the out-of-the-box approval process. This can be very useful especially to address the following use cases:
- Multitiered approvals, for example, when approvals are needed from a design authority group
- Automated life cycle stage assignment, for example, when it is desired to automatically change the status of an Asset from build to release
- Automatic publishing of services to OSR depending on status, life cycle stage or any other categorization
- Implement custom Oracle BPM 11g processes based on different events
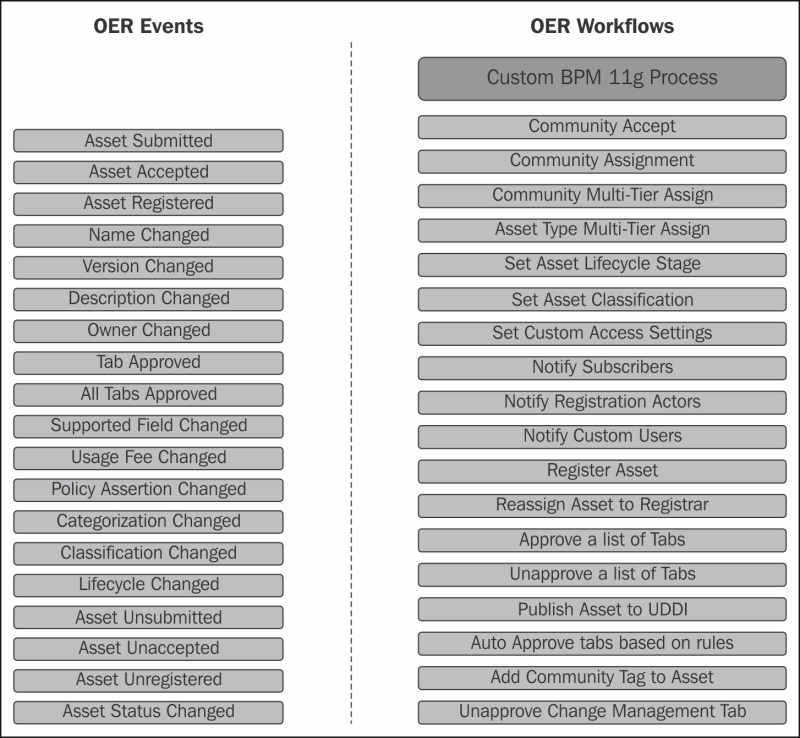
The Event Manager allows for different types of events to be wired to OBPM automated workflows or if desired, to custom BPM 11g PS6 processes. The following diagram depicts some samples of events wire to workflows:
Tip
Please refer to Chapter 3, Introduction to Oracle Enterprise Repository, for an architectural description OER workflows and Event Manager. You may also refer Event Manager to the Oracle OER Configuration Guide section 9.2.2, Automated Workflows.
http://docs.oracle.com/cd/E28280_01/admin.1111/e16580/oerwf.htm#CJHGDIJB
Oracle classifies automated workflows as follows:
- Community Assignment Flow: It provides a way to automate the Asset acceptance, assignment, and registration processes by allowing the configuration of automated assignment rules and also provides the notion of federated registrars among different authorities.
- Automated Acceptance and Automated Registration Flow: In addition to using the Community Flows to automatically accept and register the Assets, a number of user roles can be used to accept and register Assets.
- Multitier Approval Flow: It structures the tab approval process in multiple steps called tiers. Asset approval tabs can be grouped into tiers, and the Multitier Approval Flow tracks each tier to verify whether all the tabs are approved by the designated approvers. As soon as the last tab in a tier is approved, the flow starts the next tier by assigning the Asset to the next level of designated approvers.
- Metadata Change Flow: It exposes a flexible framework where state changes or metadata changes can be wired to actions. The Metadata Change Flows come with a set of pre-bundled actions. New actions can be developed in the form of OER flows and can be plugged in.
- Time-based Escalation Flow: It tracks Assets in various states and notifies all interested parties. There are four different kinds of time-based escalation flows and each one can be configured individually.
- Validation Expiration Flow: It tracks expired Assets prior to the specified expiration date, as well as at the day of expiration, and sends warning notifications to all interested parties.
- AutoSyncAlerToUddi Flow: It moves a service from Oracle Enterprise Repository to Oracle Service Registry, based on a defined criteria (refer to Chapter 8, Design-time Service Promotion and Discovery, for further details).
- BPM 11g Custom Processes: Version 11.1.1.7 (PS6) of OER supports the creation of custom Oracle Unified BPM Suite 11g processes.
Tip
Note that licensing restriction applies when using BPM 11g. For further info please refer to http://docs.oracle.com/cd/E23943_01/doc.1111/e14860/products.htm#CDEHFEFG
Before implementing an OER automated workflow, the following tasks must be completed:
Please refer to the Appendix, Installation Tips and Techniques for detailed steps of the installation and configuration process for OER, OBPM, and the Event Manager. The following section covers the steps needed to customize workflows.
Note
The version of OER used in this book (OER PS6) introduces the possibility of utilizing custom Oracle BPM 11g. For the purposes of this book our objective in the chapter is to show the thought process needed in order to deliver a fit-for-purpose solution rather than using all features of the product. However, the OER configuration steps considered to be relevant have been described in more detail.
Having understood the default behavior of the automated workflows, as well as the new requirements that need to be supported by the target governance model, the next step is do a gap analysis and identify what changes need to be made to the OER workflows.
Based on the use case described in the chapter, the following model identifies is the expected behavior that needs to be configured in the automated workflows in order to deliver the requirements of Weir & Bell Telecom.
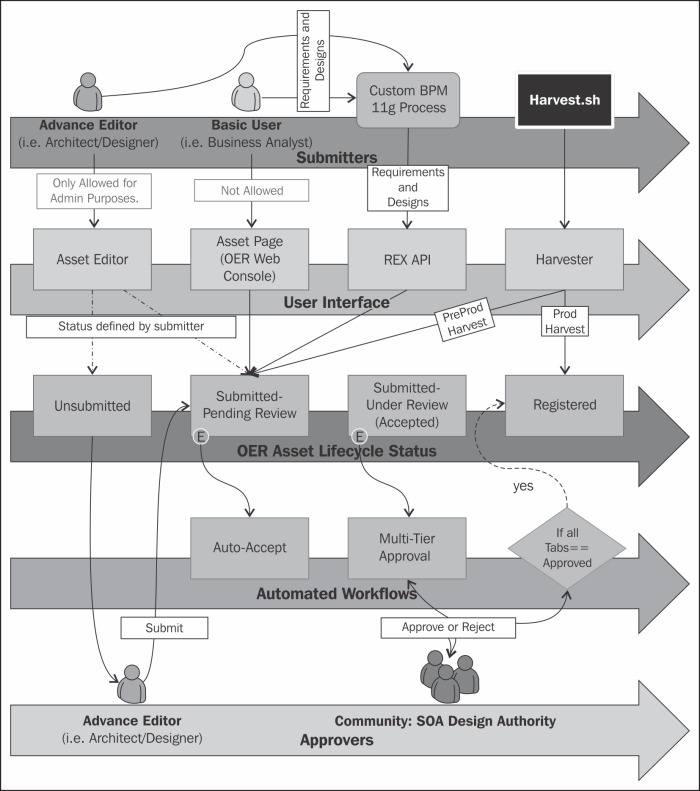
The model suggests that the following configurations and customizations are needed in OER and OER Workflows:
- A custom BPM 11g process needs to be created to allow the submission of Requirement Documents and Design Documents. The process would then undergo a custom approval workflow and once completed the Assets should be submitted into OER with a status of Submitted – Pending Review (please refer to section BPM 11g for further info).
- Assets should not be submitted either from the Asset Editor or the Submit an Asset page. The only exception to these rules is when for administration or troubleshooting purposes an Asset must be created via these tools.
- Once Assets reach the status of Submitted – Pending Review, an automated workflow should trigger multitier approval based on the different roles of the SOA Technical Working Group. At this stage the different approvers can verify the Policy Assertions and Asset them accordingly. Once all tabs of the Assets are approved, the Asset is automatically accepted and registered.
- New or modified Assets are harvested from preproduction with the status of Submitted – Pending Review. Periodically Assets are harvested from production with status of Registered (refer to Chapter 4, Initial Configuration, for additional information on Harvesting).
The following diagram shows the mapping between events and workflows that support the listed requirements:

Configurations of the out of the box automated workflows are done in a file called workflows.xml.
This files needs to be generated using an OBPM Workflow Utility that comes with OER and then subsequently loaded into the OBPM OER engine.
Note
Note that this chapter assumes that an OBPM has been successfully installed and the OBPM OER engine has been configured. For further information on how to achieve this task please refer to Appendix, Installation Tips and Techniques.
During installation and configuration of OBPM, this toolkit is unzipped and placed under <OBPM HOME>/OBPM_SetupScripts. From this location the script /config_gen.sh can be executed to generate a new workflow.xml file. This is particularly important whenever new users are added into OER, as the workflow.xml file should be refreshed if the new users have to participate in an automated workflow.
The following is an example of how to customize the workflow.xml file to address the OBPM requirements identified in the previous section, and also how to load the new workflow.xml file into the OBPM OER engine:
- From the folder
<OBPM HOME>/OBPM_SetupScriptsbackupworkflow.xml. - Ensure that OER is up and running.
- From
<MW Home>/repository111/core/workflow-toolsexecute:./config_gen.sh http://<oer host>:<port>/oer/services/FlashlineRegistry <oer admin user> <oer password> <output directory>
For example:
./config_gen.sh http://soabpm-server:7101/oer/services/FlashlineRegistry admin welcome1 .
- Copy the newly generated
workflow.xmlto<OBPM HOME>/OBPM_SetupScripts. - Generate an encrypted password for the OER Admin user (either as described in Chapter 5, Harvesting, or from the following URL: http://<oer server>:7101/oer/diag/encryptstrings.jsp)
- From
<OBPM HOME>/OBPM_SetupScriptseditworkflow.xmlto include the encrypted password as follows:- Change the
<alerConnection>element details so theuripoints to the OER server. For example,<alerConnection> <uri>http://soabpm-server:7101/oer/services/FlashlineRegistry</uri> <registrar> <user>admin</user> <password>encrypted password</password> </registrar> </alerConnection>
- Include the encrypted password for admin users in all locations where user appears. For example,
<user>admin</user>
<password>v2_1.yCFfBmPBkrk=</password>
- Change the
Asset acceptance, assignment, and registration can be automated by configuring the Community Flows. By configuring a community, Assets within the community can be auto-accepted and upon approval of all Asset Types, the Asset will be registered. Communities are configured as follows:
- Set the community for the producing projects in the
<producingProjectSettings>tag.<producingProjectSettings> <producingProject name="Common Project" community="SOA Design Authority" id="50000"/> <producingProject name="Order To Cash Integration" community="SOA Design Authority" id="50001"/> </producingProjectSettings>
- Set the community for all Asset Types that will be handled by the community in the
<assetType>tag.<assetType name="Service" community="SOA Design Authority" id="154"> … <assetType name="Requirement Document" community="SOA Design Authority" id="50100"> … <assetType name="Design Document" community="SOA Design Authority" id="50100">
- Based on an existing community (for example, SOA Center of Excellence) create a new community named SOA Design Authority and add the properties
autoAccept=trueandautoRegister=true. These two properties are needed so workflows autoaccept an Asset after submission and once all tabs are approved (based on the multitier approvers, defined in the multitier rules) it then autoregisters the Asset.<communities name="SOA Design Authority" autoAccept="true" autoRegister="true"> … - Set the multitier rules in both the community and the Asset Types as follows:
- Wire the
AssetSubmissionevent to theCommunityAcceptworkflow as follows. This wire will allow for the community rules to autoaccept the Asset.<state name="urn:com:bea:aler:events:type:AssetSubmission"> <action>CommunityAccept</action> <action>ApproveTabAction</action> <approveTabs> <tab name="Change Management"/> </approveTabs> </state>
- Wire the
AssetAccepted,AssetTabApproved, andAssetAllTabApprovedas follows so once all tabs are approved, the Asset is automatically registered.<state name="urn:com:bea:aler:events:type:AssetAccepted"> <action>MultiTier_Tier1_Assign</action> </state> <state name="urn:com:bea:aler:events:type:AssetTabApproved"> <action>MultiTier_NextTier_Assign</action> <action>ResetChangeManagementTab</action> </state> <state name="urn:com:bea:aler:events:type:AssetAllTabApproved"> <action>AllTabsApproval_Register</action> </state>
- Save the file and backup.
Once the changes have been made to workflow.xml, the file needs to be loaded into the OER BPM engine. This could be done in two ways:
- Stopping the OER OBPM engine and copying
workflow.xmlto<OBPM HOME>/workflow/aler_egineand then starting the engine. - Loading the
workflow.xmlto the OER OBPM engine with therefresh_workflow.shscript as follows:- From the folder
<OBPM HOME>/OBPM_SetupScriptsrun:source setenv.sh ant -v copy-workflow-config
- Ensure that OER is up and running.
- From
<MW Home>/repository111/core/workflow-toolsexecute:./refresh_workflows.sh http://<obpm server>:9000/albpmServices/aler_engine/ws/RefreshConfigServiceListener aler_workflow_user <aler password>
For example,
./refresh_workflows.sh http://soabpm-server:9000/albpmServices/aler_engine/ws/RefreshConfigServiceListener aler_workflow_user welcome1
- From the folder
Once all of the desired changes have been made to the automated workflows, these should be tested by submitting a new Asset and stepping through each step of the Asset life cycle and check that the behavior is consistent with the changes made in workflow.xml. For example:
- An Asset of type Service is harvested with status Submitted – Pending Review and with a producing project set to, for example, Order to Cash Integration.
- OER triggers the event
AssetAccepted. Inworkflow.xmlthis event is wired to theCommunityAcceptaction and therefore the Community Accept flow is executed.Tip
Refer to section 9.6.4.1, Configuring Community of the OER Configuration Guide for further info on this flow: http://docs.oracle.com/cd/E28280_01/admin.1111/e16580/oerwf.htm#CJHJEGAB
- The workflow checks if there is an
autoApproveorautoRegisterflag set for this Asset'sassetTypeinworkflow.xml. As none of these flags were set inassetType,it then tries to determine if these flags have been set for the community to which either the Asset or the project belongs to. - The workflow identifies from the
producingProjectSettingsofworkflow.xmlthat the Asset belongs to the project Order to Cash Integration and therefore identifies that the Asset belongs to the community SOA Center of Excellence. - As defined in the community rules, the Asset is then auto-accepted.
- Once an Asset is accepted the
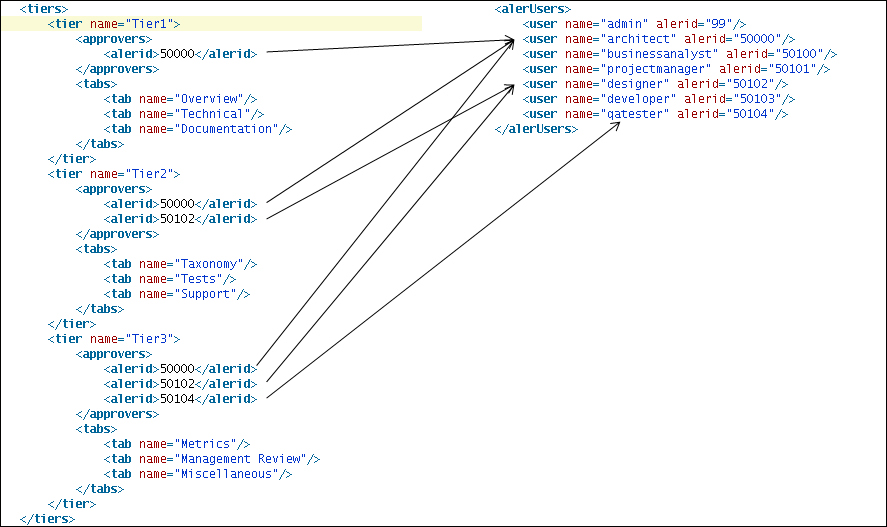
AssetAcceptedevent is triggered. Inworkflow.xmlthis event is wired to theMultiTier_Tier1_Assignthe Asset is assigned to Tier 1 approvers as defined in the multitier rules for the community. In this example, the Tier 1 approver is only the architect. - As defined in the multitier rules of the community SOA Center of Excellence, the Tier 1 approvers are responsible for approving the tabs Overview, Technical, and Documentation.
- The Tier 1 approvers should now see the Asset that needs approving in the
MyStuffpage. - The approver can click on the Edit button of the Asset to open the Asset Editor and then perform the necessary approvals.
- Once the tabs Overview, Technical, and Documentation are approved, the event
AssetTabApprovedis triggered. Inworkflow.xmlthis event is wired to theMultiTier_NextTier_Assignaction. This action triggers a flow that will reassign the Asset to the Tier 2 approvers (in our example, the architect and the designer) and subsequently to the Tier 3 approvers (architect, designer, and quality tester) once the Taxonomy, Tests, and Support tabs have been approved. - Once all of the remaining tabs are approved (Metrics, Management Review, and Miscellaneous), the event
AssetAllTabApprovedis triggered. TheAllTabsApproval_Registeraction triggers the flow to register the Asset.
The best way to debug OBPM 10g workflows is by using the OBPM 10g Log Viewer. To debug automated workflows using Log Viewer follow these steps:
- Using a browser launch OBPM Process Administrator by entering the URL: http://<OER Server>:8686/webconsole/faces/jsf/login.jsp.
- Log on with the
oer_bpm_adminuser. Note that this user was created during the configuration of OBPM 10g.
- Click on the link Engines located on the left-hand side of the page. When the middle page refreshes click on aler_engine.
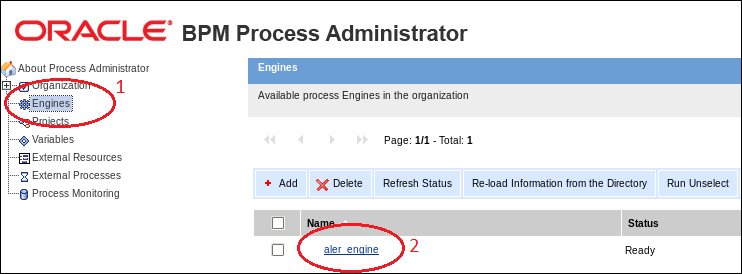
- Click on the Log Viewer link located on the bottom right-hand side of the middle page.

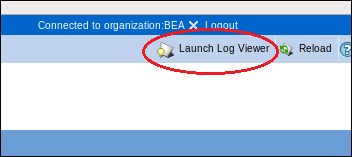
- From the Log Viewer page, click on the Launch Log Viewer link located on the top right-hand side of the page. This will open up the Log Viewer applet.
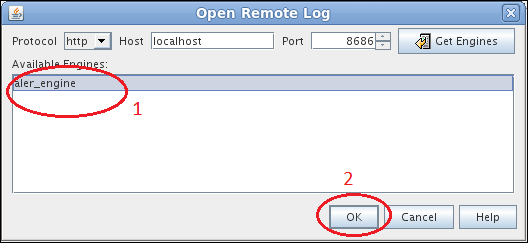
- Click on Get Engines and then enter the user
oer_bpm_adminand its password and click OK.
- Click on aler_engine and then click on OK.
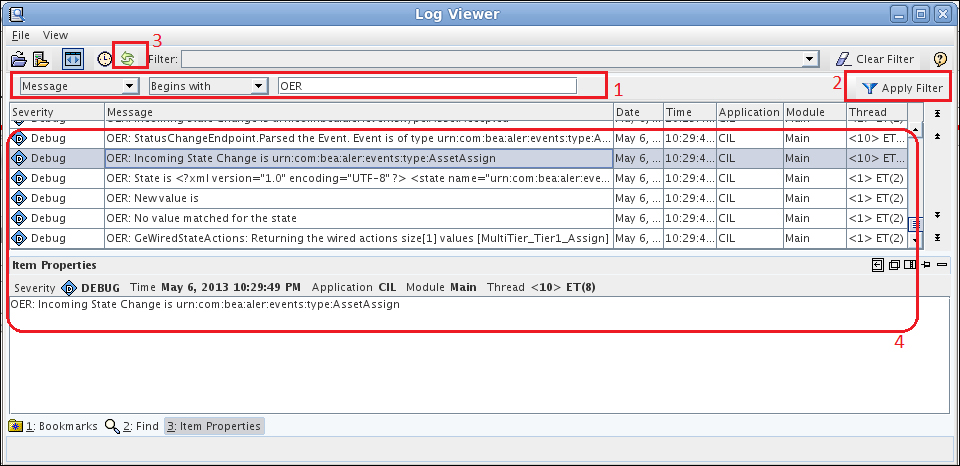
- The Log Viewer window will open. Filter the OER logs by selecting the filters Message | Begins with and enter the text
OERand then click on Apply Filter. - Select a message to view further details.
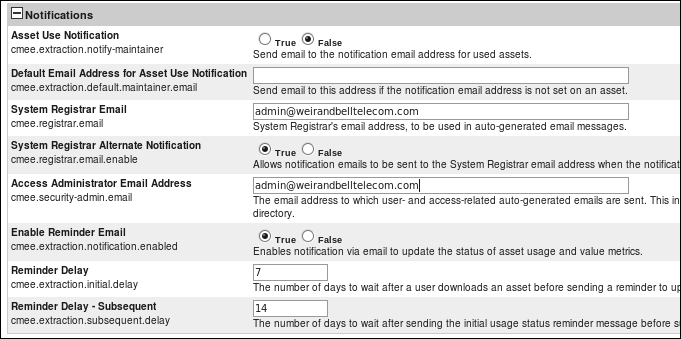
OER supports sending automatic e-mail notifications within the OER automated workflows and based on specific events. E-mails can be enabled or disabled as desired and also a variety of out of the box e-mail templates are available for use. To set up general notifications, follow these steps:
- Log on to OER as admin and navigate to the Admin page.
- Click on the System Settings menu option.
- Enter the
cmee.registrar.emailin the Enable New System Setting field located on the top right-hand side of the System Settings page. - Click on Enable.

- Enable the desired notifications and enter the relevant e-mail addresses.
- On the section Email enter the details of the SMTP Server.
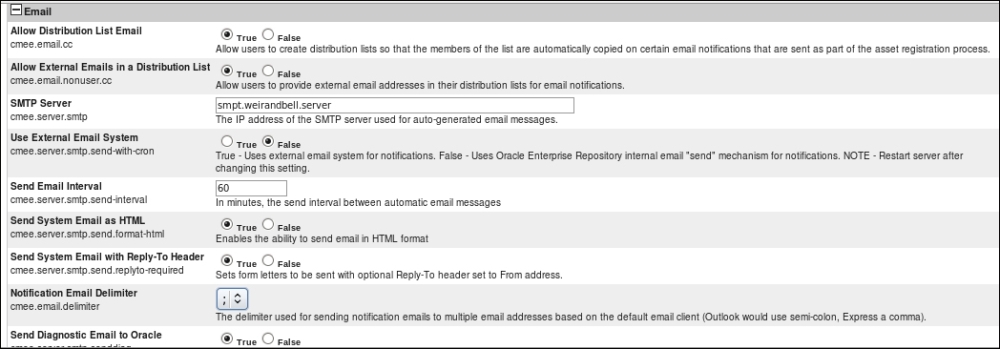
- At the bottom of the page click on the Save button.