Before going ahead and bootstrapping the registry, the following prerequisites should be completed:
- Installation of Solution Packs.
- Creation of new Categorizations.
- Creation of new Asset Types.
As described in Chapter 3, Introduction To Oracle Enterprise Repository, there are different types of Packs available for OER. The Base Pack is installed by default during the product installation and requires no further configuration. However, the following Solution Packs need to be manually installed:
- Policy Management Solution Pack: This pack is required while using the Policy Management features
- Harvester Solution Pack: This pack is required for the use of Workflows, Harvester, and the Oracle Registry Repository Exchange Utility (which will be covered in a later chapter)
- Enterprise Architecture Solution Pack: This pack is required when using the Architecture Blueprints Compliance Templates
All Solution Packs can be found on the OER server, under the following path:
<MIDDLEWARE_HOME>
epository111core	oolssolutions
Tip
A Middleware Home consists of the directory where the binaries for Oracle WebLogic Server home and other WebLogic based products reside. http://docs.oracle.com/cd/E12839_01/core.1111/e10105/concepts.htm#CHDGBFCJ
The installation of Solution Packs is achieved through the use of the Import/Export tool. Additionally, the Policy Management Solution Pack requires that the Policy Management System Settings are enabled. This is done from the System Settings menu of the Admin Page under the Policy Management section. In this section, the options Enable Compliance Templates, Enable Asset Policies, and Collapse Policy Assertions must be set to True, and the Asset Policy Relationship drop-down must be set to Policy Applies To. Once applied, the changes should be saved.

The Import/Export tool is accessed from the Admin page under the Import/Export menu on the left panel. The tool is launched by clicking on the Import/Export Client link. To import a pack, perform the following steps.
- Once the Import/Export tool opens, click on the Import tab.
- Click on Browse, select the pack to Import, and then click on Next.

- On the next screen, click on Next again and if all goes successfully, a screen similar to the following should appear. At this point, click on Finish and proceed to import the other packs.

- Repeat the same steps to import
11.1.1.x-Enterprise-Architecture-Solution-Pack.zip,11.1.1.x-Policy-Management-Solution-Pack.zip, and11.1.1.x-Policy-Management-Solution-Pack-Relationship-Fix.zip.
Categorizations are created or edited using the Asset Editor. Note that the user must belong to the registrarAdministrator role to create or modify Categorizations. Categorizations are created as follows:
- Open Asset Editor by clicking on the Edit/Manage Assets link available in the Assets page.
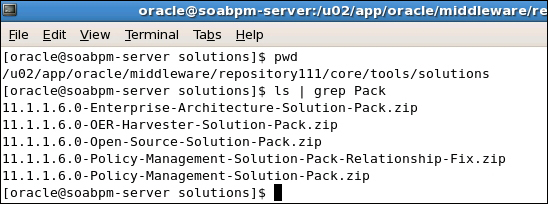
- On the top menu Actions, select the Configure Categorizations option.

- The Configure Categorizations window allows for the creation and modification of Categorizations. Click on Add to create a new Categorization.
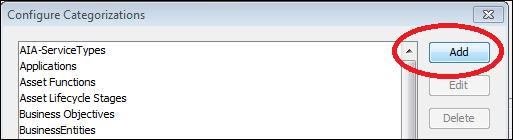
- Once the Add Categorization window opens, you must enter the Element Name which is how this Categorization will be referred to later on when assigned to a type.
- Once all the Categorizations are added, click on OK to save the Categorization.
- These steps can be repeated for the creation of any Categorization such as the Project Deliverables as shown in the following screenshot:

Tip
For the Project Deliverables Categorization we ticked the option Assignable to projects?. This is because we recognize that the Solution Packs already provide types for most of the SOA Suite 11g and OSB 11g artifacts. However, this Categorization was intended to be used to better classify the projects depending on what the nature of the expected outcomes were. With this option enabled, it will be possible to assign any of the created Categorizations to a new or existing project.
Categorizations are created or edited using the Type Manager. Note that a user must belong to the registrarAdministrator role to create or modify Asset Types. Asset Types are created as follows:
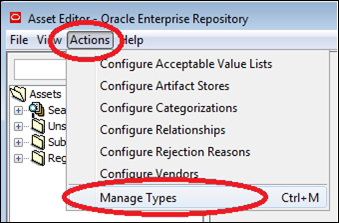
- To open Type Manager, first launch the Asset Editor by clicking on the Edit / Manage Assets link available in the Assets page.
- Then from the top menu Actions, click on the Manage Types option.
There are three Artifacts Types that can be managed from the Type Manager:
- Asset Types.
- Compliance Templates Types.
- Policy Types.
Tip
Refer to the Type Manager section of Chapter 3, Introduction To Oracle Enterprise Repository, for the description of these artifacts.
Note
When creating a new Type you must select an existing one as the Type for Default. The newly created Type will be identical to the selected Type for Default. The recommendation is therefore to evaluate Types using the Type Manager and then select an existing Type with similar properties to the desired New Type and select this as Default.
The following Types for Default were identified as suitable for the required Asset Types:
|
New Type Name |
Artifact Type |
Type for Default |
Customization Needed |
|---|---|---|---|
|
Asset Type |
EA - Sample Asset Type |
| |
|
Asset Type |
Governance Document |
| |
|
Asset Type |
Requirement Document |
None required. |
In the following steps, we will demonstrate how to create the Governance Document Asset Type as defined in the table. Similar steps can be followed to create the remaining types.


The first customization is done as follows:
- Select the Tests item in the Tabs box and then click on Remove.

- Click on Yes to confirm the deletion.
Now similar steps must be completed for the Viewer tab (otherwise the item will be displayed when viewing the Assets from the console).
- Click on the Viewer tab, then under the Groups section from the Column Two box select the item Tests and click on Remove.
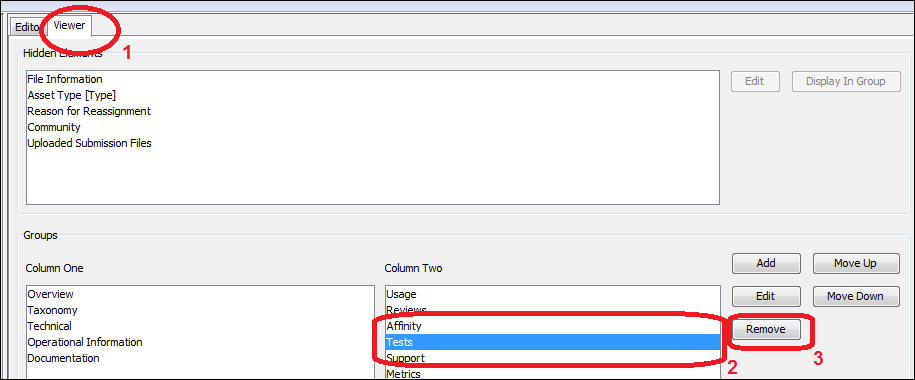
- Click on Yes to confirm the deletion.
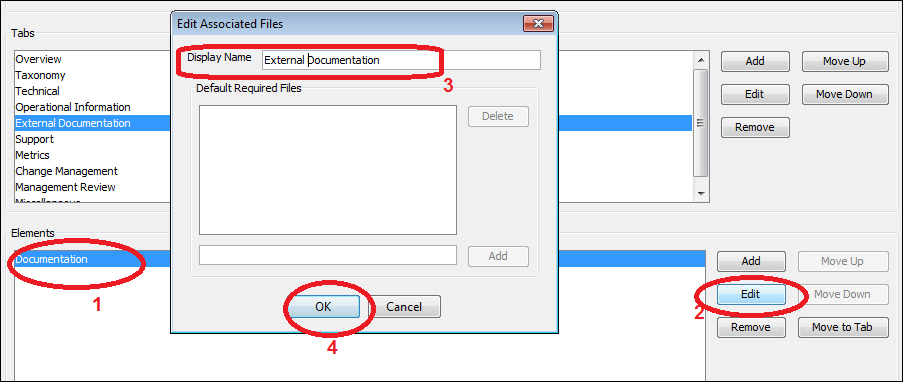
The next customization is to rename Documentation to External Documentation in the Editor and Viewer tabs.
- In the Editor tab, in the Tabs box, select the Documentation item. Then click on Edit and once the Tab Information window opens, enter the new name in the Tab Name field and click on OK.

- To rename the Documentation element, select the item Documentation in the Elements box and click on Edit. Once the Edit Associated Files window opens, enter the new name in the Display Name field and click on OK.
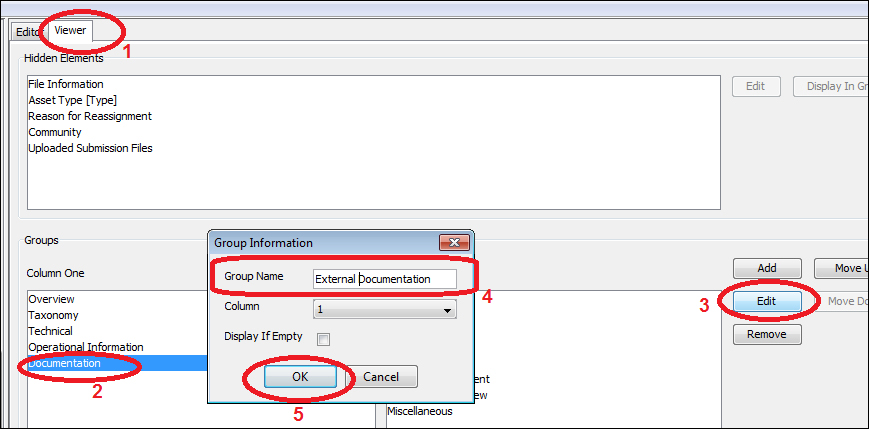
Now a similar procedure must be completed for the Viewer tab.
- Click on the Viewer tab, then under the Groups section in the Column One box, select the item Documentation and then click on Edit. Once the Group Information window opens, enter the new name in the Group Name field and click on OK.
- To rename the Documentation Element, select the item Documentation [External Documentation] in the Elements box and click on Edit. Once the Edit Associated Files Element: External Documentation window opens, enter the new name in the Display Name field and click on OK.

The third customization required is to replace the Enterprise Architecture Model categorization in the Governance Framework categorization in the Taxonomy tab both for Editor and Viewer.
- In the Editor tab, in the Tabs box, select the Taxonomy item and click on Remove. Then click on Yes to confirm the removal.

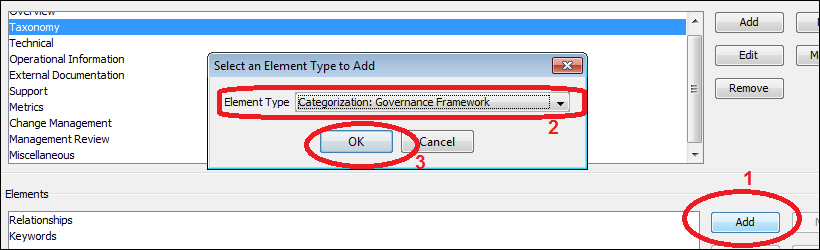
- To add the new Categorization, in the Elements section click on the Add button. Once the Select an Element Type to Add window opens, select Categorization: Governance Framework and click on OK.
- Modify the Display Name if desired. For our example we have kept it the same.

- The new Element is added to the bottom of the box. In our case, we would like this item to show up at the top of the Editor (and Viewer) tab. To do so, in the Elements box, select the Governance Framework item and then click on the Move Up button until the item is located in the desired position.

- The last step is to display the Governance Framework Element in the Viewer tab.
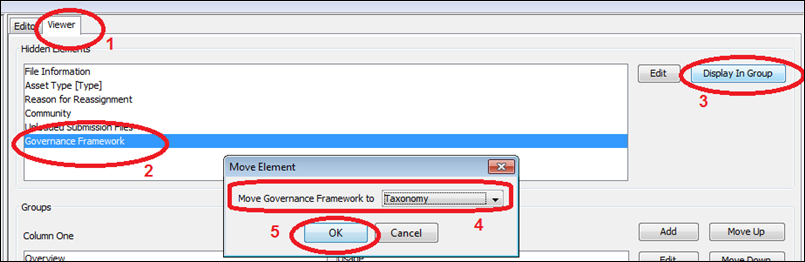
- In the Viewer tab, in the Hidden Elements box, select Governance Framework and then click on Display In Group. Once the Move Element window opens, select Taxonomy (as this is where we want to display the Element) and click on OK.
- To display the Governance Framework item at the top of the group, in the Elements box, select the Governance Framework item, and click on the Move Up button until the item is located in the desired position.
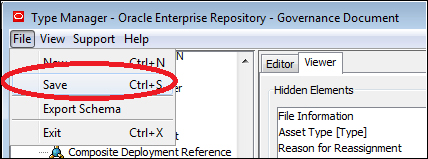
- Once all customizations have been done, save the changes by clicking on the Save option located in the File top menu.
Repeat similar steps to create the Requirement Document Asset Type using Governance Framework as the Type of Default. In the Requirement Document Asset Type replace the Governance Framework categorization with the Project Deliverable Categorization and save the changes. Once this is done, create the Design Document Asset Type using the Required Document as Type for Default.