
Once all the prerequisites have been fulfilled the next step is to Bootstrap OER as per the defined Strategy. There are broadly five steps required to complete this task:
- Harvest SOA Suite 11g and MDS production server using the Harvester through the command line.
- Harvest OSB using the OSB Harvester utility.
- Submit all document Assets (such as Governance and Design Documents) using Asset Editor.
- Configure JDeveloper with the OER plugin, so that Assets can be discovered and registered from the IDE.
- OER may also be bootstrapped from OSR.
The following sections will describe in detail how to complete each of these steps:
The following steps were followed in order to harvest SOA Suite and MDS:
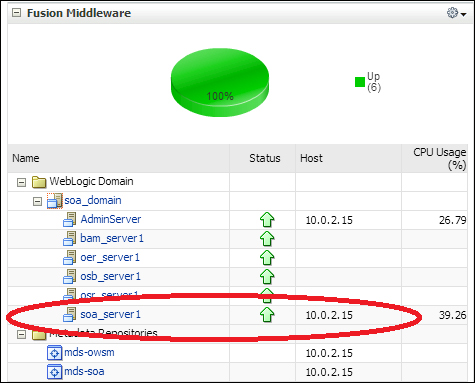
- Ensure that SOA Suite, the MDS, and all SOA Composites are up and running.
- Log on to Enterprise Manager 11g Fusion Middleware Control with the WebLogic user.
http://<weblogic admin server>:7001/em - On the landing page, a series of dashboards should appear. In the Fusion Middleware section the (right-hand side of the page) and under the SOA Domain, check that soa_server1 is up and running.
Tip
MDS holds all of the metadata such as WSDLs, schemas, and SCA composites that are required by SOA Suite to run the deployed services. Therefore, if an SOA Suite is up and running properly it is very likely that MDS is also running properly. However, it is also possible to check the status of MDS by following the instructions described in Section 8 Troubleshooting Oracle Metadata Repository from the Fusion Applications Administrator's Troubleshooting Guide.
http://fusion.kabolly.com/~sheffie1/kabolly/fusion/doc.1111/e25450/mds_trouble.htm
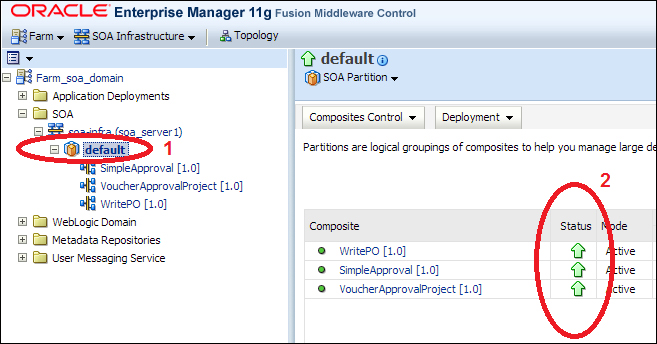
- Within Enterprise Manage FM Control, check that the composites are up and running. This can be done by clicking on the SOA partition (for example, default) under the SOA infrastructure (soa-infra) node. All the composites will appear on the right-hand side of the page. If composites are successfully running, the Status should be a green arrow.
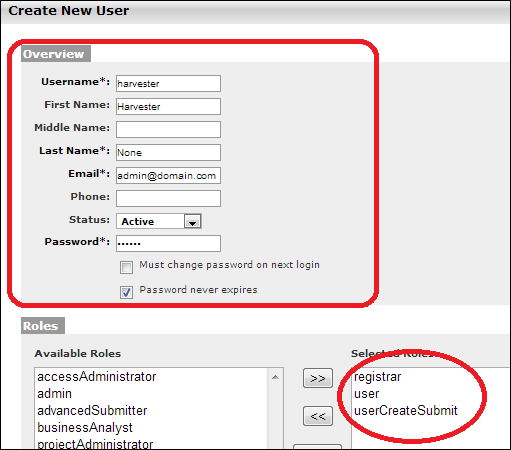
Create an OER user to be used for the Harvester and grant the Basic Access Settings: View, Edit, Accept, and Register on Assets. Ensure that the password for this user does not expire, and also take a note of the password as it will be required later on when configuring the connection to OER.
Tip
Any user with these rights would suffice and a new account is not mandatory. However, we considered this to be good practice as it would provide better visibility over Assets created by the Harvester, and also more flexibility as the account details could change later on without affecting any other users.
Follow these steps to extract the Harvester and password utilities, and encrypt the password for the Harvester user and for the WebLogic account.
- With the oracle user (or the user used to install OER), start an SSH session or a Terminal Client session and locate on the following path:
<MIDDLEWARE_HOME> epository111core oolssolutions - Unzip the Harvester tool. In a Linux/Unix based OS execution, this can be achieved by executing the following command:
unzip 11.1.1.x.x-OER-Harvester.zip –d harvester
- Additionally, on a Linux/Unix based OS, change the permissions of the Harvester Home so, the owner has the write and execute rights. This can be done with the following command:
chmod –R u=rwx ./harvester
- Unzip the Password tools. In a Linux /Unix based OS execution, this can be achieved by executing the following command:
unzip 11.1.1.x.x-OER-PasswordTools.zip –d passwordtool
- Again on a Linux/Unix based OS, change the permissions of the Password tool so the owner has the write and execute rights. In a Linux /Unix based OS execution, this can be achieved by executing the following command:
chmod –R u=rwx ./passwordtool
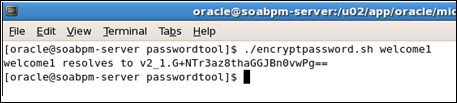
- Encrypt the password of the Harvester user using the encrypting tool. If using a Linux/Unix-based system the following command can be executed:
Locate into the
passwordtoolfolder and execute the password tool by passing the Harvester user password as input:./encryptpassword.sh <Harvester user password>
- Encrypt the password of the WebLogic user by executing the same command, but supplying the password of the WebLogic account of the SOA Suite domain. Note that an account other than WebLogic can be used provided that it has the WebLogic roles Admin, Operator, and Monitor.
Configure the Harvester connection details to the OER and SOA Suite servers as follows:
- Locate into
harvesterfolder available inside the Harvester Home (note that this assumes that the Harvester tool was unzipped into theharvesterfolder). - Using a text editor open the file
HarvesterSettings.xml. - Set the Registration Status of the harvested Assets by modifying the
<registrationStatus>tag as follows:<registrationStatus>Registered</registrationStatus>
- Enter the OER connection details as follows:
<repository>
  <uri>http://[OER Server]:[OER Server Port]/oer</uri>
  <credentials>
    <user>[Harvester User]</user>
    <password>[Harvester user encrypted password]</password>
  </credentials>
   <timeout>30000</timeout>
</repository>
- Uncomment the tag
<remoteQuery>. - Enter the SOA Suite connection details as follows and comment out
<projectName>and<soaPartition>so all composites from partition default are harvested.<remoteQuery> <serverType>SOASuite</serverType> <!--<projectName></projectName>--> <uri>http://[SOA Suite Server]:[SOA Suite Server Port]</uri> <credentials> <user>weblogic<user> <password>[Weblogic user encrypted password]<password> </credentials> <!--<soaPartition></soaPartition>--> </remoteQuery>
Tip
It is also possible to specify new parameters through the command line while executing the Harvester. Refer to Table 6-4 Command Line Options for the Harvester of the OER Configuration Guide for further information: http://docs.oracle.com/cd/E23943_01/admin.1111/e16580/harvest.htm
Execute the Harvester using the following steps:
- Ensure that the
JAVA_HOMEis set up properly and that it points to a JRE, that is, Version 6 or higher. A quick way to check this on a Linux/Unix-based OS is by executing the command:echo $JAVA_HOME - If set up properly, the outcome should be similar to the screenshot:

- Run the Harvester in preview mode to ensure that all connection settings are correct and that all servers are up and running:
./harvest.sh –preview true - If after executing the Harvester you get the exception Artifact harvest failed due to: RemoteException occurred in server thread then you must apply Patch 13738080 as per the instructions provided in the readme file.
- Successful execution of this command should end with a summary of the Assets identified, and a message that the OER transaction was rolled back.

- If no errors are encountered after running the Harvester in preview mode, then proceed to execute the Harvester as following:
./harvest.sh
Tip
For further information on the usage of the Harvester tool refer to section 6.2.2.2 Selecting the Artifacts to Harvest for the Command Line of the OER Configuration Guide
http://docs.oracle.com/cd/E23943_01/admin.1111/e16580/harvest.htm#BABJCIJA
- Check that the execution ends with a successful message.

- Check that the harvested Assets appear in OER by logging into OER and searching for the SOA composites available in the production system.
Oracle highlights two main prerequisites when Harvesting OSB Assets:
- If you wish to harvest from Oracle Service Bus, install Oracle Service Bus server (Version 10.3.1.0) on the same machine as the Harvester, or on a shared file system accessible to the Harvester.
- If you wish to harvest any later versions of Oracle Service Bus 11g, then you have to use the corresponding Oracle Service Bus harvester version that is specifically developed for later versions of Oracle Service Bus 11g. This is available as part of the Oracle Service Bus 11g product installation.
Tip
Further information on the Harvester is available in Section 6.1.1 Prerequisites of the OER Configuration Guide: http://docs.oracle.com/cd/E23943_01/admin.1111/e16580/harvest.htm#BABIBEBD
Since the version of OSB deployed in Weir & Telecom was greater than 10.3.1, we harvested using the Harvester tool bundled with the OSB binaries. This was done as follows:
- Firstly, ensure that OSB and OSB Proxy and Business Services are up and running:
- Log on to Enterprise Manager 11g Fusion Middleware Control with the WebLogic user. The URL is as follows:
http://<weblogic admin server>:7001/em - On the landing page, a series of dashboards should show appear. In the Fusion Middleware section (the right-hand side of the page) and under the SOA Domain, check that soa-server is up and running.

- Open a new browser window and go to the OSB console
http://<weblogic admin server>:7001/sbconsole - From the OSB Home page, click on the Service Health tab.

- Check that Endpoint URI Status for the monitored services is Online.

Configure the Harvester connection details for the OER and OSB servers:
- With the oracle user (or the user used to install OER), start an SSH session or a Terminal Client session and locate onto the
harvesterfolder available inside the OSB Home.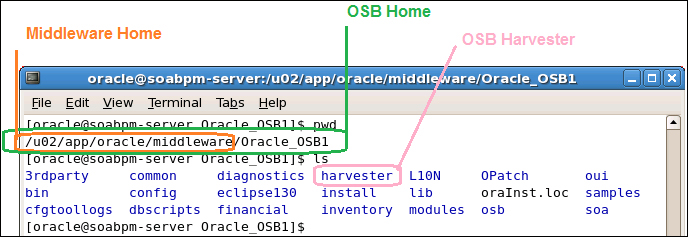
- Using a text editor open the file
HarvesterSettings.xml. - Set the status of the Harvested Assets by modifying the
<registrationStatus>tag as follows:<registrationStatus>Registered</registrationStatus> - Enter the OER connection details as follows:
<repository>
  <uri>http://[OER Server]:[OER Server Port]/oer</uri>
  <credentials>
    <user>[Harvester User]</user>
    <password>[Harvester user encrypted password]</password>
  </credentials>
  <timeout>30000</timeout>
</repository>
- Uncomment the tag
<remoteQuery>(if not already uncommented). - Enter the OSB connection details as follows, and comment out
<projectName>so all OSB Proxy and Business Services are harvested.<remoteQuery> <serverType>OSB</serverType> <!--<projectName></projectName>--> <uri>http://[OSB Server]:[OSB Server Port]</uri> <credentials> <user>weblogic<user> <password>[Weblogic user encrypted password]<password> </credentials> </remoteQuery>
Execute the Harvester as follows:
- Set the OSB Harvester environment variables (Middleware Home, OSB Home, and Harvester Home) by executing the command
source setenv.sh:
- Run the OSB Harvester in preview mode to ensure that all connection settings are correct, and that all the servers are up and running:
./osb11g-harvest.sh –preview true - Successful execution of this command should end with a summary of the Assets identified and a message that the OER transaction was rolled back.

- If no errors are displayed after running the Harvester in preview mode, proceed to fully execute the Harvester as following:
./osb11g-harvest.sh - Check that the execution ends with a successful message.
- Check that the harvested Assets appear in OER by logging into OER and searching for the OSB Business and Proxy services available in the production system.
At this stage all of the Assets available in the SOA Suite and OSB production systems have been harvested and are available in OER. However, important design and architecture documents that may reside in content management systems such as WebCenter Content are not yet available as Assets in OER. Such documents include Service Designs and Governance Documents, for example. Documents can be linked to Assets using the Asset Editor, and adding the associated document's name and URLs to the Documentation tab. This may be acceptable in some situations, but using this approach results in Assets that cannot be explicitly searched for or subsequently associated with other Assets such as services. This was not acceptable in the case of Weir & Bell Telecom.
In the preceding sections, we added the required Categorizations and Asset Types to support Requirement Documents, Governance Documents, and Design Documents. Now, we can proceed to add these Assets using the Asset Editor.
In this section, we will demonstrate how to submit three Assets of type: Governance Document, Design Document, and Requirement Document respectively, and how to create all the required relationships to the Assets.
Note
Please refer to the Overview section of Chapter 3, Introduction To Oracle Enterprise Repository, for a full picture of the Asset Relationship View used as the base for establishing the relationships between the Assets submitted.
The following steps describe how to submit an Asset, approve it, and register it through the Asset lifecycle. In this case, we will show how an SOA Detail Design document can be submitted, associated with a service and approved. We will also show how to specify applicable design standards that have been adhered to during the service implementation.
- Log into the OER console using an account that belongs to the Register role.
- From the Assets page, launch the Asset Editor.
- From the top menu File select the option New.

- Enter the following details for the asset in the Create a New Asset window and then click on OK.
- Name: The name of the SOA Service Design. Note that usually companies follow their own company-wide naming conventions for these types of documents. While OER itself will not enforce a particular convention, it is highly recommended that you comply with your company's convention to make it easier to search for such assets.
- Version: All Assets in OER are subject to version control. The standard convention used by default is
<major version>.<minor version>, for example,1.0. Versions are extremely important for many reasons, such as avoiding duplicity and change management, amongst many others. - Type: As in this sample, we are submitting a service design document, then the Asset Type should set to Design Document.
- Initial State: This field defines the actual Registration Status of the asset after submission. All Assets submitted to OER with a status of: Unsubmitted, Submitted : Pending Review and Submitted : Under Review will appear in OER as Unregistered assets and will undergo a governance workflow that involves a series of approvals (Chapter 6, Asset Lifecycle and Workflow, discusses the Asset lifecycle and workflow in more detail). If the Asset is submitted as Registered, no approvals are required.

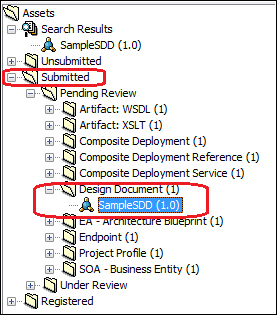
- From the browser tree located on the left panel, browse to Submitted | Pending Review | Design Document(1) and then click on SampleSDD (1.0) to edit the asset.
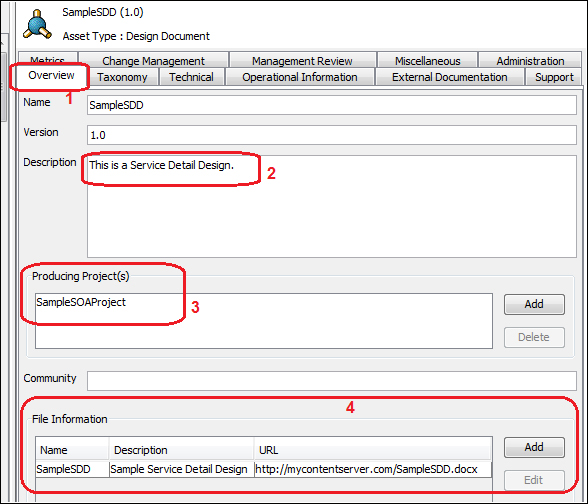
- From the Overview tab, it is possible to add further details to the Asset. It is recommended that a Description, the Producing Project(s), and the File Information details are added. The latter is particularly important as users will likely want to read the content of this document, so it is imperative that the URL is entered correctly.
- Click on the Taxonomy tab to assign the Project Deliverables and Relationships to other Assets.
- Under the Assign Project Deliverables section, click on the Assign button and then tick the Detail Design box and click on OK.

- Relationships are established by clicking on the Add button under the Relationships section.

- When the Add Relationship window opens, select the Relationship Type that you wish to apply and Search for an Asset to apply the relationship to. Before creating the relationship, verify it by looking at the Confirm Relationship section. If all looks correct then click on OK.

- In our sample we create three relationships with the intention to define:
- The SampleSDD is a Technical Detail Design for SOA Service: Sample Service - Account Detail (2.0).
- The SampleSDD content must comply with the design patterns available in the SOA Design Standards. The SOA Design Standards document is enforced by the policy SOA Design Standards Policy (1.0). Therefore, SampleSDD is Subject to Policies defined in this document.
- SampleSDD is based on SampleFunctionalDesign(1.0).

- The last step is to Accept and Register the Asset and for this particular Asset Type also provide a Technical Review.
- Click on the Management Review and tick on the Passes Technical Review box.

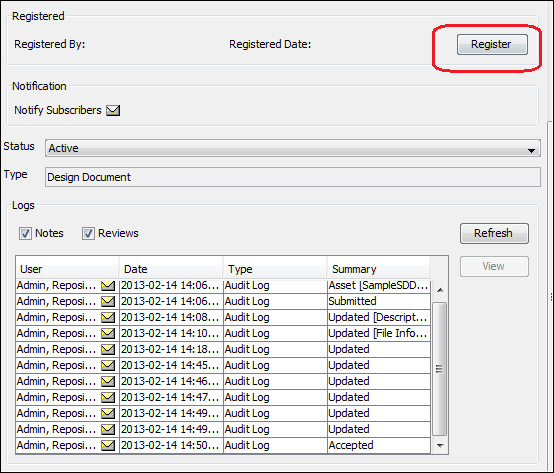
- Click on the Administration tab and then click on the Accept button. This will change the Asset state to Submitted : Under Review.

- From the same tab, click on the Register button to change the Asset state to Registered.
- From the File top menu, click on Save to save all changes made to the Asset.

- Following a very similar process, it is possible to manually submit all the document Assets that were not harvested automatically by the Harvester. Also note that, if this task becomes too painful and slow, it is possible to develop a custom script using the REX API. Refer to Chapter 3, Introduction To Oracle Enterprise Repository, section Repository Exchange Utility (REX)for further information of the API.