
Working with the Finder
After your Mac boots or when you first log in, take a look at that smiley-face guy grinning at you near the bottom-left corner of your screen. That’s the Finder (see Figure 1.1), and it’s one of the most important items in all of OS X Mountain Lion.
The Finder is an application that always runs in Mountain Lion and it has been a part of Mac OS since its inception. The Finder is what Mac fans have used for decades to browse their computer drives and discs.
It has evolved into a great tool that I can’t imagine not having (especially as you can’t view the contents of your hard drive without it). For Windows converts, think of the Finder as the OS X equivalent to Windows Explorer. In this section, I show you how to use the basic features in Finder, and I also give you tips that I’ve learned to make it even easier and more productive to use.

1.1 The Finder icon.
The Mountain Lion desktop at a glance
The desktop is what you see when you first start up or log in to your Mac. This is where all the action in your applications takes place. The desktop is a major part (and actually, the starting point) of the Finder.
Figure 1.2 should mirror your own Mac screen very closely after you log in. It shows the major parts that you see when the Finder first comes up.
Now that you know the names of the items you see in the Finder, you can use Table 1.2 to decipher what functionality they provide.
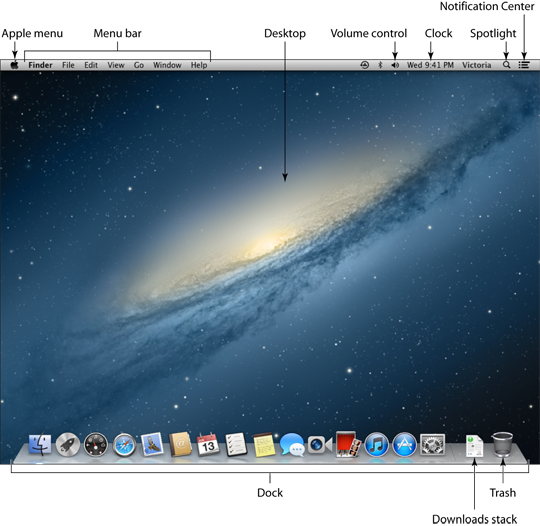
1.2 The Finder desktop in all its default glory.


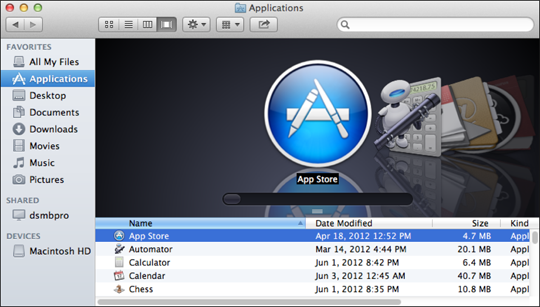
Now that you are more familiar with the features of the desktop, you can examine a Finder window, which is the mechanism you need to view files and folders on your drives. Figure 1.3 shows a default Finder window.

1.3 Finder windows are used for browsing your drives, files, and folders.
Table 1.3 gives a brief breakdown of each noteworthy item in the Finder window.

Setting the Finder preferences
You’ll notice throughout this book that you can modify most things in Mountain Lion to match your personal preferences and tastes (to one degree or another), and that’s the way I like it. The Finder is no exception (see Chapter 2 for a lot of Finder customization tips). To access its preferences, choose Finder→Preferences or press ![]() +,. Let’s take a look at the preferences that the Finder allows you to control.
+,. Let’s take a look at the preferences that the Finder allows you to control.
General
The options listed in the General tab of the Finder Preferences window, as shown in Figure 1.4, are fairly self-explanatory (with the exception of spring-loaded folders and windows, which are so cool that they get their own sidebar).

1.4 Options available in the General tab.
The available options allow you to do the following:
![]() Show certain items (such as hard or external disks, CDs, DVDs, iPods, or servers) on the desktop.
Show certain items (such as hard or external disks, CDs, DVDs, iPods, or servers) on the desktop.
![]() Choose which folder automatically opens when you open a new Finder window.
Choose which folder automatically opens when you open a new Finder window.
![]() Decide whether to always open folders in new (separate) windows. I do not recommend that you use this feature unless you regularly use or compare multiple windows.
Decide whether to always open folders in new (separate) windows. I do not recommend that you use this feature unless you regularly use or compare multiple windows.
Labels and Sidebar
The Labels tab of the Finder Preferences window allows you to assign color labels to categories that you determine. You can then assign these labels to files and folders by right-clicking them (or Control+clicking if you don’t have a two-button mouse) and then selecting a label from the list, as shown in Figure 1.5.

1.5 Assigning a label color to a folder.
The Sidebar tab of the Finder Preferences window simply lets you choose which types of items to display in the sidebar of every Finder window.
Advanced
Table 1.4 explains the options that are available in the Advanced tab of the Finder Preferences window.


You can securely empty the Trash on a case-by-case basis instead of enabling it all the time. To do so, place the item you want to permanently delete in the Trash, and then choose Finder→Secure Empty Trash.
Moving around in the Finder
OS X employs the same basic navigation techniques as any other graphical operating system. Double-clicking opens files and folders, while right-clicking (or Control+clicking) items opens contextual menus with which you can alter or perform an action on an item (like the Labels example earlier in this chapter). You can also click and drag items to move them to and fro. As I’m sure you’re experienced at the basics of mouse operations, I’ll move on to more Finder-centric tasks and options.
Finder viewing options
You can change the way files and folders are displayed in Finder windows by choosing one of the four View options in the toolbar: Icon, list, columns, or Cover Flow. Let’s look at how each option displays the contents of the same folder so that you can clearly see the differences between each view.
Icon view
Icon view shows each file and folder as large icons in the window, as shown in Figure 1.6.

1.6 A folder in icon view.
Quickly Open Commonly Used Folders
I can’t speak for other Mac users, but the Finder menu that I most wish I had discovered years ago is the Go menu, which you see in the menu bar when the Finder is active. The Go menu gives you instant access to the most commonly used folders in Mountain Lion, but for some reason I overlooked it for a good portion of the years I’ve used OS X. Click the Go menu to quickly go to the Applications or Utilities folders, your Network, and more.
Better yet, familiarize yourself with the keyboard shortcuts (listed to the right of each command in the Go menu) used to access those items. If an item you want to jump to isn’t in the Go menu, press ![]() +Shift+G to open the Go to Folder window, type the path of the folder you want, and then click Go to jump over to it.
+Shift+G to open the Go to Folder window, type the path of the folder you want, and then click Go to jump over to it.
List view
List view does just what it says: It displays the files and folders in a list. You can arrange the list by filenames, the date the files were modified, the size of the file or folder, and the kind of item it is.
Columns view
My personal favorite is columns view. This view arranges the contents of a folder into columns, with each column displaying the contents of the subsequent folder. The final column also shows a preview of any item you have selected.
Cover Flow view
Cover Flow is hands down the coolest viewing option at your disposal. As shown in Figure 1.7, files and folders are displayed as they really appear when opened in an application, which can be a great help when searching for a particular document or picture.
1.7 Click and drag the slider back and forth in Cover Flow view to see how effortlessly the Finder zooms through the files in the folder.