
Setting Preferences in Mail
Just like any other app, Mail works best when it works best for you. Because only you know what works best for you, Mail provides the ability to change its default behavior to suit your needs using Preferences. Press ![]() +, to open the Mail preferences window.
+, to open the Mail preferences window.
General
The options in the General pane are shown in Figure 10.7.
Table 10.2 gives the scoop on each of these options.

10.7 The Mail General options.


Accounts
The Accounts pane lets you see and edit your account information and decide how Mail handles certain behaviors for your accounts. Earlier in this chapter, I discussed adding and removing accounts from this pane. Now, let’s take a look at the other options available for your accounts. The Accounts pane is separated into three tabs: Account Information, Mailbox Behaviors, and Advanced.
Account Information
The Account Information tab, shown in Figure 10.8, allows you to set up the information necessary to receive e-mail from any one account, as well as to enable or disable (without deleting it) the account. This information is available from your e-mail provider or your company’s IT administrator.
The Outgoing Mail Server pop-up menu lets you specify an SMTP server to send mail from this particular account. If you haven’t set up an outgoing server, click the pop-up and select Edit SMTP Server list to enter the information as provided by your e-mail provider or IT admin.
Select the Use only this server check box to prevent Mail from using a different SMTP server should the one assigned to this account be unavailable for any reason.
Mailbox Behaviors
The options in the Mailbox Behaviors tab (see Figure 10.9) differ depending on whether the account type is IMAP or POP.

10.8 Account Information is where you tell Mail the settings for your e-mail account.
The options include:
![]() Drafts. Decide whether to keep copies of drafts on your e-mail provider’s servers or not. I advise you to select this check box so that if something happens to your Mac, your draft messages can still be accessed from another computer. This option is only available for some IMAP accounts.
Drafts. Decide whether to keep copies of drafts on your e-mail provider’s servers or not. I advise you to select this check box so that if something happens to your Mac, your draft messages can still be accessed from another computer. This option is only available for some IMAP accounts.
![]() Sent and Junk. Choose whether Mail should erase Sent or Junk mail from their respective mailboxes, and choose how to handle deleted sent and junk messages.
Sent and Junk. Choose whether Mail should erase Sent or Junk mail from their respective mailboxes, and choose how to handle deleted sent and junk messages.
![]() Trash. Tell Mail how to handle messages that you delete. Moving deleted messages to the Trash mailbox gives you the opportunity to find them again should you need them. Storing deleted messages on the e-mail server is a good idea so that you can get to these messages if you need to, but they won’t take up extra space on your Mac (if you deselect the first option, that is).
Trash. Tell Mail how to handle messages that you delete. Moving deleted messages to the Trash mailbox gives you the opportunity to find them again should you need them. Storing deleted messages on the e-mail server is a good idea so that you can get to these messages if you need to, but they won’t take up extra space on your Mac (if you deselect the first option, that is).

10.9 Tell Mail how to handle items in your mailboxes with the Mailbox Behaviors tab.
Advanced
The Advanced tab allows you to tell Mail to automatically check for new messages, automatically erase deleted messages from an IMAP account in which you don’t move deleted messages to the Trash, and keep copies of e-mails on your e-mail provider’s server. You can also specify the IMAP Path Prefix, port number, and the authentication type necessary to communicate with your e-mail provider’s SMTP server.

The Remove copy from server after retrieving a message option should be deselected if your e-mail account uses POP. Selecting this check box prevents you from retrieving e-mails from your e-mail provider should you have problems with your Mac. Deselecting this check box keeps copies of e-mails on your e-mail provider’s server as a backup.
Junk Mail
Everyone gets junk e-mail from time to time, and the Junk Mail pane, shown in Figure 10.10, helps you kick those unwanted messages to the curb. It also tells Mail which e-mails are not junk.
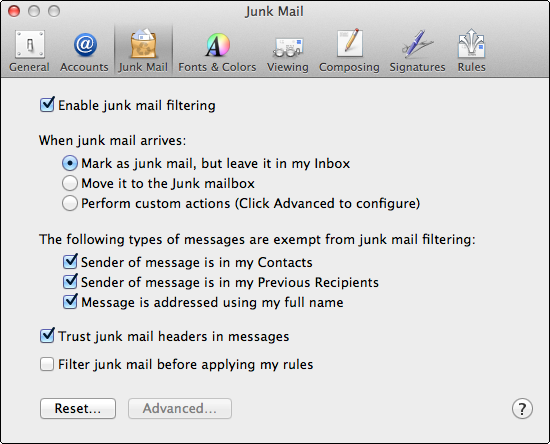
10.10 Configure how Mail detects and handles junk e-mail messages.
The available options are:
![]() Enable junk mail filtering. Select this check box to turn on the junk mail filters.
Enable junk mail filtering. Select this check box to turn on the junk mail filters.
![]() When junk mail arrives. Tell Mail how to handle junk e-mails that arrive. You can mark them as junk but still keep them in your Inbox so that you can inspect them, move them automatically to a Junk mailbox so that you can peruse them at your leisure, or customize how they are handled.
When junk mail arrives. Tell Mail how to handle junk e-mails that arrive. You can mark them as junk but still keep them in your Inbox so that you can inspect them, move them automatically to a Junk mailbox so that you can peruse them at your leisure, or customize how they are handled.
![]() The following types of messages are exempt from junk mail filtering. This option is invaluable because it lets Mail know which messages it should never mark as junk. If your messages are from senders in your Address Book, from senders of previous e-mails, or addressed to your full name, you can instruct Mail not to filter them as junk.
The following types of messages are exempt from junk mail filtering. This option is invaluable because it lets Mail know which messages it should never mark as junk. If your messages are from senders in your Address Book, from senders of previous e-mails, or addressed to your full name, you can instruct Mail not to filter them as junk.
![]() Trust junk mail headers in messages. Some e-mails already contain indicators that they are junk. Selecting this option lets Mail rely on those indicators to filter the messages out as junk.
Trust junk mail headers in messages. Some e-mails already contain indicators that they are junk. Selecting this option lets Mail rely on those indicators to filter the messages out as junk.
![]() Filter junk mail before applying my rules. Later in this chapter, I cover how to set rules for Mail. Selecting this option lets the junk mail filter run on all e-mails before your rules are carried out.
Filter junk mail before applying my rules. Later in this chapter, I cover how to set rules for Mail. Selecting this option lets the junk mail filter run on all e-mails before your rules are carried out.
![]() Reset. Click Reset to return Mail to its default junk filtering options. Use this one with caution; after you reset the junk filter it forgets any settings and rules you applied to it.
Reset. Click Reset to return Mail to its default junk filtering options. Use this one with caution; after you reset the junk filter it forgets any settings and rules you applied to it.
![]() Advanced. Click Advanced to set your own custom rules for what Mail should do with junk e-mails. Select the Perform custom actions radio button in the When junk mail arrives section to access the Advanced button.
Advanced. Click Advanced to set your own custom rules for what Mail should do with junk e-mails. Select the Perform custom actions radio button in the When junk mail arrives section to access the Advanced button.
Fonts & Colors
This one doesn’t get much simpler. Use the Fonts & Colors pane to set the default font for your Message List, messages, notes, and fixed-width fonts. If you are sending a plain text message (as opposed to the default HTML), you can choose to use a fixed-width font. You can also set the default colors for quoted text, which is the text that is included when you reply to or forward an e-mail.
Viewing
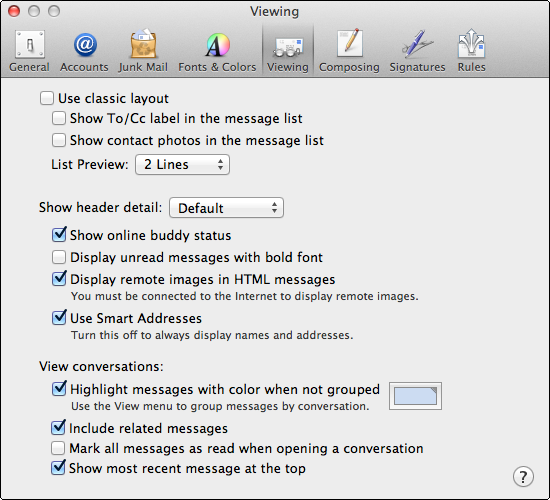
The Viewing pane, as shown in Figure 10.11, is where you tell Mail how to display your e-mails.
The available options include the following:
![]() Use classic layout. Select this option to have your messages appear in a list on top of the preview pane, as in earlier versions of Mail.
Use classic layout. Select this option to have your messages appear in a list on top of the preview pane, as in earlier versions of Mail.
![]() Show header detail. The pop-up menu and check boxes below it let Mail know how you want the header information to appear in your e-mails. To clarify, headers are items that are commonly seen at the top of e-mails, such as From and To. The four boxes under the pop-up menu perform the following tasks:
Show header detail. The pop-up menu and check boxes below it let Mail know how you want the header information to appear in your e-mails. To clarify, headers are items that are commonly seen at the top of e-mails, such as From and To. The four boxes under the pop-up menu perform the following tasks:
• Show online buddy status. Selecting this option shows the status of your iChat buddies in your e-mails.
• Display unread messages with bold font.
10.11 You can customize how your messages are displayed in Mail with these options.
• Display remote images in HTML messages. Select this option to have pictures and graphics appear in e-mails.
• Use Smart Addresses. You can decide to have Mail display the name of the recipient in the address field, as opposed to their actual e-mail address by selecting this option.
![]() View conversations. Mail allows you to view related e-mails as a group, which is called a conversation. The self-explanatory options in this section let you determine how these messages are displayed in conversation view.
View conversations. Mail allows you to view related e-mails as a group, which is called a conversation. The self-explanatory options in this section let you determine how these messages are displayed in conversation view.
Composing
There are many options in the Composing pane, as shown in Figure 10.12, and they are divided into three sections: Composing, Addressing, and Responding.
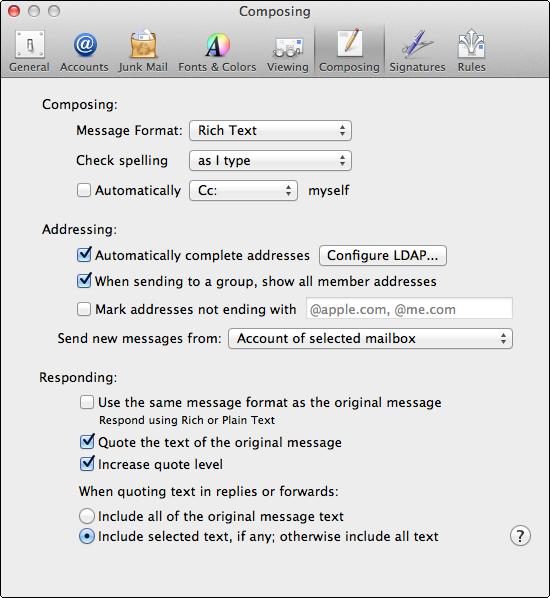
10.12 The options in the Composing pane configure how Mail puts together an e-mail.
Composing
The following options (see Figure 10.12) help you when creating a new e-mail or when replying to one:
![]() Message Format. Determine the default format to use when creating new e-mail. If you choose plain text, you can’t use the advanced graphics features of Mail, such as Stationery.
Message Format. Determine the default format to use when creating new e-mail. If you choose plain text, you can’t use the advanced graphics features of Mail, such as Stationery.
![]() Check spelling. You can check spelling as you type, once you hit Send, or never.
Check spelling. You can check spelling as you type, once you hit Send, or never.
![]() Automatically Cc myself. Select this check box to send a copy of e-mails you send to others to yourself. This may not be necessary because Mail puts a copy of your sent messages in the Sent folder anyway.
Automatically Cc myself. Select this check box to send a copy of e-mails you send to others to yourself. This may not be necessary because Mail puts a copy of your sent messages in the Sent folder anyway.
Addressing
The Addressing section (see Figure 10.12) helps configure how Mail works with e-mail addresses in new e-mails and notes:
![]() Automatically complete addresses. This option allows Mail to complete e-mail addresses as you type them, saving you tons of keystrokes over time. LDAP (Lightweight Directory Access Protocol) is used by many businesses to access company-wide telephone and e-mail directories. Your IT administrator can tell you if your company uses LDAP servers. If it does, click Configure LDAP and type the information needed to connect to the LDAP server.
Automatically complete addresses. This option allows Mail to complete e-mail addresses as you type them, saving you tons of keystrokes over time. LDAP (Lightweight Directory Access Protocol) is used by many businesses to access company-wide telephone and e-mail directories. Your IT administrator can tell you if your company uses LDAP servers. If it does, click Configure LDAP and type the information needed to connect to the LDAP server.
![]() When sending to a group, show all member addresses. If you send e-mail to groups, selecting this option displays the e-mail address for each individual in the group.
When sending to a group, show all member addresses. If you send e-mail to groups, selecting this option displays the e-mail address for each individual in the group.
![]() Mark addresses not ending with. This option helps prevent you from sending unintentional e-mails to folks by marking e-mail addresses that don’t end with a particular domain name.
Mark addresses not ending with. This option helps prevent you from sending unintentional e-mails to folks by marking e-mail addresses that don’t end with a particular domain name.
![]() Send new messages from. Choose which e-mail address to show in the From field when sending messages to others.
Send new messages from. Choose which e-mail address to show in the From field when sending messages to others.
Responding
The Responding options in the Composing pane (see Figure 10.12) let Mail know how it should reply to those who have been courteous enough to send you messages:
![]() Use the same message format as the original message. It’s a good idea to reply to someone using the same format as his or her original e-mail. For example, if you reply to a plain text e-mail with rich text the recipient may not be able to read it.
Use the same message format as the original message. It’s a good idea to reply to someone using the same format as his or her original e-mail. For example, if you reply to a plain text e-mail with rich text the recipient may not be able to read it.
![]() Quote the text of the original message. Select this option to display the original message and subsequent exchanges under your reply.
Quote the text of the original message. Select this option to display the original message and subsequent exchanges under your reply.
![]() Increase quote level. Select this option to distinguish individual quotes using colors and indentions.
Increase quote level. Select this option to distinguish individual quotes using colors and indentions.
![]() When quoting text in replies or forwards. To include all text from the original e-mail in a reply or forward, select the first radio button. To include only text you’ve selected in the original e-mail, select the second radio button.
When quoting text in replies or forwards. To include all text from the original e-mail in a reply or forward, select the first radio button. To include only text you’ve selected in the original e-mail, select the second radio button.
Signatures
The Signatures pane, shown in Figure 10.13, allows you to create and edit personal e-mail signatures. A signature can contain any information you like, such as your address, phone number, fax number, and so on. You can create as many signatures as needed, which comes in handy if you have multiple accounts because you can assign specific signatures to each one.

10.13 Signatures give your e-mails a personal touch, much like signing a handwritten letter.
To create a signature:
1. Select the account to which you want to assign the signature or choose All Signatures to allow all accounts to use the new signature.
2. Click the plus sign (+) to add a new signature.
3. Give the signature a descriptive name (middle window) and type the signature information in the large text field on the right.
4. To edit the fonts and colors in the signature, highlight the text you want to change, right-click (or Control+click) the highlighted text, choose Font→Show Fonts or Font→Show Colors, and then make the changes you desire.
5. If you want to keep uniformity throughout the message and signature, select the Always match my default message font check box.
6. Select the Place signature above quoted text check box to situate your signature after your message but before the quoted text.
7. If you want to use one signature with multiple accounts (not all, though), drag the signature from the middle window and drop it onto the account names to which you want it applied.
Rules
Under the Rules tab, Mail allows you to create your own rules and dictate how it distributes and marks certain messages. These rules can be based on criteria that you set, allowing a high level of customization.
Using the four plus and minus sign buttons on the right side of the pane, as shown in Figure 10.14, you can add, edit, duplicate, and delete rules.
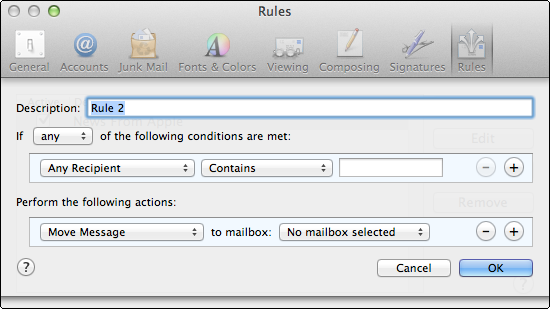
10.14 Create your own rules to customize how Mail distributes your messages.
To add a new rule to the Rules list, follow these steps:
1. Click the Add Rule button.
2. Type a descriptive name for your new rule. A rule tells Mail that if a certain condition exists it should perform a certain task or action.
3. Create a rule:
a. Determine if any or all conditions must be met using the pop-up menu.
b. Select the conditions using the appropriate pop-up menus. To add more conditions click the plus sign (+). To remove conditions click the minus sign (–).
c. Select the task to be performed using the pop-up menus in the Perform the following actions section. Click the plus sign (+) to add more actions or the minus sign (–) to remove actions.
4. Click OK to create the new rule.