
Customizing the Finder
The Finder is the application you use most often on your Mac, so you may as well customize it to suit your needs and preferences. OS X gives you a lot of latitude when it comes to customizing the Finder, and I show you a few of my favorite tweaks to this quintessential Mac OS standby in this section. While Chapter 1 covers the ins and outs of using the Finder, in this chapter you can discover how to give it that personal touch.
Finder windows
The Finder is a great tool for navigating your Mac, and I like to take full advantage of the available customization to make the Finder work for me.
Figure 2.7 is an example of the Finder modified to my specs. One of the differences between my customized Finder window and the default configuration is that the toolbar and sidebar have been changed significantly. This gives me quick access to the tools and folders that I use the most. I’ve also changed my view from Icons to Columns and there are two new additions to the bottom of the window: the path and status bars.
In the rest of this section, I show you how I customized Finder. Of course, you don’t have to make the same changes to yours. In fact, I encourage you to experiment with all the options the Finder affords, including those I don’t touch on, so that you can find the combination that works best for you.

The path bar is an easy way to see where you’ve been and to quickly get back there. To enable it, open a new Finder window, and then choose View→Show Path Bar. It then appears in the bottom of the Finder window, as shown in Figure 2.7. The folders in the path bar change as you browse your hard drive. Double-click one of the folders in the path bar to zoom back to it. It’s sort of like taking a tiny step back in time!

2.7 The Finder done my way.
Modifying the toolbar
The toolbar gives you fast access to common tasks and actions, and helps you navigate your Mac more efficiently. You can change the default set of tools in the toolbar by adding items that you use more than others or removing those that you don’t need. All of this is done in the Customize Toolbar sheet, shown in Figure 2.8.
Follow these steps to customize the Finder toolbar:
1. Activate the Finder by clicking its icon on the left side of the Dock.
2. Open a new Finder window by pressing ![]() +N.
+N.
3. Choose View→Customize Toolbar to open the Customize Toolbar sheet.
4. To add an item to the toolbar, drag and drop it from the sheet to the position in the toolbar you desire.
5. To remove an item from the toolbar, simply drag and drop its icon anywhere outside of the Finder window, and it disappears in a puff of smoke!
6. If the arrangement of the icons in the toolbar doesn’t suit you, just click and drag them to the spot where they work best. As you drag an icon, the other icons move automatically to make room for it.
7. Once you have everything just right, click Done to close the sheet.

2.8 The Customize Toolbar sheet allows you to edit the tools available in the toolbar.
Table 2.3 gives an overview of the function of each item in the Customize Toolbar Sheet to help you make informed decisions about those you want to include.

The fastest way to alter items already on the toolbar (or even the toolbar itself) is by using the trusty ![]() key. To quickly rearrange items on the toolbar, hold down the
key. To quickly rearrange items on the toolbar, hold down the ![]() key, and then click and drag the item to its new location. To remove an item, simply press
key, and then click and drag the item to its new location. To remove an item, simply press ![]() +click and drag it out of the toolbar, and then drop it.
+click and drag it out of the toolbar, and then drop it.

Changing the sidebar
The sidebar contains links (or shortcuts) to folders, discs, and servers to which you often need access. You can modify the contents of the sidebar in a number of ways:
![]() To remove an item you don’t use, right-click (or Control+click) the item and select Remove from Sidebar.
To remove an item you don’t use, right-click (or Control+click) the item and select Remove from Sidebar.
![]() Add your favorite folders by dragging their icons into the sidebar under the Favorites section, as shown in Figure 2.9. The other items in the sidebar shift as necessary to make room for their new neighbor.
Add your favorite folders by dragging their icons into the sidebar under the Favorites section, as shown in Figure 2.9. The other items in the sidebar shift as necessary to make room for their new neighbor.
![]() Adjust the size of the sidebar by clicking and dragging the divider bar.
Adjust the size of the sidebar by clicking and dragging the divider bar.
![]() Hide the sidebar from view altogether by choosing View→Hide Sidebar from the menu, or by pressing
Hide the sidebar from view altogether by choosing View→Hide Sidebar from the menu, or by pressing ![]() +Option+S.
+Option+S.
![]() Rearrange items in the sidebar by clicking and dragging them to their new location.
Rearrange items in the sidebar by clicking and dragging them to their new location.

2.9 Make the sidebar conform to your needs.
See Chapter 1 to discover how to choose which Devices, Shared, Places, and Search For items are displayed by default in your sidebar.
Adding a background image or color
One trick that adds a touch of class and functionality to your Finder windows is to add a background picture or color to them. These can be used for simple decoration or to differentiate the contents of each folder. For example, if you keep records of your children’s homework on your Mac, you could assign a picture of each child to the folder containing her homework. When you then open one of these folders in a Finder window, a light background picture of your little darling instantly identifies whose homework you’re checking. This option is especially helpful if you have multiple windows open at once. To add a background image or color to your Finder windows, do the following:
1. Open the folder to which you want to add the image or color.
2. Choose View→Show View Options, or press ![]() +J.
+J.
3. Select the Color option in the Background section to add a color to the window, or select the Picture option to place an image in the background, as shown in Figure 2.10.

2.10 Make changes to a folder’s window background by using the Background section of the View Options window.
• If you choose to use a color, click inside the white square to the right of the option button to open the Colors palette. Select the color that you want to use for the background and close the Colors palette.
• If you select Picture, drag an image into the Drag image here box next to the Picture option button.
You must be in Icon view in order to use a background or color image in the Finder window. To do so, simply click the Icon view icon in the toolbar of the Finder window.

A potential “oops” when using an image is that if the image is too large to fit in the window you only see the part of it that does fit. The Preview application that is loaded with OS X Mountain Lion is a great tool for easily resizing images. See Chapter 12 for step-by-step instructions.
Changing icons
A very popular method for redecorating your Mac is using custom icons for applications, folders, and files. You can change a plain folder icon into something more suitable for its contents. For example, you might use a football icon for the folder in which you keep your child’s practice and game schedules. I’ve seen many a Mac on which icons were changed system-wide, from top to bottom!
Here’s how to change any icon in OS X Mountain Lion:
1. Highlight the icon you want to use and press ![]() +I (Get Info) to open its Info window.
+I (Get Info) to open its Info window.
2. Click the icon picture in the upper-left corner of the Info window, as shown in Figure 2.11, and then copy the icon by pressing ![]() +C or choosing Edit→Copy.
+C or choosing Edit→Copy.
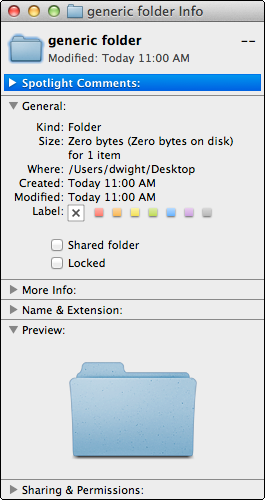
2.11 Change an icon from within its Info window.
3. Close the Info window.
4. Highlight the item with the icon you want to change and open its Info window by pressing ![]() +I.
+I.
5. Click the icon in the upper-left corner of the Info window and paste the new icon there by pressing ![]() +V or choosing Edit→Paste.
+V or choosing Edit→Paste.
6. Close the changed item’s Info window.
There are utilities that you can purchase on the Internet to greatly ease your icon revamping. One such tool is CandyBar (www.panic.com/candybar), which makes icon customization and organization a breeze.
Adding and removing items in the Dock
You can add and remove items to and from the Dock as you please, and it’s really easy to do:
![]() To add an item to the Dock, simply drag its icon to the Dock and drop it where you want it. You can also reposition an item in the Dock by simply dragging and dropping it in its new location.
To add an item to the Dock, simply drag its icon to the Dock and drop it where you want it. You can also reposition an item in the Dock by simply dragging and dropping it in its new location.
![]() If you have an application open that you want to keep in the Dock, click and hold its icon, hold your pointer over Options, and then select Keep in Dock from the contextual menu that appears, as shown in Figure 2.12.
If you have an application open that you want to keep in the Dock, click and hold its icon, hold your pointer over Options, and then select Keep in Dock from the contextual menu that appears, as shown in Figure 2.12.

2.12 Keep an icon in the Dock if you use it often.
![]() To remove an item, drag its icon from the Dock and let go of the mouse button. The icon disappears in a puff of smoke! Don’t worry — the original item is still in its location, you’ve just removed its alias.
To remove an item, drag its icon from the Dock and let go of the mouse button. The icon disappears in a puff of smoke! Don’t worry — the original item is still in its location, you’ve just removed its alias.
Changing the appearance or placement of the Dock
You can tame the Dock by setting its preferences to meet your needs. Open the Dock preferences by right-clicking (or Control+clicking) the divider line and selecting Dock Preferences.
The Dock preferences window lets you make several changes:
![]() Increase or decrease the size of the Dock by moving the Size slider.
Increase or decrease the size of the Dock by moving the Size slider.
![]() If your icons are too small to see clearly, select the Magnification check box and adjust the slider to increase or decrease the amount of magnification. Magnification of the icons occurs when you hold the mouse pointer over the Dock.
If your icons are too small to see clearly, select the Magnification check box and adjust the slider to increase or decrease the amount of magnification. Magnification of the icons occurs when you hold the mouse pointer over the Dock.
![]() The Dock can be positioned on the left or right side of the window or at the bottom (the default setting).
The Dock can be positioned on the left or right side of the window or at the bottom (the default setting).
![]() The Minimize windows using option lets you choose the special effect that occurs when you minimize a window into the Dock. To minimize a window, click the yellow button in its upper-left corner.
The Minimize windows using option lets you choose the special effect that occurs when you minimize a window into the Dock. To minimize a window, click the yellow button in its upper-left corner.
![]() Select the Double-click a window’s title bar to minimize box to enable the feature it describes.
Select the Double-click a window’s title bar to minimize box to enable the feature it describes.
![]() To save tons of space in the Dock, select the check box called Minimize windows into application icon. To access minimized windows using this method, click and hold the icon for the application that owns the window, and you see the window in the contextual menu; click to maximize it.
To save tons of space in the Dock, select the check box called Minimize windows into application icon. To access minimized windows using this method, click and hold the icon for the application that owns the window, and you see the window in the contextual menu; click to maximize it.
![]() Select the Animate opening applications check box to cause the icon of an item you are opening to bounce up and down in the Dock. I leave this option deselected; the bouncing annoys the heck out of me.
Select the Animate opening applications check box to cause the icon of an item you are opening to bounce up and down in the Dock. I leave this option deselected; the bouncing annoys the heck out of me.
![]() If you don’t like the Dock cramping your style — or your desktop space — you can hide it by selecting the check box next to Automatically hide and show the Dock. When you inevitably have to use the Dock again, hold your mouse pointer at the bottom of your window for just a second. The Dock temporarily pops back into view, only to go back into hiding when you finish.
If you don’t like the Dock cramping your style — or your desktop space — you can hide it by selecting the check box next to Automatically hide and show the Dock. When you inevitably have to use the Dock again, hold your mouse pointer at the bottom of your window for just a second. The Dock temporarily pops back into view, only to go back into hiding when you finish.
![]() Select the Show indicator lights for open applications check box if you want bright white dots to appear beneath the icons of applications that are open.
Select the Show indicator lights for open applications check box if you want bright white dots to appear beneath the icons of applications that are open.