
Setting Up a Backup Drive
There are a couple of steps necessary to get started with Time Machine: You need to format your backup drive, and then you need to tell Time Machine that it can use this drive for its backups.
Formatting a hard drive
You must format any drive you connect to your Mac before you can use it with Time Machine. To format a drive (see the Caution before continuing this procedure), follow these steps:

If this is a drive you’ve used before, be sure that you copy all the data from it before performing a disk format. After the formatting process has started, all data on the drive is lost forever.
1. From within the Finder, open Disk Utility by pressing ![]() +Shift+U and then double-clicking its icon.
+Shift+U and then double-clicking its icon.
2. Connect the drive to your Mac.
3. Select the drive in the list on the left of the Disk Utility window.
4. Click the Erase tab near the top of the window, as shown in Figure 14.8.
5. Set the Format option to Mac OS Extended (Journaled).
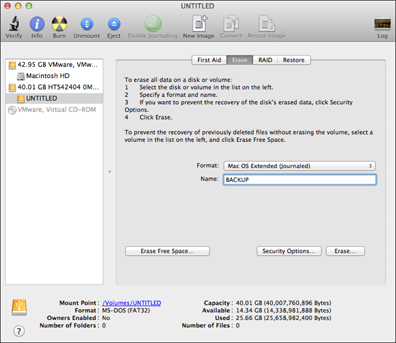
14.8 Click the Erase tab and select the volume format to get the drive ready for Time Machine.
6. Click Erase, and then click it again in the verification window.
7. Once the formatting is finished, click Eject in the Disk Utility toolbar at the top, and disconnect the hard drive from the Mac.
Configuring a backup drive for Time Machine
When you first connect an external drive (you may have to format it first) to your Mac, Time Machine detects its presence and asks if you want to use it for backups. If you say yes, Time Machine sets everything up automatically, and away you go. In most cases, this is fine; you are never bothered about it again and Time Machine does its duty.
You may be asking why you would say no to the question, if that were the case. Well, if this is a drive you’ve used in the past or one that you want to partition, you may not want Time Machine hijacking it for its sole use. To manually set up a drive, follow these steps:
1. Open the Time Machine preferences (shown in Figure 14.9) by choosing Apple menu→System Preferences, and then clicking the Time Machine icon.

14.9 The Time Machine preferences allow you to manually configure how it works.
2. Click Select Backup Disk.
3. Choose a drive and click Use Backup Disk.
4. Time Machine begins a countdown, similar to the one shown in Figure 14.10, for when it will perform the first backup.
5. If you want Time Machine to automatically begin backing up everything on the system, just sit back and relax. However, if you want to back up only a portion of the hard drive, click the On/Off switch on the left side of the Time Machine preferences pane to toggle the switch to Off. Next, follow the directions in the next section.
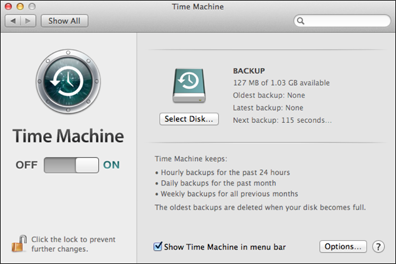
14.10 Time Machine counting down to its first backup.
Excluding files from a backup
There may be several good reasons why you don’t want Time Machine to back up every file on your Mac. For example, perhaps there isn’t enough storage space on the backup drive or you simply don’t want to back up all the information for each user on the computer. Whatever the reason, you need not fear because I’m about to show you how to exclude information from your backup sessions. Follow these steps:
1. Be sure Time Machine is Off so that it doesn’t begin a backup process while you choose the files you don’t want to back up. Simply click the On/Off switch to toggle it.
2. Click Options in the middle of the preferences pane.
3. Click the plus sign (+) in the lower-left corner of the Exclude these items from backups window.
4. Browse your Mac to select the folders and files you do not want included in the backup, and then click Exclude to add them to the list, as shown in Figure 14.11. Refer to the Estimated size of full backup to see if your backup drive can store that much data. Click Save when finished.

14.11 You can exclude files from a Time Machine backup.