
System
The System section of the System Preferences contains panes for configuring the accounts on your Mac, updating software, choosing a start-up disk, and many more system-wide options. For information about the Users & Groups and Parental Controls preferences, see Chapter 4. Time Machine is covered in depth in Chapter 14.
Date & Time
Adjust the Mac time settings with the Date & Time preferences pane, shown in Figure 3.19.
The tabs provide the following options:
![]() Date & Time. Select the Set date and time automatically check box to have your Mac get the correct date and time from an Internet time server, and then select a time server from the list provided. You can choose to make manual settings by deselecting this option and adjusting the date and time to your preference.
Date & Time. Select the Set date and time automatically check box to have your Mac get the correct date and time from an Internet time server, and then select a time server from the list provided. You can choose to make manual settings by deselecting this option and adjusting the date and time to your preference.
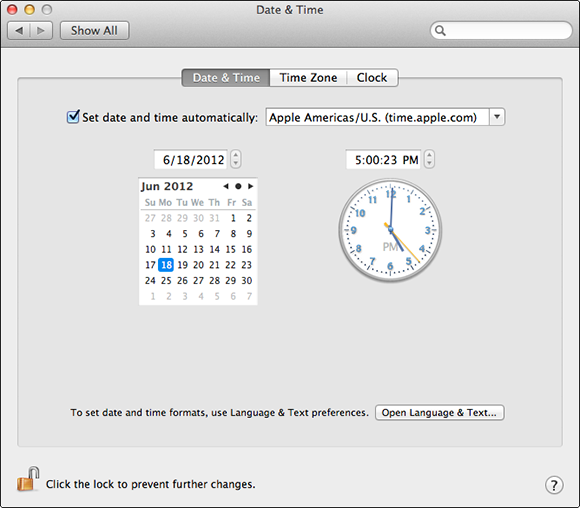
3.19 Set the date and time using the Date & Time preferences pane.
![]() Time Zone. Select the time zone you are in by choosing an area on the map.
Time Zone. Select the time zone you are in by choosing an area on the map.
![]() Clock. Decide whether and how to display the date and time in the menu bar, and allow your Mac to speak the time to you at the specified intervals.
Clock. Decide whether and how to display the date and time in the menu bar, and allow your Mac to speak the time to you at the specified intervals.
Software Update
Mountain Lion uses the Software Update application to check for updates to the operating system and apps from the App Store.
You can instantly check the Apple servers for new updates by clicking Check Now. You can also schedule update checks by selecting the Automatically check for updates option. If you’ve purchased apps on other Macs, you can select the Automatically download apps purchased on other Macs option to have them installed on your current Mac.

There are several schools of thought when it comes to upgrading to the latest and greatest software. In my opinion, if there’s an update available for your operating system or an application, go ahead and get it. The vast majority of the time, updates don’t cause any problems; on the contrary, they usually end up fixing or preventing them.
Dictation & Speech
Mountain Lion is so intelligent that it can talk to you and even respond to spoken commands. Dictation is a feature new to OS X as of Mountain Lion, and it allows you to dictate to your Mac. Your Mac passes your dictation to Apple. Apple sends it back to your Mac as text. Here are the available options.
Dictation
The Dictation tab, shown in Figure 3.20, lets you turn Dictation on or off, as well as select the microphone with which your Mac should listen to you. You can also select a listening key using the Shortcut pop-up menu, which is the key you press to make your Mac listen to your dictation. Tell your Mac what language you will be dictating in using the Language pop-up menu.
To use Dictation, just open any app that contains a text field, make sure the cursor is in the text field, press your listening key, and begin speaking.

3.20 The options available in the Dictation tab.
Text to Speech
This section of the Dictation & Speech preferences lets you choose which voice your Mac uses when it speaks to you. Select from several pre-installed voices and modify the rate at which your Mac says the words. You can also have Mountain Lion announce system alerts, announce when an application needs to be looked after, or speak text that you’ve highlighted in a document.
Startup Disk
This preference pane allows you to choose to start your Mac from any drive that contains a valid OS X or Windows installation. If you have multiple partitions or external drives containing operating systems on the Mac hard drive, the Startup Disk preferences is where you tell your Mac from which partition or drive you want it to start up. When you first open these preferences, you are presented with a list of drives that are considered to be valid start-up devices. Select the drive with which you want to boot up, and then click Restart.
Adding an Archives preference pane
The most likely reason you would use the Mountain Lion Archive Utility is to compress files and folders. This makes them easier to send via e-mail and reduces the amount of space they take up on a drive. From time to time, you may desire to change the way Mountain Lion compresses files, depending on the tasks you are trying to perform, but there is no visible way to do so by default. Apple has a hidden preference pane that you can manually add to your System Preferences window. In this pane, you can change the way Archive Utility behaves. Should you need to install it at some point, follow these steps:
1. Open a new Finder window by pressing ![]() +N from within the Finder.
+N from within the Finder.
2. Browse to the directory /System/Library/CoreServices and locate the Archive Utility.
3. Right-click (or Control+click) the icon for Archive Utility and select Show Package Contents.
4. Open the Contents folder, and then open the Resources folder.
5. Double-click the Archives.prefPane file.
6. Click Install when prompted to install the Archives preference pane for all user accounts on the computer. Type the name and password of an administrator account when prompted, and then click OK. The Archives preference pane, shown in Figure 3.21, can be found in the Other section at the bottom of the System Preferences window.
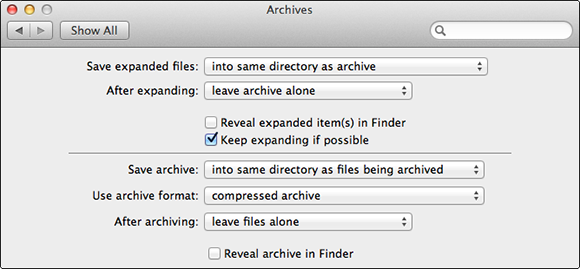
3.21 Determine how Mountain Lion compresses files and folders.
Other important preferences are covered throughout this book. Be sure to refer to the table of contents or the index if what you’re looking for is not covered here.