Chapter at a Glance

In this chapter, you will learn to: | |
✓ | |
✓ | |
✓ | |
Up to this point, we’ve worked with publications designed for print. But Microsoft Office Publisher 2007 does not limit you to printed publications—you can also create publications specifically designed to be sent as e-mail messages or published as Web sites. As with printed publications, Publisher provides a depth and breadth of design and layout choices that is truly impressive.
In this chapter, you will first create a simple one-page e-mail message publication, and then learn to send one or all pages of a multi-page publication by e-mail. Then you will create and modify a Web site.
See Also
Do you need only a quick refresher on the topics in this chapter? See the Quick Reference entries in Communicating Your Message Online.
Important

Before you can use the practice files in this chapter, you need to install them from the book’s companion CD to their default location. See Using the Book’s CD for more information.
Troubleshooting
Graphics and operating system–related instructions in this book reflect the Windows Vista user interface. If your computer is running Windows XP and you experience trouble following the instructions as written, please refer to the Information for Readers Running Windows XP section at the beginning of this book.
E-mail has become a common, accepted, and for some people, preferred method of communicating with business associates and customers. You can use Publisher to easily create professional-looking HTML e-mail messages that incorporate and reinforce your brand.
See Also
For more information about brand design elements, see Building Your Brand in Chapter 4.
With any one of these programs configured as your default e-mail application, you can create a message directly from Publisher so the publication content appears, fully formatted, in the message body:
Microsoft Office Outlook (2003, 2007, or later)
Outlook Express (version 5.0 or later), which is installed with Windows XP
Windows Mail (version 6.0 or later), which is installed with Windows Vista
Message recipients do not need Publisher to view a publication that you send as a message; they can use any HTML-enabled e-mail application including Hotmail, AOL, or Yahoo Mail.
If you use an e-mail application other those listed above, you can send a publication with its design elements intact as an attachment to a message, in any of these formats:
Publisher. You can send the Publisher (.pub) file. The recipient will need Publisher to view the publication, and will be able to make changes to it.
Portable Document Format (PDF). After installing the free Save As PDF add-in from the Microsoft Download Web site, you can save a copy of a publication in PDF format. The recipient will need Adobe Acrobat or Adobe Reader (a free download from Adobe) to view the publication. PDF has become a common standard for secure distribution of all sorts of documents, because most people don’t have the software necessary to make changes to PDF content.
XML Paper Specification (XPS). After installing the free Save As XPS add-in from the Microsoft Download Web site, you can save a copy of a publication in XPS format. The recipient will need the XPS reader also (a free download from Microsoft) to view the publication. XPS is a relatively new document format, but it is rumored to have better support for gradients and transparencies, so might be preferable if your publication includes a lot of photographic elements.
Tip
You can create a PDF or XPS file by using the Save As command or the Publish As PDF Or XPS command; either produces the same result.
See Also
For more information about saving in PDF or XPS format, see Packaging Publications for Printing in Chapter 3.
Graphic image. You can save a publication in several image file formats, including Portable Network Graphics Format (.png), Device Independent Bitmap (.bmp), Graphics Interchange Format (.gif), Tag Image File Format (.tiff), and JPEG File Interchange Format (.jpg). A publication saved in one of these formats is simply a large picture. This is the lowest common denominator and makes it more likely that any recipient can view your publication, regardless of what applications are installed on his or her computer. Choose the file type carefully, because some graphic file formats create very large files.
You can also save publications as text files, documents, and Web pages, but these formats will not necessarily preserve the design elements as you intend.
You can create an e-mail message from any of these three starting points:
A design template
A blank publication
An existing publication of any format
See Also
For more information, see Creating a Message from a Multi-Page Publication later in this chapter.
Publisher 2007 includes design templates for these six types of e-mail messages:
Invitations to an activity or presentation
Product-marketing messages and catalogs
Letter-style communications
Newsletters
There are 44 designs available for each message type, for a total of 264 template choices, plus two blank templates. These templates are designed to provide a starting point for your message, but as with other publications, you can personalize the content as much or as little as you want.
Tip
A benefit of designing publications for online viewing is that you can use colors and photographic artwork without worrying about the cost of printing or the appearance of the printed version. Just remember to use graphics of a reasonable size and resolution to avoid clogging up the recipient’s e-mail inbox with huge messages.
Two standard message page sizes are available: Short (5.818 × 11 inches) and Large (5.818 × 66 inches). The default design template content fills the 11 inch–high message format. Choose the page length most likely to accommodate your intended content. You can change the page size after you create the initial message. If you choose the longer page, you can reduce the page length to fit the final content—although you don’t have to. When Publisher creates the e-mail message from the publication, it sizes the message to the precise length of the content.
Tip
We asked a member of the Publisher development team why the message template width is set to 5.818 inches, but she didn’t know why that odd measurement was chosen. It likely has to do with the width of an Outlook message window or Reading Pane. Do you know why? If so, we’d love to hear from you!
In this exercise, you will create an e-mail message from a template, format the message background, duplicate a group of objects, and send the message. There is no practice file for this exercise.
Note
BE SURE TO install and configure Outlook, Outlook Express, or Windows Mail before beginning this exercise.
Start Publisher and display the Getting Started window. In the Publication Types list, click E-mail. Then scroll the center pane to see the available templates.
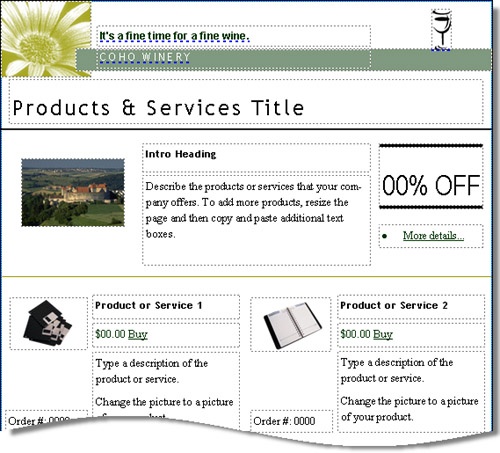
In the Newer Designs category, under Product List, click PhotoScope. In the Customize pane, set the Color scheme to (default template colors), and the Font scheme to (default template fonts). Then click Create.
Publisher creates a one-page publication in the Large message format, containing placeholder design elements, graphics, and text for a catalog-like promotional message. If you have saved information in an information set, some details are filled in for you. (In this example, we’re using information from a fictitious winery.)
Scroll the page to view the template content.
After 11 inches (about two screens of information), the long page is blank.
In the Format Publication task pane, click the Other Task Panes button, and then click Background.
The Background task pane displays solid and patterned background options that coordinate with the current color scheme. Each of the five color choices is a 30% tint of one of the five Accent colors.
Click the pale gold (30% tint of Accent 2) color square, and then in the pattern list, click the Gradient fill (horizontal) icon (the third icon from the top of the left column, the one that is darker at the bottom than at the top).
Publisher changes the message background color to a gradient from white at the top of the message to gold at the bottom of the page. Because the page is so long, none of the background color is visible behind the message content. We’ll discuss this later in the exercise.
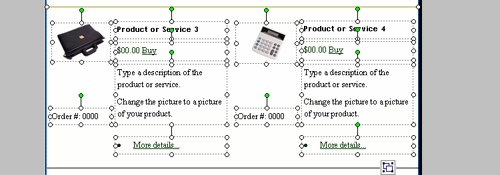
Scroll the page to display the row containing Product or Service 3 and Product or Service 4, and the horizontal line indicating the beginning of the row, at the top of the page.
On the Objects toolbar, click the Select Objects button. Point to the scratch area on the left side of the page, immediately above the horizontal line, and then drag a box to encompass the line and the two product listings that follow.
Release the mouse button to select all the objects entirely within the selection box.
The Picture toolbar appears because one of the selected objects is a picture. Move the toolbar out of the way if necessary.
Repeat step 7 to select all the objects in the area from the black horizontal line preceding the location details to the final text box.
Point to any one of the selected objects. When the insertion point changes to a four-headed arrow, drag the selected objects down the page to leave a blank section large enough for an additional row of catalog items.
Click in the blank area to release the selection, and then on the Edit menu, click Paste. (Or press
 .)
.)A copy of the Product Or Services listing appears on top of the original.
Repeat step 11 to move the pasted objects into place below the originals. If necessary, adjust the location by pressing the
 ,
,  ,
,  , and
, and  keys.
keys.Your message now fills approximately 13.5 inches of the publication page, followed by more than 50 inches of blank page.
On the File menu, point to Send E-mail, and then click E-mail Preview.
Publisher displays the HTML-format message in your default Web browser.
Right-click the HTML page, and then click View Source. (If you’re using a browser other than Windows Internet Explorer, click the equivalent command.)
A Notepad window opens, displaying the Web page source code. Nearly 20 pages of code are behind the reasonably simple e-mail message.
Scroll about one-third of the way through the document to display the code surrounding the actual content.
Although the content in the message was not laid out in tables, Publisher has formatted the HTML content within tables to maintain the design.
Close the Notepad window and the Web page, and return to Publisher. Close the task pane if it is open.
On the File menu, point to Send E-mail, and then click Send as Message.
An e-mail message header and toolbar appear above the publication. The Accounts button appears on the toolbar only if you have multiple e-mail accounts configured within the default e-mail application.
The Design Checker automatically checks the publication for any elements that will change when converting the publication to a message. The Design Checker button appears below the message header only if the Design Checker identifies possible problems.
Click the Design Checker button.
The Design Checker task pane opens, displaying the results of its evaluation of the message. Because we haven’t personalized the content of this message, we will not fix these issues before proceeding. You can find out which specific content is causing the errors by clicking an error message to go to the associated item.
In the message header, enter your own e-mail address in the To box, and Publisher test message in the Subject box. Then on the message toolbar, click the Send button.
Display your e-mail inbox and the received message.
Although the message publication page was set to 66 inches, the message itself ends just after the final text, and the gradient background is applied to within the length of the message.