Brochures are one-page, two-sided publications that are designed to be folded to create four or six panels. The outside page of the brochure is the "wrapper." The front panel usually displays the brochure’s title, and the back panel often has contact details and a place for a mailing address. The other panels might contain information about the company or organization. The real message of the brochure is carried on the three or four panels on the inside page. When the brochure is opened, all the panels on this page can be viewed at once, so they are generally designed to create a harmonious balance and a smooth flow of information.
Publisher comes with many brochure templates. Some present information in various formats that you customize to meet your needs. Some include space for general information but also include a structured price list in a tabular format. Eight special-purpose layouts are provided for events and fundraisers.
The appearance of your publications helps convey their message. By using the Publisher templates, you can develop professional-looking brochures whose appearance is appropriate to their contents. However, you can easily apply your own formatting to any part of a publication to get precisely the look you want.
As you know, all text in a publication is typed in a text box. You create paragraphs by typing text and pressing the Enter key. A paragraph can be a single word, a single sentence, or multiple sentences. You can change the look of the paragraph by clicking buttons on the Formatting toolbar.

Clicking the Line Spacing button displays the Paragraph dialog box, where you can adjust the space between lines within a paragraph and between paragraphs. You can also indent paragraphs from the left and right margins, as well as specify where the first line of a paragraph begins and where the second and subsequent lines begin in this dialog box. (To quickly indent entire paragraphs, you can click the indentation buttons on the toolbar.)
You can also determine the position of a paragraph between the left and right margins by changing its alignment. You can click the alignment buttons on the Formatting toolbar to align paragraphs as follows:
Clicking the Align Text Left button aligns the left end of each line of the paragraph at the left margin, with a ragged right edge.
Clicking the Align Text Right button aligns the right end of each line of the paragraph at the right margin, with a ragged left edge.
Clicking the Center button aligns the center of each line of the paragraph between the left and right margins, with ragged left and right edges.
Clicking the Justify button aligns the left and right ends of each line of the paragraph at the left and right margins, adjusting the space between words as necessary to achieve this.
Collectively, the settings you use to change the look of a paragraph are called paragraph formatting.
Setting a right indent indicates where all the lines in a paragraph should end, but sometimes you might want to specify where only one line should end. For example, you might want to break a title after a specific word to make it look balanced on the page. You can end an individual line at the insertion point without ending the paragraph by pressing Shift+Enter to insert a line break. You can see many types of line breaks and paragraph breaks (as well as spaces and tab marks) by selecting Special Characters on the View menu. The line break (line feed) character looks like a bent arrow, and the paragraph mark (¶) looks like a backward P. Inserting a line break does not start a new paragraph, so when you apply paragraph formatting to a line of text that ends with a line break, the formatting is applied to the entire paragraph.
Tip
A paragraph’s formatting is stored with its paragraph mark. If you delete the paragraph mark, thereby making the preceding text part of the following paragraph, that text takes on the formatting of the following paragraph. If you insert a paragraph break within a paragraph, the new paragraph takes on the formatting of the existing paragraph.
Every paragraph in a publication is formatted with a style, which is a collection of character and paragraph formatting. When you create a publication based on a template, the template’s styles control the basic formatting of the publication and any changes you make to the character or paragraph formatting are applied on top of these styles. You can click a paragraph to see its style displayed in the Style box on the Formatting toolbar, and you can apply a different style by clicking it in the Style list. You can also display the Styles task pane and work with styles from there.
If the styles defined by a publication’s template don’t meet your needs, you can create your own styles in the following ways:
By updating an existing style to reflect formatting you have manually applied to a paragraph
By modifying an existing style in the Modify Style dialog box.
By defining an existing combination of manually applied formatting as a style
By creating the style manually in the New Style dialog box.
Tip
Custom styles are available for use only in the publication in which you create them. You can import custom styles from an existing publication by clicking the Import Styles button in the Styles task pane. In the Import Styles dialog box, navigate to and double-click the publication containing the custom styles you want. Publisher then imports those styles into the current publication.
After you format the characters and paragraphs in a publication the way you want them, you can adjust the layout to accommodate the text. In a brochure that is designed to be folded, you might find that you need to continue text from a text box on one panel to a text box on a different panel. Publisher does not automatically flow text from box to box the way Word flows text from page to page. You have to explicitly link text boxes to tell Publisher where it should flow the text. This gives you control over the continuation of articles from page to page.
You create and break links and move between linked text boxes by clicking the buttons on the Connect Text Boxes toolbar.
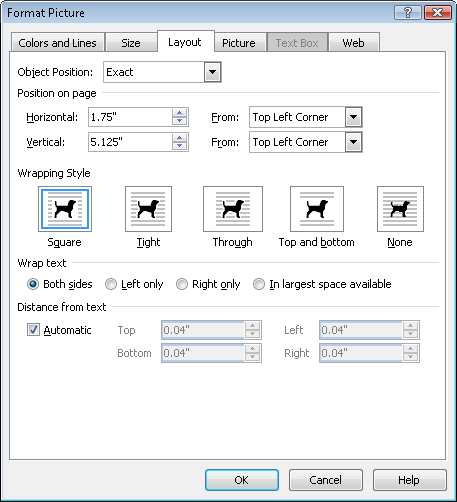
Because you need to entice a potential reader to open a brochure, most marketing materials of this type include eye-catching graphics on the wrapper. To arrange text and graphics in attractive layouts, you will often need to flow text around graphic objects in various ways. On the Layout tab of the Format Picture dialog box, you can choose from five different text-wrapping styles. If you choose a style that allows text to flow beside a graphic, you can wrap text on both sides, on one side, or in the largest space available. In addition, you can specify the spacing between the text and the graphic.
Tip
You don’t have to flow text around a graphic. On the Layout tab of the Format Picture dialog box, you can set the Object Position as Inline and select the Move Object With Text option to anchor the graphic to the text. Then if you add or delete text, the graphic moves with the text instead of the text moving around it.
To enable the Object Position option, the picture must be on top of the text box in the object stack.
In this exercise, you will create a brochure and then format its text manually and by customizing styles. You will link two text boxes to flow text from one to the other. Finally, you will change the text wrapping style of a photograph and balance the text in the text boxes on the inside page of the brochure.
Note
USE the Brochure publication. This practice file is located in the DocumentsMicrosoft PressSBS_Publisher2007MarketingMaterials folder.
BE SURE TO close any open publications and display the Getting Started window before beginning this exercise.
In the Publication Types list, click Brochures, and scroll the center pane to see the available templates.
Each brochure design category is divided into purpose-specific brochure types.
In the Classic Designs category, under Informational, click Straight Edge.
Under Customize in the right pane, set the Color scheme to Glacier and the Font scheme to Aspect. (Keep the default settings under Options in the right pane.) Then click Create.
Take a look at the two pages of this brochure, and then on the Standard toolbar, click the Open button. In the Open Publication dialog box, navigate to the DocumentsMicrosoft PressSBS_Publisher2007MarketingMaterials folder, and double-click the Brochure publication.
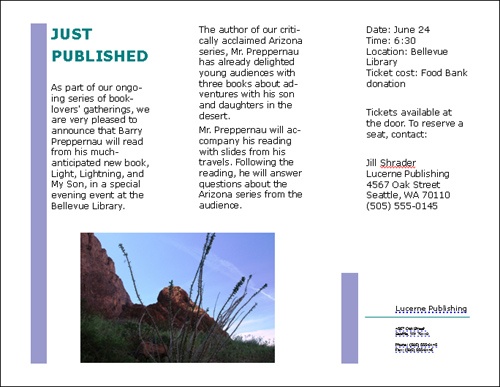
This is a customized version of the brochure you created. We have entered text, inserted graphics, and deleted extraneous elements so that you can focus on formatting the brochure.
Close the Format Publication task pane. On page 1 (the outside wrapper) of the Author Reading brochure, click inside each text box in turn, noticing the style name that appears in the Style box on the Formatting toolbar. Then display page 2, and click inside each of its text boxes.
Paragraphs of the same style look the same, no matter where they appear in the brochure.
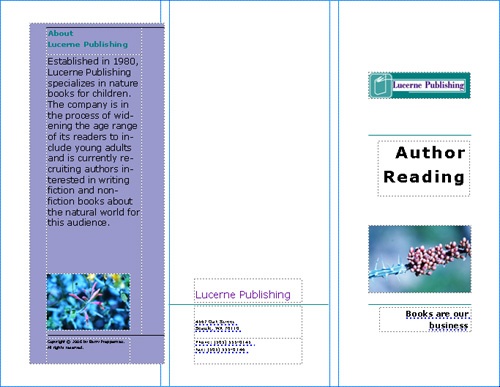
Display page 1. In the right section of the page, select Author Reading (click it and press
 , or drag across it), and then on the Formatting toolbar, do the following:
Select Books are our business, make it bold, and then right-align it.
In the middle section of the page, select Lucerne Publishing, increase its size to 16 points, and then change its color to purple (Followed Hyperlink).
In the left section of the page, click About Lucerne Publishing, and change the Zoom level to 100%. Then click to the left of Lucerne, and press
 to insert a line break. Select all the text in the text box, increase the font size to 12 points, and make the text bold. Finally, change the Zoom level to Whole Page.
Select all the text in the box below About Lucerne Publishing, and increase its size to 14 points. Then click a blank area of the page to see the results.
The paragraph you just formatted is styled as Normal, which is also applied to paragraphs on page 2 of the brochure. Let’s change the Normal style so that the text in the Normal paragraphs on page 2 automatically appears at the same size as in this one.
Select the paragraph again. Then on the Format menu, click Styles to display the Styles task pane.
In the task pane, point to Normal, click the arrow that appears, and then click Update to match selection.
The look of Normal changes in the task pane to reflect the formatting applied to the paragraph.
Display page 2 to verify that the font size of its Normal paragraphs has changed to reflect the modified style.
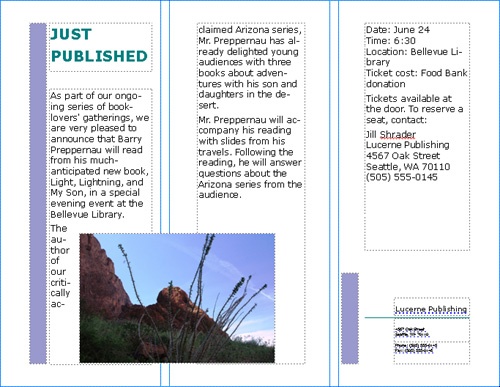
In the left section of the page, click anywhere in the text box containing JUST PUBLISHED, scroll the styles list in the Styles task pane, and click Title 2. Then select the title, make it bold, and change its color to teal (Accent 1).
Click the text box below the title.
The Text In Overflow button appears below the text box, indicating that this box contains more text than is displayed.
On the Connect Text Boxes toolbar, click the Create Text Box Link button. Move the pointer over the empty text box in the middle section of the page, and when the pointer changes to a pouring pitcher, click the mouse button.
Troubleshooting
You can flow text only into an empty text box. When pointing to a text box that contains content, the pointer resembles an upright pitcher and the linking function is disabled.
Publisher flows the additional text into the linked text box.
Tip
To unlink two text boxes, click the first box and then on the Connect Text Boxes toolbar, click the Break Forward Link button.
You don’t want the text in the first text box to dribble down the left side of the photograph at the bottom of the brochure, so you need to adjust the way Publisher flows text around the photograph.
Click the photograph, and then on the Picture toolbar, click the Format Picture button. In the Format Picture dialog box, click the Layout tab.
Under Wrapping Style, click Top and Bottom, and then click OK.
Publisher moves the text from the left side of the photograph to the top of the text box on the second panel. Now let’s fine-tune the layout to balance the text in the three panels.
On the Arrange menu, point to Ruler Guides, and click Add Horizontal Ruler Guide. Then drag the guide down until it is approximately aligned with the last line of text in the center text box.
Click the border of the left text box, and then press the
 key repeatedly until the last line in the text box is aligned with the ruler guide.
Click after the word donation in the right text box, and press
 . Then click after the word contact, and press .
Scrutinize the words that Publisher has automatically hyphenated, and if you want, insert line breaks to override the hyphenation.
For example, we inserted a line break to the left of the word Library in the right panel.
See Also
For information about hyphenation, see Controlling Hyphenation in Chapter 5.
Click a blank area of the brochure. Then on the View menu, click Boundaries and Guides to turn off the guides and see the results.
You can now print two-sided copies of the brochure, fold them in three, and distribute them.