Chapter at a Glance
In this chapter, you will learn to: | |
✓ | |
✓ | |
✓ | |
✓ | |
✓ | |
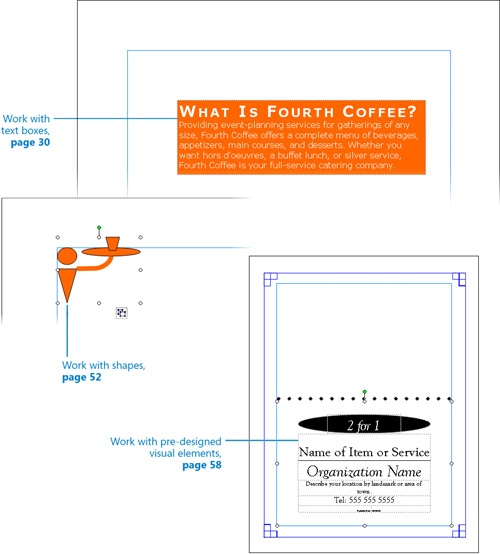
Microsoft Office Publisher 2007 is specifically designed to make it easy to create publications that contain a mixture of text and visual elements arranged in frames on the page. Knowing basic techniques for inserting and manipulating visual elements is the key to quickly assembling impressive publications.
The publications you create are most effective when you achieve the balance of text and graphics that best conveys your message. Some publications convey information through text and include visual elements only to catch the reader’s eye or to reinforce or illustrate a point. At the other end of the scale, some publications include almost no text and instead rely on visual elements to carry the message.
In this chapter, you will first create a text object and see how to enhance the text with color and formatting. Then you will use WordArt to create fancy, stylized text for those occasions when regular formatting doesn’t quite meet your needs. Next, you will insert clip art graphics and pictures, add borders, and change the size, color, and position of the images. You will draw, connect, and group shapes. Finally, you will insert ready-made design elements from the Design Gallery. The instructions in the exercises assume that you are working in a blank publication so that you can focus on the techniques you are learning. However, you can easily adapt the instructions to any type of publication.
See Also
Do you need only a quick refresher on the topics in this chapter? See the Quick Reference entries in Creating Visual Interest.
Important

Before you can use the practice files in this chapter, you need to install them from the book’s companion CD to their default location. See Using the Book’s CD for more information.
Troubleshooting
Graphics and operating system–related instructions in this book reflect the Windows Vista user interface. If your computer is running Windows XP and you experience trouble following the instructions as written, please refer to the Information for Readers Running Windows XP section at the beginning of this book.
When you create a document by using a word processing program such as Microsoft Office Word 2007, you enter text on the page in the area defined by the margins. When you create a publication by using Publisher, however, you enter each section of text in a text box. You can create text boxes or manipulate the text boxes that are part of a Publisher template. The text box is an object that can be sized to fit the text it contains. You can type text directly into the text box, paste text from another file, or insert the entire contents of another file.
In Publisher, the text in a text box is called a story. A story is any discrete block of text that occupies a single text box or a set of linked text boxes. It can be a single paragraph or multiple paragraphs.
See Also
For information about linking text boxes, see Solving Organization Problems in Chapter 5.
After you create a text box, or when you click a text box to make it active, you can move it by dragging its frame.
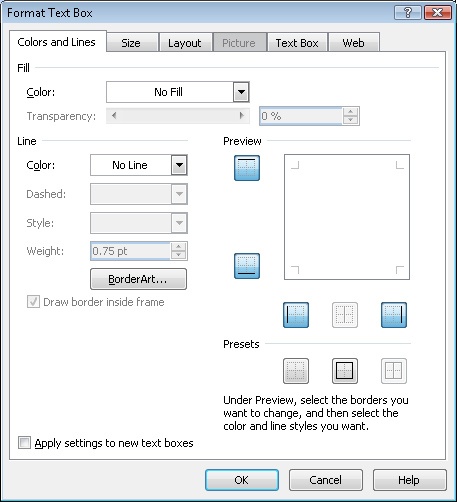
You can drag the handles of the frame to change the size or shape of the box. If you want a specific size or shape, you can change the settings on the Size page of the Format Text Box dialog box. In this dialog box, you can also specify the following:
The background color of the text box, whether it has a border, and the color of the border.
The position of the text box on the page, and how text in adjacent frames flows around this text box.
The vertical text alignment, the margins, and whether Publisher can automatically adjust the size of the text box to fit the amount of text you insert in it.
When a text box is active, a green rotating handle is attached to its upper-middle handle. You can drag this handle to change the angle of the text box and the text within it.
Tip
You can change the direction of text within the text box from horizontal to vertical by clicking the Rotate Text Within AutoShape By 90° option on the Text Box page of the Format Text Box dialog box. You can rotate the entire box by clicking Rotate Or Flip on the Arrange menu and then selecting one of the options.
Brief splashes of text, such as those on a postcard or in a flyer, need to have more visual impact than longer blocks of text, such as those in a newsletter. You can vary the look of text by changing the character formatting:
All text is displayed in a particular font consisting of alphabetic characters, numbers, and symbols that share a common design.
Almost every font comes in a range of font sizes, which are measured in points from the top of letters that have parts that stick up (ascenders), such as h, to the bottom of letters that have parts that drop down (descenders), such as p. A point is approximately 1/72 of an inch.
Almost every font comes in a range of font styles. The most common are regular (or plain), italic, bold, and bold italic.
Fonts can be enhanced by applying font effects, such as underlining, small capital letters (small caps), or shadows.
A palette of harmonious font colors is available, and you can also specify custom colors.
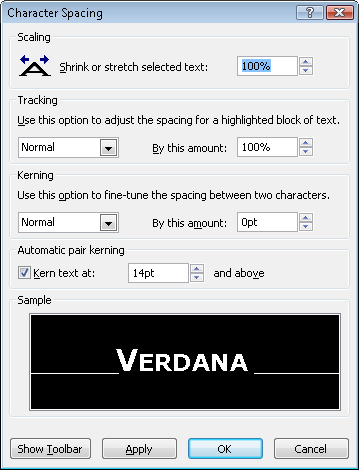
You can alter the character spacing by pushing characters apart or squeezing them together.
In this exercise, you will create a blank publication, add a text box, and then insert the contents of an existing Word document. You will then format the text box by filling it with color and format the text by changing its character formatting.
Note
USE the Text document. This practice file is located in the DocumentsMicrosoft PressSBS_Publisher2007VisualInterest folder.
On the Start menu, click All Programs, click Microsoft Office, and then click Microsoft Office Publisher 2007.
In the Publication Types list, click Blank Page Sizes.
In the Blank Page Sizes pane, under Standard, click the Letter (Portrait) thumbnail. Then click Create.
Tip
If a publication is open, you can create a new blank publication by clicking the New button on the Standard toolbar.
Publisher creates a blank publication of the selected size. Blue margin guides designate the margins of the publication, which by default are set to 1 inch on all sides. To the left is the Format Publication task pane, and docked on the left side of the window is the Objects toolbar.
Close the Format Publication task pane. Then on the Objects toolbar, click the Text Box button.
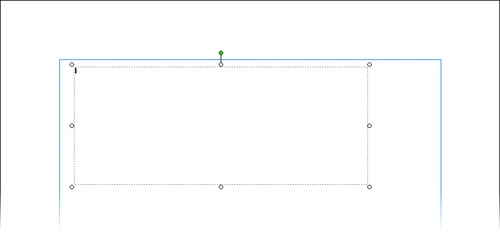
Move the cross-hair pointer over the blank page, and when the pointer is slightly to the right of the left margin guide and slightly below the top margin guide, hold down the mouse button, and drag to the right and down, without releasing the mouse button.
Notice as you drag that Publisher displays the exact coordinates of the upper-left corner (the anchor point) of the text box and its exact dimensions on the status bar. The anchor point coordinates are expressed in relation to the upper-left corner of the page.
Release the mouse button when the text box dimensions are 5.000 × 2.000 in.
A blinking insertion point in the text box shows where any text you type will appear.
Without clicking anything else, on the Insert menu, click Text File.
The Insert Text dialog box opens, displaying the contents of your Documents folder.
See Also
For information about how to move around in dialog boxes such as this one, see Saving and Closing Publications in Chapter 1.
Navigate to the DocumentsMicrosoft PressSBS_Publisher2007VisualInterest folder, and double-click the Text document.
Publisher inserts the contents of the document into the text box.
On the Standard toolbar, click the Zoom arrow, and change the zoom level to 100%.
Point to the frame around the text box, and when the pointer changes to a four-headed arrow, drag the frame down and to the right, releasing the mouse button when the text box coordinates are 2.000, 2.000 in.
Double-click the text box frame to open the Format Text Box dialog box.
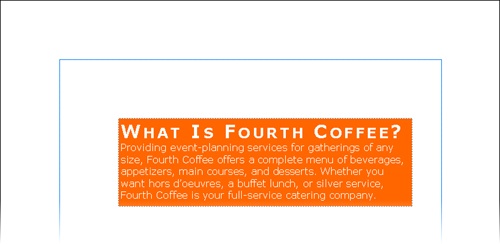
On the Colors and Lines tab, under Fill, click the Color arrow, and in the default color palette, click the orange square (Accent 3). Then click OK.
See Also
For information about applying a different color scheme and using custom colors, see Creating Folded Cards in Chapter 3.
On the Edit menu, click Select All to select all the text in the text box.
On the Formatting toolbar, click the Font arrow, and then in the list, click Verdana.
See Also
For information about using font schemes, see Choosing a Font Scheme in Chapter 4 and Solving Organization Problems in Chapter 5.
On the Formatting toolbar, click the Increase Font Size button twice, to increase the font size to 12 points.
If the font is too big, you can click the Decrease Font Size button. You can select a specific point size by clicking the Font Size arrow and clicking the size in the list.
On the Formatting toolbar, click the Font Color arrow, and in the default color palette, click the white square (Accent 5). Then click anywhere in the text box to release the selection.
Drag the bottom handle of the text box frame upward, releasing the mouse button when the dimensions shown on the status bar are 5.000 × 1.500 in.
Select the heading What Is Fourth Coffee? by dragging across or double-clicking it, and then click the Increase Font Size button five times to increase the font size to 22 points.
With the heading still selected, on the Format menu, click Font to open the Font dialog box.
The Sample box shows the formatting applied to the selection. As you make changes to the settings in the dialog box, the sample changes to show how the selection will look if you click Apply or OK. (Clicking Apply implements the current settings without closing the dialog box.)
Click the Font style arrow, and in the list, click Bold. Then under Effects, select the Small caps check box, and click OK.
You can click buttons on the formatting toolbar to change the font style of text, but to apply font effects, you have to use the Font dialog box. If you want to apply several attributes to the same text, it is often quicker to open the dialog box and apply them all from there.
On the Format menu, click Character Spacing to open the Character Spacing dialog box.
Under Tracking, click the arrow of the left box, and in the list, click Very Loose. Then click OK.
Click outside the text box to release the selection and see the results.