Although various technologies are now available to track appointments and schedules electronically, many people still prefer to use printed calendars to keep them organized and on time. Calendars can be an excellent promotional item because they keep your information in front of the recipient for the entire calendar period. You can include information about promotions and events, or if you create a calendar for friends and family members, you can include information about personal events such as birthdays. You can use Publisher to create a calendar for a single month, for a range of months, or for an entire year. Various designs are available in full-page or wallet sizes, or you can build a custom-sized calendar from a blank publication.
After you choose a calendar template in the Getting Started window, you can specify whether each calendar page displays a month or a year, and which months or years the calendar includes. (If you don’t select a year, Publisher creates a calendar for the current year.) Publisher creates a calendar consisting of one page specific to each month or year in the selected range. For example, setting a starting month of January and an ending month of June of the same year produces a six-page publication. You can also add a Schedule Of Events section, which is a text box next to the calendar grid on each page in which you can insert information. You can change the text box header to represent information other than events.
See Also
You can insert a one-month calendar object from the Design Gallery into any type of publication. For information, see Working with Pre-Designed Visual Elements in Chapter 2.
Some calendar templates include placeholders for photographs or other artwork. If you are creating a calendar for distribution to other people and you select one of these templates, think carefully about the ownership of the artwork you plan on using. If you insert your own photographs, do you want to indicate ownership in some way? If you plan to use artwork created by other people, do you have the right to distribute those materials without infringing on the owner’s rights?
Many people assume that if a graphic is available on the Web, it is part of the public domain. However, it is wise to err on the side of caution whenever you use artwork in your publications, unless you know it is not protected by a copyright. For example, the clip art that comes with Publisher and that is available from Microsoft Office Online is not copyrighted and can be used by anyone for any purpose. Materials that are copyrighted are usually accompanied by a variation of the following statement:
Copyright © 2007 by Online Training Solutions, Inc. All rights reserved.
If you want to use artwork that you have been given by someone else, it is wise to acknowledge the source. Otherwise, hard feelings can result if it appears to the owner that you are trying to claim credit for his or her work. You can add captions, credits, and copyrights to your publications in unobtrusive text boxes, so don’t be tempted to omit them only because you think they might detract from your design.
In Publisher, you can customize the background of any page by adding a solid color, a color gradient, a texture, or even a picture. This type of formatting is particularly effective in full-page publications such as calendars, because the background holds the objects on the page together with a cohesive design element.
A color gradient is a visual effect in which a solid color gradually changes from light to dark or dark to light. Publisher offers several gradient patterns, each with several variations. You can also choose a preset arrangement of colors from professionally designed backgrounds in which different colors gradually merge.
Tip
Be cautious when using preset color arrangements with calendars. It is important that the background be subtle and that it not compete with the other objects for attention or make them unreadable.
If you want something fancier than a gradient, you can give the background a texture, or you can even use a picture. Publisher comes with several textures that you can easily apply to the background of your pages.
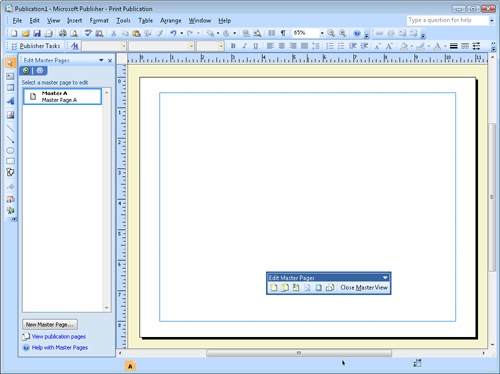
When you create a publication, the pages take on the characteristics of the template on which it is based. You can then make changes to individual pages. In a multi-page publication, making the same change to the design of every page can be tedious. For efficiency and precision, you can make the change to the publication’s master page instead.
The design of the master page controls the look of all the pages in the publication. Anything that appears on the master page appears on every page. Most master page elements can be changed only on the master page. (An exception is the background; you can override a master page background on an individual publication page.) For this reason, most publications created with Publisher templates have a blank master page—the design elements are individually inserted on each page so that you can easily change them.
To make changes to a publication’s master page, you click Master Page on the View menu to display the page, the Edit Master Pages task pane, and the Edit Master Pages toolbar.
By clicking buttons on the toolbar, you can do the following:
Add a new master page.
Duplicate or rename the active master page, or delete it if there is more than one.
Add layout guides to the active master page.
See Also
For information about layout guides, see Using Guides in Chapter 4.
Display spreads or single pages.
Clicking the Close Master View button on the toolbar returns you to the publication. You can temporarily display the publication’s pages to check the effects of a change by clicking View Publication Pages at the bottom of the Edit Master Pages task pane.
While the master page is displayed, you can choose commands from menus and click buttons on toolbars to insert and format the elements you want to appear on every page of the publication. For example, you might want to add your company logo or a watermark to every page.
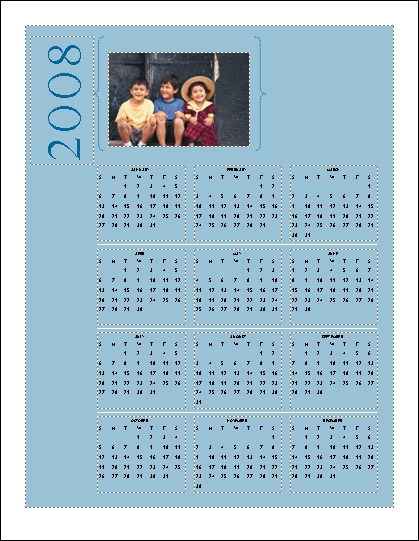
In this exercise, you will first create a full-page calendar for the entire year, with a custom photograph and copyright statement. You will then create a 12-page calendar with a schedule of events for the current month, change the background of an individual page, and then change the background on the master page.
Note
USE the Arizona10 picture. This practice file is located in the DocumentsMicrosoft PressSBS_Publisher2007CardsCalendars folder.
BE SURE TO display the Getting Started window before beginning this exercise.
In the Publication Types list, click Calendars, and then scroll the center pane to see the broad range of available design templates.
In the Full Page category, click Photo Album.
Under Customize in the right pane, set the Color scheme to Aqua. Under Options, change the Page size to Portrait and the Timeframe to One year per page. Then click Create.
Publisher creates a full-page, vertical, 12-month calendar based on the selected design template.
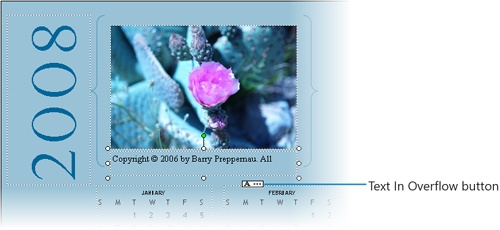
Right-click the existing picture, point to Change Picture, and then click From File. In the Insert Picture dialog box, navigate to the DocumentsMicrosoft PressSBS_Publisher2007CardsCalendars folder, and double-click the Arizona10 picture.
See Also
For information about inserting and manipulating pictures, see Working with Graphics in Chapter 2.
On the Objects toolbar, click the Text Box button, and then draw a text box below the photograph. Make it the width of the photograph and about a quarter inch high.
In the text box, type Copyright (c) 2006 by Barry Preppernau. All rights reserved.
Tip
When you press the Spacebar after typing (c), Publisher substitutes the copyright symbol, because the Replace Text As You Type check box is selected in the AutoCorrect dialog box. For information about AutoCorrect, see Correcting Spelling Errors in Chapter 5.
Because some text will not fit in the text box, Publisher displays the Text In Overflow button.
See Also
For information about ways to work with overflow text, see Continuing Stories from One Text Box to Another in Chapter 4.
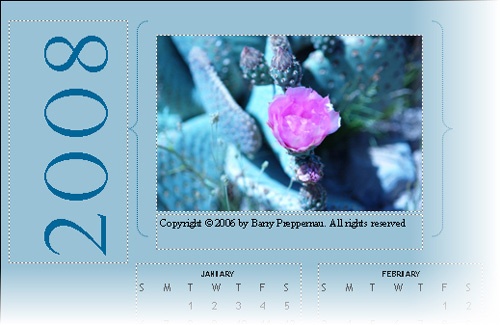
Press
 to select all the text in the text box, and then on the Formatting toolbar, click the Decrease Font Size button until all the text you typed fits on one line. Then click an empty area of the page to see the results.
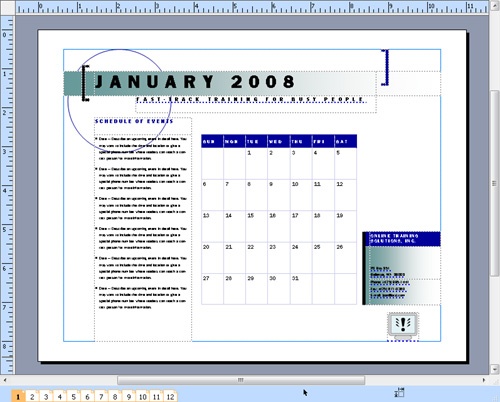
Repeat steps 1 through 3 to create a calendar with the Axis design and the Waterfall color scheme. Under Options in the right pane, click Set Calendar Dates, set the Start date to January and the End date to December, and click OK. Select the Include schedule of events check box, and then click Create.
Publisher creates a 12-page, horizontal calendar.
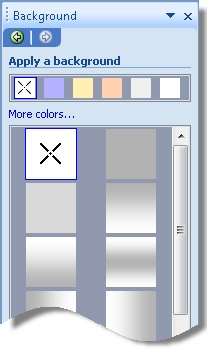
On the title bar of the Format Publication task pane, click the Other Task Panes button, and then click Background to display the Background task pane.
Click several options to see their effects on the calendar.
Clicking one of the color boxes at the top of the task pane changes the gradients at the top of the More Colors list to reflect that color. You can also apply any of the available textures, patterns, or pictures to the calendar’s background.
In the Background task pane, directly under Apply a background, click the 30% tint of Accent 1 (violet) square. Then click any gradient fill box in the list.
On the page sorter, click several pages to verify that the background was applied to only the first calendar page. Then redisplay page 1.
On the View menu, click Master Page to display the publication’s underlying master page.
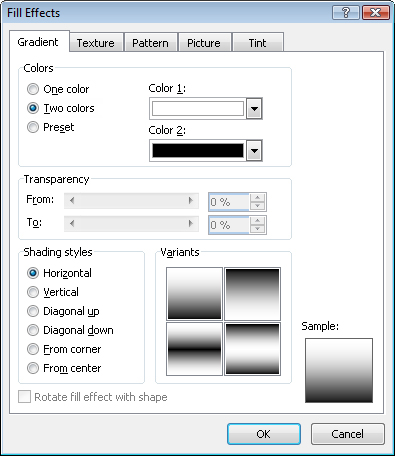
Display the Background task pane, and at the bottom, click More backgrounds. Then under Colors on the Gradient tab of the Fill Effects dialog box, click Two colors.
The Fill Effects dialog box changes to display the options for two-color gradients.
Click the Color 2 arrow, and click the Accent 2 (aqua) square. Then under Shading styles, click From corner, and under Variants, click the lower-left box. Click OK.
At the top of the Background task pane, click the Other Task Panes button, and click Edit Master Pages to display that task pane. Then at the bottom of the pane, click View publication pages. Then click various pages on the page sorter.
The master page background has been applied to all the pages, but the background you applied directly to page 1 in step 12 is still visible in parts of that page.
Display page 1, display the Background task pane, and click the No Fill box at the top of the first column in the list.
The additional background is removed from page 1 so that it displays the entire master page background.