If you want to add a fancy title to a publication, and you can’t achieve the effect you want with regular text formatting, you can use WordArt. With WordArt, you can visually enhance text in ways that go far beyond changing a font or font effect, simply by choosing a style from a set of small thumbnail images arranged in a gallery.
Tip
For the best results, use WordArt to emphasize short phrases, such as Customer Service, or a single word, such as Welcome. Overusing WordArt can clutter your publication and draw attention away from your message.
You add stylized text to a publication by clicking the WordArt button on the Objects toolbar. You then select a style from the WordArt gallery, enter your text, and apply any additional formatting. Publisher inserts the text in your publication as a WordArt object that you can size and move like any other object. You can also change the shape of the object to stretch and form the letters of the text in various ways.
In this exercise, you will add a WordArt object to a publication and then modify the appearance of the text. There is no practice file for this exercise.
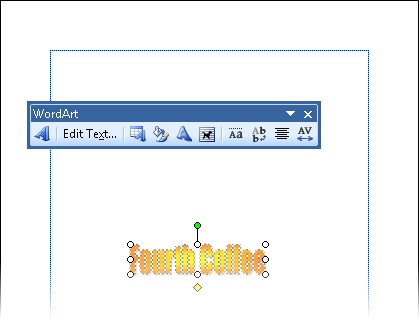
On the Objects toolbar, click the Insert WordArt button.
The WordArt Gallery opens, displaying the available styles.
Click the first thumbnail in the third row (the orange and yellow sample), and then click OK.
The Edit WordArt Text dialog box opens so that you can enter the text you want to depict as WordArt.
With the placeholder text selected, type Fourth Coffee, and then click OK.
The formatted text appears as an object in the center of the page, and Publisher displays the WordArt toolbar.
If necessary, move the toolbar out of the way. Then move and resize the WordArt object until it spans the top of the page and is about 2 inches high.
On the WordArt toolbar, click the WordArt Shape button, and then in the gallery, click the third thumbnail in the first row (Triangle Up).
On the WordArt toolbar, click the Format WordArt button.
The Format WordArt dialog box opens. This dialog box resembles the Format Text Box dialog box shown earlier in this chapter.
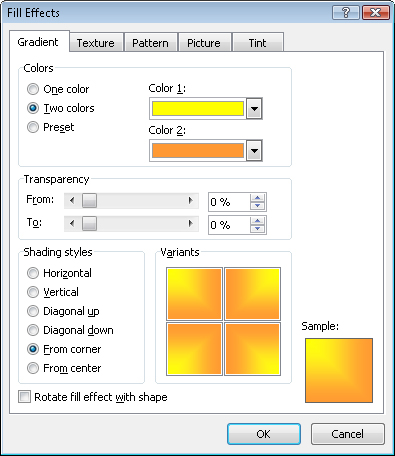
Under Fill on the Colors and Lines tab, click the Color arrow, and then click Fill Effects.
The Fill Effects dialog box opens.
With Two colors selected under Colors on the Gradient tab, click the Color 1 arrow, and in the default palette, click the Purple box. Then in the Color 2 list, click the Gray box.
Under Shading styles, click Horizontal, and under Variants, click the lower-left option. Then click OK twice.
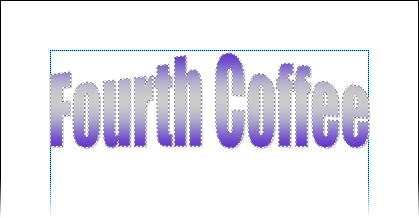
Drag the yellow diamond handle to the left of the frame up until the dotted outline of the letters is aligned with about the half-inch mark on the vertical ruler.
The letters at the sides of the WordArt object stretch so that the triangle effect is less exaggerated.
Click away from the object to release the selection and see the results.