Flyers are one-page, one-sided publications that are designed to be read at a glance. Don’t underestimate the task of designing a good flyer; you need to distill the information down to the minimum number of words that will convey your message and arrange the text along with graphics for maximum impact.
Publisher comes with many flyer templates. Some present different designs for marketing a product, service, or event; others are special-purpose layouts for sales, fundraisers, or announcements. Instead of using one of these templates, however, in this section we show you how to arrange elements created by using the techniques you learned in earlier chapters to create a flyer on a blank page. This process is called page layout.
After inserting graphics and text boxes or drawing shapes in approximate locations on a blank page, you can precisely position, align, and stack the objects by using the commands on the Arrange menu. In addition to the blue margin guides, three other types of non-printing guides help you precisely position and align objects:
Grid guides. You display these fixed lines to create a grid on the page for use when laying out a publication. You can specify how many column guides and row guides you want, as well as the spacing between them.
See Also
For information about layout grids, see the sidebar titled Page Layout and the Grid, later in this chapter.
Baseline guides. You display these fixed horizontal lines to show baselines to align text you have in your publication. This is useful if you want to align the text in multiple text boxes.
Ruler guides. You display these movable horizontal and vertical lines when you want to precisely position or align objects without using a grid.
Clicking Align Or Distribute on the Arrange menu gives you access to commands for aligning individual or multiple objects in several ways. For example, you can:
Align objects vertically so that their left or right edge or centerline aligns with that of the first object selected. Or align them horizontally so that their top or bottom edge or centerline aligns with that of the first object selected.
Distribute multiple objects evenly within the space they currently occupy, either horizontally or vertically.
Align objects with the page margins, or distribute them evenly between the page margins.
You can also have objects that you move automatically snap (attach themselves) to the nearest ruler mark, guide, or other object.
When objects overlap each other, they are stacked. The stacking order is determined by the order in which you inserted the object, with the first object at the bottom of the stack and the last object at the top. You can change the stacking order by bringing an object to the top (the front) of the stack, sending it to the bottom (the back), or moving it forward or backward one position at a time.
If you can’t locate or select an object because it is covered by others in the stack, you can run the Design Checker to identify hidden objects. You can then click Go To This Item or Bring Object To Front to make the object accessible.
Tip
The Design Checker detects design problems in your publications, such as objects that are not within the print area or are off the page, text boxes containing more text than can be displayed, and pictures that are disproportionately scaled.
When you have many objects to organize on a page, it is often helpful to remove some of them temporarily so that you have room to work. Publisher provides a gray scratch area around the page in which you can place an object until you decide where it fits. When you want to move an object to a different page of a multi-page publication, it is often more convenient to move an object to the scratch area, display the page where it belongs, and then move the object onto that page than it is to cut and paste the object.
In this exercise, you will align objects in various ways, change their stacking order, and position them with the help of a grid.
Note
USE the Flyer publication. This practice file is located in the DocumentsMicrosoft PressSBS_Publisher2007MarketingMaterials folder.
OPEN the Flyer publication.
Set the Zoom level to Whole Page.
On the Tools menu, click Design Checker.
The Design Checker notifies you of a hidden object.
In the Design Checker task pane, point to the Object is not visible warning, click the arrow that appears, and then click Fix: Bring Object to Front.
The logo graphic is now visible at the top of the stack of objects.
Drag the logo into the gray scratch area to the left of the page.
Close the Design Checker task pane. Then drag the photograph into the scratch area to the right of the page.
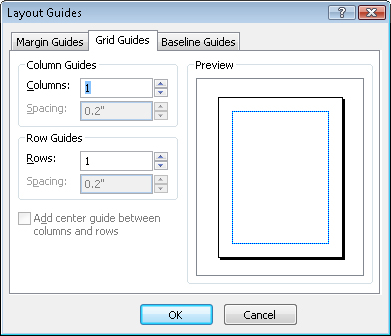
On the Arrange menu, click Layout Guides, and then in the Layout Guides dialog box, click the Grid Guides tab.
You can set column guides and row guides, as well as the space between them.
Under Column Guides, change the Columns setting to 5, and under Row Guides, change the Rows setting to 7. Then click OK.
A grid of squares with a 0.2 inch space between each column and each row now occupies the entire space between the blue margin guides.
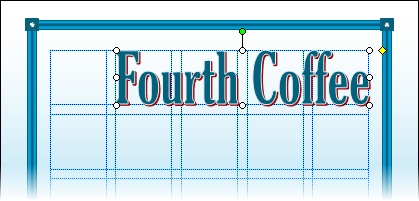
Right-click the visible part of the Fourth Coffee heading, point to Order, and then click Bring to Front.
You might need to move the WordArt toolbar to see the object.
With Fourth Coffee still selected, on the Arrange menu, point to Align or Distribute, and then click Relative to Margin Guides to turn on that option.
On the Arrange menu, point to Align or Distribute, and click Align Top. Then point to Align or Distribute, and click Align Right.
Now drag the lower-left corner handle down and to the left to stretch the object until it fills four of the five grid units at the top of the page.
Click the coupon object, and drag it toward the lower-right corner of the page. Stop dragging when the object snaps to align with the bottom and right margin guides.
The object snaps to the guides because To Guides is turned on under Snap on the Arrange menu.
Drag the row of orange dots out of the way, and then enlarge the coupon until it fills the bottom three grid rows across the five grid columns.
Drag the text box down until it slightly overlaps the coupon, and then drag the row of dots until it sits immediately above the text box.
Now you can arrange the objects currently stored in the scratch area.
Drag the photograph onto the page, aligning the right edge with the right margin and aligning the top edge so that Fourth Coffee does not obscure the women’s faces. Then hold down the
 key and drag the lower-left corner handle to enlarge the photo until it spans the right three grid units.
With the photo still selected, on the Arrange menu, point to Order, and then click Send to Back.
The photo moves behind the other objects on the page.
Drag the logo onto the page, and then align it with the left and top margin guides.
Click a blank area of the page, and then on the View menu, click Boundaries and Guides to turn off that option.
Publisher hides the margin and grid guides so that you can see the results of your work.