Publisher doesn’t immediately come to mind when thinking about Web site development applications, but it does actually provide a good basis for the development of a simple Web site. An advantage to using Publisher to develop your Web site or to develop Web pages is that you can very easily reinforce your brand by incorporating colors, fonts, and graphic elements from other publications. If you are a professional Web designer or want to create a site with a significant number of fancy programmatic elements, it is likely that you will use a more tailor-made Web site creation environment than Publisher.
Publisher 2007 includes 72 design templates (including No Design) and a blank template in three widths designed for varying screen resolutions (or if you want to purposefully limit the width of the site content). As with all publications, you can specify the font scheme and color scheme when you create it. You can also select the navigation bar location, choosing between a vertical bar on the left, a horizontal bar on the top, a horizontal bar on the bottom, and combinations thereof; or you can opt to go without a navigation bar.
As with printed publications, Publisher provides pre-designed Web pages that you can adapt to your needs. Most Web sites incorporate specific types of pages, and because the layout of each page type has become quite standardized, you can easily create the site you need based on the standard page templates. When you create a Web site, you can choose to start with a simple home page, or to start from a more complete base, you can select the Easy Web Wizard option when creating the site. When you choose this option, Publisher creates the home page and then displays the one-page Easy Web Site Builder, which asks a series of questions about the types of information you want to provide to site visitors, and adds pages to the initial site in response to your questions. If you have experience with Web site development you will probably find the Easy Web Site Builder unnecessary, but it provides a helpful starting point.
Publisher provides 30 Web page templates. These 9 common page types are available through the Easy Web Site Builder:
Home. Every Web site has one home page—this is the page that appears when a visitor connects to your primary URL (for example, www.microsoft.com). To serve as the home page, the file name must be either index or default, because this is the name Web browsers look for. On the home page, you can welcome visitors, provide an overview of your organization (or the purpose of the site), and provide links, search engines, or other tools to help visitors find the information they are seeking.
About Us. Use this page to tell people about your company or organization, your products or services, and your personnel.
Contact Us. Use this page to tell people how to contact your company or organization and where you are located.
Product List With Links. This consists of a one-page product list and six Product Detail pages. The default product list includes space for six products, each with specific areas for a picture, a description, an identifying code (such as the SKU or ISBN), the price, and a link to the associated Product Details page where you can provide additional pictures, a more detailed description, a feature list, and contact information.
Service List. This page includes space for four services, each with specific areas for a picture, a description, an optional link to a Service Detail page (not created by default), and contact information.
Calendar. This page displays a monthly calendar and a list of events, each with an optional link to an Event page (not created by default). Publisher creates a calendar for the current month; you can change the month by deleting the calendar object and replacing it with another from the Design Gallery.
Project List. Although this is identified for use with projects, you can use the structure provided by this page to list a variety of information, including projects, clients, or activities. This page includes space for five entries, each with specific areas for a picture, a description, and an optional link to a Project Detail page (not created by default).
Employee List. This page includes space for five entries, each with specific areas for a picture, a biography or job description, contact information, and an optional link to an Employee Detail page (not created by default).
Related Links. From this page, you can provide visitors with links to other Web sites, or (less commonly) to specific pages of your site.
After you create a site, you can add blank or pre-designed pages to the site, and then personalize the content of those pages to fit your needs. Available page types include Calendar and Events, Employee (List and Detail), Frequently Asked Questions, Forms (Order, Response, and Sign-Up), General Information, Job List, Legal, News Articles, Photo (Gallery and Detail), Product (List and Detail), Project (List and Detail), Service (List and Detail), and Special Offer.
When you add a page to an existing site, you can choose whether to add it as a top-level page that appears on the site navigation bars, or simply to create the page and then manually link to it from another.
Presenting Information in Tables and Lists
Some Publisher templates or template pages include placeholders for information that is formatted in a table or in a list. You can customize these placeholders with your own text the same way you would any other placeholder. You can also add a table or a list to any text box.
Information such as statistics or comparisons is best presented in a table. You can create two types of tables:
A standard table is an object consisting of a series of cells laid out in columns and rows to form a grid. You can specify the width of the table and its columns, or have the column width adjust to fit its content. If necessary, you can merge or split cells to vary from the grid, but it is not as easy to make adjustments to a non-standard table. You can apply a variety of standard formats to a table to more clearly illustrate your content.
The table object is independent of other objects, such as text boxes, so you can place, move, size, and format it independently of anything else on the page.
A tabular list is a series of paragraphs, each containing a specific number of pieces of information separated by tab characters. You set the tabs to align the information in columns. You can align the content of each column either by its left edge, its right edge, or its center point, and you can align a series of decimal numbers by the decimal point. You can format the space between columns as a line or a series of dots, dashes, or bullets.


Information such as sequential steps or options is best presented in a list. You can create two types of lists:
You present sequential information (such as step-by-step instructions) or a specified number of items (such as three choices) in a numbered list. A numbered list can have multiple levels, each with a specific alphanumeric numbering system and indent level.
You present non-sequential information or an unspecified number of items in a bulleted list. A bulleted list can also have multiple levels, each denoted by a specific bullet character and indent level.


For either type of list, you enter each list item in its own paragraph, apply the list format, and if necessary set the level; Publisher inserts the numbers, letters, or roman numerals indicating the series order.
You can add another publication to a Web site; for example, you can add a menu to a restaurant site or a resume to a personal site. To add a publication as a top-level page to a Web site, follow these steps:
Open the publication in Publisher. On the File menu, click Publish to the Web.
In the Publish to the Web dialog box, browse to your Web site directory structure, name the file, and then click Save to save an HTML version of the file.
Open the site in Publisher. Click anywhere on the navigation bar, and then click the Navigation Bar Options button that appears.
In the Navigation Bar Properties dialog box that opens, click Add Link.
In the Add Link dialog box, in the Link to list, click Existing File or Web Page. Then in the Look in pane, browse to the HTML version of the file.
In the Text to display box, enter the text you want to appear on the navigation link. Then click OK.
In the Navigation Bar Properties dialog box, the linked file appears in the Links list.
To change the position of the linked file on the navigation bar, click the Move Up and Move Down buttons. When the navigation links appear in the order you want, click OK in the Navigation Bar Properties dialog box.

You customize the placeholder content of a Web site in the same way you would the content of any other publication you work with in Publisher. You can replace or remove placeholder text and graphics; add, remove, or rearrange text boxes and images; and link text boxes to control the flow of content. Publisher makes it simple for you to do all these things regardless of your experience with Web programming languages.
You can format many of the same page features for a Web page as you can for a printed publication page, including bookmarks, hyperlinks between locations, and a background color, pattern, or picture. Although Publisher does not provide as many bells and whistles as Microsoft Office FrontPage, Microsoft Office SharePoint Designer, Microsoft Expression Web, or similar programs intended solely for Web design, it does make it easy to insert background sounds, form controls, and hot spots, and to attach metadata to a page to help search engines locate it. You can implement other functionality, such as a hit counter, by inserting the necessary HTML code on the page (by using the Insert HTML Fragments command).
In this exercise, you will create a Web site based on a template, add and configure a form, customize the navigation bar, and preview the site. There is no practice file for this exercise.
In the Publication Types list, click Web Sites. Scroll the page to see the available templates. Then in the Classic Designs category, click Scallops.
Under Customize in the right pane, set the Color scheme to (default template colors) and the Font scheme to (default template fonts).
Under Options, set the Navigation bar to Vertical only. Select the Use Easy Web Wizard check box, and then click Create.
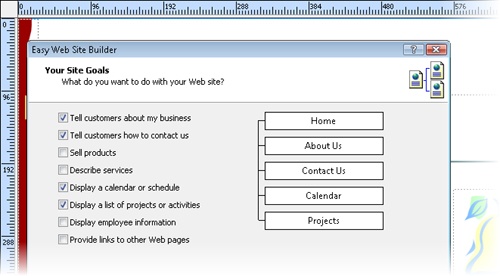
Publisher creates the home page of a Web site based on the selected template, and the Easy Web Site Builder dialog box (shown earlier in this chapter) opens.
In the Easy Web Site Builder dialog box, select the following check boxes:
Tell customers about my business
Tell customers how to contact us
Display a calendar or schedule
Display a list of projects or activities
As you select each check box, the page or pages Publisher will create for that purpose appear on the right side of the dialog box.
Select any other pages that interest you, and then click OK.
Publisher creates the page or pages to support each selection. The Web Tools toolbar appears.
On the navigation bar, note the order of the Web site page links. Then on the page sorter, click each page in turn.
The navigation bar reflects the order of the pages within the publication. It is customary for the Contact Us page to be the last entry on the navigation bar.
On the page sorter, drag page 3 (Contact Us) to the end of the publication.
The navigation bar does not change to reflect the new page order. We’ll return to this issue later in the exercise.
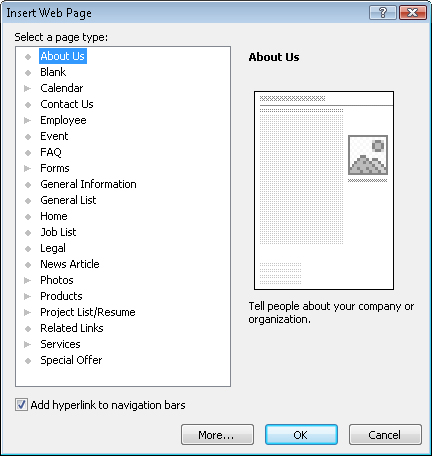
Display page 4, the Project List. Then in the Web Site Options pane, click Insert a page.
The Insert Web Page dialog box opens, displaying a list of all the available page types.
In the Select a page type list, click Forms, and then click Sign-up Form. With the Add hyperlink to navigation bars check box selected, click OK to create the page.
Publisher creates the form as page 5, but inserts the corresponding page link at the end of the navigation bar, labeled simply Form.
Click anywhere on the navigation bar, and then click the Navigation Bar Options button that appears.
The Navigation Bar Properties dialog box opens.
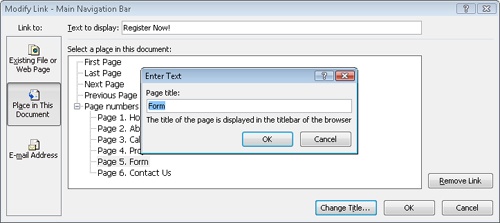
In the Links list, click Contact Us. Click Move Down three times to place the page link in the same order that the pages appear on the page sorter.
In the Modify Link dialog box, replace Form in the Text to display box with Register Now! Then click Change Title.
The Enter Text dialog box opens.
In the Enter Text dialog box, replace Form in the Page title box with Register Now! Then click OK in each of the three open dialog boxes.
The form created by Publisher is a fully functional information submission form. Before you can publish the site, you must specify the action to occur when a site visitor submits the form.
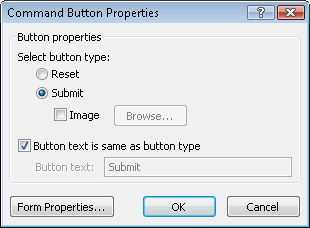
Scroll to the bottom of the form, right-click the Submit button, and then click Format Form Properties.
The Command Button Properties dialog box opens.
Clear the Button text is same as button type check box, and in the Button text box, replace Submit with Register. Then click Form Properties.
Tip
Within Publisher, you can move between site pages either by clicking page numbers on the page sorter, or by pressing Ctrl and then clicking the page link in the navigation bar.
The Form Properties dialog box opens.
Under Data retrieval method, click Send data to me in e-mail. Under Data retrieval information, enter your e-mail address in the Send data to this e-mail address box that appears, and enter Publisher Form Test in the Subject of e-mail box. Then click OK in each of the two open dialog boxes.
On the form page, click the Register button once to select it, and then press the
 key several times to align the left edges of the button and the Exp. date box.
In the Web Site Options pane, click Preview Web site.
The site opens in your default browser.
Click the navigation pane buttons to move between pages and see the types of content created by the page templates.
Because the site has not yet been published, submitting the form will result in an error.