
Redmine is known to lack reporting functionality, but not in the case of time tracking, as time tracking is generally useless without reporting.
In the previous section, you learned that Redmine provides many links to time reports. Let's list them here:
- Overall spent time on the project list page, which can be accessed through the Projects item in the top-left menu. This link opens a report that lists all visible time entries for all projects.
- The Details and Report links on the project's Overview page. The corresponding report lists all the time entries for the project.
- The number of hours on the issue page. This report lists all the time entries for the issue.
- The title of a time entry event on an activity page. The report that such a link points to lists all the time entries for the corresponding issue.
So, as you can see, time reports are generally available for three nesting levels: the global level (for all projects and issues), the project level (for all issues), and the issue level.
In this section, we will review the report for the issue level (for Chapter #8). Check it out in the following screenshot:

The breadcrumbs in the top-left corner can be used to switch between nesting levels. To the right-hand side of the breadcrumbs, you can see the Log time link, which can be used to add new time entries.
Below the Spent time title, you can see the Filters block. By default, only the Date filter is enabled here, but you can use the Add filter select box to add other filters.
Here are the filters that are supported by the time report:

The Project filter, however, is available only on the global level (for all projects). On other levels, it is enforced.
Below Filters, you can also see the Options block, which is shown in the next screenshot. It is collapsed by default.
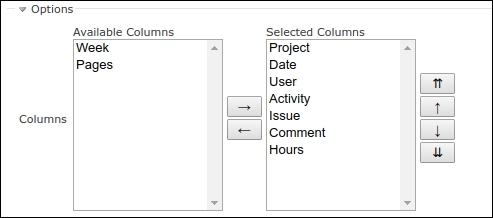
Using these options, you can choose which columns should be included in the report. Moreover, it can include custom fields as columns (Pages is a custom field).
Now let's review the Details and Report tabs, which contain different views of the report.
In this subsection, we continue to discuss the first screenshot of the Time reports section.
Under the Details tab, we get a list of time entries that match the specified filters. This list is shown in the table, most columns of which can be used for sorting (all except Comment and custom fields, actually). Above the list, you can see the grand total of all hours for all the time entries that are included in the report. The rightmost column (the untitled one) contains icon links that can be used to edit (![]() ) and delete (
) and delete (![]() ) time entries (of course, users should have the appropriate permissions to see and use these links). Below the list, you can see the Atom and CSV links. The former can be used to subscribe to time entries and the latter can be used to export the report.
) time entries (of course, users should have the appropriate permissions to see and use these links). Below the list, you can see the Atom and CSV links. The former can be used to subscribe to time entries and the latter can be used to export the report.
As you might have noticed, rows of the list can be selected by either checking the checkboxes in the leftmost column, or clicking on the rows themselves (you can hold the Ctrl key to select more than one row). Additionally, you can click on the ![]() icon in the leftmost column to select all rows at once.
icon in the leftmost column to select all rows at once.
Right-clicking on the selected row (or rows) invokes the drop-down menu that is shown in the following screenshot:
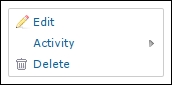
Using this menu, you can delete selected time entries, change their activity, or invoke the bulk edit form. The latter can be used to change several time entries at a time. Check it out here:

Under the Report tab, you can see the report builder, which is shown in the following screenshot:

The Details field specifies what date-based columns the report will include. In my case, these are Days (2016-01-01, 2016-01-02, and so on). The report supports Years, Months, Weeks, and Days values for this field.
The Add field is more interesting. It allows you to choose up to three grouping attributes that will be shown in the report as columns. Thus, in the previous screenshot, the first grouping attribute is User and the second one is Activity. Also, the grouping attributes are to be added in the same order in which they should appear in the report. Thus, to get the report that is shown in the preceding screenshot I first added the User group and then added Activity.
Possible values of the Add field are shown here:

The Clear link can be used to reset the report's configuration.
The resulting report can be exported using the CSV link, which can be found in the bottom-right corner.
Tip
The Timesheet plugin
The Timesheet plugin, which was originally authored by Eric Davis, can be used to generate more flexible time reports. Check it out at https://github.com/arkhitech/redmine_timesheet_plugin.