The art of photography is often referred to as painting with light. Although the subject of a photograph such as figure 1-1 may appear to be a landscape, it's the light reflected from that landscape that makes the photograph, not the subject itself. Without light, you simply can't make a photograph.
Simply stated, capturing a photograph is recording the light reflected from a scene by means of a camera, which uses a lens to focus an image onto a photosensitive recording medium. For generations, that medium was photographic film, which created an image through chemical reactions. Now, digital image sensors are rapidly replacing chemical-based film as the preferred photographic medium, and photographers typically record images as computer files instead of film negatives. Although the photographic recording medium is new, the essence of photography is the same — it's still about recording reflected light.
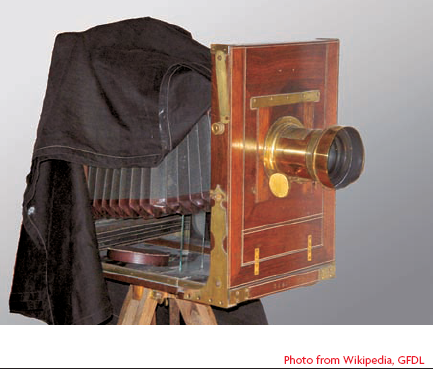
Cameras have come a long way over the years. Early cameras, such as the one in figure 1-2 were little more than a lens holder in the front, a film holder in the back, and a flexible bellows in between that created a light-tight enclosure. The technical process of making a photograph with such a camera was arduous. The introduction of the box camera in figure 1-3 reduced the size of the contraption so that it was easier to transport and popularized multiframe rolls of film instead of single sheets.

The 35mm SLR (single lens reflex) further reduced the size of the camera while adding a much more sophisticated focusing system, interchangeable lenses, and a built-in exposure meter. As a result, cameras such as the venerable Nikon F2 (see figure 1-4) gave photographers lots of creative control in a small package. The evolution continued with the addition of convenience features such as automatic film advance, automatic focusing, and automatic exposure in cameras like the one shown in figure 1-5. The sophisticated features and slick design of these electronically controlled cameras makes them fast and easy to use. Much of the technical process of taking a picture is automated, leaving the photographer free to concentrate on aesthetic decisions such as framing the image, and of course, the lighting.


In some respects, today's digital cameras have revolutionized photography. Digital sensors have replaced film as the image recording device, and images are stored on a memory card instead of in a film cassette. Digital images can be viewed instantly on a display screen on the back of the camera instead of waiting hours or days for film processing. Editing and printing images can be done on a personal computer instead of in a specially equipped lab.
However, in spite of all the changes brought about by digital photography, a digital camera such as the Canon Digital Rebel in figure 1-6 looks and operates a lot like its film-based predecessor. At its core, the camera is still a light-tight box with a lens that focuses reflected light from the scene onto a photosensitive recording medium. You still need to frame and focus the image the same way, and control the exposure with aperture and shutter speed in the same way, so it's not surprising that those parts of the camera design remain unchanged. The only feature that has really changed is the technical details of the recording medium. Granted, that's a significant change, but it doesn't alter the fundamental truth that photography is the art of recording light and that the camera is basically just a simple recording tool.

To be sure, there are some differences between recording a photographic image digitally and recording it onto film, and I explore some of them in other chapters. However, those differences, while they do exist, don't make a profound difference in photographic lighting and exposure for most photographic subjects. Photography by natural light is pretty much the same whether you record the image on film or digital. In the studio, you can use most of the same lighting technologies and techniques for both film and digital (with some exceptions), and a given exposure will produce equivalent results on both film and digital of the same ISO (with some exceptions and limitations). Of course, there are numerous small details that are different in digital photography, but they usually require minor tweaks in a lighting technique or exposure, not a major change in approach.
Note
See Chapter 8 for more information on the differences between film and digital photography.
The area where digital photography has the greatest impact is on the photographer's workflow. And I'm not referring only to the processing and printing workflow after a photograph is taken. I'm talking about changes in the shooting workflow as well.
By necessity, the workflow for film-based photography had to allow for the fact that film processing takes hours. If the film had to be sent to an outside lab for processing, it could be days before the photographer could see the results. Consequently, testing new equipment and lighting techniques was a painfully slow process, which required tedious testing procedures and meticulous record keeping to match test conditions with the results that weren't available until hours or days later. The process usually goes something like this:
Set up a test situation to test a new camera, lens, or lights. You may need to repeat or refine the tests, so you must either leave the test setup untouched while you wait for results, or you must make careful notes that will enable you to replicate the test conditions exactly at a later time.
Shoot a series of test exposures. Because of the time lag before you can see results, you must try to anticipate and test as many variations as possible, which means keeping meticulous notes of the exposure settings and other variables for each exposure.
Send the film to the lab for processing. Wait hours or days to see the results.
Evaluate the results, taking time to carefully match each exposure to your notes.
Repeat the whole process as needed. Each test cycle takes a few hours if you shoot color transparency film and have access to an in-house processing lab, much longer if you use outside processing.
In contrast, digital photography produces instant results. You can view your image immediately on the camera's display screen and get important exposure information from the histogram display. It takes just minutes to transfer an image to a computer for detailed examination. This makes for a fast and efficient feedback loop that is changing how photographers work. Digital photographers can confirm each shot and reshoot immediately if necessary. For complex studio shots that require testing, refinement, and retesting, the test cycle time has been reduced from hours to seconds. When working with studio flash, some digital photographers find that it's faster to fire off a test shot and adjust from there than to meter the scene with an external flash meter. The working pace is quicker and experimentation is faster and easier. The test process is reduced to something like this:
Set up a test situation to test a new camera, lens, or lights. Your test will be complete in minutes, so there's no need to take precautions that will enable you to replicate the test conditions later.
Shoot a quick test exposure. You can see each result immediately, so you don't need to structure elaborate procedures to test several variables. And you can probably dispense with the note taking because you're dealing with only one thing at a time, and the camera automatically records most exposure variables if you need to refer to them.
View and evaluate the results on the camera's display screen. Or, for a more detailed examination, download the images to your computer.
Repeat the process as needed. Each test cycle takes less than a minute if you evaluate the results on the camera's display. If you transfer images to a computer, it might take five minutes.
Note
See Chapter 4 for more information on using light meters to measure light and calculate exposures.
Photographers are observers and recorders of light. The camera is the tool that records the light reflected from the subject, but it's the photographer that observes that light and decides what to photograph and when; what to include and what to exclude. The photographer can choose to simply capture an image of pleasant scene, such as the wildflowers in figure 1-7, or look for an interesting interplay of light and shadow, such as figure 1-8.


Artists have been observing light and making it a major component of their art for hundreds of years. Painters have long used dramatic contrast of light and shadow to highlight a portion of the subject and create a distinctive mood, and the trend continues today. For example, consider the low-key portrait of a welder in figure 1-9. The side-lit face standing out from the overall dark tones of the rest of the image is reminiscent of the lighting in paintings by the old masters, such as the Rembrandt self-portrait in figure 1-10 (Self Portrait as the Apostle Paul, by Rembrandt van Rijn, 1661, oil on canvas, Rijksmuseum, Amsterdam).


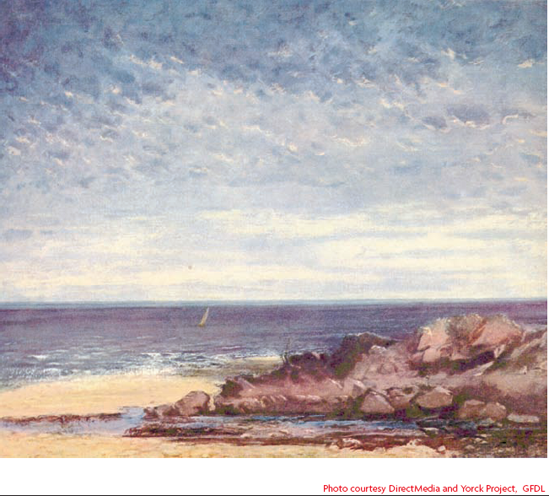
Even mundane subjects can become striking images when the lighting is right. Consider too, the photograph of the Irish coastline in figure 1-11 and compare it to the painting of the Normandy coast by French realist painter, Gustave Corbet, in figure 1-12 (Seacoast in the Normandie, Gustave Courbet, 1867, Oil on canvas, Puschkin Museum). Both are pictures of rather nondescript sections of beach. What makes these images appealing is the quality of the light and how it plays across the clouds in the sky, the water, and the rocks on the shore.

The French impressionist painters were known for their obsession with light and their attempts to capture distinctive lighting in their paintings. They created beautiful artwork by painting ordinary scenes in extraordinary light. The anonymous photographer who shot the fields and trees in figure 1-13 captured a lighting effect that is very similar to the lighting in the Alfred Sisley painting in figure 1-14 (Small Meadows in Spring, by Alfred Sisley, 1881, Oil on canvas, National Gallery, London, UK). In both images, the light coming from the left side of the frame at a low angle causes each tree limb and tuft of grass to stand out with a distinct highlight on one side and shadow on the other.


What makes a great photograph is not a great subject; it's great lighting. No matter how interesting or spectacular the subject may be, you won't get a good picture without decent lighting. For most photographic subjects, that means choosing the season, time of day, and other conditions for best results.
For example, figures 1-15 and 1-16 show nearly identical scenes of Monument Valley. The dramatic difference is the lighting from the last rays of the setting sun in figure 1-16. What a difference a few hours make!


Note
Lighting is the biggest difference between a typical tourist picture of a spectacular scene and the postcard or magazine images of the same scene taken by a professional photographer. The tourist typically shoots the scene in whatever light is available at the time. The pro has the patience and perseverance to wait for the light to be right, sometimes returning to the scene repeatedly in search of the best light.
When shooting landscapes and other outdoor subjects, photographers have little choice other than waiting for nature to change the lighting conditions. However, when shooting indoors, you have the option of taking an active role in manipulating the light to create the desired effect.
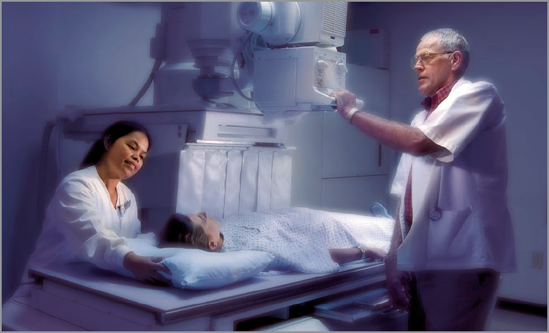
If the goal was to simply record the medical scene in figure 1-17, the photographer could have taken the picture with the light from the overhead fluorescent room lights or an on-camera flash. Instead, he chose to create a much more dramatic effect with some carefully placed photographic lights. By selectively lighting certain areas and keeping other areas relatively dark, he drew attention to the people and subdued the distracting background and overpowering bulk of the machinery.
Note
See Chapter 11 for more information on location lighting.

In the photographic studio, you have total control over lighting. You can create and control the entire environment, adding and taking away lights at will.
The advertising illustration shown in figure 1-18 was shot on a studio tabletop set that was designed around the planned lighting effect. The highlights on the black rocks were created by the main light, a large soft-box positioned above the subject. Other soft lights and reflectors filled from the sides and front. The background effect was created by a spotlight positioned behind a sheet of rear projection material. All this to provide a mood setting for the museum-quality freshwater pearls that are the subject of the photograph.

Note
See Chapters 10 and 12 for more information on studio lighting.
There's more to photography than just getting enough light focused onto your camera's digital sensor to form a recordable image. The amount and character of the light establish the creative mood of the photograph and define the subject.
Tip
The image sensor in a typical digital camera isn't as sensitive as the human eye, so your camera needs more light for a successful photograph than the minimum light level you need to see objects in your environment. As a general rule, if the ambient light is too dim for you to read the labels on your camera's buttons comfortably, you need to resort to flash or other supplemental lighting.
The overall lightness or darkness of an image goes a long way toward creating its general mood. You can see that clearly in the fashion shots shown in figures 1-19 and 1-20. The dark tones of the low key lighting in figure 1-19 create a very different first impression from the predominantly light tones of the high key image in figure 1-20.

Note that the flesh tones in both images are similar in value. The difference is the way the flesh tones contrast with their surroundings in each image. They are the lightest areas of the low key image in figure 1-19, but the flesh tones are darker than the white background and shirt in figure 1-20.
One of the essential characteristics of light that can have a profound effect on the images you create is the relative hardness or softness of the light.

Hard light is kind of light you get from a point source, shining directly on the subject. It's a highly directional light that produces crisp, bright highlights and dark, sharp-edged shadows. Figure 1-21 shows a studio test setup lit by a single light placed about 30 degrees to the left of the camera and pointed directly at the subject. Notice the distinct shadows cast by the toy, the nose on the head, and the stem of the glass.

Direct sunlight is the best example of hard light. The sun is a huge light source, but it's so far away that it's essentially a point source. The high contrast light created by direct sunlight is good for some subjects, such as the landscapes earlier in this chapter, but the harsh shadows aren't usually very flattering for people, as you can see in figure 1-22.

Soft light is the kind of light you get from a large, diffuse light source or an indirect light that is bounced and scattered before reaching the subject. It's characterized by relatively broad highlights and open, soft-edged shadows. Figure 1-23 shows the same studio test setup from figure 1-21, but with a large translucent white diffuser placed between the light and the subject. Notice that the nose shadow is much softer, and the shadows of the toy and glass stem are almost gone.

The classic real-world example of a soft light is called open shade. That's when the subject is placed in the shade, out of the direct sunlight, but lit indirectly by a large expanse of sky. Compare figure 1-24, which I shot in open shade, to figure 1-22. Notice that the harsh shadows are gone. The left side of the face is lighter because it's exposed to more light from the sky while the foliage blocks some of the light from the right side. The transition from highlight to shadow is smooth, and the contrast between lightest and darkest areas are much less severe.

A photograph is usually a two-dimensional rendering of a three-dimensional subject. The three-dimensional forms are defined by the way the light reflects off different angles and curves of the surfaces, creating highlights, shadows, and gradations in between.
Without the subtle shading created by good lighting, you wouldn't be able to see the model's muscle definition in figure 1-25. (And the model would be disappointed if all those hours in the gym were wasted by a misplaced light.)

To create the kind of shading required to define three-dimensional forms, you need a directional light — one that shines across the subject from a definite direction, creating lighter areas on the side closest to the light and darker areas on the side away from the light. It's the differences that define the form.
If a subject is evenly illuminated, with almost no shadows, you don't get the shading that defines the form. To illustrate the point, I lit figure 1-26 with two lights placed equal distances on either side of the camera and surrounded the test head with diffusion material. The result is a kind of flat, nondirectional light that makes it difficult to see the shape of the features.

Compare that to figure 1-27. The overall illumination level is the same, but now the light is coming from one light, positioned high and to the left so it has a distinct direction going across the subject instead of straight on from the front. This creates shadows on the right side to contrast with the highlighted left side. The light source is still diffused as before, but I placed a black card on the right side of the head to block some of the reflection into the shadows, which increases the contrast. Forms that were lost before are clearly visible now.

The position of the light source relative to the subject is also a critical factor in defining three-dimensional form. You get very different results when the light comes from different directions, even when the subject is exactly the same. To illustrate this point, I shot another series of the test head in figures 1-28 through 1-30, this time without the light background diffusers surrounding it.

In figure 1-28, the light source is positioned level with the camera and almost 90 degrees to the right. Placing a reflector on the left side of the subject bounces some light back into the shadows, so they don't go completely black.
In figure 1-29, the light is at the same level, but I moved it around to the left of the camera, just far enough to create some shadow on the right side of the nose. Doing this creates a markedly different look from the side-lit head in figure 1-28. Notice that the right side of the face beyond the jaw line disappears into deep shadow because there's no reflector or supplementary light to fill in areas that aren't illuminated by the main light.

In figure 1-30, I kept the light at approximately the same angle to the left of the camera, but moved it in and up so that it pointed down at about a 60-degree angle. Notice how that change creates shadows under the eyelids, nose, and lips that weren't there before. A reflector placed under the camera lens bounces some light back into the shadows so the right side of the face no longer disappears into blackness. The last version looks more natural because it comes closest to the normal overhead lighting that we see every day.
What are the differences between point-source and hard light, and between diffuse and soft light?
The terms point-source and diffuse describe light sources, whereas the terms hard light and soft light describe the character of the light striking the subject. Because point-source lights produce hard light with stark highlights and crisp, dark shadows, the two terms are often used interchangeably. Likewise, because diffuse light sources produce soft light with lower contrast and open, soft-edged shadows, those terms are also used interchangeably by some people.
You say that great lighting makes great photographs, but what about framing and composition? Aren't they important too?
There are many factors that go into making a photograph, and the quality of the framing (selecting what to include and exclude from the image) and composition (using good design principles to achieve a pleasing arrangement of the objects in the image) are both major contributors to the overall quality of the image. However, photography is the art of recording light, so the quality of the lighting is what defines the image. You need good framing and composition too, but it doesn't matter how magificent the framing and composition are; if the lighting isn't good, you don't have a decent photograph, much less a great one.