
Few types of photography are more gratifying than creating a portrait that not only captures the subject's personality, but that also becomes a portrait the subject will treasure for years. But portraiture is challenging because, unlike inanimate objects, people tend to sit still for only so long before they become bored and ultimately irritated. Many people are often nervous about having their picture made, and, unless you, the photographer, can calm and reassure them, the subject's nervousness inevitably shows up in the portrait. It's essential that you get all the artistic and technical aspects of the photograph right, but you don't have the luxury of taking as much time as you want to fiddle with composition, focus, lighting, and exposure. When you're shooting a portrait such as the one in figure 11-1, you must shoot fast, while you have the cooperation of the subject.

This chapter covers some of the basic exposure considerations and lighting patterns for portraits and other pictures of people. It's enough to get you off to a good start with photographing people. When you're ready to explore the topic in more depth, you can refer to some of the many books that are available on exposure and lighting for portraits, and still more books on poses and other aspects of portraiture, wedding photography, and related specialties. Although the lighting and exposure may seem complex at first, if you capture the person with a great, natural expression that reveals their personality and vitality, you've already mastered the most important aspect of portraiture.
There are several goals in portraiture, all of which are important in making a successful portrait.
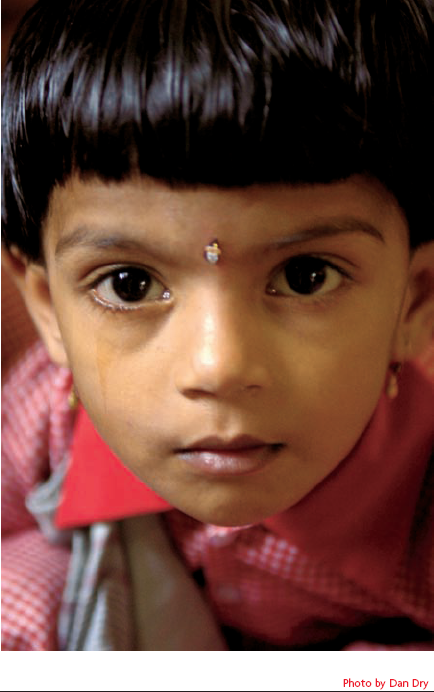
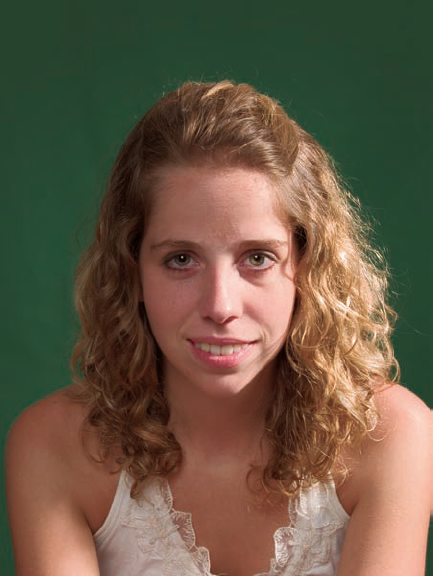
Capture the subject's essence: Whether you are making a portrait of a man, woman, or child, the primary goal is to reveal the person's personality. This goal has nothing to do with lighting or exposure; instead, it has everything to do with your ability to interact with the subject and to put them at ease. Developing a rapport by chatting with the subject before the portrait session often makes the difference between a "camera smile" and a smile where the subject is genuinely engaged with the conversation. As you chat with the subject, study the person's face looking for characteristics and features that you want to play up and downplay in the images, whether it's an exuberant grin or the intent gaze of the child's eyes in figure 11-2.
Create three-dimensional lighting: Another goal of lighting in portraits is to create a three-dimensional appearance in a two-dimensional medium. With portraits, the goal is to wrap the light around the subject, revealing texture and shadows that define and emphasize the subject's strongest features and characteristics. And, of course, the eyes must look alive and sparkling. Most portrait lighting is characterized by the following:
Soft light: Soft light minimizes lines and wrinkles, and it's generally a more flattering light. Hard light tends to be too harsh for portraits except in the rare instances where the goal is a very dramatic special effect.
Directional light: You need enough visible highlight and shadow to define the form of the subject's face. For a natural effect, that usually requires a light angled slightly down and across the face. You don't get enough shadow definition if the lighting is too low in contrast and/or a frontal light coming from the camera position.
Close light: Having the light source positioned close to the subject creates a noticeable falloff in light intensity across the face, which enhances the modeling effect of the directional light.
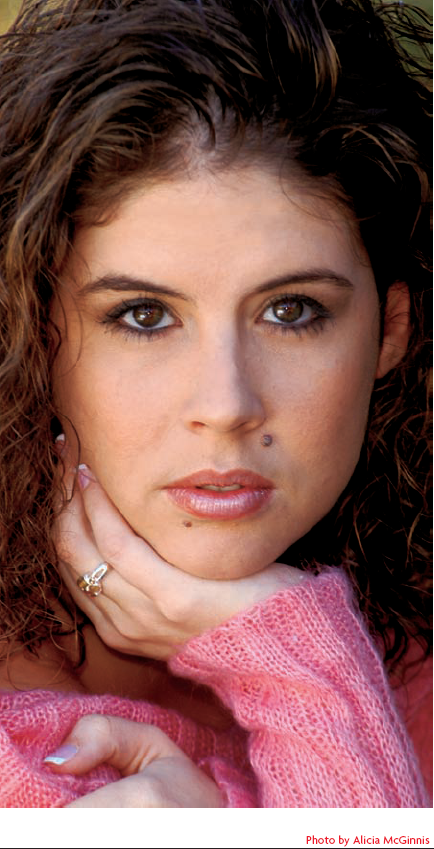
Catch light: You need at least one light source positioned so that the subject's eye catches a reflection of the light and bounces it back to the camera, as shown in figure 11-3. This catchlight creates a lively sparkle in the eye, and without it, the eyes look dull and lifeless. Normally, the main light and/or fill create the catchlight, but if they don't, you may need to add a light for this purpose.
Determine the exposure: The proof of any image, especially the case with portraits, is in the print. Getting a good print starts by getting a good exposure in the camera. Regardless of how adept you are at using image-editing programs, if you don't get the exposure right in the camera, your images won't have optimal detail throughout highlights and shadows, good tonal range throughout the image, and a high-quality final file that isn't degraded through over editing. The other advantage is that getting it right in the camera takes far less time than fixing it in Photoshop.
Note
Refer to Chapter 4 for more information on metering modes and techniques.
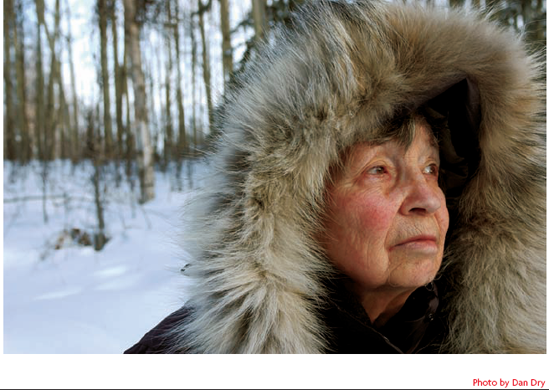
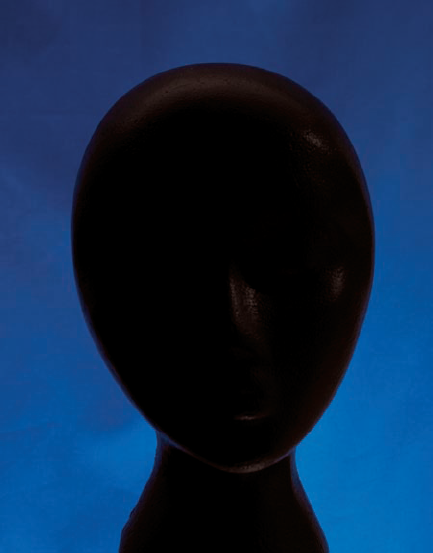
By and large, the onboard reflective light meters featured in most digital SLR cameras are accurate and dependable. However, if the background of a portrait is very dark (as in figure 11-4) or very light, the meter reading may be unduly influenced by the background. One way to avoid having the background influence the meter reading is by using an incident meter that reads the amount of light falling on the subject rather than the amount of light that is reflected by the subject. Another approach is to use your camera's spot metering mode to read the subject's flesh tone and base your exposure on that. Don't forget to adjust the indicated exposure for the difference between the subject's skin tone and the average reflectance for which the meter is calibrated.
Another exposure consideration is how you want to render the background and the subject in relation to the background. If the light in the scene is too bright to use a wide aperture to blur the background, you may want to use a diffuser, scrim, or even a neutral-density filter to get the wide aperture you need for a shallow depth of field.
Tip
Normally, bracketing your shots by shooting alternate exposures a stop or so over and under the metered exposure helps ensure that you get an optimum exposure. However, the technique doesn't always work when shooting pictures of people, because the optimum exposure and the optimum expression seldom occur in the same frame. Bracketing may be necessary in difficult lighting conditions. However, a better exposure strategy for a portrait session where you control the lighting is to start with a quick test shot, then analyze the histogram, and retest. When you get the exposure right, shoot everything at that setting (unless and until you change the lighting). That way, the only variable is the subject's expression.

Environmental portraits, such as figures 11-5 and 11-6, are a popular alternative to traditional studio portraits for high school seniors, engaged couples, family groups, and others. There are obvious advantages to photographing the subject in a location where they feel natural and at ease, instead of the alien environment of a photographic studio. And the selection of location and background for the photo can create a context for the portrait and make a statement about the subject.
Environmental portraits can be in most any environment, indoors or out, but the natural light of an outdoor location has a special appeal for the subject and the photographer alike. Natural light can be beautiful, but it can also be harsh, unflattering, and difficult to work with. The trick is to find an attractive location with light that is flattering to the subject. The following list describes some natural-light situations and how to deal with them:

Direct sun: Although the brilliant light of the direct mid-day sun is often highly desirable for scenic photography, it's the most challenging and least flattering light for portraits. Most photographers avoid shooting portraits in mid-day sun because the light produces strong, sharp-edge shadows, overly bright highlights, and the light is generally too harsh to make pleasing portraits.
Mid-day sunlight can, however, be modified to achieve acceptable portraits. One approach is to place the subject's back to the sun, and then illuminate the subject with fill flash (as shown in figure 11-7) or by bouncing sunlight from a reflector and toward the subject. With two reflectors, you can use a silver reflector as the primary light source, and then use a white reflector as a secondary source to fill shadow areas. Alternately, you can block the harsh overhead sunlight by moving the subject under an awning, onto a porch, or into the shade of some trees or a building. You can also use a large sheet of diffusion material, placed between the sun and the subject, to reduce the intensity of sunlight and soften it enough to create a more flattering light.
Sunset and sunrise: The time just before and during sunset is when the warmest and most intense color of natural light occurs creating vibrant golden color and soft contrasts that define and enhance textures and shapes. It's a great time for fashion shots such as figure 11-8. Likewise in the early dawn, the gold and red hues emerge. For fashion and commercial photographers, the prized golden hour begins just as the sun emerges over the horizon, and again in the last hour before sunset. This light is especially good for fashion work because the light is direct and at a low angle without being excessively harsh. Light during these times may require diffusion and reflectors to fill shadow areas.
Open shade: When the subject is positioned under a tree, awning, or overhang, as is the case in figure 11-9, the harsh overhead light is blocked, and the subject is illuminated by a diffuse light from the open sky that is directional enough to provide modeling on the subject's face. The light in such a shaded area is soft, and has medium to low contrast, which is usually a naturally flattering light that requires little or no supplemental fill from reflectors.
Overcast sky: The classic example of diffuse light is the light of an overcast day. A layer of clouds covers the sky and diffuses the sunlight, which creates gradual shadows with soft edges and low subject contrast. This type of even lighting can make flattering portraits, as shown in figure 11-10.
Tip
Open shade and overcast sky lighting both tend to have a cool bluish cast, even after selecting the nominally correct white balance during shooting. To restore a pleasing warmth to skin tones shot under these conditions, you can either adjust the color temperature slightly when you process the Raw files, or adjust the color in Photoshop. Choosing Image | Adjustment | Photo Filter and selecting the 85 warming filter at about 20% usually does the trick.
However, because an overcast sky is overhead lighting, it sometimes produces unattractive shadows in the eye sockets and under the nose and chin, and doesn't usually create good catchlights in the subject's eyes. Although the light is generally even, there is also typically some directionality to it that you can use to your advantage. You can use flash fill or a silver reflector to fill in shadows or to add catchlights to the subject's eyes. As figure 11-11 demonstrates, flash fill is also a good way to add some much needed pop to the dull, flat light of a heavy overcast.
Note
See Chapter 10 for some more examples of open shade and window lighting.
Window light: Not all natural light is outdoors. The natural daylight coming in through a window can be among the most beautiful light you can find. This directional light can range from relatively hard to soft depending on the size of the window and the outside light conditions. Obviously, beams of direct sunlight streaming through a window create a hard light, but a large window that opens onto a clear north sky creates a nearly ideal soft light with enough directionality to provide excellent modeling. A reflector is useful for redirecting some of the light into the shadow side of the subject's face when the subject is positioned at an angle to the window.


For example, figures 11-12 and 11-13 were both lit with just window light and a reflector. In figure 11-12, the window is just outside the frame on the right. The subject is posed against an off-white wall, so some bounce light is coming from that wall and the adjacent walls outside the frame. A large silver reflector beside the camera provides a stronger fill light and catchlights in the eyes. In figure 11-13, the subject is posed against the glass of a large window. Most of the window is open and serves as the main light, but a black card on the other side of the glass behind the subject turns that portion of the window into a mirror to create an interesting reflection. Again, a silver reflector to the left of the camera provides a fill light and creates catchlights in the eyes.

Tip
North-facing windows provide even, indirect light for portraits. By contrast, south-facing windows catch more of the direct sun rays. Windows on the shady side of a building can provide light that is comparable to a north window. Also, large windows produce a softer light with more "wrap around" quality than small windows.

In the studio, the photographer has complete control over the lighting. It doesn't matter whether the lights are studio strobes or accessory flash units, hot tungsten lights or cool fluorescents; the important thing is the control you have over positioning and modifying the light to suit your vision and goals. You can use that control to create images, such as figure 11-14.
Although you can shoot a successful portrait with one light and some reflectors, most portrait lighting schemes usually employ four lights that each serve a specific purpose, contributing to the overall effect. Here's an overview of the four lights in the typical portrait lighting scheme and what they do:

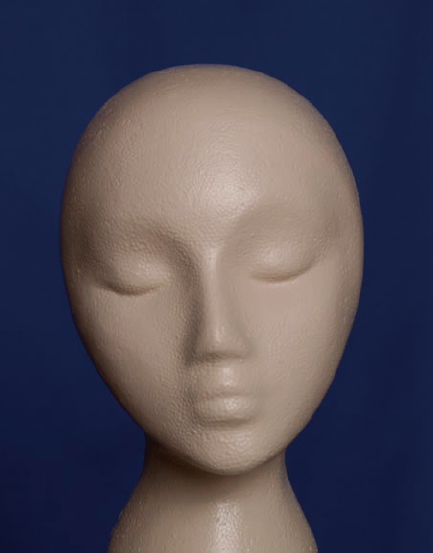
Main light: The main light defines the form by casting shadows from the subject's nose and other facial features. It's usually the brightest light, and as such, it establishes the overall exposure by lighting the all-important dominant highlights on the face. In most cases, the main light needs to be a soft light, such as an umbrella or softbox. Figure 11-15 shows my test head lit by the main light alone. In this case, the light is positioned about 45-degrees to the left of the subject's nose and about 45-degrees above the subject's eyes. As you experiment with the main light placement, study the shadows that are created on the facial plane, particularly under and to the side of the subject's nose. These shadows create the modeling on the face to give the face dimension.
Fill light: The fill light opens up the shadows cast by the main light and reduces overall contrast ratio. The fill light is typically a large, soft light that is positioned on the opposite side of the camera from the main light. It's usually a stop or so less bright than the main light. Figure 11-16 shows my test head lit by the fill light alone. In this case, the light is positioned just above and to the right of the camera. The fill light doesn't necessarily have to be a separate light — a well-placed reflector can often do the same job.
Hair light: The purpose of the hair light is to add a highlight to the hair and create a rim of light along the back of the head and shoulders to help separate the subject from the background. The hair light is usually a small spotlight or a regular flash head or light with a snoot or grid attachment to help confine its light to the desired area and control unwanted spill. To do its job, the hair light needs to be aimed down onto the back of the subject's head from a position well above and behind the subject. Mounting the hair light on a boom facilitates proper positioning. Figure 11-17 shows the test head lit with the hair light alone.
Background light: As the name implies, the background light lights the background. Sometimes enough spill from the main and fill lights provides an adequate light level on the background. If so, you don't need a separate background light. However, there's a distinct advantage to lighting the background separately. It allows you to control the brightness of the background independently of the lighting on the subject, and you can create interesting light falloff patterns across the background. The background light may be one or two lights depending on the effect desired. They are usually positioned behind the subject and pointed toward the background, so they don't spill any light onto the foreground subject. Figure 11-18 shows the test setup with only the background light on. In this case, the background light is behind and below the subject, pointed up at the muslin background material.
Putting it all together: All four lights, working together, create the effect shown in Figure 11-19.


Tip
When choosing a lens, the goal should be to avoid distortion to the subject's face. This can usually be accomplished with a short telephoto lens, for example, an 80-105mm lens (35mm format equivalent) at a distance of 4 to 6 feet from the subject render the face in a pleasing and realistic manner. A wide angle lens exaggerates perspective, making features closest to the lens look larger and further features look smaller. Conversely, a longer telephoto lens tends to flatten perspective.
Over the years, photographers have developed and refined several standard lighting schemes for portraiture. These traditional lighting schemes have proven useful to emphasize the subject's strongest features or to minimize features such as a long, narrow face. Here are some of the most commonly used lighting setups and ideas on when to use them.
Broad lighting is when the main light illuminates the side of the subject's face that is closest to the camera in a three-quarter view as shown in figure 11-20. This lighting pattern works well for subjects with thin or narrow faces because it makes the face appear wider. To create a broad lighting effect, follow these steps:

Start with the subject's head position angled away from the camera slightly in a two-thirds or three-quarters view.
Place the main light above and to one side of the subject. The exact position can vary significantly — you can combine broad lighting with one of the other lighting schemes, such as Rembrandt, loop, or split lighting (described later in this chapter). The important thing is that the main light be on the same side of the subject's nose as the camera.
Place the fill light as needed to fill in the shadows from the main light. Because the position of the main light varies, so does the position of the fill light. However, the most common position for the fill light is probably straight in front of the subject's nose.
Note
For this lighting demonstration series, I deliberately chose a hard main light and fairly high lighting ratios in order to accentuate the distinctive nose shadows of each lighting scheme.
Short lighting is the exact opposite of broad lighting — the main light illuminates the side of the subject's face that is farthest away from the camera, as shown in figure 11-21. This lighting pattern works well for thinning full faces. To create a short lighting effect, follow these steps:
Start with the subject's head position angled away from the camera slightly in a two-thirds or three-quarters view.
Place the main light above and to one side of the subject. As with broad lighting, the exact position can vary significantly in order to combine short lighting with one of the other lighting schemes, such as Rembrandt, loop, or split lighting (described later). The main light must be positioned on the opposite side of the subject's nose from the camera. Because the subject's face is angled away from the camera, this puts the main light well off to one side — sometimes more than 90 degrees from the camera position.
Place the fill light as needed to fill in the shadows from the main light. Because the position of the main light varies, so does the position of the fill light. However, the most common position for the fill light is next to the camera on the opposite side from the main light.

Split lighting lights only one side of the face, leaving the opposite side in shadow. This lighting scheme, shown in figure 11-22, is often combined with high lighting ratios to produce a very dramatic effect. However, it can also be a very subtle effect if you keep the light ratios low with a generous amount of fill light. Like short lighting, split lighting tends to elongate the face, so it works well for subjects with full faces. However, the strong cross lighting exaggerates laugh lines and other wrinkles, so it tends to be more useful for young subjects who haven't yet developed deep wrinkles or for men who consider their wrinkles to be character lines. To create the split lighting effect, follow these steps:
Start with the subject's head in any position from looking straight into the lens to angled away from the camera in a two-thirds or three-quarters view.
Place the main light almost level with the subject's eyes and about 60 degrees off to one side of the subject. Move the light further off to the side (more toward 90 degrees from the subject's nose axis) until the highlight on the subject's opposite cheek just disappears. The highlight/shadow demarcation line should run straight down the nose and split the chin and forehead fairly evenly.
Place the fill light about 90 degrees from the main light. Doing this usually puts the fill light close to the camera, just to the opposite side of the camera from the main light. For a dramatic effect, use a very weak fill light or reflector. For a more subtle effect, use a stronger fill to create a 2:1 or 3:1 ratio with the main light.
Rembrandt lighting, shown in figure 11-23, takes its name from the famous Dutch painter, Rembrandt van Rijn. It's characterized by the distinctive inverted triangle-shaped highlight on the cheek on the shadowed side of the face, which is reminiscent of the lighting seen in many Rembrandt portrait paintings. It's also called 45 degree lighting because of the position of the main light. Rembrandt lighting is often combined with short lighting to flatter oval or round faces by making the face appear narrower. To create Rembrandt lighting, follow these steps:
The subject's head can be in most any position from looking straight into the lens to angled away from the camera in a two-thirds or three-quarters view.
Place the main light approximately 45 degrees above the subject's eye level and 45 degrees to one side of the nose axis. Adjust the angle and height of the light as needed to create the distinctive inverted triangle highlight on the opposite cheek bordered by the eye socket, nose shadow, and the outer edge of the cheek itself. The nose shadow needs to extend far enough off to the side to merge with the cheek shadow in order to create the bottom point to the triangular cheek highlight. The shadow from the bridge of the nose should connect with the eye socket, but it should not obscure the eye.
Place the fill light just off the nose axis on the opposite side from the main light. This usually puts the fill light close to the camera, just to the opposite side of the camera from the main light, but if the subject's head is angled strongly away from the camera, the fill light may be on the same side of the camera as the main light.

This lighting setup creates a "loop" shadow under the nose, as shown in figure 11-24. This lighting style brings out the brilliance of the subject's eyes. To create loop lighting, follow these steps:

The subject's head can be in most any position from looking straight into the lens to angled away from the camera in a two-thirds or three-quarters view.
Start with the main light approximately 45 degrees above the subject's eye level and 45 degrees to one side of the nose axis as in Rembrandt lighting. Bring the light in toward the nose axis until the nose shadow forms a loop-shape just below and to one side of the nose. The nose shadow should not extend out far enough to connect with the cheek shadow or down far enough to reach the edge of the lip, nor should it disappear into the side of the nose. That leaves you considerable leeway to adapt this basic lighting scheme to work with a variety of different facial structures.
Place the fill light at about eye level on the opposite side of the nose axis from the main light, separated about 60 to 90 degrees from the main light.
Butterfly lighting, shown in figure 11-25, gets its name from the butterfly-shaped shadow under the subject's nose. It's also known as Paramount lighting because it was used extensively by Paramount Studios in the heyday of their starlet promotions in the 1930s. This classic glamour lighting setup enhances high cheekbones and a beautiful face. The main light is placed in a high position but not so high that it creates deep shadows under the nose and eye sockets. To create butterfly lighting, follow these steps:
The subject's head position needs to be angled to one side of the camera and not looking down. If the subject looks straight into the lens, you'll have trouble positioning the lights and camera along the same axis. A downward tilt of the head can make it very difficult to position the main light so that the nose shadow doesn't extend over the lips.
Start with the main light approximately 45 degrees above the subject's eye level and straight ahead of the subject's nose. To help maintain the proper head and light positions, ask the subject to point her nose at the light stand for the main light. Adjust the height of the main light so that the eye sockets are well lit and the nose shadow creates the butterfly wing shape, without extending down to the edge of the lip.
Place the fill light at about eye level, just below and beside the main light. The original plan for this lighting scheme called for the main and fill lights to be stacked with the main directly above the fill, and both of them on the subject's nose axis. However, I've found that it works just as well for the fill light to be positioned between the main light and the camera, and it's a little easier to position the lights that way.

The traditional portrait lighting schemes can be invaluable as a reference and starting point for your own experimentation and exploration, but you shouldn't feel constrained by them. You don't have to stick with the traditional lighting schemes or the traditional studio settings — you can use your imagination and try a wide range of different effects. Don't be afraid to move the lights or the subject. The "right" light is achieved when the angle of the person's face and the angle of the light create a three-dimensional shape of the subject.
For example, consider figure 11-26, for which the photographer transported his studio lights to a court room to create a virtual studio for this portrait of a lawyer. The main lighting on the face is very close to the standard loop lighting scheme. Instead of the usual hair light across the top of the head and shoulders, this portrait features a light along the left side of the subject that ties into what appears to be window light on the door and flag in the background.
Figure 11-27 is another example of an imaginative use of lighting for an executive portrait. In this case, the subject is outdoors, but posed in such deep shade that the shadowed surroundings, such as the horse sculptures on the right are just silhouettes against the sunlit background. The subject would be a silhouette too if it weren't for a strong light coming in from the left — probably a powerful studio strobe. The strong cross light is just a little shy of being split lighting.
Figure 11-28 is another example of how the fundamental principles of lighting and exposure can serve you well whether you're shooting individual portraits or for editorial or stock assignments. This image was taken for stock to show merging of cultures. The exposure was ISO 100, f/19, 1/250 sec. using a Hasselblad H1 camera with a Kodak Pro 645 Digital back and an 80mm lens.


Not all pictures of people are individual portraits, but many of the same fundamentals of lighting and exposure apply. Here is a compendium of tips for some of the other people pictures besides portraiture:
Fashion photography: Fashion has a lot in common with portraiture — especially the environmental portraiture that's so popular today. Many of the settings and lighting techniques are the same. The big difference is that the emphasis of photos such as figures 11-29 and 11-30 is on the image the model is projecting with the clothes, hair, makeup, pose, setting, and attitude instead of the real person inside those clothes. The purpose of the picture is to sell a product, not create a cherished memory for the subject or their family.
Group portraits: Small groups, such as the family in figure 11-31, are really portraits with multiple subjects. The lighting is same as for an individual portrait, but you can't be as fussy about the exact positions of each person's head in relation to the lights — you can't get the perfect nose shadow for all members of the group simultaneously. One trick that helps is to use softer light overall for more leeway in positioning.
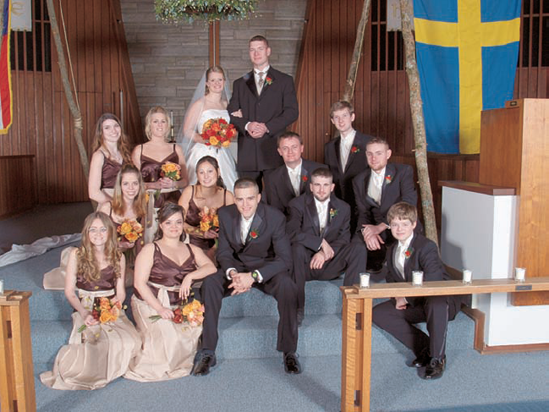
Larger groups, such as the wedding party in figure 11-32, are more of a challenge. It's best to shoot large groups outdoors if possible, because the sun and sky create a large, uniform light that is difficult to replicate indoors. If you're forced to shoot inside, move your lights as far back as possible to minimize the light falloff that causes those members of the group that are closer to the light to be in brighter light than those who are farther away. Use at least two lights, one as a main and the other a fill. A single light is sure to cause bad shadows on someone.
When positioning couples or groups, look for the interplay of their combined forms. With groups, begin by placing one person, and then arrange others around that person for a pleasing composition of shapes and sizes. To ensure sufficient depth of field, shoot at a narrow aperture so that all faces are equally sharp. If the light is low and requires a wide aperture, position the subjects on the same plane perpendicular to the lens axis.
Weddings and special occasions: Weddings and other special occasions are especially challenging to photograph. They include everything from romantic portraits, to large groups, to candid shots. Time limitations generally preclude elaborate lighting setups, so everything must be done quickly and smoothly. And it's a once-in-a-lifetime event, so every shot has to count — there will be no opportunity for reshoots.


If the weather cooperates, shoot outside as much as possible to take advantage of the natural light for shots such as figure 11-33. Natural light is faster, easier, and more dependable than any photographic lights you can carry to the location.
When you must move inside, use an accessory flash unit that is capable of bounce lighting in order to avoid the harshness of direct flash wherever possible. Consider using a bounce diffuser accessory to further soften the light from the on-camera flash. Figure 11-34 was shot with bounce flash with an additional diffuser accessory on the flash.


The lighting, exposure, and composition for my portraits look good, but there still seems to be something missing. What's wrong?
Lighting, exposure, and composition are all important factors in making good photographs, and getting those factors right is your primary concern when taking a picture of an inanimate object. But a portrait is a photograph of a living, breathing human being, and the emotional content of the picture, as evidenced by the subject's facial expression and body language, is at least as important as the technical considerations.
Portrait photographers sometimes use the acronym ESP as a reminder that Expression Sells Pictures. It's apropos because it often seems like you need some of the other kind of ESP (extra-sensory perception) to get portrait subjects to relax and give you the kind of expression you're both looking for. You need to make a connection with your portrait subject on a personal level in order to bring out that expression.
Some photographers have a natural talent for quickly developing a rapport with a subject, others just don't. If you don't instinctively "connect" to people, try assuming the role of a director coaching an actor. Ask your subject to imagine a situation, such as a pleasant experience or meeting a dear friend, and then capture the resulting expression that appears on the subject's face.
If I'm mixing ambient light with fill flash, how do I determine the exposure for the flash?
Start by determining the proper exposure for the ambient light. If you're in a situation that calls for flash fill, there's probably a stark contrast between the highlights and some dark shadows, so you'll probably need to use your camera's spot metering mode to read the highlights and apply exposure compensation to adjust for any differences in reflectivity between the highlight and the middle gray for which the meter is calibrated. Next, decide how much difference you want between those highlights and the shadows that will be filled in by the flash. Set the exposure compensation for the flash to achieve the desired difference. Generally, 1 to 2 stops of negative flash-exposure compensation is usually a good starting point.
What should be the point of sharpest focus in a portrait?
The eyes, and in particular, the eye closest to the camera should be the sharpest point in the image. In a group portrait, there will usually be a central person around whom others are arranged, and the central person's eyes should be in sharpest focus.
How can I minimize wrinkles in an older subject?
Two factors tend to accentuate wrinkles: hard light and light that rakes across the wrinkled surface at an angle. Therefore, to minimize facial wrinkles, you need to use softer lights and/or reduce the angle at which the light strikes the face by moving your main light to a more frontal light placement. To create a clean jaw and neckline, ask the subject to stand with one foot on a stool, and then to turn and face the camera while leaning slightly toward you. This action helps stretch the neck to minimize the appearance of loose skin and jowls in mature subjects.