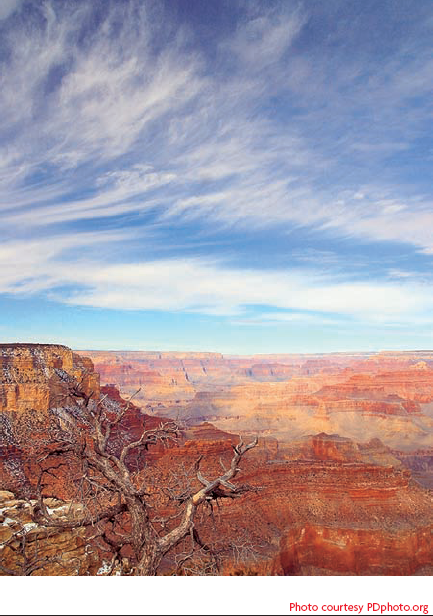
Since the early days of photography, photographers have been drawn to the abundant subject matter available in nature. It remains as true today as it was when Ansel Adams was conducting classes in Yosemite Valley. Like the film photographers before them, digital photographers are often inspired to create images that record and interpret the natural beauty they find around them, whether it's a scenic landscape in a spectacular location such as in figure 13-1, a colorful sunset at a favorite vacation spot, or a flower in a backyard garden.
Photographing nature means shooting with available light. Obviously, it's impossible for a photographer to light a sweeping landscape, and it's seldom practical to light other nature subjects. Fortunately, it's also unnecessary because nature subjects are located outdoors where the ultimate light source, the sun, provides plenty of illumination — at least during daylight hours. As a result, nature photographers seldom need to supply any lighting. At most, you might use a small reflector or portable flash as a supplemental fill for some smaller close-up subjects.
Okay, I realize that I'm generalizing about nature photography being available light only. Granted, there are situations in which photographers carry lighting equipment out into the field, usually to photograph nocturnal animals. Also, photographers sometimes bring small specimens back to the studio and photograph them under controlled conditions. But both of these circumstances are relatively rare.
However, just because you can't create the lighting for a nature photograph from scratch the way you can light a product or portrait in the studio, doesn't mean that the quality, direction, and color of the light is any less critical to your photograph. Photography is still all about recording the light reflected from your subject. The difference is that, in nature photography, the strategy is to observe and select the light instead of attempting to actively manipulate the light.

Scenic landscapes like figure 13-2 can make breathtakingly beautiful photographs when the light is right. The same scene can be dull and uninteresting in different light.
You can't reach out and move the sun and clouds to change the angle and character of the light, so landscape lighting is all about selecting the season and time of day when the sun is in the best position to light the scene naturally. You may get lucky and arrive upon a scene just as that special lighting situation occurs. Sometimes, you can see the light beginning to take shape and only need to wait a while for it to develop.
Other times, you may find a scene that you want to photograph, but the light is just not right, and you have no choice but to return at another time or day when the light is better. For example, if you're looking to the west, at an east-facing side of a mountain, the morning sun will light the trees on that mountainside in their full color, but by mid-afternoon, the eastern side of the mountain is in shadow, bathed in a softer light that's shifted toward the blue. Later in the evening, the same mountainside will be silhouetted against the setting sun.
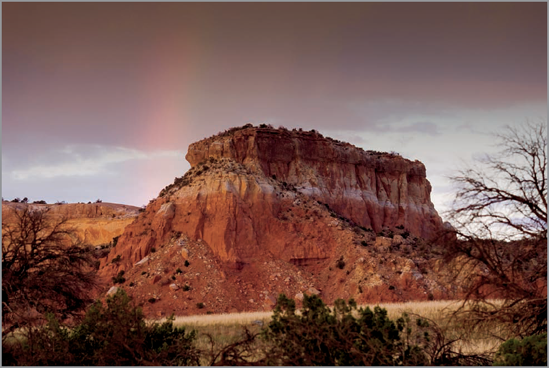
Generally, you want to shoot the sunlit side of a hill or mountain as shown in figure 13-3. You want the sun to be behind the camera, shining onto the scene you want to photograph. You can also get some nice effects with the sun shining across the scene from one side, but you rarely want to shoot into the sun unless you are trying to capture a sunrise or sunset. Of course, there are always exceptions to these general rules depending on the effect you're going for.


Early morning and late afternoon sun produce more dramatic effects with longer shadows and warmer light as seen in figures 13-4 and 13-5. Mid-day sun minimizes shadows for more uniform lighting. In open terrain, mid-day light tends to be a little less interesting, but it may be the only time of day when the sun reaches down into a deep valley or gorge as in figure 13-6, or into a clearing or stream in a deep forest.
Tip
A good topographic map and GPS receiver can be handy tools to help analyze the lay of the land and plan a return trip to a promising landscape when the light might be better. The GPS receiver makes it easy to pinpoint your exact position and angle of view, and a detailed map of the terrain lets you identify the features you want to photograph and then make some good guesses as to what portions will be in sunlight or shade at different times of the day. If you don't have a GPS, a small pocket compass is enough to get yourself oriented to the basic sun positions, even on an overcast day.


A classic scenic landscape often comes very close to being the theoretical "average" photographic subject for which light meters and automatic exposure systems were designed. As a result, you can usually get good results from your camera's automatic exposure system in most of the light metering modes. As you select the most appropriate metering mode, keep the following points in mind:
If your scene includes lots of high contrast areas, use average metering mode to keep any of the contrast extremes from biasing the exposure too much. For most scenic photos, average or multi-segment metering mode should work equally well.
If your scene includes a large area of clear sky like figure 13-7 and you want to concentrate on the terrain, point the camera down slightly to reduce the amount of sky in the frame while you meter the scene and lock the exposure. Then reframe the shot and take the picture.
If you're going for a dramatic effect, such as the last rays of the setting sun on a mountain top as shown in figure 13-8, use your camera's spot metering mode to isolate the key interest area and expose for that.
Scenery doesn't usually move, so you can use aperture-priority exposure mode and select the aperture based on the depth of field you need. Many digital cameras also include a Scenery program mode as well, but I prefer and recommend aperture-priority for the additional control it gives the photographer.
If you frame a distant scene with some much closer rocks or trees as in figure 13-9, you may need to use a very small aperture for adequate depth of field. That, in turn, means using a slow shutter speed to get the equivalent exposure. Set your lens to its hyperfocal distance to maximize depth of field, and use a tripod to keep everything sharp despite the slow shutter speed.


Note
For more information on depth of field and hyperfocal distance see Chapter 7.
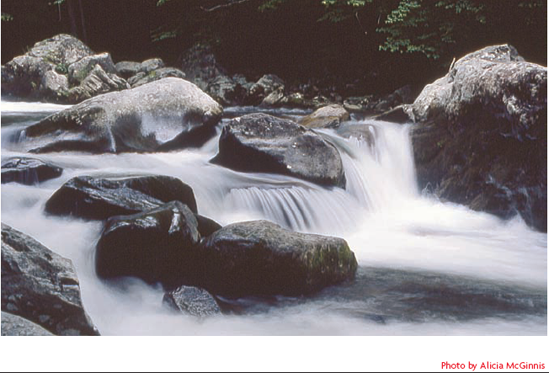
Waterfalls are popular photographic subjects, as are rivers, streams, and waves at the seashore. Moving water presents a particular challenge for nature photographers.
Normally, you want to keep the central subject of a photo sharp. Shooting moving water such as in figure 13-10 means using a fast enough shutter speed to stop the motion of the water so that glimmering highlights are crisply frozen in position in the final image. This approach produces an accurate rendition of the scene, but it can be a little static. Allowing the glittering highlights on the water to create a motion blur in the image, as in figure 13-11, often evokes the feeling of a softly flowing stream better than the sharp image.


You can easily achieve this effect by simply using a slower shutter speed. How slow depends on the speed of the water. Here's the general procedure for shooting the moving water effect:
Start by mounting your camera on a sturdy tripod to eliminate camera movement so that everything but the water stays sharp. Frame and focus your shot.
Select shutter-priority (or manual) exposure mode so you can directly control the shutter speed selection.
Set the initial shutter speed selection according to the speed of the water and shoot a test shot.
For a waterfall or fast-moving stream, start with a shutter speed of about 1/8 second.
For a slow-moving stream or lazy waves lapping at the shore, you will need a slower shutter speed, so start at about 1/2 second.
Evaluate your results and then adjust the shutter speed and reshoot as needed to get the desired effect. To get more detail in the water, use a faster shutter speed. To increase the motion blur effect, use a slower shutter speed. As you adjust the shutter speed to find the best setting, do it in full stop increments. Smaller changes in shutter speed don't usually produce a significantly different effect.
Wildlife, such as in figure 13-12, are particularly challenging to photograph. They are, by definition, wild animals that are unpredictable and usually wary of humans. Sometimes you can observe and photograph insects and some small animals up close, but it's very difficult (and potentially dangerous) to get close to most wildlife outside of a zoo.

So, photographing most wildlife is a matter of stalking a quarry that is elusive, uncooperative, and located a long distance from the photographer's vantage point. Doing that successfully takes knowledge of the animal's habits, plus skill, patience, and a long telephoto lens.
You're on your own when it comes to developing the knowledge and patience parts. The best I can do is offer general tips on getting good exposures with telephoto lenses:
Long telephoto lenses such as the one used for figure 13-13 magnify camera shake, so fast shutter speeds are required if you expect to get sharp images with a hand-held camera. As a rule of thumb, use a shutter speed that is faster than the reciprocal of the lens focal length. So, with a 400mm telephoto lens, you need to use 1/400 shutter speed or faster.
A lens with an image stabilization feature can help reduce, but not eliminate, the camera shake problem. Image stabilization typically enables you to get sharp results from hand-held shots at shutter speeds that are about a stop slower than you can with a regular lens. (Unfortunately, image stabilized lenses are quite expensive.)
In low light situations (most anything less than full mid-day sun), boost the sensitivity rating (ISO setting) so you can use a faster shutter speed at the same light level.
If you use automatic exposure, use shutter priority mode so that you can select a shutter speed that adequately controls camera shake with the telephoto lens. Alternatively, you can use aperture priority mode and set the aperture to the maximum available on the lens, thus ensuring that you will be shooting at the fastest possible shutter speed. You'll usually want to avoid the camera's programmed exposure modes because they don't give you enough control over shutter speed selection.
Watch out for backlighting and other situations that might fool your camera's meter and auto-exposure system, such as the sky being reflected off the water in figure 13-14. As you pan to follow a moving animal, lighting can change very quickly. Be ready to switch to spot metering mode and/or override the auto-exposure with exposure compensation or manual exposure settings.
Use a tripod or other camera support to stabilize the camera and minimize camera shake. Using a monopod or sandbag can enable you to shoot at shutter speeds that are a stop or so slower than you can hold freehand. A good solid tripod can add even more to the range of shutter speeds that will produce sharp results.
Put your camera in silent mode. If your camera gives you the option to disable its beeps, clicks, and other confirmation sounds, be sure to turn them off. Animals usually have very keen hearing and are easily startled by unusual sounds, and you don't really need to hear your digital camera imitating the sound of a film camera's film advance motor as you fire off each frame.


Domestic animals, such as the dog in figure 13-15, are much less wary of humans, which makes getting close enough for a good shot somewhat easier. As a result, you can sometimes photograph them up close with normal lenses, although a short telephoto or zoom helps maintain a reasonable working distance, which allows you to photograph the animal without interfering with its activity. (Besides, you may be more comfortable with a fence between you and a skittish thoroughbred horse or a prize bull.)

Tip
Photographing animals using your camera's built-in flash can produce a red-eye effect, just as does in humans. The eyes are often glow green instead of red, but the basic effect is the same. The camera's red-eye reduction feature is totally useless with animals because the pre-flash that's supposed to reduce pupil size interrupts what they were doing and scares them away. It's best to avoid using flash when photographing animals. If you must use flash, use an external flash unit instead of the camera's built-in flash, and bounce the light from the flash off the ceiling to further reduce the chances of getting the glowing eye effect in your photograph. If all else fails, fix it in Photoshop.
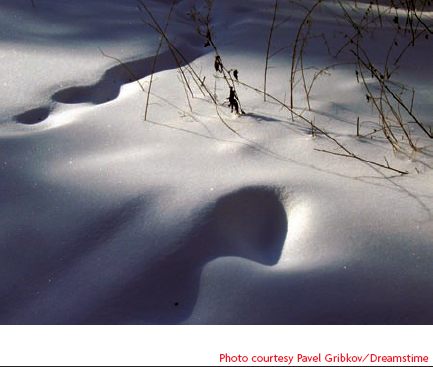
Beach scenes, such as figure 13-16, and snow scenes can make great photographs when they are properly exposed. But getting a good exposure with most cameras is a challenge because such scenes tend to fool light meters.
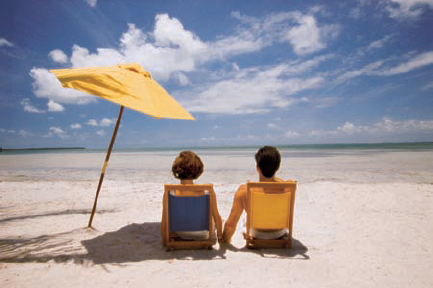
The camera's built-in meter and exposure system is set up to calculate the correct exposure for an average scene, adjusting the exposure as needed to adapt to differing light levels. The problem is that a scene that contains large expanses of highly reflective water, white sand, or whiter snow reflects far more light than the average scene.
There's no way for the camera to tell the difference between a highly reflective scene (such as a beach or snowscape) and a normal scene in brighter light. The camera detects more light entering the lens and reacts as though the light is brighter, instead of light colored objects in the scene reflecting more than the normal amount of light. The result is an underexposed image, such as figure 13-17, with sand or snow that is gray instead of white. It can sometimes be an interesting effect, but it's not an accurate rendering of the scene.
The only way to address the problem of getting a good exposure of a scene that contains a lot of unusually light tones and reflective surfaces is to use some sort of manual exposure compensation. You can use the camera's exposure compensation (EV bias) feature to tell the auto-exposure system to give the image more exposure, or you can meter off of a gray card instead of the bright scene and lock in that exposure. Of course, you can also switch to manual exposure mode and set the aperture and shutter speed yourself. Measuring the light falling on the subject with an incident light meter is probably the best way to determine the proper exposure for a scene with unusual reflectance, but if you don't have an incident meter handy, you can use the following guidelines to adjust your exposures:
Exposure compensation for a typical beach scene (see figure 13-16) is about plus one stop.
Exposure compensation for a typical snow scene (see figure 13-18) is about plus two stops.
Test your exposure and read the histogram. Because the subject is composed of mostly light tones, the hump in the histogram should be to the right of center, but the peak shouldn't be jammed against the right side of the histogram. If your camera display shows highlight clipping, you can expect to see scattered clipped highlights, but there shouldn't be large areas that are blown out.

Remember that the best shots aren't always the most accurate rendition of the original scene. Try adjusting the exposure for effect. You can deliberately underexpose the scene even more than normal by using spot metering mode and basing your exposure on one of the lighter tones in the scene. Doing so produces an image that's much darker than normal overall, but with some richly detailed highlights. If you use the same technique in reverse (spot meter on a darker tone), you create a forced high-key effect, such as figure 13-19, with all the lighter tones washed out to white and unusually open and luminous shadows.
Nature photographers seem to like photographing sky and cloud formations, either by themselves or in combination with scenic landscapes. And no wonder — sunrise, sunsets, big fluffy clouds at mid-day, and storm clouds all make for interesting pictures, such as figure 13-20.
Getting the proper exposure for a dramatic skyscape can be tricky. Sometimes your camera's meter and auto-exposure system produces an excellent exposure on its own. Other times, you can override the auto-exposure settings to get the effect you want. The following tips may help:
For a deep blue sky with a few cirrus (wispy) or cumulus (fluffy) clouds, such as figure 13-21, you can probably use the indicated automatic exposure.
For a light blue sky, or one with more coverage of white clouds, meter the sky and then apply plus one stop exposure compensation.
For a sunrise or sunset where you want to emphasize rich color, meter the sky and then apply minus one stop exposure compensation. Bracket around that exposure. Check your results and make additional adjustments if needed.
Storm clouds such as those in figure 13-22 often average out to be reasonably close to middle gray, so you can use the metered exposure without adjustment. If the clouds are especially dark, meter the sky and then apply minus one stop exposure compensation to keep the auto-exposure system from lightening up the clouds.
If the sun is in the frame, as it is in figure 13-23, don't use the average or multi-segment metering modes. Switch to spot metering mode and select a middle tone, such as the gray underside of a cloud, on which to base your exposure. You can often find a good middle gray tone in a sunrise or sunset. If the darkest clouds are lighter than middle gray, meter the darkest area, and apply plus one stop exposure compensation.


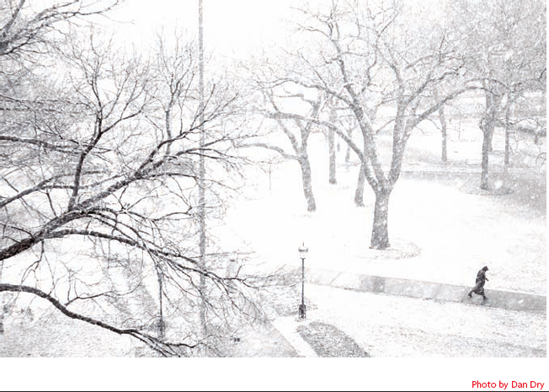
There's a natural inclination to think of rain, snow, and foggy conditions as a bad time to take pictures, but the unusual lighting effects can be beautiful as you can see in figure 13-24. As you can see in figure 13-25, the soft diffused light is very flattering to many subjects and the brightness range of the scene is usually well within the camera's dynamic range, which means that you don't need to sacrifice detail in highlights or shadows because of excessive brightness range, as often happens on a sunny day.
The soft light also makes metering and exposure easy. Light is usually distributed fairly evenly across the frame, so average and multi-segment metering modes both work equally well and seldom need any exposure compensation unless the subject matter is unusually dark or light. It's a good thing that metering is easy and reliable, because light levels are usually relatively low and highly variable, which makes manual exposure guidelines almost useless for shots such as Figure 13-25.
Tip
When shooting in inclement weather, you must take care to protect your camera gear from getting wet. One good technique is to pull a plastic garbage bag down over your camera mounted on its tripod. Make small slits in opposite sides of the bag for the lens hood and eyepiece, and tape them into place. You can reach up into the bag from below to operate the camera controls while keeping the camera completely covered. It helps to wear a broad brimmed hat to further shield the camera while you frame and focus.


Nature photography runs the gamut from the broad expanses of scenic landscapes to the close-up views of flowers and other small natural objects. Besides the difference in scale, close-ups such as figure 13-26 differ from landscapes and wildlife photographs in that flowers and other close-ups are one kind of nature photo where you can realistically expect to be able to exercise some control over the light.
Like other nature photography subjects, flowers, insects, and other small subjects are usually located outdoors where there is plenty of natural light available. Often, all you need to do is look around to find a nice specimen in good light. One very effective technique is to find a flower head in full sunlight and a background that's in the shade. Figure 13-27 shows an example of this natural spotlight effect that causes the flower to stand out in sharp contrast to the dark background. If the situation doesn't occur naturally, you can place a black card behind the subject to create a similar effect.


When shooting flowers and other small subjects, keep these points in mind:
Shooting small subjects positioned close to the camera means working with shallow focus, and that means that you need good depth of field control, whether your goal is to stretch the depth of field enough to cover a couple of flower blooms, or whether you want shallow depth of field to throw a background out of focus.
Use aperture-priority auto-exposure so you can control depth of field with the aperture selection.
Multi-segment metering mode will work well most of the time, but you may need to switch to spot metering to isolate the main subject if the background is especially dark (see figure 13-27) or light (see figure 13-28).
The big difference between photographing a landscape and a flower such as figure 13-29 is that when the light isn't right on the landscape, all you can do is wait for it to change, but if the light isn't right on the flower, you may be able to change it. For example, if a flower is in full sun, but you want a softer light, you could use a diffuser to soften the harsh sunlight, or simply have a friend stand so that they cast a shadow on the flower, thus creating open shade lighting for the flower.


How can I get a good exposure of both the sky and the ground in a landscape?
The sky is usually much lighter and brighter than the ground, which means that when the ground is properly exposed, the sky is overexposed and washed out. One way to work around the problem is to set your camera up on a tripod and shoot a series of frames at different exposures, each properly exposed for a portion of the image, and then combine the images in Photoshop or another image editor. Better yet, shoot a multistep bracket and merge them into a 32-bit high dynamic range image. Shoot the exposure bracket in 2-EV increments by changing the shutter speed, not aperture.
How can I avoid awkward shadows and overexposure in flash close-ups?
When it comes to using flash to light flowers and other small subjects that may be very close to the camera, some extra care (and equipment) may be required. At normal working distances (more than about four feet), the camera's built-in flash or an external shoe-mount flash will usually work normally. However, as the distance between the camera and subject decreases, the problems tend to increase. Even at minimum power, the flash may be too bright, causing the subject to be overexposed. Also, the lens and/or lens hood may create a shadow on the subject.
To address these problems, special flash units are available that are designed just for close-up photography. To eliminate the possibility of a lens shadow, the flash unit typically mounts to the front of the lens like a filter or lens hood. There may be a pair of flash heads sitting on either side of the lens or the flash head may be a ring that encircles the lens. Positioning the light as close as possible to the lens axis nearly eliminates any visible shadow from the flash by placing the shadow directly behind the subject. To control the overexposure problem, the close-up flash units are usually relatively low power and connected to sensitive exposure control module mounted on the camera's hot shoe that links to the dedicated TTL flash exposure controls. Using these specialized close-up flash units enables photographers to shoot close-ups in low light that wouldn't be practical otherwise.