


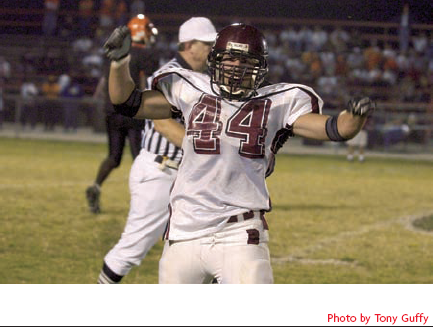
Photographing action presents the photographer with challenges unlike those found in any other photographic specialty. Whether the subject is a major sports event, such as the Kentucky Derby (see figure 12-1), or the more subdued action of a family outing staged for an advertising illustration (see figure 12-2), the photographer is confronted with the need to distill the essence of a dynamic situation into a single image.
Meeting that artistic challenge requires the ability to anticipate the action, the vision to recognize the defining image, the timing to capture just the right moment, and the technical skill to record it. And a healthy dose of good luck, too.
I can't pass along an Irish good luck charm on these pages, but perhaps the discussions of exposure considerations for shooting action can help you successfully capture the moment when your own intuition or good fortune put you in the right place at the right time for that great action image.

Shooting stationary photographic subjects is easier than shooting things that move. When the subject is static, it doesn't create many exposure constraints. For static subjects, you can use any combination of shutter speed, aperture, and ISO that delivers the correct amount of light to the image sensor in your camera. You can use a low ISO setting for minimal noise, and then select your aperture depending on the depth of field you need. The shutter speed can vary significantly without affecting the shot.
For static subjects, you can use a small aperture and a slow shutter speed, or a larger aperture and faster shutter speed. If the subject isn't moving during the exposure, then the shutter speed doesn't make any difference as long as the camera is relatively stable. The only constraint on shutter speed selection is that it needs to be fast enough to control the camera shake of a hand-held shot — and you can easily eliminate that concern by using a tripod.
Moving subjects, on the other hand, present the photographer with a completely different set of issues. Any movement of the subject while the shutter is open creates a blur in the finished image, so selecting a shutter speed that controls that blur is a critical factor in the exposure. All of a sudden, shutter speed becomes the top priority as you seek the ideal balance between shutter speed, aperture, and ISO. So naturally, this is the time to use your camera's shutter-priority exposure mode, which allows you to set the shutter speed while the auto-exposure system determines the aperture.

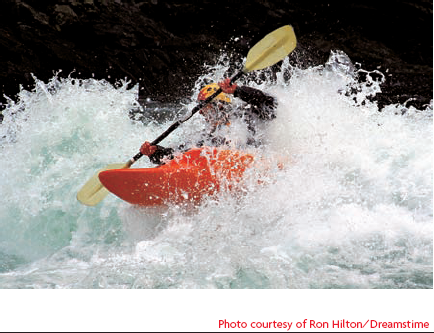
When you're shooting action, the movement of the subject isn't the only movement you need to consider. In many cases, you must also contend with significant amounts of extra camera movement as you pan, tilt, zoom, and generally move around to follow the action in the viewfinder. Then, when the decisive moment (such as the falling jockey in figure 12-3) arrives, you punch the shutter release in a frenzied attempt to grab the shot. All this jostling around exaggerates the relative motion between the camera and the subject and requires even higher shutter speeds if your goal is to generate a sharp image.
For most action shots, the photographer's vantage point is some distance from where the action takes place. (Believe me, you don't want to be in the middle of the track as the thundering hooves of a dozen horses gallop toward you. It's scary enough to be on the other side of the rail.) That means that telephoto lenses (in this case, 450mm) are necessary to get frame-filling shots such as figure 12-4. Telephoto lenses magnify camera shake as they magnify the image, which is yet another reason why most action shots require high shutter speeds to control all the camera and subject movement.

Because of their location, most action shots must be done with available light. After all, you can't usually invade a sports field such as the one shown in figure 12-5 with a bunch of photographic lights. You must rely on the existing light, whether it's daylight or the artificial lights of a stadium, arena, or other venue.
Furthermore, the subject is usually too far away for an on-camera flash to be effective. (The typical built-in flash has a maximum range of about 15 feet, and you're rarely that close to any action taking place outside of the home.) Even if you're close enough to use a flash, it's often not advisable to do so because a flash that is close enough and bright enough to produce a good exposure would be distracting (and potentially dangerous) for the participants in most sports. You can sometimes get away with using flash if you're shooting casual activities of kids and pets, but even then, you should be mindful of the disruption the blinding light of the flash can cause.
We've already established that most action photos require high shutter speeds to control both subject and camera motions. Shooting at high shutter speeds is no problem if you have lots of light. According to the sunny-16 rule, the base exposure for a sunlit subject with the default ISO of 100 is f−16 at 1/100. Bumping the shutter speed up to 1/500 puts the aperture at f−7, which is near the middle of the aperture range of a typical lens. At 1/1000, the aperture is still f−5, and at 1/2000, the aperture is f−3.5. The 1/2000 at f−2.8 exposure that the photographer used for figure 12-6 shows that real-world exposures in daylight conditions may vary slightly, but usually stay remarkably close to the sunny-16 rule.
All these aperture/shutter speed combinations are very usable — but that's in full sun on a sunny day.


You won't have as much light to work with on a cloudy day, at an indoor arena, under stadium lights (see figure 12-7), or in many other situations. To maintain the fast shutter speeds you need to control subject and camera movement, you may need to open up two to four stops or more, which is beyond the aperture range of most lenses (especially telephoto zooms that tend to top out at around f−4). Fast lenses with larger maximum apertures are available, but they're expensive. So, the only other solution is to boost the ISO setting as much as necessary to allow you to shoot at a reasonable aperture/shutter speed combination.
Of course, cranking up the sensitivity of your camera's image sensor by increasing the ISO setting also increases the amount of digital noise in your finished images. Digital noise is a problem in product shots, where crisp detail and smooth tones are critically important, but action photos are all about capturing that dynamic moment, and a little noise is a small price to pay for the ability to get the shot in the conditions that exist. Still, you need to be aware of the tradeoffs involved in increasing the ISO setting and push it only as far as necessary.
So, to summarize the exposure considerations for action photography, here's a hypothetical mental checklist for balancing the exposure elements:
Set your camera for shutter-priority automatic exposure or manual exposure mode, so you can directly control the shutter speed selection. If you must use a preprogrammed shooting mode or scene, choose the sports/action mode, but I don't recommend that option because you don't have as much direct control.
Select the lens focal length you want to use (either the focal length of a prime lens or the focal length setting of a zoom lens), and calculate the slowest safe shutter speed for hand-held shots. To do so, first convert the lens focal length to its 35mm equivalent by applying the conversion factor for your camera. For example, if you're using a 120mm lens (or zoom setting) and the conversion factor is 1.5, then the 35mm equivalent is 180mm. The slowest hand-holding speed is the inverse of the effective focal length, which is 1/180 in this example. You can skip this step if you use a tripod or other camera support to eliminate camera shake as a constraint on shutter speed.
Evaluate the subject motion and select a shutter speed fast enough to freeze that motion (assuming that freezing the motion is your goal, which is normally the case). The shutter speed you select depends on the speed and direction of the subject motion. For fast-paced sports action, you probably want to use 1/500 or faster. For kids playing, a shutter speed between 1/125 and 1/250 may be fast enough.
Compare the results of steps 2 and 3, and set the shutter speed to the faster of the two.
Set the camera's metering mode as appropriate for the subject and take a light level reading to determine whether the light is bright enough to support an exposure at an aperture that is within the range that's available on your lens. For most sports and action subjects, matrix or multi-area metering works best, but you may want to use average or spot metering in some circumstances. Most cameras take a meter reading and display the exposure settings, complete with over/under exposure warnings, in the viewfinder when you half-press the shutter release button.
If step 5 indicates that the shot would be under exposed, even if you use the maximum aperture available on your lens, then increase the ISO setting as needed to achieve a good exposure. If this requires such a high ISO setting that digital noise becomes objectionable, you need to return to steps 2 and 3 and reevaluate the shot. You may need to use a shorter focal length lens that you can hand-hold at a slower speed, and accept that you won't be able to stop all the motion, so you need to look for pauses and peaks in the action that you can shoot at a slower speed without excessive blur.
This list may seem long when you read it here, but with a little practice and experience, you can use this checklist to determine an exposure in a matter of a few seconds.
Great sports shots take planning — things happen much too fast to react to them after the fact. By the time you see something happening and reach for the camera, the moment is gone. To get great shots like figures 12-8 and 12-9, you have to be in the right place at the right time, watching the action unfold in the viewfinder.
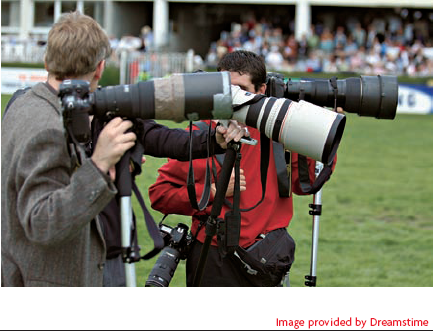
You need to know the sport well enough to anticipate where the action will take place, and position yourself to capture that action. Figure 12-10 shows sports photographers lined up along the sidelines of a major sporting event. In some cases, the competition for prime spots can be fierce. For example, on the first Saturday in May, there are dozens of photographers and video crews vying for a spot on the first turn at Churchill Downs, in position to take the classic Kentucky Derby shot shown in figure 12-11 with the horses rounding the turn and the famous twin spires of the clubhouse in the background.


Just as you need to anticipate where the action will occur and position yourself accordingly, you also need to anticipate your exposure in advance and preset your camera with the ISO, aperture, and shutter speed you expect to use. You don't have time to be fumbling with exposure settings when you're busy trying to follow fast-moving action. One of the great advantages of digital photography over film is the ability to see results immediately, which allows you to test your exposure settings and make adjustments just moments before an important shot.
Tip
When fast reactions are essential to catching just the right action, consider setting your camera for manual operation. Even the fastest auto-exposure and auto-focus systems take time to perform their calculations, which contributes to the slight delay between pressing the shutter release button and the image being recorded on the camera's sensor. Presetting exposure and focus in manual mode minimizes shutter lag and allows your camera to respond a split second faster; thus improving your chances of getting just the right shot.
For most action shots, you want to freeze all subject motion to keep the subject sharp. For that, you need a fast shutter speed. The only question is, how fast is fast enough.
As a general rule, 1/500 second is fast enough to stop most human actions, although you may need an even faster shutter speed to freeze details such as the head of a golf club in mid swing. You can use slower shutter speeds with slower-moving subjects, but it's unusual to be able to get much below 1/125. Also remember that the direction of movement makes a difference. Big actions moving across the frame require a faster shutter speed than smaller actions that occur along the lens axis.
The 1/2000 shutter speed that the photographer used for figure 12-12 was fast enough to freeze not only the major motion of the horse, but also it's mane and saddle number flapping in the breeze.

In contrast, a much slower shutter speed was sufficient to stop most of the action of the bowler in figure 12-13. The bowler is moving much slower to begin with, the motion is more aligned with the lens axis, and the photographer used a normal focal length instead of a telephoto. All these factors combined to enable the slow 1/45 shutter speed to control all the motion except a little blur of the bowler's right arm. It's amazing just how slow you can go in just the right conditions.
Another way to capture a sharp image of an active subject is to shoot the natural pause that often occurs at the peak of a motion. Peak actions, such as a basketball player at the apex of a jump shot, or the golfer in figure 12-14, are often dramatic poses that give the illusion of movement, even though the subject is actually relatively still for a fraction of a second. Because you're actually capturing a momentary pause in the subject movement, you can often do so with a slower shutter speed than would be required to freeze the full action.


Freezing all subject motion isn't the only way to shoot action photos. Sometimes, allowing the moving subject to blur the image creates more of a feeling of motion than a perfectly sharp image.
One way to accomplish this is to keep the camera steady and shoot at a shutter speed that is slow enough to allow some, or all, the subject motion to blur. Figure 12-13 shows this kind of deliberate blur in the bowler's right arm. Notice that the lack of camera movement produces a relatively sharp background in contrast to the moving subject.
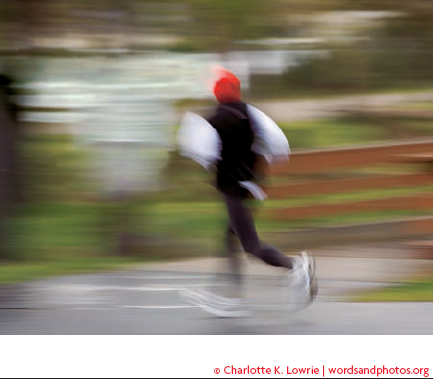
Figure 12-15 shows another form of deliberate blur, called panning. In this technique, you move the camera to track your subject's motion during an exposure with a slow shutter speed. The camera motion blurs the background, but since the camera is moving with the subject, that subject is less blurred than the background.
The technique works best with action going across the frame, not coming toward or away from the camera, and the strength of the effect depends on how much motion occurs while the shutter is open. For example, figure 12-15 was shot at 1/8 second, using a telephoto lens, which exaggerated the panning motion. Figure 12-16, on the other hand, was shot at 1/30 using a wide angle lens, thus producing a more subtle effect.
Note
Panning is a great technique, but it takes practice (and some luck) to pull it off successfully. I describe the technique in more detail in Chapter 6.
Photographing kids and pets may not seem like a sport, but like sports photography, it's a situation that requires you to capture images of a moving subject. It doesn't really matter whether the movement is part of an organized sport or the general activities of the people around us, you still need to use shutter speeds that are fast enough to freeze action, and the critical importance of the shutter speed selection means that you'll probably be working in shutter-priority mode.
Tip
Giving shutter speed priority in exposure selection doesn't always mean using your camera's shutter-priority mode. If you use your camera's aperture-priority mode and select the largest aperture available for your lens, the auto-exposure system will automatically select the fastest shutter speed available for the current light level.
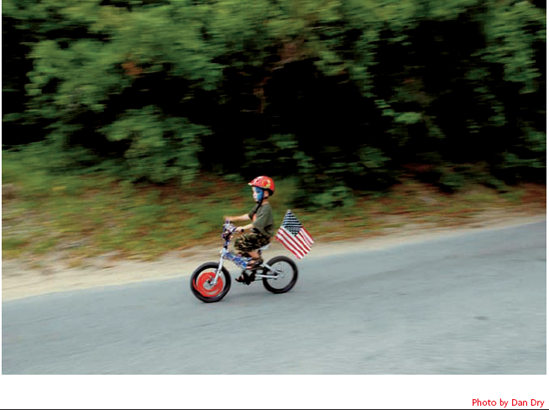
Any time you're trying to capture motion, it's easier to do so outdoors in daylight, where you have plenty of light to support the fast shutter speeds you need to use to freeze subject motion. In figure 12-17, the photographer chose 1/1000 to catch a close-up of a flying bicyclist in mid air.
As you move into shaded areas or indoors, the lower light levels naturally restrict your shutter speed selection, but you can get some nice shots at moderate shutter speeds if the action isn't too raucous. For example, 1/125 was fast enough to catch the youngsters playing in the shade in figure 12-18.
Indoor light levels are often so low that you're forced to use slow shutter speeds, even after increasing the ISO setting to its maximum. Slow shutter speeds can't stop any significant subject motion, but as Figure 12-19 demonstrates, you can still get good photographs by capturing your subject during natural pauses and peaks in the action. In this case, a 1/15 second exposure caught this young pool player lining up a shot. At that shutter speed, you must be concerned about camera movement as well as subject movement, so a tripod or other camera support is necessary.


Fortunately, kids and pets aren't always in motion. They have their quieter moments in which they present almost stationary targets. If you can catch your subject at one of these brief interludes, you can forget about subject motion and use any shutter speed that you need for the correct exposure. In figure 12-20, the dog remained motionless during a full one-second exposure. Although this example is extreme, it shows that it is possible to shoot normally active subjects with very slow shutter speeds.
Actions of children and pets are far less predictable than a more structured activity on a sports field, so getting into position to capture them is much more difficult.


Fortunately, there's at least one offsetting advantage that can make things a little easier, and that's the ability to get close enough to the action to use flash. The camera's built-in flash typically has a very limited range, but range isn't an issue when the action takes place barely more than an arm's reach away (see figure 12-21), and it's usually sufficient to light a subject anywhere within the same residential room with the photographer.

One problem with the camera's built-in flash is that the direct flash creates a very harsh light with hot highlights and hard, dark shadows. Using a more powerful flash unit with a tilting head gives you the option of bouncing the flash off the ceiling, which produces a much more pleasing and natural lighting effect as shown in figure 12-22.

Tip
Sometimes, simply pointing a camera at children causes them to change their behavior — they stop the activity that you want to photograph and begin posing for the camera. To minimize the chances of that happening, turn away from the children and pretend to focus your camera on something else that's the same distance away and in same light. Use this decoy target to preset the exposure and focus, and lock in the settings. Lower the camera and watch for the right moment. When the moment comes, you can quickly raise the camera and shoot before the children have time to change what they are doing.
Is shooting sequences a good way to capture sports action?
Most digital SLRs, and many other digital cameras, have the ability to shoot short multiframe sequences at the rate of several frames per second. Many photographers seem to think that firing off a burst of shots is the best way to capture any action. But that's not necessarily so.
For a lot of sports action, shooting a multiframe sequence isn't the best way to capture the exact instant of peak action. A single well-timed shot is often better than a multiframe sequence, just as a well-aimed rifle shot has a better chance of scoring a direct hit on the bulls-eye than a shotgun blast. On the other hand, the shotgun is more appropriate than a rifle for very fast-moving game and when it's more important to get several close hits than it is to score a precise bull's-eye. Similarly, shooting sequences can be an effective way to get off more shots in quick succession than you could do manually, and it does give you more chances at getting a usable image of some very fast-moving subjects.
If you do decide to use sequences to capture sports action, it's important to remember a couple of common limitations on the feature. First, the multiframe bursts are usually limited to a few frames, so you must resist the temptation to begin a sequence too early or else you may run through all the frames before reaching the peak action you want to capture. Second, after shooting a sequence, swriting those images to the memory card may take several seconds, and you may miss other shots while you wait for the camera to catch up.
How high can I push the ISO setting before digital noise becomes objectionable?
All camera sensors exhibit increased digital noise as the sensor's sensitivity increases with changes in the ISO setting. However, the sensors in different cameras exhibit varying amounts and kinds of noise. Some cameras deliver excellent results at the default ISO setting but show marked increase in noise with modest increases in the ISO setting. Other cameras show a more gradual increase in noise at higher ISO settings. The only way to know for sure how your camera reacts is to test it, and then you can judge for yourself how much digital noise is too much for the kinds of images you plan to create.