
Shutter speed is the exposure element that controls how long your camera's sensor is exposed to light. It's the time-based factor of exposure, and as such, it becomes the critical exposure element when you must control motion in a photograph.
Note
See Chapter 5 for an overview of the relationships between shutter speed, aperture, and sensitivity.

Most photographers think of shutter speed primarily in terms of freezing subject motion, such as that of the horse and rider in figure 6-1. That's an important consideration, but there's more to shutter speed selection than just picking a fast enough speed to stop the motion of a moving subject. In fact, the shutter speed selection can be just as important when shooting an unmoving subject or when your goal is to accentuate the motion instead of stopping it.
Shutter speed is one of the three basic elements of exposure. Because the goal is to balance all three elements to achieve the correct exposure for a given light level, changes that you make in shutter speed necessarily affect one or both of the other exposure elements, aperture and sensitivity (ISO).
Selecting a slower shutter speed increases exposure by allowing light to strike the camera's sensor for a longer time, which lightens the image or allows you to maintain the same overall exposure while using a smaller aperture to increase depth of field or lower ISO setting to reduce the effect of noise. Conversely, selecting a faster shutter speed for a given light level reduces exposure, which darkens the image or requires you to compensate by selecting a wider aperture (which reduces depth of field) or a higher ISO (which increases noise) in order to maintain the same equivalent exposure. The trick is to find the optimum balance point between them.
It's essential to understand how changes in shutter speed relate to changes in aperture and sensitivity. The three different exposure elements use different numbering schemes (fractions of a second for shutter speed, f-stops for aperture, and ISO numbers for sensitivity), but they all relate back to exposure, which is measured in EV units (which most photographers call a stop). A change of one EV (one stop) changes the exposure by a factor of two, halving or doubling the base exposure.
Historically, shutter speed settings always changed in one EV increments, with each step of the shutter speed selector on such a camera representing a full stop increase or decrease in the exposure. Smaller exposure adjustments were handled by aperture selection, not shutter speed. Table 6-1 shows the traditional standard shutter speeds and also the standard f-stops, all in full stop (one EV) increments. (The aperture and shutter speed pairings in this table would be appropriate for ISO 100 on a cloudy day.)
Table 6-1. Standard Shutter Speeds & f-stops
Standard Shutter Speeds | Standard f-stops |
|---|---|
1 second | f−64 |
1/2 | f−45 |
1/4 | f−32 |
1/8 | f−22 |
1/15 | f−16 |
1/30 | f−11 |
1/60 | f−8 |
1/125 | f−5.6 |
1/250 | f−4 |
1/500 | f−2.8 |
1/1000 | f−2 |
1/2000 | f−1.4 |
1/4000 | f−1 |
Tip
If you use more than one camera, try to set the EV increment the same on all the cameras. If one click of the dial or press of the button always has the same effect on your exposure, you'll be able to make quick exposure adjustments by feel. It really pays off when you need to react quickly to changing conditions.
Most cameras today have abandoned the traditional full-stop shutter speed increments in favor of finer adjustments that give the photographer more precise control. On most digital SLR cameras, each "click" of the shutter speed dial is typically one-third or one-half stop and you end up with a lot of intermediate shutter speeds (such as 1/350 and 1/650) in addition to the standard speeds shown in Table 6-1. On some cameras, you can select your preferred shutter speed increment — usually as part of an EV increment setting that applies to shutter speed, aperture, and ISO.
One advantage of the full-stop shutter speed increments is that you can envision how your shutter speed adjustments affect exposure. Each click of the shutter speed dial represents one stop, or one EV. With the smaller increments, you may need to move the shutter speed dial or button two or three steps to make the same change in your exposure.
Having to do so is not really a problem because the aperture and ISO adjustments on most cameras move in the same size increments as shutter speed, so you can increase one and decrease the other in predictable steps. But you have to get used to how big (or small) a change in exposure you get with each step of increase or decrease in shutter speed on the camera you're using at the moment. And smaller increments make it a little easier to lose track of how far you've moved from your starting point when making manual exposure adjustments.
When figuring out the best shutter speed to use, your first consideration is usually subject motion. You need to think about whether and how the subject is moving, and how you want to represent that motion.
If the subject and camera are both stationary, you can base your exposure decisions on the aperture and ISO you want to use without regard for whether the shutter speed is fast or slow. But when the subject is moving, you have to consider how much movement may occur while the shutter is open and what effect that will have on your finished image.
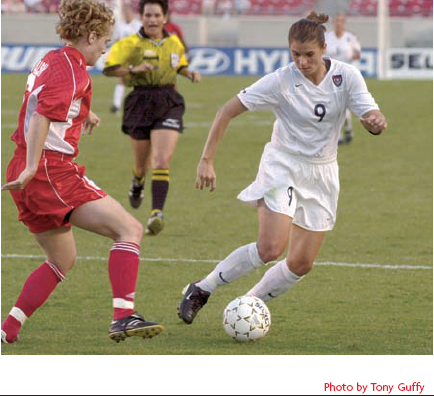
A slow shutter speed allows the image of a moving object to move across the sensor during exposure, resulting in a blurred image, even if the image was sharply focused. In figure 6-2, you can see the path of the soccer ball during the 1/4 second that the shutter was open. Conversely, figure 6-3 shows how a fast shutter speed can freeze motion and capture a sharp image of fast moving soccer players because the subject doesn't have time to move significantly during the brief instant that the shutter is open.
Proper shutter speed selection depends first on whether your goal is to freeze the action or allow the moving object to blur. Then you need to analyze the speed and direction of the moving object to determine just how fast or slow the shutter speed needs to be to achieve the desired effect.
Note
See Chapter 12 for more information on shooting action.

Generally, most photographers want to avoid blurred images, so stopping the action is the name of the game whenever the subject is moving. That means shooting at a fast enough shutter speed to minimize, if not totally eliminate, any blurring due to subject motion.
How fast is fast enough to freeze motion? The answer is that it depends on how fast the subject is moving and in what direction. In figure 6-4, the photographer used a shutter speed of 1/1250 to freeze every hoof splash and whip flick, although a slightly slower speed might have been sufficient.
Obviously, a race car speeding around the track is moving faster than a running human, and you'd expect to need a faster shutter speed to freeze the motion of the faster-moving object. However, the sheer speed of the subject isn't the only factor. The direction of motion relative to the camera position also makes a difference. Freezing motion across the frame requires a faster shutter speed than movement straight toward or away from the camera. So both speed and direction are significant.

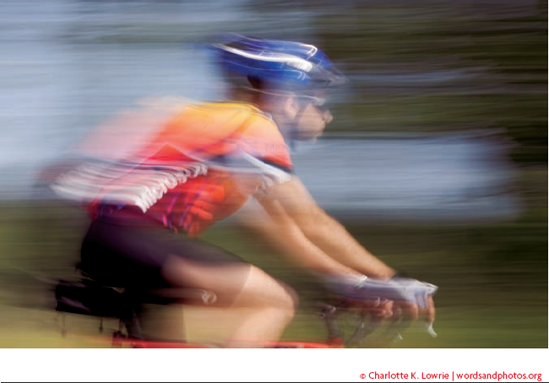
Normally, you want to avoid blur from a moving subject, but sometimes, deliberate blur can imply speed and motion in a way that a normal photo cannot. Sometimes the effect is subtle, as in figure 6-5, where the blurring of the spokes of the bicycle wheels are just enough to imply that the rider is moving forward and not just balancing in place. The effect works because the spokes are moving faster than the rider and bicycle as a whole, and the shutter speed is just fast enough to stop the rider's motion but not the spokes in the spinning wheels.
Figure 6-6 combines a slower shutter speed and a faster-moving subject to create a photo in which the blurred image conveys a feeling of speed and energy. In order to shoot at the slow shutter speed (1/6) required to produce this effect on a bright sunny day, the photographer selected an aperture of f−32.
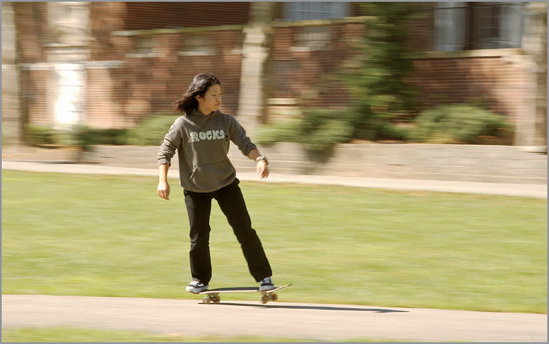
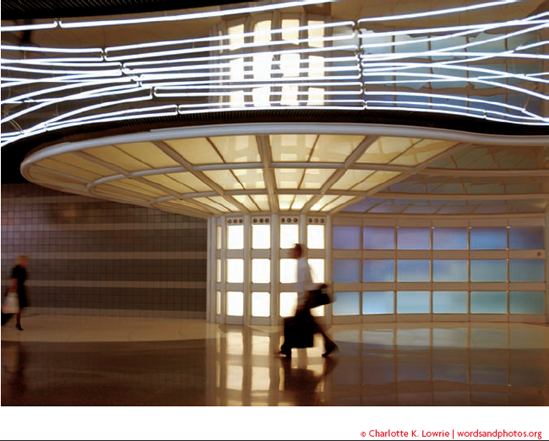
Figure 6-7 shows another variation on subject motion blur. In this case, the blur of the moving subject contrasts with the relative sharpness of its static surroundings. Using a tripod and a shutter speed of 1/10 second keeps the background sharp but blurs the walking man moving through the scene.

The subject isn't the only thing in motion in most photographs —the camera often moves, too.
Most shots are hand held, and a living, breathing human body isn't the most stable camera platform. So unless you use a tripod or other camera support, you need to consider camera motion in addition to subject motion when selecting the most appropriate shutter speed.
For an image to be sharp, there must be no significant movement of the image on the sensor while the shutter is open. Any movement of the image during exposure creates a blur. The most obvious source of movement in the image is a moving subject, and you control it by selecting a fast shutter speed. The other source of image movement is camera movement, which can cause just as much image blur as subject movement. The cure for camera movement is the same as for subject movement: a faster shutter speed.

Figures 6-8 and 6-9 show the effect of shutter speed on the blur from camera movement. Figure 6-8 is noticeably blurred as a result of hand holding the camera at a slow shutter speed of 1/4 second. In comparison, figure 6-9 is also a hand-held shot, but the 1/500 second shutter speed effectively stopped all camera shake and produced a sharp image.
Select a relatively fast shutter speed to stop camera shake in hand held shots. The shutter speed required to control camera shake depends on a number of factors, including the focal length of the lens and the photographer's skill at holding the camera steady.
Longer focal length lenses magnify the image and also magnify the effect of any camera movement. Therefore, longer focal lengths require faster shutter speeds to effectively control camera shake. Most photographers can get acceptably sharp images when hand holding wide angle and normal lenses at moderate shutter speeds (around 1/60 or 1/125). With practice and good technique, you might get by with slightly slower speeds (down to about 1/30) with wide-angle lenses. Hand holding a moderate telephoto lens usually requires a little faster shutter speed such as 1/250 or 1/500. For a really long telephoto lens, a very fast shutter speed or a tripod is essential.
Tip
When it comes to controlling camera shake, a good, solid tripod or other camera support has no equal.
Camera motion can actually be used to reduce the blur caused by subject motion. The technique is called panning and it produces images such as figure 6-10 in which a moving subject appears relatively sharp against a blurred background. The background blur adds to the feeling of motion in the photograph.
Panning is a tricky technique to master. It involves moving the camera to track the subject movement during an exposure with a moderately slow shutter speed. The camera movement offsets the subject movement so that the image of the main subject remains stable on the image sensor during the exposure. At the same time, the camera movement causes the static background objects to blur. Doing it right takes good eye-hand coordination, practice, and no small amount of luck. Here's the general procedure:
Prefocus your camera on the spot where the subject will be when you want to take the picture. Half-press the shutter release to lock and hold that focus point (or use whatever focus lock or manual focus feature your particular camera offers).
Start tracking the subject in the viewfinder well before it reaches the spot where you want to take the picture. The success of the panning technique depends on keeping the subject in a stable position in the frame as it moves across the background, and you need to establish the subject position and the pace of the panning motion early so you can continue the pan smoothly throughout the shot.
Shutter Speeds for Flash Synchronization
You need to be aware of some special considerations when selecting the correct shutter speed for flash photography. You generally don't have to worry about flash/shutter synchronization as long as you're using the camera's built-in flash or a dedicated on-camera flash unit from the camera manufacturer. The camera takes care of synchronization for you automatically in most shooting modes and warns you if you attempt to use inappropriate settings in manual mode. However, flash synchronization speed becomes an issue when you work with an external flash, whether it's a non-dedicated on-camera flash or a studio strobe system.
The typical SLR camera shutter is composed of two curtains. When you trip the shutter release, a curtain, which had been covering the sensor, opens to start exposing the sensor to light coming in through the lens. Then, a fraction of a second later, a second curtain follows the first across the sensor, shutting off the exposure. At slower shutter speeds, the sequence is open, expose, close. At higher speeds, the second curtain starts to close even before the first curtain gets all the way across the sensor opening. As a result, the entire sensor opening isn't exposed all at once. Instead, the two curtains create a slit that moves across the sensor during the exposure.
This traveling slit exposure that occurs at higher shutter speeds is a problem for flash photography because the flash duration is usually much shorter than the fastest shutter speed. The flash exposure works properly as long as the light from the flash can reach the entire image sensor at the same time, which means the flash must fire after the first curtain opens completely and before the second curtain starts to close the sensor opening. That usually occurs at speeds of 1/125 or 1/60 and slower, but it can be as fast as 1/500 on some cameras. If you select a faster shutter speed than your camera supports for flash synchronization, the entire sensor opening won't be open when the flash fires and only a portion of the frame will be properly exposed as shown in the figure below.
When the subject reaches the target zone, gently press the shutter release while continuing the panning motion. Remember that the viewfinder of most SLRs go black during the exposure and the subject disappears momentarily. You must be prepared for that and continue to pan smoothly, following the subject even when you can't see it. Keep both eyes open during the entire pan so you can use your peripheral vision to keep yourself oriented during the viewfinder blackout.
Continue the panning motion to follow the subject after the exposure. When the subject returns to the viewfinder, it should be in the same position in the frame as before. This follow through is essential to maintaining a smooth panning motion during the exposure.
Check your results on your camera's preview screen. If your camera has a zoom feature, use it to see just how well you kept the subject sharp and just how much blur there is in the background. Evaluate the results and try again. If there's not enough blur in the background, try a slower shutter speed. If there's too much blur, try a faster shutter speed. If the subject bounced or blurred too much, just try again, and again, and again. Be persistent. It usually takes many attempts to get one good panning shot.

The sensors in digital cameras, like the film that preceded them, are designed to record images in a fraction of a second at light levels that you typically find outdoors in daylight. As light levels drop, you can use larger apertures and slower shutter speeds to deliver the necessary amount of light to the sensor for a successful exposure — up to a point. The kind of time exposures required to shoot night scenes such as the one in figure 6-11 stretches most current image sensors to their limits.
The sensors in most digital cameras respond as expected to changes in shutter speed, as long as you're working within the normal shutter speed range (1/4 second or faster). However, despite the fact that many digital SLRs have shutter speeds that go as high as 30 seconds, most image sensors do not perform well at shutter speeds over 1 second. Sensors may exhibit reciprocity failure (require disproportionately greater exposure time at low light levels), excessive noise, or both.
Note
See Chapter 8 for more information on ISO settings and digital noise.

Digital noise can be especially troublesome in long exposures. The random bright pixels scattered throughout the image often become more numerous and brighter as the exposure time increases. Figure 6-12 shows the noise resulting from the combination of a slow shutter speed (2 seconds) and high ISO (1600). The noise is more visible in the enlarged section of the shadow area in a long time exposure. In extreme cases, the noise can be so bad that it renders the image unusable.
How fast does my shutter speed have to be to freeze most action?
As a general rule, a shutter speed of 1/500 is sufficient to stop most human and animal actions. You may need to use a faster shutter speed if your subject is a speeding race car or an arrow in flight. On the other hand, you can often get by with somewhat slower shutter speeds (1/250 or 1/125) if you capture the relative pause at the peak of a motion, or if the subject just isn't moving very fast to begin with.
Remember that the motion of the subject, and therefore, the shutter speed you need to use to freeze that motion, isn't affected by light levels. A group of bicyclists can pedal just as fast in the dim light of dusk as they can in the bright light of mid-day sun. However, your ability to get a sharp photograph of that moving subject is dependent on having enough light available to support the fast shutter speeds you need to freeze the action. Shooting a fast-moving subject at 1/500 is easy on a sunny day, but shooting the same subject at dusk can be a real challenge. Even with your lens aperture wide open and a high ISO setting, there may not be enough light to get a good exposure at such a fast shutter speed. You may have no choice but to use a slower shutter speed and accept some motion blur, or try to catch a pause in the motion.
What's the slowest safe shutter speed for hand held shots?
That depends on the focal length of the lens and the skill of the photographer. If you practice good technique (solid stance, good camera grip with elbows close to the body, controlled breathing), you can minimize camera shake and get good results at much slower shutter speeds than if you try to shoot on the run with an unstable stance and a shaky hold on the camera.
Assuming good technique, the other factor that most influences safe hand holding shutter speed is lens focal length. Shorter wide angle lenses tend to minimize camera motion and longer telephoto lenses magnify camera motion, so the longer the focal length, the faster the shutter speed needs to be if you want a sharp hand held shot.
The rule of thumb for most photographers is that the slowest safe shutter speed for hand held shots is equal to the inverse of the lens focal length. So for hand holding a 50mm lens, you need to use a shutter speed of 1/50 second or faster. For a 30mm wide-angle lens, the safe hand holding shutter speed is about 1/30, and for a 200mm telephoto lens, it's 1/200, and so on.
The rule was developed for 35mm cameras, and for most digital SLRs, you need to apply the appropriate conversion factor to the lens focal length to find its 35mm equivalent. For example, if you're using a 40mm lens on a digital camera with a lens conversion factor of 1.5, the lens is equivalent to a 60mm lens on a traditional 35mm camera and the safe hand holding speed is 1/60 second.
Of course, you can shoot at much slower shutter speeds without encountering problems from camera shake if you use some form of camera support. The best portable camera support is a good sturdy tripod. A monopod is much less cumbersome to carry and set up and still provides reasonably good support. If you forgot your tripod, you can use any stable object as a makeshift camera support. Hold the camera against a doorframe or set it on the roof of a parked car for support. Brace yourself against the trunk of a tree or plant your elbows on a countertop. Anything you can do to minimize camera movement will help ensure that your pictures come out a little sharper.
What are some typical shutter speeds for panning subjects on a sunny day?
It depends entirely on the subject's speed and how much background blur you want in the finished image. It doesn't matter whether you're shooting on a sunny day or under heavy rain clouds — it matters only how fast the subject is moving across the frame relative to its background. Actually, the background blur is created by the movement of the camera, not the subject, but the technique is based on panning the camera to track subject movement in perfect synchronization, so it's the speed of the subject that dictates everything else.
If you're panning the camera to follow an Indy race car as it zooms around the track at nearly 200mph, you might get noticeable background blurring with shutter speeds as fast as 1/250. For a kid on a bicycle, you might get a similar effect at 1/30. For a given panning speed, a slower shutter speed produces a more pronounced blurring effect in the background. For the bicyclist, you might try 1/30 for a slightly blurred background, 1/15 for a prominent blur, and 1/8 or 1/4 to reduce the background to streaks. You might use a shutter speed of 1 second or more for a panning effect with a slow-moving subject.