If you already know all about the interrelationships of aperture, shutter speed, and sensitivity, and you routinely calculate equivalent exposures in your head, then you can skip or skim this chapter. But if you're a typical photographer who relies on your camera's automatic exposure system for most of your photographs, then you're probably a little fuzzy about some of the details of what the exposure system is telling you, and perhaps a bit reluctant to step in and override the camera's automation to achieve a desired effect. If your understanding of the elements of exposure is somewhat rusty, this chapter should help.
In photographic terms, exposure means to allow light (presumably, light that is being focused through a lens) to strike the film or image sensor, thereby recording the image. However, a great deal more happens during exposure than just haphazardly exposing the image sensor to light. You must precisely control the amount of light that reaches the image sensor if you want to get the proper exposure — one that reflects the photographer's vision of the scene with the proper range of tonality and good detail in highlights, midtones, and shadows. You, or your camera's automatic exposure system, adjust the camera's aperture, shutter speed, and ISO (sensitivity) settings, collectively called the elements of exposure, to adapt to variations in the brightness of the light being reflected from the scene and control how much of it reaches the sensor in order to achieve the proper exposure.
Sometimes, getting a good exposure is relatively simple. The brightness of the mid-day sun is constant and predictable, so you don't need fancy light meters and exposure programs in your camera to get a good exposure of a scenic subject in full sun, as figure 3-1 shows. Well-established exposure guidelines, such as the sunny-16 rule, work as well as the most sophisticated automatic exposure system under such predictable lighting situations.

Note
See Chapter 4 for more exposure guidelines.
If you took pictures only in full sun at mid-day, your camera wouldn't need much in the way of exposure controls. However, when you are indoors, or in situations in which the sun is filtered and reflected in unpredictable ways, the brightness of the light varies dramatically and so do the exposure settings you need to use to achieve the correct exposure.
Modern digital cameras employ built-in light meters and sophisticated automatic exposure systems to help you get good exposures under almost any lighting conditions you're likely to encounter. But there's more to good photographic exposure than just getting the right amount of light on the image sensor. Different combinations of aperture, shutter speed, and sensitivity can create different effects in your image. To produce images like figure 3-2, with its flowing water in the softly reflected light at the bottom of a canyon, you need to understand the relationship of aperture, shutter speed, and sensitivity, so you can make an informed decision about the optimum combination to produce the effect you want.

Exposing the image sensor in your camera to light reflected from a scene that you want to photograph usually results in something getting recorded, no matter what exposure settings you use. The trick is to get a good exposure that produces a good-quality image.
Figure 3-3 shows a good exposure of a test subject, with a good balance between highlights, midtones, and shadows. The result is a natural-looking rendition of the scene. You can see detail in the highlights, good color in the midtones, and detail in the shadows. The black velour background goes totally black, as I intended.

If you don't let enough light from the scene get to the image sensor, the result is an under-exposed image. For example, figure 3-4 shows the test subject from figure 3-3 under exposed by two stops. The image looks dark overall. The lightest tones, such as the end of the large shell, don't look too bad, but midtones, such as the colors of the toy and the vase, are muted and dull. Shadow areas, such as the butcher block base, are very dark and lack detail, particularly toward the back edge and around the base of the wine glass.

Under exposure seriously degrades the quality of an image. Even if you try to compensate for the under exposure by adjusting the overall brightness and contrast in an image editor, the lack of detail in the shadow areas is still apparent. Figure 3-5 shows a close-up section of the under exposed image after processing in Photoshop. Notice that the color noise creates almost a posterized effect in the wood. Compare that to the same section of the properly exposed image in figure 3-6. Notice the smoother shading and more natural tones in the properly exposed image.


Letting too much light reach the camera's image sensor is just as bad, if not worse. Figure 3-7 shows the same test subject with two stops over exposure. Now plenty of detail can be seen in the shadow areas, but the colors of the toy are a little washed out, and the highlights, such as the hat and the end of the large shell, are blown out—they're white, with almost no detail at all.

As you can see in figure 3-8, attempting to compensate for over exposure by darkening the image in Photoshop doesn't help much. The detail in the end of the shell is gone, and so is most of the detail in the wheels of the toy. All the colors are exaggerated, garish, and unreal. That may be an interesting effect, but it's not a realistic rendering of the scene. Figure 3-9 shows a comparison with the same section of the properly exposed image.
Tip
The preview image you see on the camera's display immediately after taking a photograph may make the image look significantly lighter or darker than what the camera actually recorded. Don't base your exposure judgments solely on the appearance of the preview. Your camera's histogram display provides more reliable exposure information.


Ideally, the correct exposure is the one that captures all the tones and values from the original scene and records them accurately. Unfortunately, photographers don't live or take pictures in an ideal world, so they must adjust exposures to adapt to a range of challenging conditions.
Like film before it, the image sensor in a digital camera is capable of reproducing a limited brightness range. An image with an 8-bit color depth, such as a standard JPEG image file, can record brightness values from 0 to 255 in each of the three color channels, which is a ratio of 256:1, or a range of eight stops. This range is often called exposure latitude.
Being able to record a brightness range of 256:1 sounds pretty good until you consider that typical photographic scenes often have brightness ranges of 1000:1 or more. In direct sun, the range can easily exceed 20,000:1. Therefore, the brightness range of the scene you are trying to photograph is likely to exceed the brightness range you can record as a digital image.
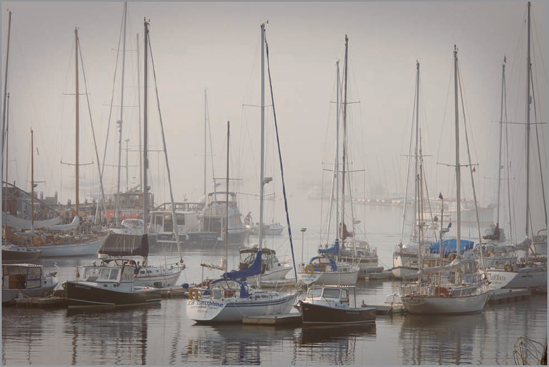
If you are fortunate enough to be taking a picture in fairly flat lighting, such as the foggy scene in figure 3-10, the brightness range of the original scene may fit easily within the range that you can record in an image file. In that case, the correct exposure is the one that captures all the values from the scene, and you should be able to record good detail in highlights, midtones, and shadows.
However, when the brightness range of the scene is greater than you can record in an image file, there's no way to capture all the values from the scene. Inevitably you're going to lose some of the lightest or darkest values. If you adjust your exposure to retain detail in the brightest highlights, the darker shadows will go black, and if you adjust your exposure to retain shadow detail, the highlights burn out.
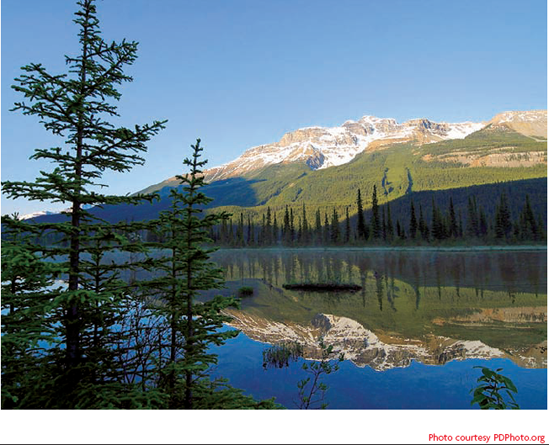
When faced with a scene with an excessive brightness range, such as the sunlit landscape in figure 3-11, you have to modify the definition of what constitutes a good exposure. Because it's not possible to retain detail throughout the entire range of highlights, midtones, and shadows, you have to determine what detail is most important and bias your exposure to record it. Therefore, the correct exposure is the one that records all the important detail while sacrificing the least detail at one or both ends of the brightness range. In figure 3-11, the photographer sacrificed some at both ends in order to achieve a realistic rendering of the sunlit foliage and a nice reflection in the lake water. You hardly notice the loss of subtle shading in the snow on the distant mountaintops, but the exaggerated darkness of the foreground trees and shadowed foliage across the lake is more apparent. The overall effect is to focus your attention on the properly exposed portions of the scene.

Tip
Camera raw can capture a much larger brightness range than the 8-bit JPEG format. Depending on your camera, the camera raw format may be a 12-bit, 14-bit, or 16-bit image, which means that you may be able to record up to a 16-stop brightness range. That gives you a much better chance of recording all the values in the original scene. However, at some point, you normally have to save your picture as an 8-bit image for printing or use in another application, and when you do, you have to get selective about what detail you retain.
The histogram is one of the most important and useful tools that a digital photographer has available for evaluating exposure. It plots the distribution of tones in an image, with the range of values from dark to light going from left to right along the base of the chart and the prevalence of a given value represented as height.
Almost all digital SLR cameras (and many of the better point-and-shoot cameras) include an option to display a histogram of your images as you shoot. The histogram in figure 3-12 is superimposed on the preview image. The histogram may also appear on a separate screen that you can select, but whatever the format, it provides valuable information about the image. Film photographers would have to wait for their film to be developed, and then take a tedious series of densitometer readings and plot the results in order to get information comparable to the histogram that digital photographers can see within seconds of clicking the shutter.
Histograms are very useful, but they require some interpretation.
Theoretically, an average scene would produce a histogram shaped like the classic bell curve — a large hump, centered in the chart, and tapering evenly on both ends. In real life, you seldom see such a histogram. The histogram in figure 3-13 is about as close as they come. This histogram is from the Levels dialog box in Photoshop. (It's essentially the same information as the histogram displayed on a camera's preview screen, but it's easier to see on these pages.)


The tonal distribution is well contained within the chart, without any spikes at either end. At the same time, the tones are distributed along almost the full value range. Together, this indicates a good exposure. The center of the hump is a little off center, which simply indicates a slight predominance of darker midtones in the scene, not an exposure problem. There may be one or more humps or peaks in a histogram. Their position doesn't have any implication for the overall exposure as long as they correspond to the distribution of tones in the subject. A dark subject shows peaks on the left side of the histogram and a light subject has peaks on the right.
Figures 3-14 and 3-15, on the other hand, are histograms from under and over exposed images. Notice how the tones are shifted toward one side of the chart, with a large spike at one end and a distribution that ends before reaching the other end of the value range. Compare the histograms of the under exposed image in figure 3-14 and the over exposed image in figure 3-15 to the histogram of a properly exposed image in figure 3-13.


The goal is to deliver just enough light to the camera's image sensor to get the optimum exposure — one that has good detail in highlights, shadows, and midtones and records as much as possible of the full brightness range of the original scene.
The amount of light required to record such an image on the sensor falls within a fairly limited range. The range of brightness of the light reflected from different photographic subjects varies tremendously, going from the dim light of a single candle flame to the blinding brilliance of direct sunlight. To control the light reaching the sensor and ensure good exposures in a variety of lighting conditions, you need to balance three factors:
Aperture: Controls how much light can pass through the lens at any given moment. In telescope and binocular lenses, the aperture is a fixed value determined by the maximum diameter of the lenses and their optical design. In camera lenses, the aperture is adjustable by means of a diaphragm that you can partially close to reduce the effective diameter of the lens, thus restricting the amount of light that can pass through. Apertures are expressed as f-numbers (commonly called stops), with the smaller numbers (f−4) designating a wider aperture opening and smaller numbers (f−22) designating narrower aperture openings.
Time: Controls how long the image sensor is exposed to the light coming through the lens. In the early days of photography, exposures were measured in seconds or minutes (sometimes hours) and controlled by removing and replacing a cover over the lens. Nowadays, exposures are measured in fractions of a second and controlled by an electronically controlled shutter in the camera. For convenience, camera controls normally list only the denominator of the fraction, so a shutter speed of 500 is really 1/500 of a second. For shutter speeds of one second and longer, camera displays typically add a suffix, such as 2s for two seconds.
Sensitivity: A numerical value that indicates how sensitive the photographic recording medium is to light. In film-based photography, different film stocks require different amounts of light for a good exposure, and the sensitivity rating provides you with the information on which to base your exposure settings. The image sensor of a digital camera has a similar sensitivity rating. The sensitivity rating is expressed as the ISO (International Standards Organization) number, which takes its name from the organization responsible for the rating system. Higher numbers indicate increased sensitivity. The default sensitivity for most digital camera image sensors is ISO 100.
Film sensitivity can be adjusted somewhat with special processing, but it's not practical to change the sensitivity rating within a roll of film. Digital cameras, on the other hand, give you more control over the ISO setting. The image sensor is electronically controlled, and you can amplify its signal to boost the sensitivity at any time. As a result, the ISO setting on a digital camera becomes an effective exposure control tool instead of a fixed parameter.
The water bucket exposure analogy makes the point that you can empty the bucket by letting the water flow through a small hole for a longer time, or a larger hole for a shorter time. The total amount of water in the bucket (the total exposure) is the same either way.
The concept of equivalent exposures states that there are multiple combinations of aperture, shutter speed, and ISO that all produce the same exposure. A larger aperture paired with a faster shutter speed can deliver the same total amount of light to the image sensor as a smaller aperture paired with a slower shutter speed.
Note
Equivalent exposures are also referred to as the principle of reciprocity. I prefer the term equivalent exposure because it's more descriptive. Some other books use reciprocity. It means the same thing.
Aperture, shutter speed, and ISO ratings have different numbering systems, but each has the same proportional effect on exposure. Everything works in EV (Exposure Value) units. An increment of one EV increases or decreases the light by factor of two, so an increase of one EV doubles the exposure, and a decrease of one EV cuts it in half. For example:
Each full f-stop of change in aperture is one EV. For example, the difference between f8 and f11.
Each time you double or halve the shutter speed, that's one EV. For example, the difference between 1/250 and 1/500.
Each time you double or halve the ISO rating, that's one EV also. For example, the difference between ISO 200 and ISO 400.
Tip
The menu system of many digital SLRs allows you to select the increments represented by each step of adjustment in your aperture, shutter speed, and ISO settings. You can often choose between one, one-half, and one-third EV increments. To make it easier to work with equivalent exposures, I suggest that you set all the exposure adjustments to the same EV increment. That way, if you increase one by two clicks of the adjustment dial, you know that you can maintain the equivalent exposure if you decrease one of the other exposure elements by two clicks. Counting clicks or button presses is much easier than mentally juggling the dissimilar numbers of shutter speeds, aperture f-numbers, and ISO ratings.
So, suppose that you start with the standard exposure for an average subject in direct sunlight at midday. According to the sunny-16 rule, that's f−16 at 1/100 with ISO 100. If you open up the aperture one stop to f−11, cut the shutter speed in half to 1/200, and leave the ISO setting the same, the overall exposure is exactly the same. They're equivalent exposures. Table 3-1 shows a more extensive listing of the equivalent exposures for the same common lighting situation. As you can see, you have lots of choices for combinations of aperture, shutter speed, and ISO that all deliver the same amount of light to the digital image sensor in your camera.
Note
See Chapter 7 for more information on depth of field and aperture selection.
For any given light level, there are lots of different equivalent exposures that all deliver the appropriate amount of light to the digital image sensor for a correct exposure. But that doesn't mean that all the equivalent exposures are exactly the same. The total exposure may be the same, but aperture, shutter speed, and ISO each affect your images in other ways besides controlling the exposure. Consider the following:
Aperture affects depth of field, causing objects that are closer to or farther from the camera to appear more or less blurred.
Shutter speed controls both subject motion and camera shake.
Increasing the ISO increases the appearance of digital noise in your image — sometimes dramatically. Noise degrades the quality of your image, so it's almost never a desirable thing, but it's often acceptable in small amounts. However, some image sensors are prone to sudden sharp increases in noise at certain ISO levels, and high noise levels can render an image unacceptable.
Depending on what effect you're going for in a given photograph, certain apertures, shutter speeds, and ISO settings may work better or worse than others. As a result, one combination of aperture, shutter speed, and ISO is optimum for the situation. Out of all the equivalent exposures, there's just one best exposure that delivers precisely the right amount of light to the digital image sensor and also gives the best possible balance between depth of field, motion control, digital noise, and all the other factors.
Note
See Chapter 6 for more information on controlling motion with shutter speed selection.
Getting precisely the right exposure is critically important to producing excellent quality photographs. But, even the best light meters and exposure systems can be fooled by difficult lighting situations, and the preview image you see on your computer's display after each shot isn't always a reliable indication that you got the best exposure. So what can you do to ensure a good exposure?
The answer is to shoot the scene at several different exposures and choose the best one later. The technique is called bracketing because you shoot a bracket of alternate exposures over and under the presumed good exposure. Ideally, you end up with a set of images like those in figure 3-16. They range from under exposure, through correct exposure, to over exposure, and the best exposure is the one in the middle. However, the beauty of a bracket is that if your base exposure wasn't exactly right, one of the other steps in the bracket will probably be properly exposed and you have a perfectly exposed image to work with instead of having to try to salvage an image that's too light or too dark.
Obviously, bracketing works best with static subjects that sit still while you shoot multiple frames that are identical except for minor changes in exposure settings. To be effective, the bracket needs to include a wide enough range of under and over exposure to cover any likely variation of the actual good exposure from the expected norm. The minimum bracket is usually three steps: one under exposed, one properly exposed, and one over exposed. For more uncertain lighting, a five-step bracket may be called for.

Another factor in a bracket is the exposure increment between the steps. They must be large enough to cover a good range in a reasonable number of steps and small enough to ensure that the optimum exposure doesn't fall in between the steps. In most cases, I find that bracketing in increments of two-thirds of a stop is about right, but half-stop or full stop increments may work better for you.
The most straightforward way to shoot an exposure bracket is to use your camera's exposure compensation feature to apply the exposure adjustment to each step of the bracket. Here's the procedure for shooting a simple three-step bracket in two-thirds stop increments.
Prepare to take the picture normally. Select aperture-priority or shutter-priority automatic exposure as appropriate. Select average, spot, or matrix metering pattern as appropriate. Frame and focus the picture.
Adjust the exposure compensation to feature to −2/3 EV using whatever combination of buttons and dials are appropriate for your camera. Then, fine-tune the framing and focus as needed and press the shutter release to shoot the first step of the bracket. Exposure compensation instructs the camera's automatic exposure system to reduce the exposure by the specified amount. You don't have to do any exposure calculations yourself.
Adjust the exposure compensation to 0 EV and then shoot the middle step of the bracket.
Adjust the exposure compensation to +2/3 EV and shoot the final step of the bracket.
You can easily adapt this procedure to add steps to the bracket or change the exposure increment of the steps. The exposure compensation feature is available on most digital cameras and it's usually convenient and easy to use. Not only that, it works with the standard auto exposure modes. It may also work with programmed scene exposure modes on some cameras.
Some cameras have an automatic bracketing feature that makes the process even easier. On an Olympus E-500, you activate the AE (auto exposure) bracket feature and set the exposure increment using the camera's menu system; then the camera makes all the adjustments for you as you shoot. In single-frame shooting mode, you press the shutter release three times to shoot the bracket — once for each step of the bracket. In continuous shooting mode, you just press and hold the shutter release. The camera fires off a three-shot burst, adjusting the exposure automatically for each shot.
Note
Some cameras offer an automated bracketing feature for flash exposures and for white balance, in addition to normal exposures. It's the same idea of shooting a set of frames of the same subject using slightly different settings when you're not sure what the optimum setting might be. For flash bracketing, the variation is in flash output and usually works only with the camera's built-in flash or a dedicated flash unit made specifically for your camera model. For white balance bracketing, the variation is in the color temperature setting.
What's the sunny-16 rule you mentioned at the beginning of the chapter?
The sunny-16 rule is a standard exposure guideline that photographers have been using for decades. It states that the correct exposure for an average subject lit by the direct light of the mid-day sun is f−16 at the shutter speed equal to the reciprocal of the ISO rating of the film or digital image sensor. Therefore, when the ISO setting is 100, the correct exposure for an average scene in mid-day sunlight is f−16 at 1/100 second; if the ISO is 200, the exposure is f−16 at 1/200; and so on. Of course, you don't have to use f−16 as your aperture to follow the sunny-16 rule. Any equivalent exposure, such as f−8 at 1/400 for ISO 100, works equally well.
How reliable is the sunny-16 rule in determining correct exposure?
There is no more reliable light source than the sun. In fact, I often use the sunny-16 rule to test a light meter or a camera's exposure system. If the meter doesn't produce a reading that comes very close to the sunny-16 guideline when reading an average scene (or gray card) in mid-day sunlight, then I assume that there's something wrong with the meter and send it in for repair.
What about the camera's programmed exposure modes? You haven't mentioned them.
Programmed exposure modes, or scenes as they are sometimes called, preset the camera's automatic exposure mode (aperture priority or shutter priority), ISO setting, and sometimes the white balance to what the camera manufacturer deems appropriate for a given general photographic subject. The default program selection is often labeled "Program" and there may be several additional selections such as scenery, portraits, or sports action. Each program may also include rules to give priority to a faster shutter speed to stop action in sports mode, or a larger aperture for a soft-focus background in portrait mode.
Programmed exposure modes were developed to aid beginning photographers who are unfamiliar with aperture or shutter speed. They don't have to understand the elements of exposure or make an informed decision about what exposure settings to use. Instead, they can just select the program for the general type of subject and let the camera do the rest. Programmed exposure modes work reasonably well for subjects and lighting conditions that are a good match for what the camera maker envisioned when they created the programs, but the programs often fail to give good results when you try to use them in unusual situations.
Frankly, I don't use programmed exposure modes, and I don't know any experienced photographers who do. I'm not comfortable being a passive observer of what exposure settings the camera is selecting for me. I simply don't want to surrender that much creative control over my images to the camera. Besides, with just a little knowledge and experience, most photographers can do a better job of evaluating the scene and selecting the appropriate exposure than the arbitrary rules of the programmed exposure mode.