
Object photography is one of the biggest categories of photographic subjects. Images of objects surround us every day in catalogs, magazine advertisements, and Web pages that show pictures of products. Images such as figures 14-1 through 14-3 are designed to capture our attention, sell a product, evoke a mood, or illustrate a concept.


Photographing inanimate objects is fundamentally different from photographing people, pets, or even nature subjects. It's almost always done in a photographic studio (or on a location set that the photographer turns into a temporary studio) and the photographer has complete control over subject placement, camera position, lighting, and everything else. An inanimate object doesn't get tired or moody like a person does, and there's no need to be concerned about capturing facial expressions. As a result, the shooting pace can be more deliberate, allowing more time for precise lighting adjustments and special techniques that aren't practical with living subjects.
For example, the basic design and the lighting in figure 14-1 are both starkly simple, but the concept relies on absolute precision and attention to detail. It took hours to set up the shot, clamping the forks in position and making tiny adjustments to get them aligned perfectly with each other, with the camera, and with the lights.
The setup for figure 14-2 was even more elaborate. It required building a rig to drop the pepper into the glass in such a way that it passed through the beam of a light sensorthat triggered the flash after a delay that had to be adjusted precisely to the millisecond. The photographer had to conceive of the shot, figure out how to pull it off, build and test the rig and light sensor circuit, and then shoot it — with excellent lighting and perfect exposure, I might add.
Note
In the interests of full disclosure, it's only fair to note that figure 14-2 is a composite image. The pepper was just below the surface when the splash reached its peak, so the photographer took a second shot with the pepper suspended in the position shown and then used Photoshop to insert that pepper into the splash image. The result is a striking photograph that shows the splash and pepper in a believable relationship, even though that's not what actually happened.
Personally, I've always considered object photography to be the purest expression of photography as an illustrative art form. The photographer has a measure of control from concept through to completion that isn't possible when photographing people or nature. There's more opportunity to actively create an image instead of observing and recording naturally occurring scenes. What's more, it's often a solo effort or the result of close collaboration with an art director, and relies less on contributions from models or the cooperation of nature.
There's a long tradition of the still life as a subject in the visual arts. In painting and drawing, the subject is often a flower arrangement or a bowl of fruit. In photography, it's more likely to be a product, such as the shoes in figure 14-3, and the flowers are relegated to the role of set dressing. Because the subject itself is usually static, and often mundane, it's frequently not enough to simply record an accurate representation of the subject, it's up to the photographer to create an appealing image with a good composition and interesting lighting.
Unlike portrait photography, with its named lighting schemes that have evolved over the years, the lighting for small product photography tends to vary tremendously. That's part of the fun for the photographer. You can analyze the product and create an individualized lighting scheme to bring out the subject's unique characteristics. You can choose a direct frontal light to emphasize color, a softly directional light to show three-dimensional form, or a hard light raking across the subject to accentuate an interesting texture. You can emulate natural light, go for the high drama of theatrical-style lighting, create an otherworldly effect, or anything else that strikes your fancy.
Tip
If you need a starting point for a simple lighting scheme for a small product, try placing the main light about 45 degrees to one side of the camera and fairly high, pointed down onto the subject. Position a fill light near the camera, level with the lens, on the opposite side of the camera from the main light. Adjust the position of those lights as needed, then add another light (or two) to light the background. This isn't a creative lighting scheme, but it can be an effective basis for a straightforward product shot.
Rarely do you find natural light that provides the kind of lighting you need for a really good small product shot. Sometimes an outdoor setting or window light at an indoor location will give you a good starting point, but even then, you usually need to manipulate the naturally occurring light with diffusers and reflectors, or supplement it with flash fill.
In the location shot of an artisan's hands trimming a piece of pottery in figure 14-4, the main light source is a large window outside the left side of the frame. The single dominant light source raking across the scene gives the image dramatic impact while looking totally natural. However, that naturalness is an illusion. The photographer supplemented the window light with a reflector just outside the frame on the right, and another beside the camera. Without those reflectors, the shadow areas would lack detail.

Usually, what looks like a natural-light setting for a small product shot is actually a set constructed in the photography studio. Figure 14-5 is one such example. It appears to be a quaint potting shed, lit by the light coming through the window, which is balanced and offset by another light source outside the right side of the frame — perhaps a large open door. But it's all a little too perfect. It's highly unlikely that you'd find this ideal balance of light in real life, and if you did, it would last for only a minute or so. You'd have to be incredibly lucky to be in the right place at the right time to catch that fleeting moment. Constructing a set in the studio gives the photographer control over the lighting and the time to get it right. Carefully imitating a hypothetical natural-light scenario makes the image more believable.

This particular set was lit with studio flash, but it could have been done just as easily with continuous lights such as tungsten, quartz, or HMI lights. For most small product photography, the choice of studio light source is determined by availability and the photographer's preference, not dictated by the subject. After all, flower pots won't sweat from the heat of hot lights, squint at the brightness of continuous lights, or flinch at the sudden burst of light from flash.
Studio sets for small product photography don't have to be as elaborate as constructing a potting shed, complete with a window. In figure 14-6, the set is nothing more than a few planks of weathered wood, with a handful of sand and a piece of rope as set dressing. The lighting is also relatively simple. The main light is a large softbox, positioned about 60-degrees to the left of the camera and pointing down at a similar angle. The fill light is positioned just over the photographer's left shoulder. Another softbox, positioned low on the right, opens up the right side of the bottles and creates a nice vertical highlight on the bottle caps.

The studio is a place where the photographer has complete control, so there's no reason to be limited to emulating natural environments. Sometimes the best way to create the desired effect is with an imaginary setting and unconventional lighting, such as in figure 14-7. The subject is several very large and unusually colored freshwater pearls. (In fact, these are museum-quality specimens and there was an armed guard in the studio.) They're posed on a sheet of black plexiglass that gets its gradation from the deliberate glare created by placing the main light — a large softbox — above and behind the subject, pointed back toward the camera. Two more softboxes on either side of the camera provide frontal lighting as a counterpoint to the main light. A white reflector sitting on top of all three lights creates a white roof for the setup and fills in what would otherwise be a black reflection in the top of the glass orb and the pearls. A single bare-bulb lamp is positioned to peek into the set where the right-front softbox meets the top reflector. It creates a small, bright highlight on the glass orb and on each pearl, which gives them a touch of sparkle, much like the catchlight in the eye of a portrait subject.

In figure 14-8, the photographer took a different approach to imaginative lighting for a small product. The main light for the overall scene is above and behind the saw, positioned so that it lights the board and the top edges of the saw, but not the side toward the camera. The saw blade is lit by a separate accent light that is carefully aimed and shuttered with barndoors to restrict its light to just the blade. A colored light hidden behind the saw creates a pool of red light on the background, and the photographer added a couple of touches of red to the front of the saw to create some continuity between the subject and the background. This kind of specialty lighting can take hours of experimentation, and the finished image is often a composite of several exposures. In this case, the blade, the saw, and the background were shot separately and then combined to create the finished image.
Tip
Studio photographs are almost always shot with totally manual exposure settings. Although there is no photographic law that bans exposure automation, most photographers rarely, if ever, use automatic exposure in the controlled environment of the studio. For one thing, in-camera auto-exposure systems don't work with the studio strobes that are the most common form of studio lighting. That may seem like a problem, but most working pros quickly develop enough familiarity with their lights and studio to predict a reasonable starting exposure based on experience alone. The final exposure is determined by evaluating test shots, reading histograms, and then adjusting the lighting and exposure as needed to get the perfect image.
In some respects, photographing food is just like photographing any other small product in the studio. The main difference is that the subject itself is generally more appealing than most ordinary commercial subjects, so there's less need for lighting gimmicks to add artificial interest. Instead, the goal of food photography is usually an accurate rendering of the subject (which is challenging enough), combined with an interesting background treatment to complement the food without overpowering it.
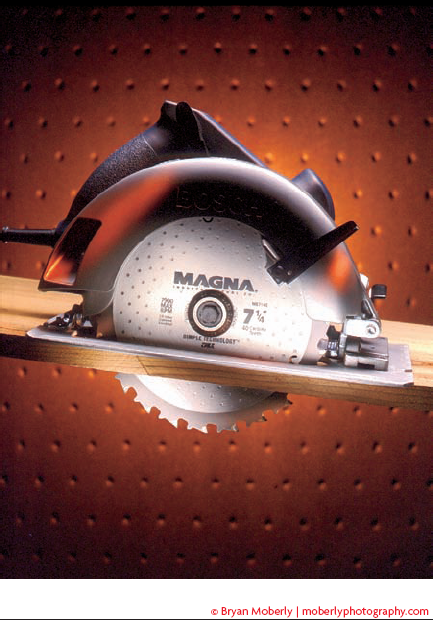
Consider, for example, figure 14-9. The main light is a softbox, positioned above the peppers on the right side. It provides both the highlights on the upper surfaces of the peppers, and the modeling that defines their forms. A reflector near the camera is all that is needed to open up the fronts of the peppers. A background light coming in from the lower-left creates a nice gradation that is bright enough to provide contrast with the shadowed lower sides of the red peppers and then gets dark enough to make the highlighted top and stem of the green pepper to really pop.
In figure 14-10, the photographer used a different lighting technique. The main light is positioned high, on the left, almost behind the grill, so that it rakes across the cut surface of the grilled chicken, bringing out its texture. It also creates the sparkling highlights on the slices and defines their back edges. Another light, positioned to the right of the camera, lights the fronts and tops of the slices and serves as a general fill light. The spotlight effect on the background is created by a third light shining down on a piece of rust-brown background paper positioned well behind the grill.

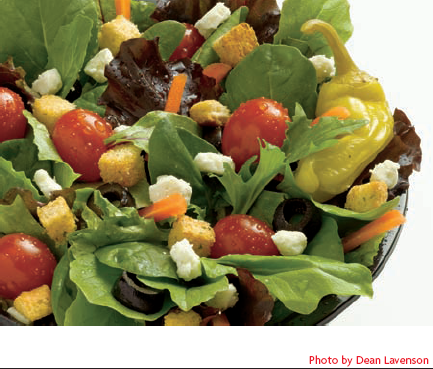
Photographing food does require some special considerations. You must remember that you're attempting to photograph a perishable product that can melt, wilt, dry out, shrivel up, or otherwise change with time — and sometimes does so very quickly. That's not too much of a concern with a subject such as the peppers in figure 14-9, but it's a major issue with a subject such as the salad in figure 14-11. Within just a few minutes of being placed under hot tungsten or quartz lights, the water droplets evaporate and the salad greens begin to wilt.
In the old days, when slow photographic films and hot lights were the only tools available to photographers, it was common practice to create meticulously hand-painted models of food and to photograph the models instead of the real thing. The substitute food models could stay under the lights as long as necessary to get the shot, but creating the models was time consuming and expensive, and the fake food raised the ire of truth-in-advertising advocates.
Nowadays, almost all food photography is done with real food, carefully selected and prepared for the studio session.
Furthermore, most photographers today avoid using hot lights for food photography because the heat from the lights quickly melts ice cream and other cold products, and just as quickly wilts or dries out other foods, making them unattractive. Flash is now the king in the food studio because it minimizes the heat problem, therefore maximizing the time the food can be on the set under the lights and still look good. The extra working time afforded by using flash is absolutely essential when you need to prepare and position multiple dishes in one shot, such as in figure 14-12.

Tip
Freshly prepared foods don't remain at their best for very long. Even without the excessive heat of hot lights, it's hard to work fast enough to get the background, lighting, and camera angle all just right before the food starts to wilt. Consequently, it's common for the food stylist to prepare at least two batches of food. The first batch serves as a stand-in while the photographer takes as much time as necessary to light the set and shoot a series of tests. Then, when everything else is ready, the stylist substitutes a fresh batch of food for the final shot.
Tip
In commercial food photography, most of the food itself is real, but photographers and food stylists often use tricks to embellish the product. For example, it's nearly impossible to find perfect clear ice cubes, and real ice begins to melt and dilute a drink immediately, so prop ice cubes made of glass or acrylic are used instead. A glycerin and water mixture sprayed from a mister bottle creates the look of water droplets on fresh vegetables or condensation on a glass, and it doesn't evaporate and disappear before you can get the shot. Cooked foods may be brushed with cooking oil to give them a nice sheen, and so on.
Silver and other similar reflective products have little or no color of their own. Instead, they reflect their environment, particularly the studio lights. You can see that phenomenon at work in figure 14-13. The right side of the polished metal tool reflects the bright white of the main light and also a strip of blue gel placed there to add some color to the subject. The left side of the tool reflects the fill light on the left and also picks up a streak of red from the cloth. The top edge of the tool is black because the darkness of the studio ceiling overhead doesn't give it anything to reflect.
When lighting jewelry, silverware, and other polished metal objects, you need to remember that each reflective surface is a mirror that is defined more by the environment that it reflects than by the light that strikes it directly. Consequently, lighting a reflective object is as much an exercise in lighting the environment for the object as it is lighting the object itself. To get clean bright highlights and light areas in a reflective subject, you need to surround it with a lot of clean white lights and reflectors. You may also want some dark areas in the environment for contrast.

The photographer used two rectangular diffusers angled over the jewelry in figure 14-14 to create a mostly white environment for the gold petals to reflect. The camera is pointed straight down, through the gap between the diffusers. The light behind the diffuser at the upper left is closer, and therefore brighter, than the one behind the diffuser at the lower-right, so the torn paper background and rose cast soft shadows down and to the right. If you look very close, you can see the difference in brightness of the reflections in the jewelry, too.

Convex objects, such as the domed lid of the silver tureen in figure 14-15, can reflect the entire studio. That could create undesirable results if you don't control those reflections. The solution is a technique called tent lighting, in which you place the subject inside a tent made of diffusion material and then light the subject by directing lights through the diffusers. The subject is surrounded by soft light because every surface of the tent either diffuses or reflects light. In this case, the tent is made of three rectangular diffusers that are clamped together to create a sort of box over the subject. The back of the box is open to allow for the sweep of the background. The camera-side of the tent is closed with more diffusion material, and the lens pokes through a vertical slit, which you can see appearing as the dark line in the middle of the lid.

Tip
A pop-up shooting tent is a convenient alternative to building your own tent lighting rig. The cube of white nylon fabric is held open by spring-loaded hoops, much like those in collapsible reflector panels or the sun shades for automobile windshields. One side of the cube opens to allow access to the interior. Velcro tabs allow you to attach interchangeable backgrounds to the floor and back of the cube. When you don't need the tent, it folds flat and collapses with a twist. Pop-up shooting tents come in several sizes, ranging from small cubes that are suitable for shooting individual pieces of jewelry, to larger cubes that can accommodate a silver tea service.
Tents Aren't Just for Reflective Subjects
Tent lighting was developed to control the reflections in silver and gold jewelry and other highly reflective subjects. However, there's another characteristic of tent lighting that makes it useful for some non-reflective subjects as well.
Because tent lighting bathes the subject in diffuse light that is reflected from all sides, it is (or can be) almost totally free of shadows. The absence of shadows is sometimes desirable for certain kinds of catalog illustrations and for product shots that will have their backgrounds dropped out or blended into a large solid-color background for text.
Tent lighting is perhaps the easiest way to achieve the shadow-free effect — provided the soft, uniform light of the tent supplies enough shape definition to keep the subject from looking like a flat paper cutout. The trick is to create some modeling by making the light brighter on the top or on one side of the tent, but to keep the off side bright enough to subdue the shadows. The only shadows that remain are directly beneath the subject.
The alternative to tent lighting for shadow-free small product photography is to place the subject on a clear glass shooting table and position background paper under the table. This setup provides enough physical separation between the subject and the background to allow you to light them independently, which enables you to eliminate shadows completely.
Tip
Sometimes, tent lighting can be too uniform. The absence of any color or dark contrast can make your subject look unreal, especially when you're shooting chrome or silver. You can easily address the problem by hanging strips of colored material (paper, fabric, or gel) inside the tent where it will be reflected in the subject. Placing colored gels on the lights or the outside surface of tent diffuses the color for a more subtle effect.
Like silver, clear glass is another substance that doesn't have much color of its own. Because almost all the light that strikes a piece of clear glass passes straight through, the glass object can be almost invisible to the human eye — and to the camera. Unlike opaque objects, which we see by the light reflected by the object, we perceive clear glass by observing distortions of objects behind or inside the glass, specular highlights (intense reflections of a light source) on the edges of the glass object, and some glare or weak reflections from the shiny surface of the glass.
Note
Completely clear, transparent glass (or acrylic plastic) creates the greatest lighting challenges. Colored or frosted glass is much easier to work with because it usually has enough color or surface texture to be visible on its own, so there's less need to resort to special lighting techniques. Opaque glass objects reflect light normally and you can use the same lighting techniques you'd use for ordinary substances such as wood or painted metal.
Figure 14-16 shows examples of all these effects at work to make the clear glass decanter clearly visible against the dark wood background. The distortion of the background is clearly visible in the lower half of the decanter, accentuated by the bottle's fluted sides. The facets of the stopper and curved lip of the decanter's mouth create lots of specular highlights — sharp reflections of the light source. The larger surface reflections across the shoulder of the bottle come from the rectangular diffuser panels positioned on either side of the subject.

Figure 14-17, on the other hand, relies almost entirely on well-placed surface reflections to define the shapes of the glassware in this striking image. The reflections come from a single softbox light on the left side of the subject, almost perpendicular to the camera angle. The light creates a primary reflection on the left side of the glass objects, and also shines through the glass to create a secondary reflection on the opposite side. The resulting highlights stand out in stark contrast to the black background. The photographer wrapped the supports for the upper pieces of glassware in black velvet to make them disappear into the background. The glow in the brandy is the photographer's secret special effect, but I suspect that it might have something to do with the fiber optic light that I saw sitting in the corner of his studio.

Often, the contents of a glass bottle are as important to the photograph as the bottle itself. And when the bottle contains a transparent liquid, it creates some challenges for the photographer. Light striking the front of the bottle normally goes through the bottle and the liquid inside before being reflected from whatever is behind the bottle, and then it passes back through the bottle and the liquid again on its way to the camera lens. As a result, the liquid inside the bottle tends to look darker than you would expect, and you may see distorted shapes and colors from the background. This is a problem if your client cares about the apparent color of the whiskey, perfume, or whatever liquid is in the bottle.
Over the years, photographers have developed some tricks to overcome these problems when photographing transparent liquids. For example, notice the light-colored cologne in a clear bottle in figure 14-18. The bottle is lying on some rope and sand, and normally, you'd be able to see the rope through the bottle. However, in this image, the photographer attached a piece of white paper to the back of the bottle to block the view of the rope and create a clean reflection back through the cologne. Because the bottle is clear and the liquid is very light-colored, a plain white reflector is all that's needed to create a bright, clean look inside the bottle.

The photographer also used a reflector behind the bottle in figure 14-19 to block the view of the background and improve the lighting through the bottle and a liquid inside. However, in this case the reflector isn't a simple piece of paper attached to the back of the bottle. Instead, the reflector is a freestanding piece of card stock positioned behind the bottle, which sits at about a 45-degree angle so it can catch the light from the large softbox on the right and reflect that light through the bottle and into the lens. The bottle is made of colored glass, so the reflector has to be bright silver in order to pump enough light through the bottle. Getting a reflector perfectly positioned and trimmed to size to fit behind the bottle like this can be a bit tricky, but it's the only way to get the desired results.

The only real difference between photographing a small product and a larger object is the matter of scale. Instead of a small product sitting on a tabletop with a three-foot square fabric remnant as a background, the large object probably sits on the studio floor and needs the full eight-foot width of a roll of background paper or a painted muslin backdrop. Larger objects may need to be moved into position on a painted cyc-wall with a dolly or forklift.
Note
Some photography studios have a cyc-wall (sometimes called a cyclorama or infinity wall) where the wall blends into the floor in a gentle curve. The cyc-walls in some larger studios extend around two adjacent walls and the corner. The cyc-wall and floor can be painted a solid color to create a seamless background for large product photography.
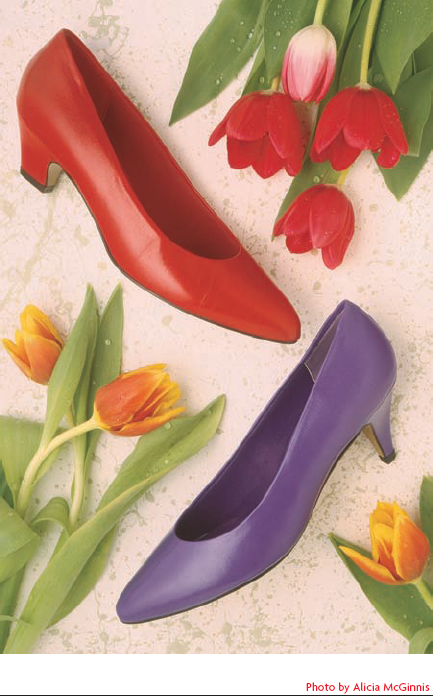
Despite the difference in the size of the subject, the basics of camera angle, exposure, and lighting remain the same — you just need to do things on a larger scale. For example, adjusting the camera to a higher angle for a small product shot might mean moving the camera up a few inches, which you can accomplish with a few turns on the crank that raises the center post of your tripod. To make the same camera angle adjustment when photographing a larger object, such as the table saw in figure 14-20, you may need to move the camera several feet higher, which is likely to require climbing a stepladder.

You need to scale your lighting up in much the same way. When photographing large objects, the lights are usually farther away from the subject, so they need to be brighter in order to achieve a similar light level on the subject. (Remember the inverse square law: doubling the distance from the light to the subject reduces the light intensity to one fourth the brightness.) You may need to use more powerful lights to get sufficient illumination levels for good exposures, and you may need more lights just to cover the larger working areas that large products require.
Note
For a complete description of the inverse square law see Chapter 10.
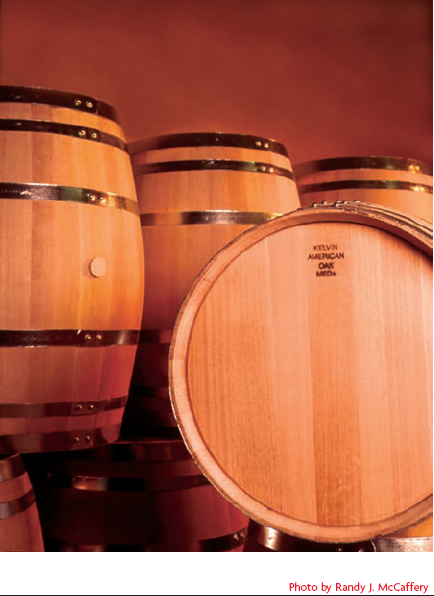
Figure 14-21 is an example of needing more lights for a larger product. The lighting scheme is simple, with the main light coming in from the right side. If the whiskey barrels were only about a foot tall, the photographer might have been able to position one light to illuminate the main subject and also spill onto the background. However, the size of the subject requires two lights to cover all the barrels, plus a third light for the background.
As you adapt your small product lighting to larger objects, keep the following points in mind:
Hard, point-source lights scale up fairly easily. As distance from the subject increases, you need higher light output, but the essential character of a point source light doesn't change. Going from a tabletop setup to a larger product can be as simple as selecting a hot light with a higher wattage lamp, or increasing the power setting on your flash power pack.
Broad lights are designed to spread their light over a wide area, and they quickly lose their effectiveness as their distance from the subject increases. To scale up for larger products, you need to either go to a larger, more powerful broad light, or replace a single broad light with a bank of two, four, or more lights. You generally want to keep broad lights as close to the subject as possible.
Soft lights, such as softboxes and umbrellas, achieve their soft effect due to the large size of the light source relative to the size of the subject. Therefore, they need to get bigger in proportion to the size of the product and their distance from the subject in order to maintain that soft light quality. For moderate-sized products, you can compensate by using some of the larger umbrellas (five feet or more in diameter) and softboxes (four by six feet) that are available. For larger products, you need to go to lightbanks, which combine multiple light heads in a single large diffuser that works like a super-sized softbox. Another way to create a large diffuse light source for a large product, is to put one or more lights behind a suitably large piece of diffusion material. The diffusion material might be translucent plastic stretched on a large (4′×8′) wooden frame, or white fabric hung from the ceiling of the studio.
Reflectors also need to get bigger as the subject size increases. Instead of a ten-inch reflector card positioned a few inches from a small product, you may need a large reflector panel eight-feet square positioned a few feet from the subject. (I often use two 4'x8' sheets of white foam board, hinged together along the long sides with white gaffer tape.)
Overhead lighting for a small product is simple to arrange with a light mounted on a boom stand. To achieve a similar effect on a larger product often requires suspending one or more lights from the studio ceiling. Studios that specialize in large product photography often have a grid of pipes suspended from the ceiling to provide attachment points for overhead lights.
Tip
Instead of trying to position a large soft light source above a large product, try suspending a large reflector from the ceiling over the subject and using it to bounce the light from one or more lights pointed up from below. The reflector can be a lightweight sheet of foam board, which is easy to lift and maneuver. Keeping the lights where you can reach them from ground level makes the task of adjusting the lights much easier than trying to work with lights suspended from the ceiling.
Photographers often build room sets in a studio when a product needs to be photographed in its environment and a suitable location isn't readily available. The subject might be kitchen or bathroom cabinets, appliances, flooring, furniture, bedding, or any of hundreds of other products that look best when placed in context of an appropriate surrounding.
Building a room set may sound like a lot of work (and sometimes it is), but it's sometimes the only viable alternative to shooting in cramped quarters such as a bathroom or closet. Even when space isn't such a severe problem, building a studio set is often easier than finding a remote location, getting permission to use it, moving existing furniture out and replacing it with the product, setting up all the lights and camera equipment, shooting the photograph, and then packing up and restoring the location to its original condition.
Besides, the set doesn't have to be as big and elaborate as you might think. Studio sets have more in common with stage backdrops than they do the rooms they try to emulate. Sometimes a set is as simple as one section of wall propped up in the studio and some carpet or a rug on the floor. Figure 14-22 shows a set consisting of two walls joined to create a corner, and there's a window in the wall on the right. Most photographers seldom need a more elaborate set.

At first glance, you might expect that lighting a room set would be very similar to lighting an architectural interior, but you normally have much more control and flexibility in positioning the camera and lights in the studio than you would on location. The set usually consists of only the walls in front of the camera, so the opposite walls aren't there to restrict where you place your camera and lights the way they are in a room at a remote location. Most sets don't have ceilings either, so you can hang lights from the studio ceiling to light your set. As a result, lighting a room set is often more like lighting a large product than it is like lighting an architectural interior.
One thing that you need to think about as you light a room set is that the set will be more believable if the lighting emulates a real room. For example, in figure 14-22, the main light comes from overhead and from the right side. The chair and plant cast shadows to the left onto the wall. That looks right because the window in the wall on the right leads you to expect a light from that side. You can easily imagine another window, just outside the frame on the right, as the source of the light that creates those shadows.
Another lighting technique that helps add interest and makes the set look more believable is the light and shadow pattern across the chair and the picture on the left wall. It mimics the effect of a beam of light coming through a window and the shadows that would be created by the window frame and mullions. The photographer created the effect by cutting window pane sized holes in a piece of foam board placed in front of the light that creates the accent light on the chair and picture. A device for creating this kind of shadow effect is called a gobo.
Figure 14-23 is a more extreme example of this same technique. The contrast between light and shadow from the key light and gobo is much greater because the overall light level from the other lights on the set is lower. However, it still looks believable because the effect is that of a room that is being lit by a beam of light from a distant window and there are several obstacles breaking up the light and creating shadows before it reaches the bed. This lighting scheme effectively accentuates the bedding while subduing the details of the set, which happens to be a wall of the warehouse area adjoining the photography studio.

Photographing paintings, mirrors, and other two-dimensional artwork presents some very special challenges. Normally, the goal is to create as faithful a reproduction of the original artwork as possible, so the task is one that demands technical precision rather than creativity.
There are two approaches to photographing artwork. One is to shoot the artwork in its normal environment, as in figure 14-24, and the other is a straight-on copy of the artwork itself, such as in figure 14-25. Surprisingly, the environmental shot is usually the easier of the two to pull off because you have some leeway to adjust camera angle and lighting, and the success of the shot is based as much on the overall appearance of the entire scene as it is on the detail of the artwork itself. The straight-on copy requires strict adherence to an established formula that dictates the specific camera and lighting setup. It has the advantage of being a standardized arrangement, but the standard is an unforgiving one.


Surface reflections and glare are the biggest problems you face when photographing two-dimensional artwork. The problem is worse when there is glass in the frame that covers the artwork, but the glossy surface of the varnish coating an oil painting can create considerable reflection problems too — especially if the piece includes a lot of heavily textured brush strokes. The peaks and valleys of the brush texture are sure to catch and reflect some specular highlights, no matter how carefully you position the lights to avoid it.
Avoiding large-scale glare problems across a piece of artwork in an environmental setting is fairly easy if you remember the rule about angle of incidence equaling angle of reflectance. You're probably shooting the artwork from a slight angle, and you can eliminate most glare problems by simply avoiding putting a light source — either direct or reflected — in a position to shine onto the subject from the mirror image of your camera angle. In figure 14-24, the main light is coming down from the upper-left. Since the camera is also positioned to the left of the artwork, there's almost no chance of getting any reflection or glare from the main light on the surface of the painting. The fill light is more likely to create a reflection problem since it's positioned to the right of the camera, but it's still to the left of a line extending out from the wall, perpendicular to the painting, so it's in the clear too. On the other hand, moving the fill light a foot or so farther to the right would create a major glare across the entire surface of the painting.
The camera position and lighting for a straight-on copy follows a fixed formula, as outlined in the following steps:
Start with the artwork hanging on a wall so that it is straight, square, and plumb. The surface of the painting should be vertical — parallel with the wall. Don't just eyeball the alignment — use a bubble level to get it right. You may need to add spacers behind the bottom corners of a framed painting to get it to hang so that it's plumb instead of tilting out slightly at the top.
Drop a plumb line down from the center of the artwork and mark that spot on the floor. Then mark a line on the floor that starts at that point and goes out into the room, perpendicular to the wall. You can use a chalk line or masking tape to mark the line on the floor. To ensure that it's perpendicular to the wall, measure out along the base of the wall and mark points three feet on either side of the centerline; then measure out four feet along the centerline. The diagonal measurements from there to the three-foot marks should be exactly five feet. Add two more lines on the floor, each one starting at the point where the perpendicular line intersects the wall and radiating out at 45-degree angles on either side of the centerline.
Position the camera (on a tripod, of course) so that the lens is exactly perpendicular to the center of the artwork and the camera back is parallel to the surface of the painting. To do so, first position the camera so that it's a comfortable working distance from the artwork and the lens is exactly over the centerline mark on the floor. Then measure the distance from the floor up to the exact center of the artwork and adjust the height of the camera lens to match that measurement. Use a bubble level to ensure that the camera back isn't tilted vertically. Finally, pan the camera to center the artwork in the frame. The camera should be squared up with the artwork.
Position two identical lights on the 45-degree lines on either side of the camera to light the artwork equally from both sides. Make sure the lights are far enough away so that their light spreads evenly across the entire surface of the artwork. Use a tape measure to ensure that both lights are equal distance from the artwork, and also measure from the floor up to the center of the light to make sure the height of the light matches the height of the camera lens and the center of the artwork. Carefully aim each light at the center of the painting.
Hold a gray card up in front of the artwork and use it to set your camera's white balance and exposure, then photograph the artwork using those settings. Don't use the camera's automatic white balance or exposure features, because artwork often includes nonstandard distribution of colors or grayscale tones that can skew the camera's exposure and color automation.
Tip
Be careful of reflections from glass over the artwork. The glass can act like a mirror, reflecting the camera and photographer, which are both directly in front of the glass. To eliminate reflections, keep the camera (and the rest of the studio) in the dark. If you can't darken the studio, hang black velvet in front of the camera to control the reflections. Shoot through a peephole in the black drape.
How can I photograph a television or computer screen?
Attempting to photograph the on-screen image from a television or computer screen can be a little tricky, especially if you also want the television and its surroundings properly exposed. First, it's important to understand that the image on a television or computer screen doesn't pop onto the screen all at once. Instead, it's scanned a line at a time, from top to bottom, and the process occurs about 60 times per second. Therefore, you need to use a shutter speed of 1/60 second or slower to capture the full scan. If you use a faster shutter speed, you'll get only part of the screen image, and the rest of the screen will be black or show only a dim ghost image left over from the previous scan. Furthermore, television broadcasts (and some computer displays) are interlaced, which means that each scan hits every other line and it takes two scans to produce the complete image. To photograph an interlaced screen image, you need to use a shutter speed of 1/30 or slower. You can usually use your camera's automatic exposure system to get a decent exposure for the screen, as long as you make sure the shutter speed is slow enough to capture the full image scan.
Color balance is another area that can be a little tricky. Televisions and computer screens are normally found indoors and you might expect them to have a color temperature that is similar to typical tungsten lights, but that's not the case. The color temperature of most televisions and computer displays is around 6000 kelvin, which is just a tad bluer than standard daylight. As a result, the screen image will look way too blue compared to its surroundings if you use tungsten lights for the rest of the scene. On the other hand, if you use flash to light the surroundings, the screen colors should match up reasonably well.
So, to photograph a television or computer screen with good color and exposure on both the on-screen image and its surroundings, you need to use flash (or another daylight balanced light source) to light the scene, you must use a slow shutter speed (usually 1/30 or slower), and you need to carefully balance the light level of the rest of the scene to match the brightness of the screen image. If you use flash, you need to be concerned only with matching the aperture for the flash exposure with the aperture for the screen exposure. The slow shutter speed doesn't increase the flash exposure.
What is the foam board you mentioned using for reflectors?
Foam board is a versatile product that is very handy to have around a photography studio. It comes in sheets, like cardboard, and consists of a Styrofoam or polystyrene core laminated between smooth paper surfaces. Foam board is light weight, rigid, and easy to cut with a sharp knife. It's available in thicknesses ranging from 1/8" to 1" and sheet sizes ranging from 8"x10" up to 4'x10'. It's primarily used in picture framing, sign making, presentations, and other graphic arts applications, and you can often find smaller sheets (30″×40″) available in art supply stores under brand names such as FOME-COR and Gatorboard. For larger sizes, try www.foamboardsource.com.