
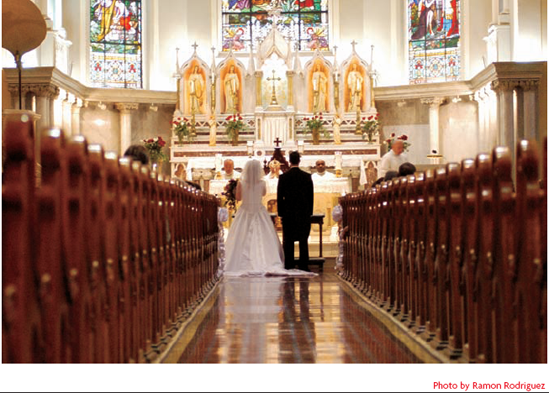
In a photographic studio, the photographer has absolute control over every nuance of the lighting for each photograph. However, most photographs aren't taken in the controlled environment of the studio. Instead, the photographer must venture out of the studio to find and photograph subjects, such as figure 10-1 in their natural environments. In most cases, photography at remote locations outside the studio means working with whatever existing light is available.
By necessity, a photographer's approach to available light photography is fundamentally different from studio photography. The emphasis is on analyzing and adapting to the light that is available at the subject's location rather than creating your own lighting scheme from scratch as you do in the studio.
This chapter explores some typical available light sources and situations with examples of how different photographers handled those situations. Although I can't possibly provide comprehensive coverage of the many varied light situations that you might encounter, the images on these pages encompass the work of several photographers in a wide range of lighting conditions.
In many cases, working with available light simply means recognizing the good qualities of whatever light is available and making the best of it. In some cases, you may be able to manipulate or supplement the available light to enhance your photograph. In other cases, you may elect to replace some (or all) of the available light with portable photographic lighting that ranges from a simple on-camera flash unit to a full set of portable studio lights. Even when you decide to replace the ambient light at a location with photographic lighting, you must still deal with the existing light, if only to ensure that you eliminate its influence on your photograph.
There are distinctly different approaches to photography that are particularly evident in how different photographers work with available light.
Photojournalistic: Some photographers take a photojournalistic approach. They see their role as that of an observer and recorder of the world around them and seek to do so with minimal interference. Some of the more extreme practitioners of this approach refuse to use any sort of supplemental lighting whatsoever, but most will use a reflector or flash fill occasionally if it's necessary to get the shot.
Artistic: Other photographers take a much more hands-on approach to location lighting. They see the pre-existing lighting as a starting point and actively look for ways to manipulate and supplement that lighting to create the finished photographs they envision.
Both approaches are valid, and they sometimes overlap significantly. A photographer who normally tends to take the photojournalistic approach may sometimes need to manipulate the lighting heavily to get a shot that tells the story they want to present. In contrast, a photographer who normally adjusts the lighting of each shot may sometimes encounter situations in which no lighting manipulation is needed.
The most common form of available light for photography is daylight — the direct or reflected light of the sun. From dawn to dusk, daylight is available to contribute at least some illumination for most any subject located outside of a windowless room or a deep cave.
Unless you're in the Arctic or Antarctic in midwinter, you can count on having at least a few hours of daylight each day, but you can't necessarily count on the quality of that light. Sunlight changes direction constantly during the day as the sun makes its arc across the sky, and the brightness and character of the light changes with time of day and atmospheric conditions.
None of those changes are within the photographer's control. You can't reach out and move the sun to a different angle or adjust the position and density of a cloud to create more or less diffusion. Instead, you need to become a keen observer of the quality of the naturally occurring light and how it affects your subject; and then be selective about when and how you take the picture. Sometimes, that means grabbing the shot in the brief moment when you see that the light is right, and other times it means waiting for the light to change (hopefully, for the better). Sometimes, you might change the camera angle or reposition the subject to take better advantage of the naturally occurring light.
Perhaps the most predictable changes in sunlight come with different times of day. As the sun starts its daily journey low in the eastern sky, the early morning light is warmer in color and not as bright as it will be later in the day, and it's often softened by fog or mist left over from the night before, as in figure 10-2.
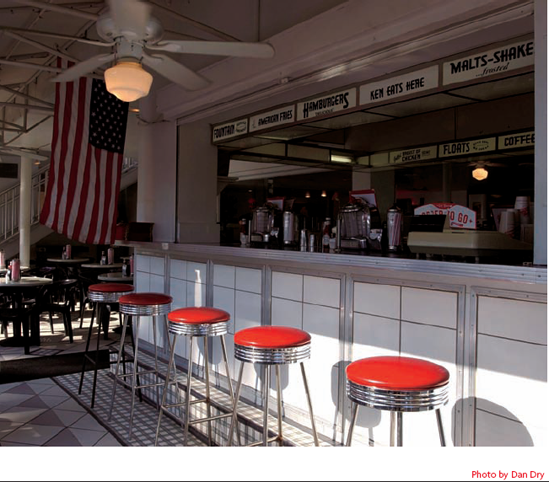
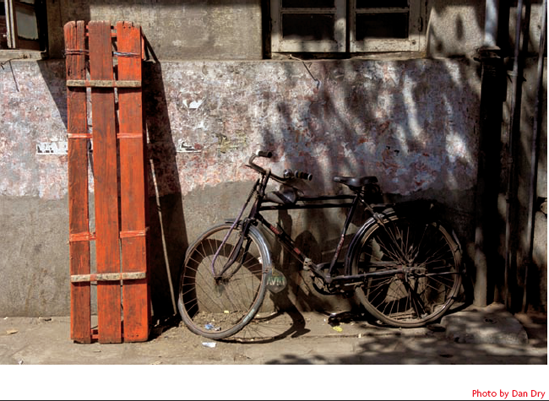
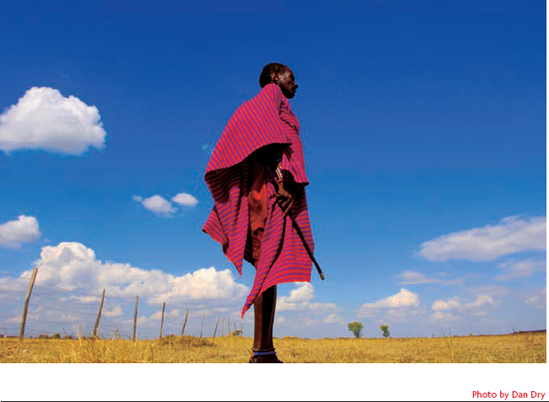
Mid-day sun creates a very different effect, as in figures 10-3 through 10-5. The sun is higher in the sky and its bright light creates sharp contrast between the brilliant highlights and the short, dark shadows. The dense shadows create an opportunity to play with shadow patterns (figure 10-3), and the crisp lighting enhances some industrial subjects (figure 10-4), which makes for good abstract studies. On the other hand, mid-day sun is not usually the preferred lighting for people, but can be appropriate when the goal is to accentuate a colorful costume and striking pose (as in figure 10-5) instead of flattering lighting on the subject's face.


As the sun begins to descend to the west in the late afternoon, the shadows get longer and less intense as a result of the lower angle and decreasing brightness of the sun. Compare the length and openness of the shadows in figure 10-6 to the short, dark shadows of figure 10-3. Both images were shot in direct sun, just at different times of day.
Evening sunlight changes color as well as angle. It takes on a warm, yellowish glow, which you can see in the color of the flagstones in figure 10-6 and in the bride's flesh tones and the yellowish greens of the garden setting in figure 10-7. You could adjust your camera's white balance setting to compensate for the color shift and neutralize the colors in the scene, but most photographers consider the warm tones to be highly desirable and stick with the daylight color setting to record them without adjustment.
Tip
If you want to exaggerate the warm tones of evening sunlight, set your camera's white balance to a higher color temperature than normal daylight. The cloudy or shade settings may do the trick.

As daylight wanes and evening gives way to dusk, the light changes even more. When the sun dips below the horizon, distinct shadows disappear, and so does the warmth of sunlight. Even after careful color correction, pictures such as figure 10-8 take on a distinctly cool tone as a result of being lit by the scattered reflections of the blue sky rather than the direct light of the sun.

Before reaching the Earth's surface, sunlight is filtered, reflected, scattered, and blocked by haze, clouds, rain, fog, and more. All these atmospheric conditions can change the character of the light drastically. As a photographer, you need to be attuned to these changes and how they affect the lighting on your subjects.
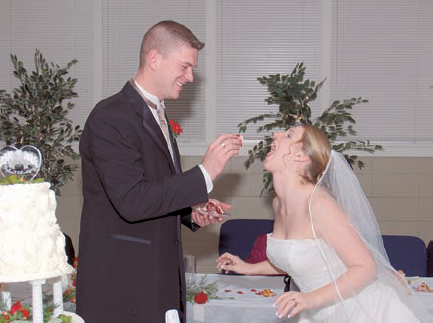
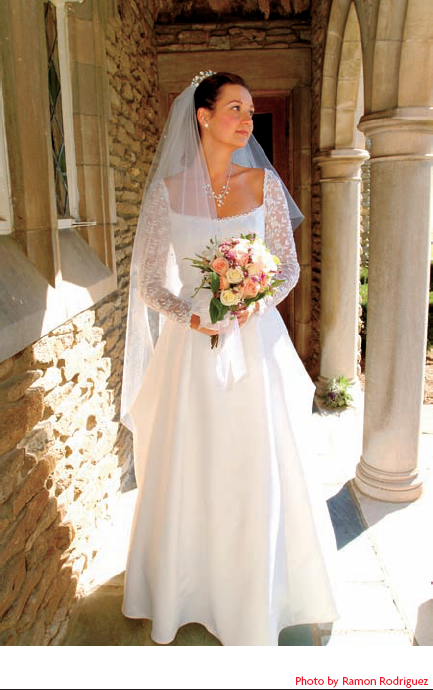
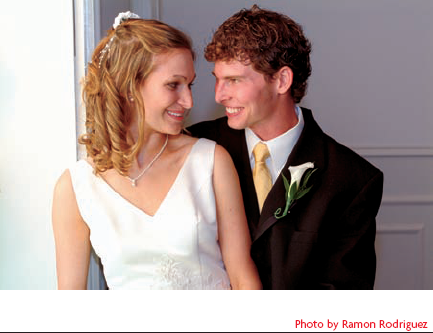
On a clear day, direct sunlight creates crisp, high contrast lighting with gleaming highlights and dense shadows. In figure 10-9, the photographer used the brightness of the direct sun to emphasize the radiant white of the bride's dress in contrast to the deep shadows behind her.
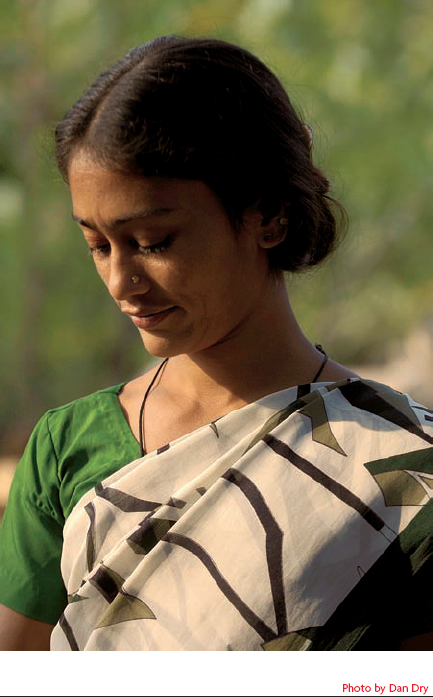
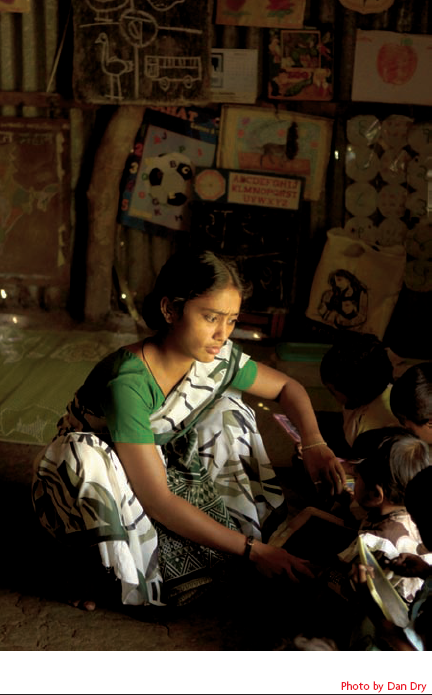
In figure 10-10, the photographer used the strong contrast of direct sunlight in a different way. Catching this beautiful young Indian woman posed so that most of her face is in shadow allows the sunlit highlight to outline the shape of her face. It's an unusual approach to outdoor portrait lighting, but it works well in this case.

Indirect sunlight has a very different character. In figures 10-11 and 10-12, the subjects were both photographed outdoors in daylight, but were in the shade instead of in direct sunlight. The light is from an open expanse of blue sky, which furnishes a large, diffuse light source instead of the stark point source of direct sunlight. This is the classic open shade lighting, and it's generally considered a more flattering light for portraiture than direct sunlight. Open shade is a soft light that produces open, soft-edged shadows and just enough contrast between the highlights and the shadows to create good modeling to define forms.
Note
See Chapter 2 for more information on color temperature and setting white balance.
Tip
Open shade lighting is cooler in color than direct sun, but that's easy to correct by selecting the appropriate white balance setting on your camera or by adjusting the color during post processing in your favorite image editor. Some cameras feature a "shade" setting (7500 kelvin) for this purpose.
Notice how the stark contrast in figure 10-10 hides the detail and focuses your attention on the simple line created by the highlighted side of the face. Compare that to the way the softer lighting in figures 10-11 or 10-12 focuses more on three-dimensional form and brings out details in both highlights and shadows.
The clouds of an overcast sky filter and diffuse the harsh sunlight to create another one of nature's soft light sources. The exact effect of an overcast sky depends on the density of the cloud cover.

A light overcast merely softens the sunlight slightly — you still get a directional light and distinct shadows, but the shadows are lighter and softer edged compared to direct sunlight on a clear day. Notice the soft edges of the shadows under the bench and plant stands in figure 10-13. They're not the hard-edged shadows of direct sunlight, but they are still distinct enough to see individual shadows of the cross braces for the plant stand legs.
A heavier overcast diffuses the light more completely so that the entire sky becomes the light source. Distinct shadow edges disappear, replaced by a very gradual transition from highlight to shadow. The diffuse light tends to fill in all but the deepest shadows. For example, in figures 10-14 and 10-15, the eye sockets of the subjects in both pictures are barely darker than the rest of the faces. The shadows under the jaws are only slightly darker. In figure 10-15, the blue tarp casts a noticeable shadow on the wood, but the edge of the shadow is so soft that it defies exact definition.


Tip
Like open shade, the light from an overcast sky is cooler in color (higher color temperature) than direct sun. As a result, images shot under an overcast sky will have a bluish tint unless you set your camera's white balance to a higher color temperature or adjust the color balance during post processing. Some cameras have a "cloudy" setting (about 6500 kelvin) for this purpose.
When storm clouds cover the sky, they can block most of the sunlight, creating a dusk-like lighting condition. The resulting light is usually dim, flat, and rather uninteresting. But it's a different situation entirely when there's a bit of sunlight peeking through breaks in the clouds as in figure 10-16. The dappled patches of sunlight scattered across the landscape create interesting contrasts, especially when areas of sunlit ground are brighter than the dark underbelly of the clouds above.
You can sometimes see this effect at mid-day when the sun shines through gaps in a general cloud cover. Under the right conditions, the sunbeam effect shown in figure 10-17 appears. However, the most dramatic effects usually occur in the early morning or late afternoon when the sun is at a low angle so that it shines under the thick clouds above the subject. For example, in figure 10-18, the sunlight coming in from behind and to the right of the photographer spotlights the lifeguard stand against the dark sky, made darker by the gathering clouds and approaching night.
Getting a good exposure in this kind of high-contrast lighting situation is a challenge. You might get lucky using your camera's matrix metering mode, but it's more likely that the automatic exposure system will overexpose the white lifeguard stand in order to render the dark sky with more midtones. If you're adept at using the Zone System, you could spot meter the sky, sand, and the lifeguard stand and calculate the exposure to place each one in the appropriate zone. Perhaps the simplest solution is to recognize that this is a situation that may fool your automatic exposure system and use your camera's exposure compensation feature to shoot a bracket of alternate exposures around whatever the meter indicates.

Note
See Chapter 5 for more information on the Zone System and Chapter 3 for information on bracketing.
Atmospheric conditions aren't confined to various levels of cloud cover far up in the sky. You can also encounter atmospheric phenomenon at ground level in the form of fog, mist, haze, and rain or snow. And of course, all these conditions affect the quality of light.


Sometimes, fog makes a good photographic subject, as in figure 10-19. Besides being a nice picture of a tranquil scene, this image demonstrates some of the light altering characteristics of fog. Notice that the fog bank almost seems to glow with a soft white light, even though it isn't a light source itself. The light comes from the sky above, but it's being diffused by the water droplets in the fog. Passing through the fog causes the light to lose directionality and scatter in all directions. The light scatter toward the camera creates the white glow, and the scatter back toward the trees adds some light and subtle color to the bank and trees that would otherwise be stark silhouettes.
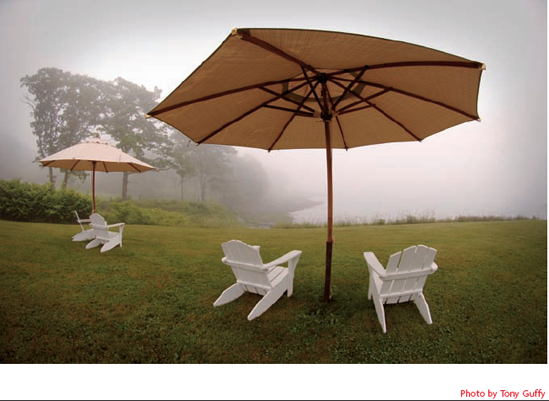
In figure 10-20, the fog bank is larger, completely covering the sky. It rises from the bank of the lake and continues up and overhead above the photographer, enveloping the entire scene in very soft light. Notice the subtle shading on the surfaces of the chairs, especially the backs of the chairs closest to the camera. On a clear day, those surfaces would be in deep shadow.
Figure 10-21 shows the effect fog has on the apparent sharpness of the objects in the scene, which is also a result of the light-scattering properties of the water droplets in the fog. The more fog there is between the camera and the subject, the lighter and less distinct that object appears. The foliage in the foreground at the bottom of the frame is relatively sharp, the front of the barn is blurred, but retains some visible detail, the back edge of the barn roof is much less distinct, and the shape of the tree behind the barn is barely discernable.
Fog isn't the only atmospheric condition to create blurring and lightening of distant objects. In fact, any sort of dust, rain, snow, mist, or humidity in the air can cause a similar effect, and does so in most scenic photographs. The strength of the effect is proportional to the amount of moisture or dust in the air. Dense fog, rain, or snow can obscure object detail in a few feet. The haze of a humid day in the southeast might create a similar effect in a few thousand feet. In the dry air of the southwest, you can see clearly for miles, but even there, the distant mountains turn blue and merge with the sky.


Outdoors, the quality of available light varies with time of day and atmospheric conditions. When you move indoors, you must contend with even more variability in the lighting. The light comes from a variety of sources, such as daylight entering the room through windows and skylights, artificial light from lamps and ceiling lights, and reflections from walls, ceilings, and other surfaces. Light from the various sources differs in brightness, character, and color — and you must sometimes deal with a mixture of light sources within the same scene.
Another significant difference between indoor and outdoor available lighting is that the light sources tend to be much closer to the subjects indoors. When working in close proximity to the light source, small changes in the relative position of the subject can make significant changes to the light on that subject because of the inverse square law. Light is brightest at the source, and that brightness diminishes rapidly as distance from the source increases. Consequently, indoor light levels can vary drastically as you move into or out of the pools of light from the individual light sources.
Note
See Chapter 9 for an explanation of the inverse square law.
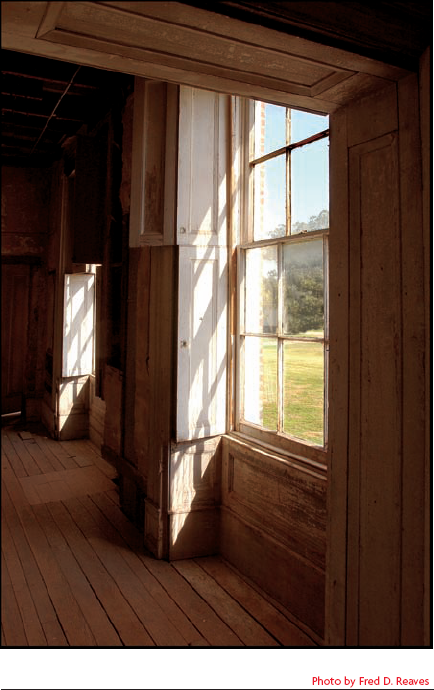
Daylight entering a room through a window, door, or skylight is often considered one of the nicest forms of indoor lighting. One of the things that makes window light attractive to photographers is that it is usually a bright light with good color. In addition, windows are usually the largest light sources in a room, lighting larger areas with more even light level than other typical indoor light sources.
Of course, the quality of light from a window depends on the size and location of the window and on the outside lighting conditions. You get different kinds of light through windows on the sunny and shady sides of a building, and the light is different on sunny or cloudy days. Drapes, shades, and other window treatments (as well as tinted glass) also affect the quality of the light.
Figure 10-22 is a beautiful study of the quality of window light. Notice how the light from the window plays across the adjacent wall. The light is brightest near the corner close to the window and dims gradually toward the left side of the frame. It's a soft light coming from a large area of open sky rather than direct sunlight. As a result, the shadows from the chair are soft-edged and there's no visible shadow from the window mullions.

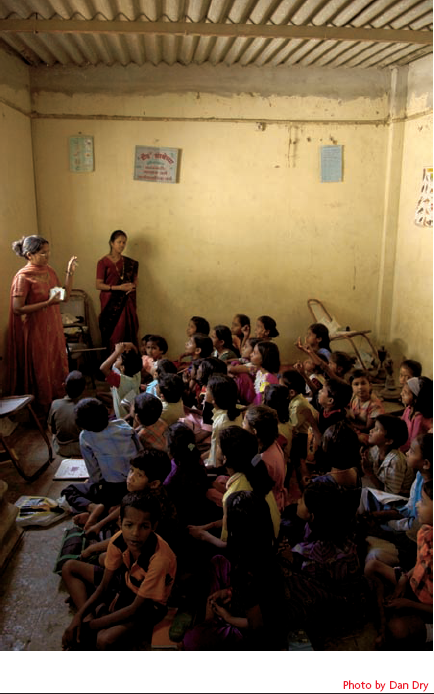
Figure 10-23 shows a classroom lit entirely by window light. The window itself isn't visible in the frame, but its location behind the teacher on left is clearly evident from the pattern of light on the walls and the highlight on the teacher's head and shoulders. Notice how the pool of light from the window lights the faces of some of the students.
In figure 10-24, the light from the window creates nice modeling across the man's hat and face, with a highlight along the edge of the hat nearest the window. To create this effect, the light outside the window must be soft and diffuse — probably an overcast day.

Figure 10-25 is another example of an informal portrait by window light. In this case, the window is outside the frame on the left. The light is soft and broad, creating gradual transitions from highlight to shadow, but the dim interior of the room creates strong contrast with a dark background and deep shadows.

In figure 10-26, you can see the effect of soft window light from another direction. This time, the light source is behind the photographer, and it's a large open doorway rather than a typical window. Notice the rich detail in the skin made possible by the modeling from the soft directional light.

Figure 10-27 shows that direct sunlight through a window creates high contrast lighting, just like direct sun outside. The extreme brightness difference between the sunlight and the interior of the room creates the opportunity for dramatic lighting effects. If you expose for the sunlight, as the photographer did in this case, anything not in the direct beam of sunlight coming through the window goes nearly black. Notice how sharp the shadows are and that even the shadows of the window frame on the surface beside the window are lighter than the rest of the room.
A constrained beam of light coming in through a window can create an interesting spotlight effect on a subject. For example, notice the strong contrast between the dark background in figure 10-28 and the subject sitting in a pool of light from a window. The small pool of light in a dark room usually occurs when direct sun beams through a window, and that often creates harsh, hard-edged shadows. In this case, the slight softness of the shadows indicates that a light overcast outside or something on the window that is diffusing the light slightly.
There's more to working with available light indoors than just window light. Sooner or later, you must deal with the man-made artificial lighting and homes, offices, and other buildings. The quality and quantity of that light varies tremendously.
The overall light level in a typical private home is often surprisingly low after the sun goes down and window light is no longer making a significant contribution. The general illumination level is often just high enough to allow the occupants to move around the house without stumbling over things in the dark. Table lamps and other task lights create pools of brighter light for reading and other activities.
This scenario creates a real challenge for available light photography. The low light levels make it difficult to get a good exposure, even with slow shutter speeds, high ISO settings, and the camera mounted on a tripod. Furthermore, table and floor lamps tend to create hotspots within the prevailing darkness, and because they sit low and are scattered around the room, it's hard to avoid having them appear in the frame, as in figure 10-29. You're frequently forced to choose between an exposure that renders the surrounding area properly while overexposing the area around a lamp, and one that favors the brighter area around the lamp while allowing the surroundings to go dark.
Tip
Because of the low light levels in many private homes, photographers jokingly refer to the conditions as available darkness instead of available light.
Good quality available light photography in a residential setting is challenging, but it's not impossible. For the informal portrait in figure 10-30, the photographer needed to find a spot where the existing lighting was favorable and a cooperative subject who could sit still during the 1/10 second exposure.
Offices, stores, and other commercial interiors generally offer better available light photography potential than residential settings. The overall light level in most offices is significantly higher than the typical home, and the light is usually more evenly distributed with fewer isolated bright spots. Most of the light usually comes from ceiling fixtures, so it's easier to avoid having the light source appear within the frame.
Offices, such as the one in figure 10-31, pose their own challenges for available light photography. Although the light levels are generally higher than what you find in homes, they still fall short of ideal levels for photography. For example, the exposure for figure 10-31 was 1/80 at f-2.8 with ISO 400, which is fairly typical. In this case, there is also some window light in the scene, but it isn't bright enough to overpower the interior lights. (It was probably an overcast day, which produced similar light levels in the room from the windows and the interior lights.)

The color of the light is also an issue in many offices. The predominant form of lighting is usually fluorescent ceiling lights, but there is often a mixture of different kinds of fluorescent tubes installed, as well as incandescent lighting and window light. Selecting the appropriate white balance setting is sometimes pure guesswork, and you still may have some pools of off color light somewhere within the image no matter what you do.
Tip
White balance can be problematic when taking available light shots in an office. Shooting in Camera Raw format (if your camera offers that option) gives you the flexibility to adjust the white balance later, when you process the Raw file, instead of having to commit to a white balance setting when you take the picture.
Inconsistencies in the color and brightness of the light sources in a scene can be a problem, but it can also create an opportunity to do something a little out of the ordinary. In figure 10-32, the photographer accentuated the spotlight effect on the hanging meat and the trays on the counter by slightly underexposing the overall scene, which reduced the overexposure of the bright areas and added contrast by making the rest of the scene a little darker.
One of the challenges to shooting people in an office environment is that almost all the light shines down from overhead, which tends to create deep shadows in the eye sockets, under the chin, and so forth. If the subject looks down, the entire face can be in shadow. In figure 10-33, the photographer partially overcame this problem by posing the subject with his head tilted back slightly, which exposed his face to more of the overhead light, but the eye sockets are still shadowed.


Lighting in gymnasiums, arenas, stadiums, and other sports venues runs the gamut from awful to reasonably good.
As a general rule, the facilities designed for professional and major college teams have the best lighting. They're usually engineered to meet the needs of broadcast television with reasonable levels of good-quality light. As a result, there's enough light to support action-stopping shutter speeds, such as the 1/500 second used to shoot the images in the composite shown in figure 10-34, and the light usually has good color too. The light is almost all from overhead, but there's enough of it to provide decent illumination, if not flattering light angles.
In contrast to the big league facilities, local school gyms often have relatively poor lighting. The light levels are typically much lower than you find at larger facilities. For example, figure 10-35 was shot at the same f-2.8 aperture as figure 10-34, but the photographer had to wait for a natural pause in the action in order to catch the young player with the slow 1/40 second at ISO 400 that the lower light levels of the small gym required.
Tip
You might be tempted to use flash to overcome the low light level found in small gyms, but I don't recommend it. A normal on-camera flash unit isn't powerful enough to effectively light a space as large as a gymnasium, but it may be bright enough to distract the players, which could be dangerous. A distracted player might fall or run into other players, benches, or photographers on the sidelines. People could get hurt!
Another problem that you may encounter in smaller gyms is poor color quality of the light. To reduce cost, small gyms often use the same kind of mercury or sodium vapor lights typically used in factories and warehouses. These lights emit a discontinuous spectrum that makes it impossible to get good color rendering, no mater how you set your camera's color balance.
Note
See Chapter 2 for more information on color balance and color temperature.

Churches and school auditoriums are more examples of challenging locations for available light photography. They are rarely designed with photography in mind. Light levels are relatively low, and mixed-color light sources are common.
For example, the lighting in the church in figure 10-36 includes daylight coming in through the skylights at the peak of the roof, incandescent lamps in the hanging light fixtures, and fluorescent lights along the left wall. Sunlight filtered through a large stained glass window behind the camera adds a red glow to the ceiling beams on the left. Despite all the different light sources, there's only enough overall light to support an exposure of 1/4 at f-3.5 with ISO 200. Because the camera was mounted on a tripod, the static parts of the image are sharp, although some of the people are slightly blurred due to the slow shutter speed.
Figure 10-37 shows another church with a different lighting challenge. The lights are all the same color, but the location of the lights embedded in and around the alter area creates numerous hot spots that are overexposed when the exposure is set at an appropriate level for the rest of the scene (1/40 at f-2.8 with ISO 200). The shutter speed was pushing the limits of a hand-held exposure with an 80mm lens, so it isn't quite as sharp overall as 10-36.


Stage lighting for a concert, play, or other stage production is yet another peculiar lighting situation that you may want to photograph. It's an unusual situation where you have a subject lit by very bright lights, but the rest of the room (and sometimes, the rest of the stage) is in near total darkness. Stage lighting is often characterized by very harsh light from odd directions, which can create hard-edged shadows in awkward locations, but there's nothing you can do about that.
Spot metering is essential for getting good exposures of a subject in a spotlight at a concert, such as the one in figure 10-38. It's the only way to be sure that your camera is basing its exposure calculations on the light reflected from the subject you want to photograph and not the black background or other parts of the stage, which may be lit very differently.
Plays and similar stage productions are usually a little easier to deal with because the entire stage is lit instead of a spotlight isolating an individual performer. The more uniform lighting means that you can probably use your camera's normal metering mode to set the exposure, provided that you can fill most of the frame with the image of the stage. Including too much of the dark auditorium could bias the exposure and cause the stage to be overexposed.

Sometimes the pre-existing light at a location just isn't quite good enough to produce quality images. Perhaps there's enough light for a decent overall exposure, but it's all from one direction, which creates some unwanted dark shadow areas. You have a choice of shooting a high-contrast image with no shadow detail, or augmenting the available light with some sort of supplemental lighting to make up for the shortcomings of the existing light.
On such an occasion, available light photography means making more light available. When done well, someone viewing the finished image never knows you added any light.
For example, figure 10-39 appears to be an architectural interior lit by the light from the wall of windows plus a few scattered ceiling lights and table lamps. However, although most of the light for this image did come from the windows, the photographer actually added significant supplemental lighting to open up shadows and balance out the difference in light levels between the areas close to the windows and areas farther into the room. There are photographic lights (strobes, to match the color temperature of the window light) positioned to the right of the camera and hidden at various locations throughout the scene, including behind the central column. The brightness of the supplemental lighting was carefully controlled so that it served as fill light instead of overpowering the window light. In addition, the photographer manipulated the image in Photoshop to bring back detail in the windows that was lost to overexposure in the main shot.

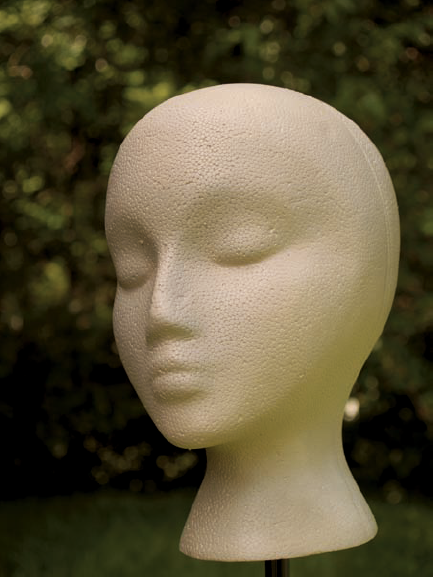
The direct light of the mid-day sun is just too harsh for many photographic subjects. The softer light of an overcast sky or open shade creates a more pleasing effect for portraits, fashion shots (such as figure 10-40), flowers, and many other subjects. However, nature doesn't always cooperate by providing shade from the direct sun or a strategically positioned cloud to filter the harsh sunlight.

It's fairly easy to change the light on a small subject. All you need is an opaque panel to create some shade or some translucent material stretched on a frame to diffuse the light. With these tools, you can convert the direct sunlight on the test subject shown in figure 10-41 to a more pleasing light.

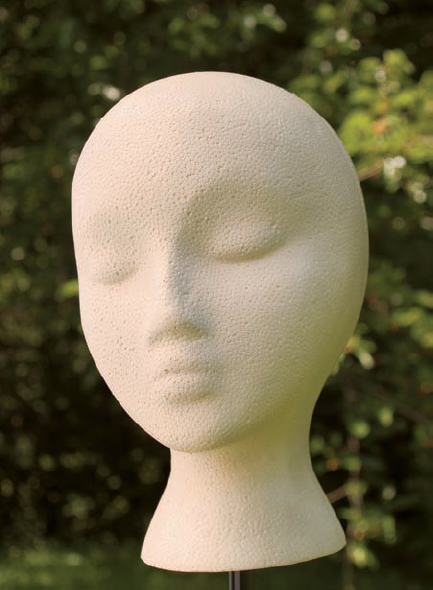
To create an open shade effect, position an opaque panel between the sun and the subject so that the subject is in its shadow. Figure 10-42 shows the effect of placing a black panel just outside the left side of the frame so that it blocks the direct sun. The test head is now lit by the open sky above and on the right side of the frame. As a result, the right side of the test head is now the highlight side instead of the sunlit left side in figure 10-41. Notice how much softer the shadows are in 10-42.
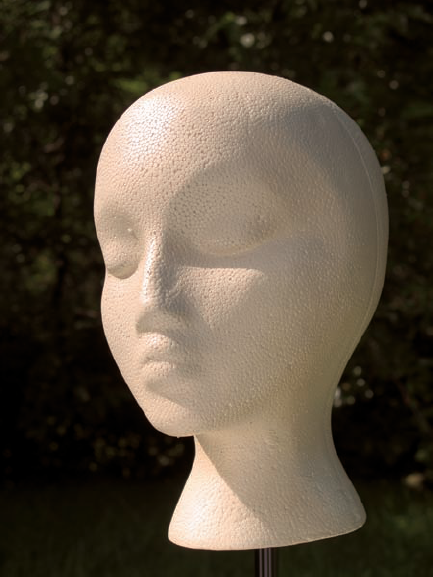
To simulate the diffuse light of an overcast sky, position a diffuser between the sun and the subject. Figure 10-43 shows the result of placing a diffusion panel vertically, just outside the left side of the frame. Notice that the subject is now lit by a soft light coming from the left. The highlights are on the left side of the head, just as they are in 10-41, but the shadows are much softer and the light wraps around the subject now because the diffuser acts as a large light source. The right side of the test head is getting a strong fill light from the general skylight — the same light that creates the open shade effect in 10-42. That light is present in 10-41, too but it appears much darker compared to the overpowering brightness of the direct sunlight and the reduced exposure that the sunlit subject requires.
Another way to soften and subdue shadows is to use reflectors to bounce light into the shadow areas. The reflector serves as a fill light, adding light to shadows to reduce excess contrast and improve detail in the shadow areas.
A reflector can be as simple as a piece of white cardboard or foamboard. You can also purchase specially made photographic reflectors in a variety of colors and reflective surfaces. The most common reflectors are matte white, matte metallic silver, and matte metallic gold.
Use a white reflector to bounce direct sunlight back into the shadows of a subject. For example, figure 10-44 shows the effect of a white reflector positioned adjacent to the lens on the left so that it bounces light up under the chin and nose. This is an exaggerated effect for demonstration purposes. Moving the reflector around to a more vertical orientation on the right side of the camera would produce a more subtle effect that would probably look more natural.
Use a silver reflector to open up shadows in open shade or overcast sky lighting conditions. A plain white reflector often isn't very effective under an overcast sky or open shade, but a silver reflector surface is much more efficient at bouncing the less intense light. To see the effect of a silver reflector, just compare figures 10-45 and 10-46. Figure 10-45 is an example of normal open shade lighting with the light coming from the top and right sides of the frame, and 10-46 shows the effect of adding a silver reflector positioned low and to the left of the camera to reflect light up into the shadows. Again, this is an exaggerated effect. You can easily reduce the intensity of the reflection by moving the reflector further back from the subject or positioning it at a less efficient angle.
Use a gold reflector to open up shadows in open shade or overcast sky lighting conditions while adding a warm color tint to the reflections. Figure 10-47 shows the effect of positioning a gold reflector surface similar to the silver reflector in figure 10-46. Notice the warm tone in the shadows under the chin, along the left cheek, and in the left eye socket.


When the existing light just isn't adequate, you may need to add some light of your own, and the simplest way to do that is with an on-camera flash unit.
Most digital cameras include a built-in flash, and it often pops up and fires automatically when the camera senses that the ambient light level is too dim to enable you to shoot at a reasonable hand-held shutter speed. Typically, the camera's built-in flash is fully integrated with the exposure system so that the flash output and exposure are all handled automatically. The result is the typical snapshot lighting as in figure 10-48. The lighting is a little harsh, but you get a good, sharp image, even in near darkness.

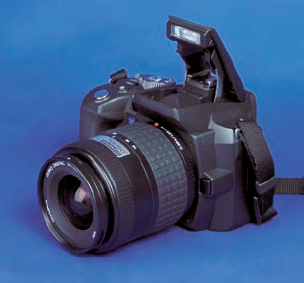
Having a built-in flash unit that pops up when needed is certainly convenient, but the design constraints imposed by the need to incorporate the flash into the camera body can limit the usefulness of the built-in flash. The main problem is its limited range. The typical built-in flash just doesn't have enough light output available to effectively illuminate a subject that is more than about 10-12 feet from the camera. That's enough range to cover the usual snapshot subjects, but it falls short from the power you need to reach out and cover larger groups from greater distances. The built-in flash is also limited to firing straight ahead, which doesn't allow you to bounce the flash off the ceiling to create a more natural light as is the case in figure 10-49.

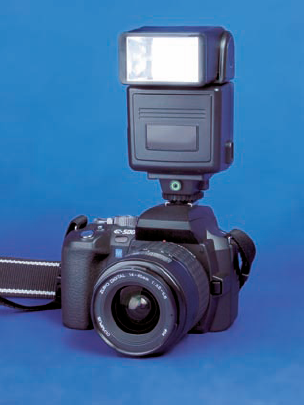
Some professional camera models don't include a built-in pop-up flash. Instead, they are designed to deliver a similar level of exposure automation when used in conjunction with an external flash unit attached to the camera's hot shoe connector. An external flash unit is usually significantly more powerful than the typical built-in flash, which gives it much more range, and since the external flash is powered by a separate battery pack, using it doesn't drain the camera's battery. Many external flash units allow you to angle the flash head up or to the side for bounce effects.
To get the full benefit of all the automatic features, you must use a dedicated flash unit designed specifically for your camera brand and model. The flash unit normally must come from the same manufacturer as the camera. In addition to exposure automation, some of the high-end flash units offer advanced features such as dual flash heads for simultaneous direct and bounce flash. The result is noticeably better lighting than you can get from a smaller built-in flash unit, as you can see in figure 10-50.

The same flash units that are designed for use with the professional camera models will also work on some of the more advanced consumer digital SLRs — provided you're willing to pay the rather hefty price. Most cameras will also work with a range of dedicated and non-dedicated external flash units from a variety of third-party manufacturers, albeit without some of the advanced features and exposure automation that are available from the brand-name units.
Tip
Some third-party external flash units offer plenty of power at a very attractive price, but they don't integrate with the camera's automatic exposure system, which can make them cumbersome to use. Typically, you must set the camera for manual exposure, and then select matching aperture settings on the camera and flash. A light sensor on the flash controls the exposure by adjusting the flash output. The system works reasonably well most of the time, but it's neither as convenient nor as accurate as a dedicated flash linked to the camera's auto exposure system.
Tip
Be careful about using a shoe-mount flash unit that isn't designed specifically for your camera model. The trigger voltages on the contacts between the flash and the camera body aren't the same on all cameras, and using mismatched units can fry sensitive electronics. There's usually no problem with the simple manual or non-dedicated flash units that have only one contact point on the bottom of the hot shoe. It's the dedicated flash units that attempt to integrate the flash with the camera's exposure system that can cause problems. Don't swap flash units between different brand cameras or use third-party flash units that aren't guaranteed compatible with your camera.
The most common way to use an on-camera flash to light a scene is to point the flash head directly toward the subject — it's called direct flash. That's the basic default setup for external flash units, and if you're using the camera's built-in flash, you have no other option.
The flash head is a very small, bright, point-source light, which creates a hard light with strong highlights and dark, hard-edged shadows. The hard light is what gives flash snapshots such as figures 10-48 and 10-51 their typical crispness. It's an effective way to get light on the subject, even if it isn't the most flattering kind of light.

The hard light of direct flash casts a dark, hard-edged shadow behind the subject. Depending on the position of the subject and the surfaces behind it, the shadow might be more or less of a distracting element of the picture. For example, in figure 10-51, the groomsman's shadow is mostly hidden — you can see only thin shadow outline on either side of his upper legs. On the other hand, in figure 10-52, more of the shadow is visible along the left side of the subject.

Tip
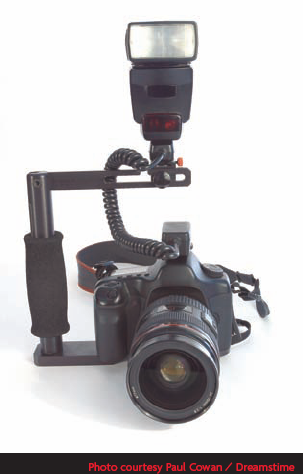
Shadows tend to be more pronounced when the camera is rotated for a vertical shot. The reason is that the flash is normally centered above the lens when the camera is in its normal horizontal orientation. This causes the shadow to be centered directly behind the subject, thus hiding most of it from view. Rotating the camera for a vertical composition moves the flash to the side of the lens instead of above it, which offsets the shadow to the opposite side of the subject where more of the shadow is visible. To avoid this problem, consider using a flash bracket that allows the camera to rotate from horizontal to vertical while keeping the flash centered above the lens.
The shadow that the flash casts from your subject is only visible if it is cast upon a surface that appears in the picture. For example, notice the groom's shadow on the wall behind the couple in figure 10-53. It's clearly visible because the wall is just a few feet away and directly in line from the flash to the subject.
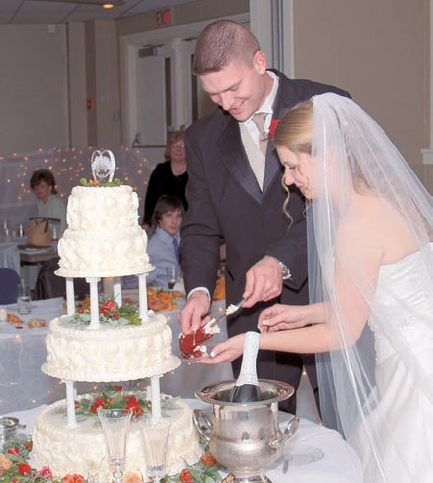
You can sometimes avoid having the shadow appear in the finished picture by selecting camera angles and subject positions that hide the shadow. One of the simplest ways to do that is to avoid having a wall behind your subject. For example, in figure 10-54, the shadows of the groom and the cake both disappear through the doorway behind the cake and are broken up by the various objects instead of creating silhouettes on a flat wall.
Another characteristic of direct flash is its propensity for creating a spotlight effect when you photograph a subject outdoors or in a large open space such as a party room. You can thank the inverse square law for this effect, which is clearly evident in figure 10-55. The camera and flash work together to properly expose the couple on the dance floor, but the light from the flash falls off sharply as distance increases, so the people, tables, and other objects in the distance are dark from underexposure.
You can transform the hard, point-source light from an on-camera flash unit into a much softer light by bouncing the light off of a ceiling or wall instead of pointing it directly at the subject. The indirect light bounced off a large surface creates a much softer light that is more flattering for most subjects. For example, compare figure 10-56, which was shot with bounce flash, to the direct flash shot in figure 10-48. Notice the softer highlights and smoother modeling in 10-56.

Tip
Bounce flash also scatters light around the room to increase the general illumination level and reduce the isolating effect of a brightly lit subject against a dark background.
In order to use the bounce flash technique, you need an external flash unit with a tilt head that allows you to aim the flash head toward the ceiling. The technique won't work with the camera's built-in flash unit or an external flash that is locked into a straight-ahead direct-flash position. With the proper equipment, the bounce flash technique is simple to do. Just keep the following points in mind:
You need to be in a room with a low, white ceiling. Eight-foot high ceilings work best. Bouncing the flash off a very high ceiling isn't practical due to excessive light falloff reducing the brightness level. A colored ceiling will absorb too much light and/or create a color cast in your photograph.
Simply point the flash head up toward the ceiling as demonstrated in figure 10-57 and then frame and focus your shot normally. Ideally, you direct the flash at a point on the ceiling roughly half way between the camera and the subject, but the position isn't critical. Most anywhere above and in front of the subject will do. Just don't aim the flash at a point that is behind the subject.
If you're using a dedicated flash that integrates with your camera's automatic exposure system, there's usually no need for any exposure compensation or other adjustments. The automatic exposure system should work normally to ensure proper exposure. If you're using a manual or semi-automatic flash, be sure to select the widest available aperture setting to maximize the working range of the flash.
Remember that the maximum working range of the flash is reduced because of the inherent inefficiencies of bouncing light off the ceiling. Check your exposures frequently and switch back to the direct flash technique if the subject gets too far away from the camera for good bounce flash exposures.

Tip
If a low white ceiling isn't available, you can try softening your flash with one of the many bounce accessories on the market. The bounce accessory is usually an angled reflector card that attaches to your flash. You point the flash up so that the light bounces off the reflector and then to the subject. None of the products I've tried work as well as a ceiling bounce, but most of them create a slightly softer light than direct flash.
In addition to using your flash as a replacement light source when the available light is totally inadequate, you can also use it as a supplemental light to augment the existing light. For example, in figure 10-58, the photographer posed the model in a scene with heavy backlighting, and then used an on-camera flash to add enough light from the front to bring out full detail in the model's face and clothes.

Dealing with the Dreaded Red-Eye Effect
We've all seen flash photographs in which a bright red glow appears in the subjects' eyes. It's rarely (if ever) a desirable effect, but it happens all too often. In order to avoid the red-eye effect, you need to understand what causes it.
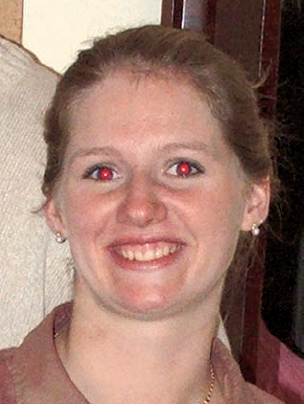
Red-eye occurs when the direct light from the flash bounces off the retina at back of the subject's eye and back into the camera lens. That can happen only when the subject is looking straight at the camera, the pupil is open wide due to low ambient light levels, and the flash is positioned very close to the lens axis, as is the case with any flash that is built-into the camera body.
To help alleviate the problem, many built-in flash units (and some external accessory flash) have a red-eye reduction mode that blinks the flash before opening the shutter and triggering the main flash to take the picture. The series of pre-flashes is supposed to cause the subject's pupils to contract, thus reducing the red-eye effect.
The trouble is that this kind of red-eye reduction often doesn't work very well. The pre-flashes aren't bright enough to be effective unless the camera is very close to the subject, and they may increase the likelihood that your subject will blink and their eyes will be closed in the final shot. Furthermore, the red-eye reduction pre-flashes cause a significant delay between pressing the shutter release button and the actual exposure. The delay makes it difficult to catch good expressions in posed shots, and it's likely to cause you to completely miss un-posed shots of children and pets.
A more reliable way to eliminate red-eye is to move the flash away from the lens. If light from the flash strikes the subject's eye at an angle, it can't bounce straight back into the camera lens, so there's no red-eye effect. Of course, moving the flash isn't an option if it's built into the camera body. On the other hand, the red-eye problem is a powerful argument for switching off the camera's built-in flash and using an external flash unit instead.
For a typical snapshot subject, it takes only a few inches of separation between the flash and the lens to create enough angle to eliminate red-eye. That's why most shoe-mount accessory flash units are designed to raise the flash tube and reflector above the top of the camera by three to five inches. It makes the flash unit more bulky, but it gets rid of a lot of red-eye problems.
As you move farther back from your subject, you need more physical separation between the flash and the lens to maintain enough angle to avoid red-eye. Consequently, many press and wedding photographers use flash brackets that position the flash head about eight to twelve inches above the lens, which is usually enough to shoot small groups without worrying about red-eye problems. For larger groups, which you must photograph from greater distances, there are adjustable-height flash brackets available that can raise the flash a foot or more above the lens.
The flash has to be pointed directly at the subject to cause red-eye, so bouncing the flash off of the ceiling or wall is another sure-fire way to avoid red-eye. The problems with this approach to red-eye management are that it doesn't work outdoors or with the camera's built-in flash, and indoors you need a powerful flash unit to compensate for the light loss from bouncing.
If, despite your best efforts, you end up with a picture of a subject with red-eye, all is not lost. Most image editor programs include features that enable you to quickly retouch red-eyes by selectively replacing the red with black. Most of these programs are easy to use and fairly effective, but none of them are perfect. It's far better to avoid the red-eye problem in the first place.
The technique is called flash fill because the sun or other available light source acts as the main light source and the flash functions as a fill light — opening up the shadows cast by the main light, reducing contrast, and lowering excessively high light ratios, just like the fill light in a studio lighting scheme. In the studio, the fill light is often positioned close to the camera, so it makes sense that an on-camera flash unit can play that role out in the field.
The key to the success of the flash fill technique is being able to control the light ratio between the existing light and the flash. That can be a tricky thing to accomplish with a manual flash, but it's easy to do if your camera has a flash exposure compensation feature. Just follow these steps:
Set the exposure for the existing light component of the picture using whatever meter reading and auto exposure modes are appropriate for the lighting conditions. You can use aperture- or shutter-priority auto exposure, or any other exposure mode except a preprogrammed scene that includes flash settings that would conflict with the settings in step 2. (Refer to your camera's manual to learn what scenes and program modes might have such conflicts.)
Set the flash component of the exposure for one to two stops underexposure. Simply find the button, dial, or menu that controls flash exposure compensation on your camera and adjust the setting to somewhere between −1 EV and −2 EV. The job of the flash is to partially fill in the shadows, without brightening those shadows up to match the highlights. This exposure compensation controls just how dark or light the shadows become.
Frame and shoot the picture and then check your results. If you don't like the light ratio between the highlights and shadows, adjust the flash exposure compensation setting in step 2 and try again.
The color temperature of an on-camera flash is approximately the same as normal sunlight, so the flash fill technique mixes well with daylight. It's especially useful for lightening the harsh shadows created by direct sunlight. In figure 10-59, the photographer deliberately overexposed the lower part of the dress to create a glowing effect. The bride's upper body is lit by a combination of open shade coming through the archway and flash fill from the camera. Without the flash fill, the bride's side closest to the building would be much too dark.
You can also use flash fill indoors. It's the perfect counterpoint to strong window light. In figure 10-60, the main light is a large bright window at the left side of the frame. Flash fill from the camera controlled the light ratios to keep the shadows from being too dark. In this case, the flash fill was also bounced to soften the effect and subdue the shadows on the wall behind the couple.
When the existing light at a location is inadequate and an on-camera flash doesn't provide enough additional light, you need to bring out the big lights — portable versions of the lights you'd use in the studio. Sometimes there's no other way to get the shot except to convert a remote location into a temporary photographic studio, complete with whatever lighting equipment you need to get the job done.
Sometimes there's just not enough existing light to get a decent exposure, and sometimes there's something wrong with the existing light that makes it unsuitable for photography, such as bad color, awkward placement, and so on. When you encounter such a situation, it's usually best to just turn out all the existing lights and start from scratch lighting the scene with your own lights.
That's exactly what photographer Dean Lavenson did in figure 10-61. He started with a dark room and added lights as necessary to achieve the desired effect, just as he normally does in the studio. He built up an intricate lighting scheme using separate lights for the wall, the sign, the cabinet, and every other major object. He did incorporate a few lights from the original scene as accents, including the examination light and the computer screens.
The interesting highlights that play across the chair cushions and several other surfaces are the result of a technique Dean calls painting with light. He works with an assistant to take multiple exposures as he moves around the scene highlighting details with a fiber optic light wand. Then he selects the details he likes from the various exposures and composites them into the base image using Photoshop. It's a laborious process that produces some stunning results.
A typical location photo shoot doesn't usually require such an elaborate lighting setup — a simple shot with two or three lights is more the norm. The point I'm trying to make with this admittedly extreme example is that once you make the decision to convert a location into a temporary photography studio, anything goes.
Tip
Don't skimp on the quality of your extension cords. The wire gauge must be more than enough to handle the load without getting hot, and plugs and insulation must be built to withstand heavy use. Standard household extension cords just don't cut it! Heavy duty outdoor extension cords are a better choice, and extra-heavy commercial-grade cables are better still.

What are the differences of available light, ambient light, existing light, and natural light?
All these terms refer to the light that the photographer finds lighting subjects at locations outside the studio, and generally speaking, they are used interchangeably. However, the terms do have slightly different connotations that some photographic purists use to draw distinctions between different kinds of light.
Natural light: The most restrictive of the terms. It implies that the light is of natural origin (from the sun) and not man-made or altered.
Existing light: Implies the pre-existing light that the photographer finds at the scene. It includes natural light from the sun and also man-made light from electric lights in homes and offices, but excludes any supplemental light supplied by the photographer.
Ambient light: Light from the surroundings. In most cases, the term is functionally equivalent to existing light, but some photographers use it in mixed lighting situations to designate the background light level and differentiate it from whatever supplemental lighting the photographer adds.
Available light: A broader term that includes all the natural and man-made light available at the scene, and also whatever supplemental light the photographer has readily available. The general connotation of supplemental light includes reflectors and diffusers, and sometimes even a flash fill. However, the old joke is that available light can include "all the light you can make available," and that you sometimes need a whole truck load of lighting equipment to get a good available light shot.
When using photographic lighting equipment, how can I avoid overloading the electrical circuits?
You need to be aware of the demands your lighting equipment will place on the electrical circuits and take steps to ensure that you don't overload any one circuit with your lights. For example, an individual flash unit may draw only a few amps, but a 1000 watt quartz light demands nearly two-thirds of the entire capacity of a typical 15-amp household electrical circuit. You typically need several lights to adequately light your subject, and the total electrical load can be significant, so you need to spread that load out over several circuits.
The secret to avoiding overloaded electrical circuits is lots of long extension cords. Instead of trying to plug all your lights into the nearest electrical outlet, use the extension cords to distribute the load to multiple outlets. Since several outlets may be on the same circuit, it's best to avoid using adjacent outlets along a common wall. Using outlets from opposite sides of a building or a large room increases the odds that the outlets are actually on separate circuits.