
Photography started out as a black-and-white medium. Photographs simply recorded the brightness level of the light reflected from various portions of the scene and represented it as shades of gray. As a result, a black-and-white photograph is an abstraction of the original scene on two levels. First, it's a two-dimensional representation of a three-dimensional scene. Secondly, it's a representation of a full-color scene as a study in light values — shades of gray with no color. This dual level of abstraction gives black and white photography an enduring visual quality that causes it to persist as a medium of artistic expression long after photographers gained the technical capability to record full-color images.

Adding color to a photographic image gives the photographer the ability to make a more complete and accurate representation of the original scene. Color simultaneously enhances realism and removes one level of abstraction that is present in a black-and-white photograph. Additionally, a photographer can use color expressively, deliberately manipulating the colors in the photograph for artistic effect instead of accurately representing the original scene.
Fortunately, in today's world of digital photography, photographers can create images in black and white, as shown in figure 2-1 and in full color, as shown in figure 2-2. Colors can be controlled and manipulated at will, provided you understand some of the mechanics of the color of light.
Let's start by looking at some of the basics of light and how humans perceive color. You may have encountered some of this information before, but a quick refresher of the key points will make it easier to understand how your eye and your camera deal with color, and that can help you make better color pictures.
The spectrum of visible light is the portion of the electromagnetic spectrum that humans can see and perceive as a range of brightness and color. The electromagnetic spectrum includes nonvisible light, radio waves, and other energy frequencies, but in this book, I'm concerned only with the range of light wavelengths that fall within the visible spectrum. Figure 2-3 shows the wavelengths of light in that spectrum as different colors, ranging from magenta through red, orange, yellow, green, cyan, and blue, to violet.

The sun, and most other light sources, emits light across the entire spectrum. When all the colors of light mix together, white is produced, and an absence of color makes black. So sunlight is white light, which is a mixture of all the colors of light.
When you look at an object, what you see is the light that is reflected off that object and into our eye (see figure 2-4). If the object reflects all portions of the visible spectrum equally, the object appears white or gray. If, on the other hand, the object absorbs some wavelengths of light and reflects others, then the object takes on the color of the light it reflects. So, a green leaf looks green because it reflects mostly green light and absorbs most of the other colors.

If the light falling on the leaf is red instead of white, the leaf doesn't look green anymore. In the absence of any green light to reflect, the leaf would be gray or black. So, changes in the color of the light source (actually, changes in the mix of colors in the light) can significantly change the colors reflected from objects.
If all light sources emitted light in equal amounts across the entire visible light spectrum, then colors would always be consistent and my discussion would end here. However, light sources are not consistent. Light sources, such as incandescent lamps, emit disproportionably larger amounts of light in one portion of the visible light spectrum (yellows and reds) and less light in others (blues). The sun as a light source is consistent, but different angles and atmospheric conditions change how sunlight is filtered and reflected before it reaches us, which changes the effective composition of the light.
To help describe and manage the differences in the color makeup of different light sources, we use the term color temperature. Light is said to have a given color temperature when it matches the spectral characteristics of the light that would be radiated by a theoretical black body heated to that surface temperature. The theoretical black body is a hypothetical construct, but it closely approximates the light emitting characteristics of both the sun and the filament in an incandescent light bulb.
Note
Color temperature is measured on the Kelvin temperature scale, which is named after William Thompson, 1st Baron Kelvin, a 19th-century scientist and engineer.
The useful portion of the color temperature scale, shown in figure 2-5, ranges from 1500 kelvin to around 20,000 kelvin. Color temperatures at the lower end of the scale represent reddish light such as the last glow of the setting sun or the light of a candle flame. Figure 2-5 shows the color temperature scale progressing through brighter orange and yellow to the white of the mid-day sun. The higher color temperatures represent the increasingly blue cast of the light from the north sky.
The color temperature scale works very well for describing the various stages of daylight and for light sources such as incandescent lamps, arc lights, and photographic flashes. However, not all light sources have light emitting characteristics that closely approximate that of the theoretical black body, which is to say a continuous wide spectrum of light, with color distribution that transitions smoothly from more to less abundant colors. (The chart on the left in Figure 2-6 diagrams the light output of an incandescent lamp.) In contrast, some lights are monochromatic (emit only one color of light) or exhibit a discontinuous spectrum, which means that they emit only a few colors of light with multiple sharp transitions between colors that are abundant and others that are almost nonexistent. Fluorescent lights have a mildly discontinuous spectrum. Notice the sharp spikes in the chart of a fluorescent lamp's light output, shown on the right side of figure 2-6. The Mercury vapor lights in figure 2-7 and the sodium vapor (lights in figure 2-8) are more severely discontinuous in their light output, which results in strange color shifts. Notice that the colors of the yellow machinery and copper coils in figure 2-7 are washed out due to the lack of yellow and red light from the mercury vapor lights.

Because lights with a discontinuous spectrum don't behave like the theoretical black body, they can't be described as having a color temperature. However, because color temperature is so widely used to describe light sources, it can be useful to know where these lights fall on the scale. The Correlated Color Temperature (CCT) maps the average color of a discontinuous spectrum light source to its approximate location on the color temperature scale. Table 2-1 lists the color temperatures or correlated color temperature of some common light sources.

Table 2-1. Color Temperature
Light Source | Approximate Color Temperature in Kelvin |
|---|---|
Candlelight | 1500 |
High pressure sodium vapor | 2100[a] |
100w incandescent lamp | 2800 |
Warm white fluorescent | 3050[a] |
Sunrise/sunset | 3200 |
Tungsten photoflood | 3200 |
White fluorescent | 4000[a] |
Neutral white fluorescent | 4500[a] |
Arc lamp | 5000 |
Noon sun | 5500 |
Photo flash | 5600 |
Mercury vapor | 3500-5900[a] |
Bright sky | 6000 |
Daylight fluorescent | 6600[a] |
Overcast sky | 7000 |
Blue north sky | 10,000 - 20,000 |
[a] Correlated Color Temperature | |

Tip
Don't get hung up on the precise numerical values of color temperatures for various light sources as listed in references such as Table 2-1. The numbers are just approximations and averages. In real life, atmospheric conditions and latitude change the color temperature of sunlight, and age and voltage change the color temperature of a tungsten lamp. Fluctuations of several hundred kelvin (sometimes more) are common among different samples of the same type of light source.
If an object can reflect only the light that falls on it, and there's a big difference in the color of light from an incandescent lamp, a sunny day, and an overcast sky, then it makes sense that an object, such as a red apple, would look different in different light. However, that's not what happens in real life. If you look at an apple inside the house, outside in direct sunlight, and again on a cloudy day, you probably won't notice any change in the color of the apple at all.
Actually, the color of the apple changes significantly. You don't notice it because of a phenomenon called chromatic adaptation. The human eye and brain automatically adapt to changing lighting conditions, adjusting color perception so that all but the most extreme color changes go unnoticed. As a result, you see the colors that you expect to see, regardless of changes in the light.
About the only time you notice differences in the color of light from different light sources is when more than one light source is visible at the same time. When you look at a scene, such as the one in figure 2-9, you can see the green cast of the light coming from inside the arched windows of the building because it contrasts with the streetlights in the foreground and the sky in the background. But when you enter the building, chromatic adaptation makes that greenish light look normal and you won't notice any green cast to your surroundings.

Tip
Chromatic adaptation is an unconscious mental process. Your eyes see the change in color from different light sources, but your brain ignores it. However, you can teach yourself to see colors objectively by paying attention to subtle color clues. For example, before you enter a building from outside, pause and look through the doorway at the different color of the light inside. Then pay attention to the subtle changes that occur as you adjust to the new light when you step inside. Notice how having another color reference, such as a window, in your field of view changes color perception slightly.
Unlike humans, cameras record light objectively. There's no chromatic adaptation process automatically making subjective adjustments so that colors match expectations. The camera has no expectation of what the colors of an object should look like, so it simply records the colors actually reflected by the object.
This is both a blessing and a curse. Objective color rendering makes the colors recorded by the camera much more accurate, but it means that those colors may not match human perceptions and expectations. In other words, the photograph may not contain the colors you thought you saw.
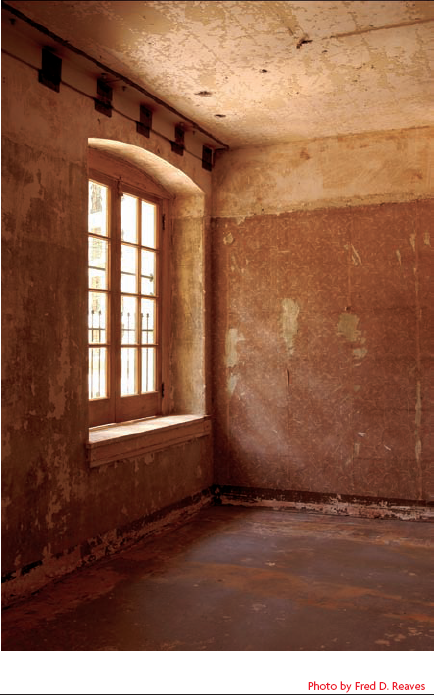
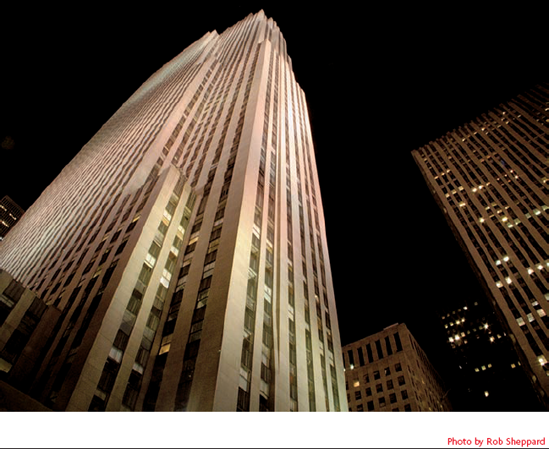
For example, figure 2-10 shows a building lit by artificial light, color corrected to look the way it appeared to the human eye. Figure 2-11 shows the same scene as recorded by the camera. The camera's image sensor is calibrated to normal daylight (color temperature of about 5500 kelvin) and the different color temperature of the artificial lights (probably around 3400 kelvin) creates a pronounced yellow-orange cast.
The digital image sensor in your camera produces optimum color results under lighting conditions that match mid-day sunlight, which is a color temperature of about 5500 kelvin. Under those lighting conditions, a digital camera produces an image with colors that match the colors you see with the human eye. However, if the distribution of colors in the light source changes, so will the colors of the image recorded by the camera. Therefore, if you take a picture in the shade or on an overcast day, the image recorded by the camera has a distinctly blue cast, which creates the pale flesh tones in figure 2-12. Similarly, a picture taken indoors by incandescent light has a strong yellow cast, as shown in figure 2-13.


When you take a picture under any lighting conditions other than mid-day sunlight, those images need color adjustments to remove the color cast caused by the different color composition of the light source. Fortunately, digital cameras have the ability to apply those color adjustments right in the camera, using a feature called white balance.
Tip
Perhaps the simplest way to deal with white balance selection is to shoot in Camera Raw format and just ignore the camera's white balance setting. You can adjust the color balance of the image easily when you process the Raw file to convert it to another format. The camera's white balance settings are necessary only when you record your images directly to a finished image format, such as JPEG.
The camera's white balance setting allows you to select one of several lighting profiles, which tells the camera the color temperature of the light source for the scene you're about to photograph. Once the camera knows the color temperature of the light source in the scene, its built-in image processing software can automatically apply the appropriate color corrections to restore normal color rendering before saving the image file.
Getting the white balance selection right is very important. A good match between the camera's white balance setting and the actual color temperature of the light source for the scene produces clean neutral colors, such as those in figure 2-14, even though the lighting was obviously not the standard sunny day. On the other hand, a mismatched white balance setting can cause blatantly off-color results such as figure 2-15, which shows what happens when you use tungsten white balance in daylight. The effect is exaggerated by the fact that the scene is in the shade, which is bluer (higher color temperature) than mid-day sunlight. For comparison, figure 2-16 shows the same scene with the correct color balance.
Tip
Remember, you must set the white balance before you take a picture. The camera applies the color adjustments immediately after you click the shutter, and the image file is recorded with the color balance you specified. If you shoot Camera Raw, you can make further color balance adjustments when you process the Raw file. However, if you shoot JPEGs, changing the color balance after-the-fact is much harder. You can edit the colors in Photoshop, but it's hard to get good results with large-scale color changes.
The available white balance profiles vary with the different makes and models of cameras. Some typical preset white balance profiles include:
Daylight: 5300 Kelvin
Cloudy day: 6000 Kelvin
Open shade: 7500 Kelvin
Tungsten: 3000 Kelvin
Fluorescent options: 4000, 4500, 6600 Kelvin
Your camera may offer different selections or use slightly different color temperatures for some profiles. You pick the one that most closely matches the light source for the scene and the camera applies the corresponding color balance adjustments.


Tip
If your camera doesn't offer a separate white balance profile for flash, try using the daylight or cloudy day (6000 kelvin) settings.
The technique for selecting white balance also varies with the different makes and models of cameras. Some cameras give you quick access to the white balance setting with a button or dial, and it's usually available somewhere in the camera's menu system as well. For example, here's the way you set the white balance on an Olympus E-500:
Press the WB button on the back of the camera. (The WB button is also the Up navigation button.) The white balance selection screen appears on the display screen on the back of the camera.
Use the selection dial on the top of the camera to scroll through the icons representing the white balance settings. Highlight the desired selection.
Press the OK button on the back of the camera to set the camera for the highlighted white balance.
In addition to the white balance presets, almost all current digital cameras offer an automatic white balance mode. It's sort of a digital camera version of a human's chromatic adaptation and it's the default operating mode for most digital cameras.
The automatic white balance feature typically works by detecting white or near white areas in the image and automatically applying color adjustments to remove any color cast from those areas. It usually works pretty well as long as you're photographing an average scene that includes some clean white or very light neutral gray. However, if there's no white in the scene, the automatic white balance has nothing to work with and the camera's attempt to color balance the image may produce surprising results.
If you don't trust the automatic white balance to give you good results in a difficult situation, and none of the white balance profiles match the light source in the scene (or the color temperature of the light source is unknown), then you can use manual white balance. Most digital cameras offer at least one manual white balance option in addition to the assorted profiles and automatic white balance.
Some cameras allow you to create a white balance point with a user-definable color temperature. The option may be labeled something like Kelvin or Custom, and allows you to create a white balance profile for a color temperature that isn't covered by one of the standard profiles. After defining the color temperature, you select and use this white balance just like any other white balance profile. The procedure for setting the color temperature for the user-defined white balance varies from camera to camera, so refer to your camera manual for instructions.
The user-defined white balance option works best for situations in which you know the color temperature of the light source, or you need to use the same non-standard setting repeatedly. When you don't know the color temperature of the light source, you want to use another manual white balance option provided by many digital cameras — one that allows you to set the white balance by sampling the light reflected off a gray card. (See figure 2-17.) This feature may be called white balance preset, custom white balance, or one touch white balance, or something similar. Refer to your camera manual for the name of the feature and specific procedure for how to select it. The following steps outline the general process:

Place a standard gray card in the scene you want to photograph, illuminated by the light source you plan to use for the finished image.
Tip
The gray card you use for setting the white balance must be neutral gray. Any amount of color tint in the gray card throws off the white balance and causes off-color images. You can purchase a standardized gray card that is designed for this purpose at any camera store. A simple cardboard gray card usually costs just a few dollars, but you can also get photographic gray reference targets made from fabric on a convenient collapsible frame and several other variations. The brand and format don't matter as long as it's neutral gray.
Aim the camera at the gray card and zoom in so that the card fills the frame completely. Make sure that no glare or shadows show on the gray card.
Follow the procedure for white balance sampling as specified in your camera manual. For an Olympus E500, you press and hold the One-Touch button while you press the shutter release, then press the OK button on the back of the camera when the One-Touch screen appears on the display.
Setting white balance by sampling the light at the scene automatically compensates for unpredictable variables such as atmospheric conditions, mixed light sources, and reflected light from the surroundings. It takes just a minute or so to do and it guarantees the best possible color reproduction. Just be sure you reset the white balance for each new lighting situation.
Tip
As soon as you finish shooting with any specific white balance setting, whether it's a preset selection or custom setting, be sure you set your camera back to the Auto white balance setting.
How can I use the white balance selection to give my pictures a slightly warmer tone?
Many people prefer a slightly warmer color rendition to the neutral colors of a "correct" white balance. Traditionally, photographers achieved that warmer look by shooting in the "golden hour" before sunset or by using a warming filter on the lens. However, you can also achieve a similar effect with the white balance selection. To get warmer (more reddish) colors, select a white balance with a color temperature just a bit higher than the actual color temperature of the light source. For example, when shooting in mid-day sun (5500 kelvin), selecting the cloudy day (6000 kelvin) white balance gives your images a slightly warmer color cast. Telling the camera that the light is bluer than it really is causes the camera to compensate by making the image a little redder.
How do I know when to select a different white balance if all the colors look normal because the human eye adapts automatically to the color of different light sources?
You're correct in concluding that chromatic adaptation normally makes subjective color perceptions undependable when it comes to detecting white balance changes that the camera will see. However, you can teach yourself to see color changes in the light sources around you by simply being conscious of colors from different light sources and observing the change as you transition from areas lit by one light source or another. With practice, you can become remarkably proficient at detecting a change in the color of the light, although you probably won't be able to identify its specific color temperature by eye alone. Often, you can guess what white balance setting to use by observing the light source. Outdoors, it's easy to differentiate direct sunlight from shade or a cloudy day. Indoors, you can readily tell the difference between the tungsten-balance incandescent light of the table lamps in most homes and the fluorescent tubes lighting most offices. However, it's not so easy to distinguish a warm white fluorescent from a cool white fluorescent. The only sure solution is to shoot a test and evaluate the results each time you enter a new lighting situation. Fortunately, the camera's preview image is usually accurate enough to confirm an approximate white balance match. It'll alert you to major mismatches such as selecting tungsten white balance in daylight. If the white balance is close enough that you can't see any problem in the preview, then it's probably close enough to be corrected easily in an image editor. Still, if critical color rendition is important, you should download your test image to a computer for careful evaluation.
How do I know what color temperature to use for a user-defined white balance?
In order to use the user-defined white balance effectively, you must know (or be able to guess) the color temperature of the light source. If you have access to a color temperature meter, you're all set, but that's not a likely scenario. If you're shooting under artificial light, try to find out the brand and type of lamps used to light the scene. If there are spare bulbs sitting around, the lamp's specifications (including its color temperature) may be printed on the packaging. Otherwise, you may be able to find the information on the manufacturer's Web site. As a last resort, there's always trial and error experimentation. Try all the white balance profiles and find the two that come closest to producing the desired color. Then set the color temperature of the user-defined white balance in between the color temperatures of those profiles. Shoot a test, evaluate the results, refine your settings, and test again as needed. Better yet, record your shots in Camera Raw format and do the color correction when you process your Raw files into another format.
How do external filters affect my camera's white balance?
If you're using preset white balance settings, then any external filters you add to your lens will have exactly the effect you would expect. A warming filter (such as a Wratten 85) gives the image a warmer cast, a cooling filter (such as a Wratten 80) gives the image a cooler cast, a green filter gives the image a greenish cast, and so on.
However, if you use those filters in conjunction with the Auto white balance setting, they won't have the same effect. The Auto white balance feature detects the color cast from the filter and does its best to counteract the color cast and render the scene in neutral colors. Sometimes the Auto white balance feature successfully compensates for the filter and sometimes it doesn't. The results are unpredictable, and might even include a color shift in the opposite direction from the filter. As a result, you should avoid using Auto white balance with filters.
If you want to use filters in a situation where you need to set the white balance from a gray card, doing so is usually not a problem. Just be sure to set the white balance without the filter in place. Then, after you establish the white balance, you can add a filter to the lens to shift the color whatever way you want.