
Although much of the creativity involved in making a photograph is in subject selection, composition, and lighting, exposure also has an important role to play as a creative tool. Much more goes into exposure than the perfunctory process of properly recording the creative masterpiece you see in the viewfinder.
In this chapter, you find out why you may not want to let the camera do the work and why it's often better to take matters into your own hands. By exercising creative control over exposure, you can control subject motion and depth of field. More importantly, you can use exposure to control how values are rendered in your photograph. You can render the scene as accurately as possible, with a full tonal range, or you can elect to shift the natural values lighter or darker for creative effect. For example, in figure 5-1, the photographer deliberately chose to underexpose the image compared to the metered exposure, thus making the image darker, which accentuated the sky and reduced the trees to a silhouette.
The multi-area metering modes (sometimes called matrix or evaluative metering) that are available in most modern cameras are very good at determining the nominally correct exposure value for most scenes. As a result, you can often use the camera's automatic exposure system to capture a reasonably faithful rendering of the scene with good detail in the shadows, midtones, and lighter tones — no manual overrides required. You can get good results a surprisingly large portion of the time. However, certain situations can fool even the best metering systems (see Chapter 4), and you may want to diverge from the metered exposure for creative effect.
Note
See Chapter 4 for more information on metering modes and common photographic situations that cause meters to give erroneous readings.

Modern digital cameras typically include a number of programmed exposure modes that are capable of totally automating the process of determining and setting the exposure. There's usually a default program for general photography (which may be labeled Auto, Program, or Normal), plus several additional programs for situations such as landscapes, portraits, sports, children, sunsets, night scenes, and so on. All you have to do is select the program mode (or scene, as they are sometimes called) that matches the kind of subject you're photographing, and the camera does the rest, leaving you free to concentrate on your subject. The results can be very effective, as shown in figure 5-2, in which the camera's default Normal program mode automatically selected a very reasonable exposure of f−5 at 1/160.
However, if you elect to use one of the camera's built-in programmed exposure modes, you surrender direct exposure control to the program. The camera's meter senses the light level and then the program sets the aperture, shutter speed, ISO, and white balance, according to a set of criteria that gives priority to different exposure elements depending on the program selected. For example, the Sport program mode usually gives priority to a high shutter speed to stop subject motion, while the Portrait mode aims for a blurred background by giving priority to a large aperture for shallow depth of field. The better cameras display the aperture and shutter speed selected by the program in the viewfinder, but it's an informational display only. The camera is in control of the exposure settings, not you.
Programmed exposure modes are just another tool in the photographer's arsenal, and like other tools, you can learn to use them effectively and creatively. They can be very useful in fast changing situations such as a child that runs from sun to shade and back again. The program can quickly adapt to the drastic changes in light levels — a task that would challenge the most experienced and nimble photographer.
The secret to mastering programmed exposure modes is understanding how each program prioritizes the exposure elements of shutter speed, aperture, and sensitivity, as well as what other camera settings are changed by each program. (Some programmed exposure modes change color rendering and auto-focus modes in addition to exposure settings.) Developing that understanding takes some work, because you won't find the detailed information you need in the camera's menu system. You need to read the program descriptions in the manual, and then do some testing to discover how the general program goals translate into specific aperture/shutter speed combinations under various conditions.
After you develop a thorough understanding of how each programmed exposure mode operates, you can make an informed decision about which program to use in each shooting situation, instead basing your selection of a scene name and a vague description on the camera's menu screen. You're still delegating exposure control to the program that you select, but you do so knowing that the program will operate within predictable guidelines. Still, you must carefully monitor the aperture and shutter speed selected by the program in the viewfinder, so you can switch to another shooting mode and override those settings if you disagree with the camera's exposure settings.

Tip
Personally, I'm not a big fan of programmed exposure modes. Although they're convenient and useful for beginners, using them makes me feel like I'm abdicating some of the responsibility for selecting exposure settings. And that doesn't sit well with an admitted control freak.
Note
In Chapter 3, I discuss selecting the one best exposure from the multiple aperture/shutter speed combinations that all deliver the same amount of light to the image sensor in your camera.

In addition to programmed exposure modes, nearly all digital cameras have two other automatic exposure modes: aperture-priority mode and shutter-priority mode. They both provide the convenience of automatic exposure while affording the photographer substantially more creative control.
When using aperture-priority exposure mode, you select the ISO and aperture and the camera automatically adjusts the shutter speed to obtain the proper exposure as determined by the built-in meter. Shutter-priority mode works the same way, except that you set the shutter speed, and the camera adjust the aperture automatically.
The aperture-priority and shutter-priority exposure modes allow you to choose which exposure element is more important and take direct control of that aspect of the exposure. Then, when you select the aperture or shutter speed, you're selecting the dominant half of that best exposure combination. The camera automatically sets the other half of the aperture/shutter speed pairing based on the light level and ISO setting. You get control without giving up the convenience and shooting speed of auto-exposure. This is an excellent way to work as long as the subject and lighting conditions are such that the camera's built-in meter can deliver a good exposure, which is most of the time.
Figure 5-3 shows aperture-priority exposure mode in operation. The photographer selected the aperture (f−8) to obtain enough depth of field to keep the flower petals sharp while allowing the background to blur out of focus. The camera's auto-exposure system set the shutter speed to 1/180. Controlling depth of field is a good example of a situation in which setting the aperture takes priority and the shutter and sensitivity are variables that can be adjusted as needed.
Note
See Chapter 7 for more information on aperture and depth of field.
In contrast, Figure 5-4 shows an example of an exposure using shutter-priority mode. In this case, the photographer selected the shutter speed needed to stop the sports action (1/500) and allowed the camera to set the aperture for the light conditions.
Creative exposure can also be deliberate deviation from the metered exposure as indicated by your camera's built-in meter. Sometimes you need to depart from the indicated exposure because the combination of subject and lighting creates a situation that fools the meter into giving an incorrect reading. Usually, that happens when the subject is composed of predominantly light or dark values instead of an average distribution of dark, light, and middle tones.
Figure 5-5 shows just such a situation. The meter doesn't know that the subject is actually a white onion on a white background and assumes that the light is being reflected from an average scene. Therefore, the metered exposure renders the onion as gray on gray instead of white on white. To accurately render the subject (figure 5-6), I needed to increase the exposure by a couple of stops. In this case, I manually set the aperture and shutter speed for the desired exposure, but you can achieve the same effect by using the camera's exposure bias setting to shift the metered exposure by a couple of EV units.
Note
See Chapter 6 for more information on controlling motion with shutter speed.


Sometimes you need to override the metered exposure to compensate for erroneous readings and achieve a natural rendering of an unusually light or dark subject. Other times, the goal isn't to produce a natural rendition of the scene at all. Instead, you may want to exaggerate some tones and subdue others by using exposure to shift all the values in a picture darker or lighter.
For example, figure 5-7 simulates the metered exposure of sunlight from a window creating highlights on some pews. It's a natural rendering of the scene, but the light, washed out highlights on the bland mid-tones of the surrounding pews don't have a lot of visual impact. In figure 5-8, the photographer emphasized the warm sunlight highlighting the pews by deliberately underexposing the image so that the highlights are a richly colored midtones contrasting against dark surroundings.

There are a few different ways to achieve this kind of exposure effect. They all accomplish the same thing, but take different paths to reach the goal.
Manual exposure: The most direct technique for overriding the camera's metered exposure is to switch to manual exposure mode and set the aperture and shutter speed yourself.
Exposure compensation: You can also use your camera's exposure compensation (also called exposure bias) feature to adjust the normal metered exposure up or down by a selected amount. In this case, you'd need to reduce the exposure by about three EV.
Spot metering: Finally, you can switch to spot metering mode and set the exposure with the metering spot pointed at the highlight on the back of the pew. By using the brightest part of the scene instead of a middle tone as the basis for your exposure, you're telling the camera you want to make that the new midtone and everything else in the scene should be darker, which effectively creates a low-key image from what could be a normal scene.
One of the challenges facing photographers is how to visualize the effect of exposure changes on the values in the finished photographic image.
The Zone System, made famous by Ansel Adams, was originally designed for black and white photography, using sheet film that was exposed and developed one sheet at a time and printed onto single-contrast graded photographic paper. Photographs are rarely produced that way nowadays. Although photographic production technologies have changed, the basic visualization elements of the Zone System remain as applicable to photography today as they were in Adams' day. It's an excellent tool to help photographers develop a better understanding of the interrelationship of exposure and tonal range, which in turn makes it easier to predictably produce properly exposed images like figure 5-9 that capture the huge brightness range of a sunlit scene within the limited tonal range of a normal image.

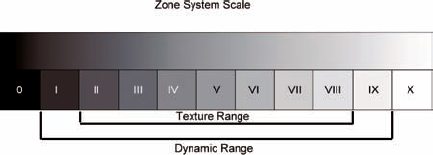
The world around us is composed of a wide range of colors and brightness. To help visualize how that immense brightness range translates into tonal values in a photograph, Adams' Zone System breaks the gray scale into 11 discrete steps, called zones.
The zones progress from absolute black to pure white, with each zone being twice as bright as the next darker step. Thus, the zones are arranged in increments that correspond to one stop of exposure (one EV).
Adams numbered the steps of the Zone Scale with roman numerals, starting with black at 0 and progressing to white at X (10). Zone V (5) is middle gray, which corresponds to the 18 percent reflectance that is the standard target for all photographic light meters. Figure 5-10 shows a representation of the zone scale compared to a continuous gray scale. (Some of the steps may not be visible on the printed page of this book.)
The following list briefly describes the zones and some of the objects that commonly have the corresponding tonal value:
Zone 0: Pure black, no tone or texture whatsoever — absolute darkness, or its photographic equivalent
Zone I: Near black, barely discernable tone, no texture — deepest shadows and silhouettes — dark end of the dynamic range
Zone II: Textured black, very dark but showing a hint of textural detail — deep shadows on dark hair or cloth — dark end of the texture range
Zone III: Dark gray, shows distinct tone and textural detail — detailed shadows such as the dark bark on the shaded side of a tree
Zone IV: Medium-dark gray, an open dark gray with excellent textural detail — open shadows such as the shadowed side of a sunlit building or a strongly lit portrait, dark green foliage
Zone V: Middle gray, the tone of a standard 18 percent gray card — a luminous shadow such as the shadowed side of a low-contrast portrait, weathered wood, or dark stone — the standard target value for light meters
Zone VI: Medium-light gray, a bright midtone showing sharp details — average Caucasian skin in good lighting, a concrete or stone building
Zone VII: Lightest gray, the brightest tone that still shows good textural detail — gray hair, light-colored cloth
Zone VIII: Textured white, very light but showing a hint of textural detail — highlights on light skin, textured snow or white sand — light end of the texture range
Zone IX: Near white, barely discernable tone, no texture — highlights on white or light colored objects such as an egg shell or teacup — light end of the dynamic range
Zone X: Pure white, no tone or texture — specular highlights and light sources
Note that zones 0 and X are each five stops from the exposure for middle gray. These are extremes that are beyond the effective range of most photographic mediums, whether film or digital. Values don't get any darker or lighter by exceeding the extremes.
Zones I through IX are called the dynamic range because they approximate the maximum effective tonal range of photographic media such as negative films and top-quality digital sensors. (Contrasting slide film and some digital sensors have a significantly shorter range.)
Zones II through VIII (middle gray plus and minus three stops) are called the texture range because they represent the working limits of the tonal range that is capable of showing any texture or detail. Most important image information in a photograph will fall into zones III through VII (middle gray plus or minus two stops).
The best way to work with the Zone System is to use your camera's built-in light meter in spot metering mode. Doing this enables you to selectively meter different areas of the scene you want to photograph and visualize where those areas fall on the zone scale. After you take meter readings from a few key areas of the scene, you can calculate the correct exposure based on those readings and then set the exposure manually. Here's how it works:
Tip
To get the maximum tonal range and quality out of the digital sensor in your camera, you need to shoot and store your images in camera Raw format. Camera Raw gives you an extended dynamic range that better matches with the zones of the Zone System. If you shoot JPEG format, you need to adjust the zone scale by omitting zones 0 and X and moving everything else in one step from the ends. This shortens the entire range to nine steps (I thru IX), the dynamic range to seven steps (II thru VIII), and the texture range to five steps (III thru VII).
Select an area of the scene and mentally "place" it's brightness on the zone scale. For example, you might place a Caucasian flesh tone at zone VI or a textured shadow at zone III or IV, depending on how dark the shadow is.
Use your camera's spot meter to read the exposure for the selected area and note the exposure settings the meter recommends.
Mentally adjust the metered exposure by the number of steps between the selected zone and middle gray. For example, zone VI is one stop brighter than zone V, so you decrease the indicated exposure by one stop. Zone III is two stops darker, so you increase the metered exposure by two stops to reach zone V. If you're reading zone V, no adjustment is necessary.
Repeat steps 1, 2, and 3 for other important tonal areas. If you properly place each area in the appropriate zone, the adjusted exposure settings in step 3 should be the same.
Manually set your camera for the exposure you calculated in step 3 and take the picture.

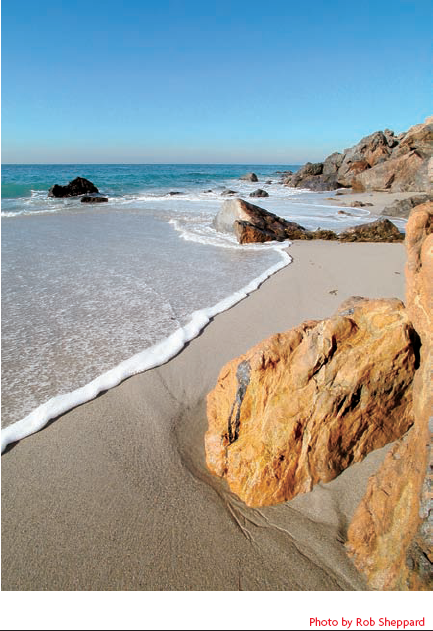
Figure 5-11 is an example of a scene that would be difficult to meter normally. The scene is composed almost entirely of dark and light tones with very few midtones, and there's significantly more light than dark, so it doesn't average out to a normal exposure. But despite the challenging situation, the zone system enables you to calculate the correct exposure easily.
Meter the foliage on the mountainside and place it in zone III. Meter some of the darker cloud areas and place them in zones VI and VII. Meter the lighter cloud tops and place them in zone VIII. Adjust the metered exposure settings to the equivalent of zone V and take the picture. The result is a properly exposed photograph with a natural-looking tonal range and without the burned out highlights or muddy black shadows that come with over- or under-exposure.
Part of the power of the Zone System is its ability to predict the impact of exposure changes on the tonal values of an image. The zones of the Zone System scale are arranged in one stop increments, so changing the exposure one stop moves all the image values up or down the scale by one zone. Therefore, after you meter various areas of a scene and place them on the zone scale relative to a given zone V exposure, you can easily imagine the changes in tonal values if you increase or decrease the exposure.
For example, in figure 5-12, the side of the house is zone VIII and the dark strip of grass across the foreground is zone II. The middle of the grassy field and the darker gray of the clouds are both zone V. Reducing the exposure one stop slides all the zones down one step (as simulated in figure 5-13). This gives the side of the house more color by moving it to zone VII. Making the clouds and the lighter grass a little darker doesn't hurt anything. However, that same exposure changes the dark grass to zone I, which transforms it from a dark textured green to a near black with little or no texture.


Tip
Digital sensors tend to be slightly more tolerant of under exposure than they are of over exposure. You can sometimes lighten an underexposed shadow area in Photoshop, but there's no way to recover the detail from an over-exposed highlight. Camera Raw retains more highlight than other formats, but once the detail is blown out, it's gone for good. So, you may want to bias your exposures toward the higher zones to make sure you don't lose highlight detail.
It takes some practice to develop the ability to visualize the effects of exposure on your images and to anticipate how changing the exposure will alter an image. Until you master that skill, bracketing your exposures is the best way to ensure that you always get an optimum exposure, even if it's not the one you (or your camera's automatic exposure system) thought was correct. As an added bonus, analyzing the alternate exposures of the bracket is an excellent way to learn how exposure changes impact the image. The value of the Zone System is that it provides a tool for structuring your observations and then for applying what you observe to future shooting situations.
The Zone System works best when you take the time to carefully meter several areas of the scene and then set the exposure manually. However, you often can use a modified form of Zone System metering with your camera in auto-exposure mode when you need to work quickly in changing lighting conditions.
The trick is to use spot metering mode instead of the more common multi-area metering and to select something in the scene that you want to place at zone V. The camera's meter and auto-exposure system are designed to produce the proper exposure for middle gray, so that matches perfectly with zone V on the zone scale. You control the exposure by metering a zone V area of the scene and let the camera automatically control the actual exposure settings. Here's how it's done:
Make sure your camera is set for spot metering mode and your preferred auto-exposure mode. Either aperture-priority or shutter-priority auto-exposure generally works best, but you can use this technique with most programmed exposure modes as well. Set the appropriate aperture or shutter speed if you choose aperture-priority or shutter-priority mode.
Scan the scene and select an area that you want to place at zone V.
Train the spot meter dot on the zone V area in the scene. Press the auto-exposure lock to lock that exposure into the camera.
Reframe the image and take the photograph.
Note
See Chapter 3 for information on exposure bracketing.
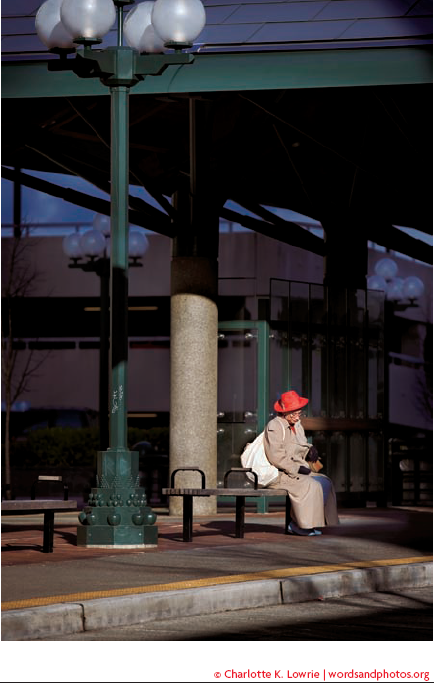
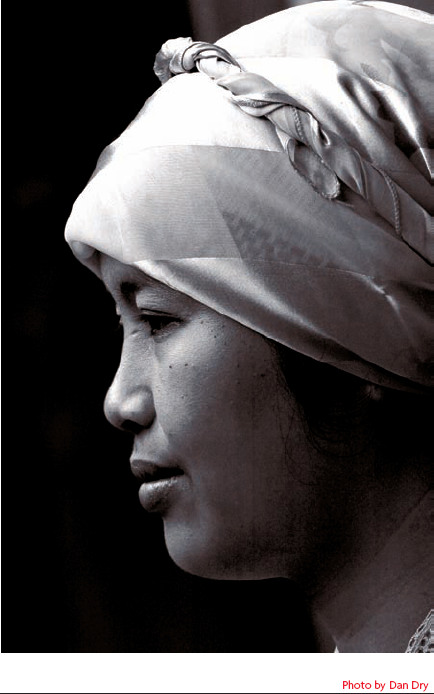
This technique is fast and easy to use — and all it requires is that the scene contain something in zone V that you can use as the metering target. It's especially useful in a situation such as Figure 5-14 that has a relatively small area of interest surrounded by a large dark (or light) background that's likely to confuse a standard metering pattern. In this case, spot metering the column behind the seated lady (or the lady's hat) yields the correct exposure for the sunlit subject and allows the rest of the scene to go dark.
There are many potential situations in which you might want to exercise your creative control and override your camera's indicated exposure settings. The most common examples are high-key and low-key images in which the overwhelming predominance of light or dark tones create an impossible situation for normal metering. The exposure indicated by the meter renders the image with an average value of middle gray. For a light, high-key subject, that's a gross under exposure, making the image look much too dark. For a dark, low-key subject, the metered exposure is an over exposure that makes the image too light.
Therefore, to get a natural rendering of a high-key scene such as figure 5-15, you must override the exposure as indicated by the meter. Undoubtedly, the best way to do that is to use the Zone System to calculate the exposure and set it manually as described earlier.
However, you can also use a rough rule of thumb for high-key subjects and simply open up two stops from the metered exposure. If your camera has an exposure compensation feature, use it to increase exposure by two EV. Otherwise, just set the exposure manually. Since this is just a rough guideline and the actual exposure compensation will vary depending on how bright your subject is, you should either bracket around the new base exposure, or shoot a test image and then make further exposure adjustments based on its histogram.
Another way to get a good exposure of a high-key subject is to use the Quick Auto Zone V technique. It usually works because even a high-key subject typically has some zone V areas on which to base your exposure. In figure 5-15, that's the under side of the lower-right petal.

Low-key scenes, such as figure 5-16, have exactly the same exposure issues as high-key scenes, except in reverse. The normal metered exposure for a low-key scene creates an image that is too light, and to correct the problem, you need to reduce the indicated exposure.
What does "expose for the shadows, develop for the highlights" mean?
That's a famous saying from Ansel Adams that refers to the custom film development component of his Zone System process. It advises the photographer to always give the film enough exposure to ensure good textural detail in the darker tones (zones II, III, and IV), then adjust the chemical processing of the film to control the density of the highlight areas (zones VI, VII, and VIII). If the lighting of the original scene exceeded the normal range, causing the highlight areas to be too bright, Adams could shorten the development time to reduce contrast in the negative and decrease the density of those highlight areas by as much as two zones. Similarly, extending the development time of the negative could increase contrast, and push the highlights into a higher zone. The goal was to produce a negative with appropriate tonal range to print on a standard photographic paper grade.
As digital photographers, we no longer use negative film with chemical development, so this specific advice no longer applies in a literal sense. However, a modified version of the saying does have some validity.
Considering that digital image sensors tend to lose highlight detail abruptly when overexposed, and given the opportunities you have for adjusting image tonalities during processing of Raw files, the digital photographer's version of this saying might be: "expose for the highlights, process for the balance." In other words, make sure your original camera exposure is correct for the upper midtones and highlights. Record their full brightness, but be very careful not to overexpose them. Then use the Camera Raw processing controls to adjust the black and white points and the midtone brightness to bring them into line with the highlight tones. Actually, when you get the upper midtones right, the rest of the Camera Raw settings seldom needs anything more than minor adjustments.
Why not just spot meter the most important part of the scene in a high-key or low-key image?
Using your camera's spot metering mode to meter the most "important" part of the scene doesn't always produce a good exposure — particularly with high-key or low-key subjects. The camera's meter is calibrated for an average middle gray and calculates exposure settings based on the assumption that the subject reflectance matches that standard. If the most important part of the scene is a midtone, then spot metering that area produces a good exposure. However, when the most important part of the scene is lighter or darker than middle gray, as is usually the case in high-key and low-key scenes, then spot metering such an area produces an erroneous exposure reading. If the target area is lighter than middle gray, the result is under-exposure. If it's darker, the result is over-exposure. You may be able to find a suitable spot metering target somewhere in the scene, but it's not usually the central, dominant subject in a high-key or low-key image.