
Can Redmine be used without plugins? Surely it can. Is Redmine thorough without plugins? I'm not sure whether it is—I haven't seen a Redmine installation that does not use any plugins. Anyway, if you can extend your installation with features that you need, why not do this?
Of course, we won't be able to review all the available plugins in this chapter. Therefore, we'll start with the ones that I believe are essential for any Redmine installation. Then we'll check a plugin that implements a highly anticipated feature that is missing in the Redmine core. Finally, we'll review plugins that are discussed by experienced Redmine users most often.
So, let's check out what amazing things can be done with some plugins. Under this section, we will review:
- The Exception Handler plugin
- The jsToolbar CodeRay Extension
- The Monitoring and Controlling plugin
- The Git Hosting plugin
- The Agile plugin
There is no perfect software—any application can throw an error. By error here, I mean an exception that occurs when an application cannot handle an emergency situation. Yes, such cases can't be avoided, but that's not even the main problem. The main problem is that an exception can happen silently and you may never know that it has happened, because you can't be sure that the user who faces it will report it to you.
This becomes especially important if you are using:
- The most recent version of Redmine
- Badly tested third-party plugins or their most recent versions
- Custom plugins that were developed for this particular Redmine installation
Luckily, Redmine writes all such exceptions to its log files or the log files of the HTTP server. But if your Redmine installation is heavily loaded and/or server administrators do not check all log files regularly (that is, at least once a day), you can still easily miss them.
The solution comes from the now-former Redmine core developer Eric Davis, who developed the Exception Handler plugin. This plugin catches unhandled exceptions, generates reports, and sends them to the specified email addresses.
Note
You can find the up-to-date fork of this plugin, which is maintained by Ricardo Santos, at https://github.com/thorin/redmine_exception_handler.
To install the plugin, you need to copy its code into the redmine_exception_handler subdirectory of the plugins directory, install the tinder and exception_notification gems (using gem install, possibly with the -v option), and run bundle install.
The very first thing that needs to be done after installation of this plugin is specifying the email addresses at which you want to receive information about exceptions. To do this, go to the Plugins page of the Administration menu and click on the Configure link that is located to the right-hand side of the plugin's row. You should get the form which is shown in the following screenshot:

After completing this form, you can check whether notifications can be sent to the specified email addresses using the Test Settings by triggering a fake exception link.
Now, you will always know when your Redmine fails. So, unless you are able to check Redmine log files regularly and carefully, I believe that installing this plugin is essential.
As described in Chapter 6, Text Formatting, to make a code in a Wiki content formatted appropriately, you need to embed it in the <pre> and <code> tags (for Textile). Moreover, you need to do this manually! Also, to have the code highlighted properly, you need to specify the correct programming language in the class attribute of the starting <code> tag. As practice shows, this is a problem for new Redmine users. Therefore, they often embed the code without syntax highlighting.
So, to make the lives of your users easier, you can install the jsToolbar CodeRay Extension. This plugin adds a new button to the Wiki toolbar, as shown here:

With this button, you just select the code, or place the cursor at the position where you want to write it, and click on the corresponding language in the drop-down box. As simple as this!
Note
This plugin consists of two parts, which are available at: https://github.com/tleish/redmine_jstoolbar_ext_coderay and https://github.com/tleish/redmine_jstoolbar_ext
As this plugin solves one of the issues that are common to many Redmine users, I believe it's essential to have it installed on your Redmine installation.
As it has been mentioned, Redmine lacks reporting and statistics. This is a well-known issue, so no wonder there exist several plugins that implement these missing features for Redmine. One of these plugins is Redmine Monitoring & Controlling (which is also known as M&C).
The Monitoring & Controlling plugin implements its functionality as a project module, so to be able to use it you need to enable this module for your project. This can be done under the Modules tab of the project's Settings page (remember that you can also enable it by default for all new projects on the global Settings page). Here is this tab:

After you have enabled the Monitoring & Controlling by Project module here, you will see in your project menu the following new tab:

Each of the charts that are shown on this page can be printed or downloaded using the icons:

As you might have noticed, this page has its own tabs and the previous screenshot shows just one of them: Tasks Management. The other tabs are: Time Management, which contains charts for due and spent hours, and Human Resource Management, which contains a chart that displays the number of issues per project member.
Note
An up-to-date fork of the plugin is available at https://github.com/benoitlm/Redmine-Monitoring-Controlling.
The most popular protocols for accessing Git repositories are HTTPS and SSH. In particular, these two protocols are used by GitHub. In Chapter 3, Configuring Redmine, I mentioned that the Git server can be configured to use Redmine users through the Redmine.pm tool. Such a configuration allows Redmine users to access Git repositories via the HTTP/HTTPS protocol. However, Git alone does not implement an HTTP server—it needs a separate application for this, which is Apache in our case (due to Redmine.pm, which is an Apache Perl module). In the same way, Git alone does not implement an SSH server—it needs a separate application to implement SSH access as well.
So, to provide SSH access to your repositories, you need an SSH server. But additionally, you need something like Redmine.pm that will support Redmine users. One such tool is Gitolite. It's a kind of shell that is opened when the user logs in to the SSH server using a special SSH account. Usually, the name of such an account is just git (it can also be gitolite or gitolite3). That's why the URL for SSH access usually looks like [email protected] (git is the username here). In other words, Gitolite uses a single system account for its operations. And, for Git users, it provides virtual accounts, much like Redmine.pm.
However, Gitolite cannot work with Redmine directly, as it knows nothing about this application. So, to integrate it with Redmine, you need the Redmine Git Hosting plugin. This plugin makes sure that Gitolite will be able to recognize Redmine users and authorize them according to their roles and permissions. In addition to this, the plugin turns Redmine into a feature-rich Git hosting application. That's why the authors of the plugin chose such a name for it.
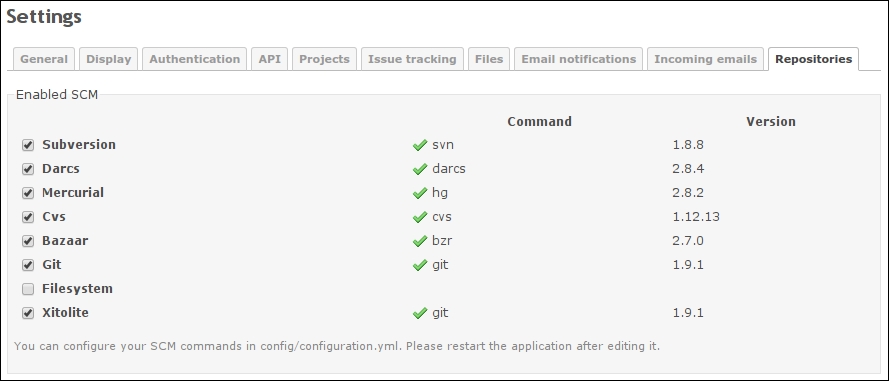
As the plugin dramatically extends the capabilities of the Git SCM, for its own Git repositories it introduces the special virtual Gitolite/Xitolite SCM. Therefore, for the plugin to be activated, this SCM must be enabled under the Repositories tab of the Settings page in the Administration menu, as shown in this screenshot:
If the Xitolite SCM is enabled here, you will see the new Gitolite SCM in the new repository form (this form can be opened by clicking on the New repository link under the Repositories tab of the project's Settings page), as shown in the following screenshot:

The difference between normal repositories and Gitolite ones can be seen right after a Gitolite repository is added to the project. Thus, it obviously has many more capabilities.

The settings page of such a repository, which can be opened by clicking on the Edit link, reveals what these capabilities are.

The Deployment Credentials section on this page reminds us that SSH access is based on SSH keys. So, to be able to access Gitolite repositories through the SSH protocol, Redmine users must add such keys to their accounts first. This can be done using the My public keys link, which can be found on the My account page. This link opens the page that is shown in the following screenshot:

Here, you need to paste the content of your public key file (it usually has a .pub extension).
However, as you have probably noticed in a previous screenshot, SSH is not the only protocol that is supported by the Git Hosting plugin for accessing its repositories. Thus, by default, it assumes that you have also configured HTTP for your Git server. But that's not all! Additionally, it supports the proprietary Git protocol (if the Enable Git Daemon option is enabled for the repository), GoLang, and Git-Annex. All of the enabled protocols are represented in Repository access links as buttons. By the way, the box with these links is also displayed on the project's Overview page (if the project has a Gitolite repository, of course).

These access links (SSH, HTTP) can also be seen on the repository page, which also has some other improvements that are provided by the Git Hosting plugin. For example, the sidebar of this page looks like in the following screenshot:

Another improvement is support for the GitHub-style README, which is shown on the repository page under the Latest revisions block (if such a file exists in the repository, of course):

As on GitHub, this README file uses the Markdown formatter, even if you are using Textile for the rest of the system.
Another really cool and important feature of the Git Hosting plugin is the comprehensive repository statistics that replace the native short statistics and become available under the Statistics link, which can be found on the repository page. Here are these statistics:

In this screenshot, you see just one of the tabs. It looks much like the statistics on GitHub, right?
Among other features that are provided by this amazing plugin are the following:
- Automatic creation of repositories on the Gitolite server. In this way, the plugin does the same job as the
reposman.rbtool (this tool was described in Chapter 3, Configuring Redmine) but, unlike the latter, it does this job on-the-fly. Additionally, it can automatically create repositories for new projects. - Support for GitHub-style post-receive URLs. In this way, Redmine will be able to notify third-party applications about new changes that have been made to the repository.
- The plugin can automatically mirror the repository to third-party Git servers, for example, to GitHub.
- The plugin can also restrict some branches to specific Redmine users and groups.
As you can see, it's a powerful and complex plugin that depends on third-party systems, such as SSH server and Gitolite. Therefore, its installation procedure is, unfortunately, quite complicated.
Note
This plugin also requires the Redmine Bootstrap Kit plugin to be installed. Detailed installation instructions for these two plugins are available at http://redmine-git-hosting.io/get_started.
Agile methodologies are intended to make software development processes adaptive, iterative, and evolutionary. While Agile is in fact more about project planning and collaboration between team members, it may also need certain features to be present in the project management tools that are used by the team. Unfortunately, the Redmine core does not come with any special agile-specific functionality, but luckily such a functionality can be found in some plugins for Redmine.
The Agile plugin by Kirill Bezrukov is the most popular Redmine plugin that is intended to assist in agile software development. Thus, it is so popular that it's even pre-installed by some hosting providers that offer Redmine in images or as SaaS (for example, BitNami, Plan.io, and so on; see also Chapter 2, Installing Redmine). But unfortunately, it's not completely free—there is the light free version and the PRO commercial one.
The agile-related functionality is provided by this plugin as a project module. So it must be enabled for the project, what can be done under the Modules tab of the project's Settings page, as shown here:

Here, this plugin is listed as the Agile project module. Alternatively, you can enable it for all new projects under the Projects tab of the system Settings page, which can be found in the Administration menu.
When the project module is enabled, the new Agile tab is added to the project menu, like this:

What you see in this screenshot is known as an agile task board. The main purpose of such boards is to visualize the development process and, therefore, to help detect any problems that are related to it. That's also the reason why such boards are usually used in the real world (that is, not in an electronic form) and are kept in a location where most team members can see them. Nevertheless, the virtual board may also be needed sometimes—for such cases, you can use Redmine with the Agile plugin.
Filters, which you can see at the top of this page, are in fact the same as on the issue list. However, Options are specific to the Agile board. Here they are:

Here, Board columns are issues statuses which should be used as the columns of the board. And, Card fields are issue fields that should be shown in cards on the board.
Also cards on the board are draggable. Thus, you can change their order in the column, what can be useful if you believe that some cards are more important and therefore should be on top. But you can also drag them to other columns, what would mean changing their issue status.

By the way, when you hover the mouse arrow over a card, the comment ![]() icon appears in its bottom-right corner—this can also be seen in the previous screenshot. Clicking on this icon allows you to quickly add a comment to the card/issue. When added, the comment is shown within the card until you refresh the page. This can be seen in the following screenshots:
icon appears in its bottom-right corner—this can also be seen in the previous screenshot. Clicking on this icon allows you to quickly add a comment to the card/issue. When added, the comment is shown within the card until you refresh the page. This can be seen in the following screenshots:

This is, in fact, an ordinary issue note and it will also be shown on the issue page.
But this is not the only board that is provided by the plugin. In the Issues section on the sidebar of an issue page, you can see the new Version planning link (for example, in the second screenshot of this subsection). If you open this link, another board will be opened. On that board, you can drag issues between versions, in this way assigning the issue to a different version (much like the way you would change the issue status using the previous board).
Additionally, the Agile plugin comes with the burn-down chart. This chart can be opened if you click on the Issues burndown link under the Agile charts label on the sidebar. Here is a sample of the chart:

This chart is another well-known Agile tool that shows how much work is left to do. Moreover, it can be considered to be essential for issue tracking applications such as Redmine.
Note
The Agile plugin can be obtained from: http://www.redminecrm.com/projects/agile
This is the only functionality that is available in the light free version of this amazing plugin. The PRO version (which unfortunately costs a lot at the time of writing) comes with many more features, such as the ability to configure and save boards, the ability to group cards on the board, different colors for cards based on issue fields, and more charts.
For a good agile experience, your task board should not just reflect the issue statuses. Instead, if you want to use the agile methodology and its task board practice with the help of the Agile plugin, you should adjust the issue statuses so that they better reflect your processes and then use them as columns on the board. Thus, you may decide that you want to use it as a more specific Kanban or scrum board. In other words, before using this plugin, you should know what kind of board you want to have.