
You might expect to see the most major part of the administration menu being discussed in a single chapter, but that's not going to happen. In this book, I'm trying to review Redmine by its functional parts and not by sections of its web interface. Anyway, this chapter discusses the largest number of pages of this menu, as they are related to the access control and workflow.
On the other hand, you might wonder why the access control and workflow are reviewed in a single chapter. In Redmine, the workflow is a set of rules for the issue life cycle that consider trackers (issue types) and member roles. And it's actually member roles that define access permissions.
Also, this chapter is intended mostly for administrators as the administration menu is visible only to this type of user. However, it should also be interesting for project managers as it explains how to configure Redmine to ease and optimize the development process, in particular the issue life cycle. Other users might find this chapter useful as well, because here they can learn what permissions they need to gain access to certain types of functionality.
In this chapter, we will cover the following topics:
- The Roles and permissions page
- The Trackers page
- The Issue statuses page
- The Workflow page
- Modifying the workflow
- A practical example
As you already know, users are added to projects as members. To add a member, you need to select a user and a role. So in this context, a role is a kind of membership type. That's why roles in Redmine are often called member roles. However, the actual meaning of role is slightly broader than just a membership type for a project, as some role permissions affect not only the project of the user.
Roles are defined for the entire system. This can be done from the Roles and permissions page of the Administration menu, which is shown in the following screenshot:

As you can see, the order of roles can be changed here using the arrows in the Sort column. The same order is used in the forms, with which users select roles for project members. Normally, you will want it to be from the most privileged at the top to the least privileged at the bottom.
However, the order can't be changed for the italicized Non member and Anonymous roles. They are always the last here. These are virtual roles, what means that they do not really exist in the database and thus cannot be edited. The Non member role is for users who are not members of the project, and the Anonymous role is for unauthorized (not logged in) users.
The Copy link can be used to copy a role's configuration, including the permissions and the associated workflow, to a new role. You should use this feature if the role which you are about to create is in some way similar to an existing one. Finally, the Delete link can be used to remove a role.
A role can be edited by clicking on its name in the list. When you do this, you get the following form:
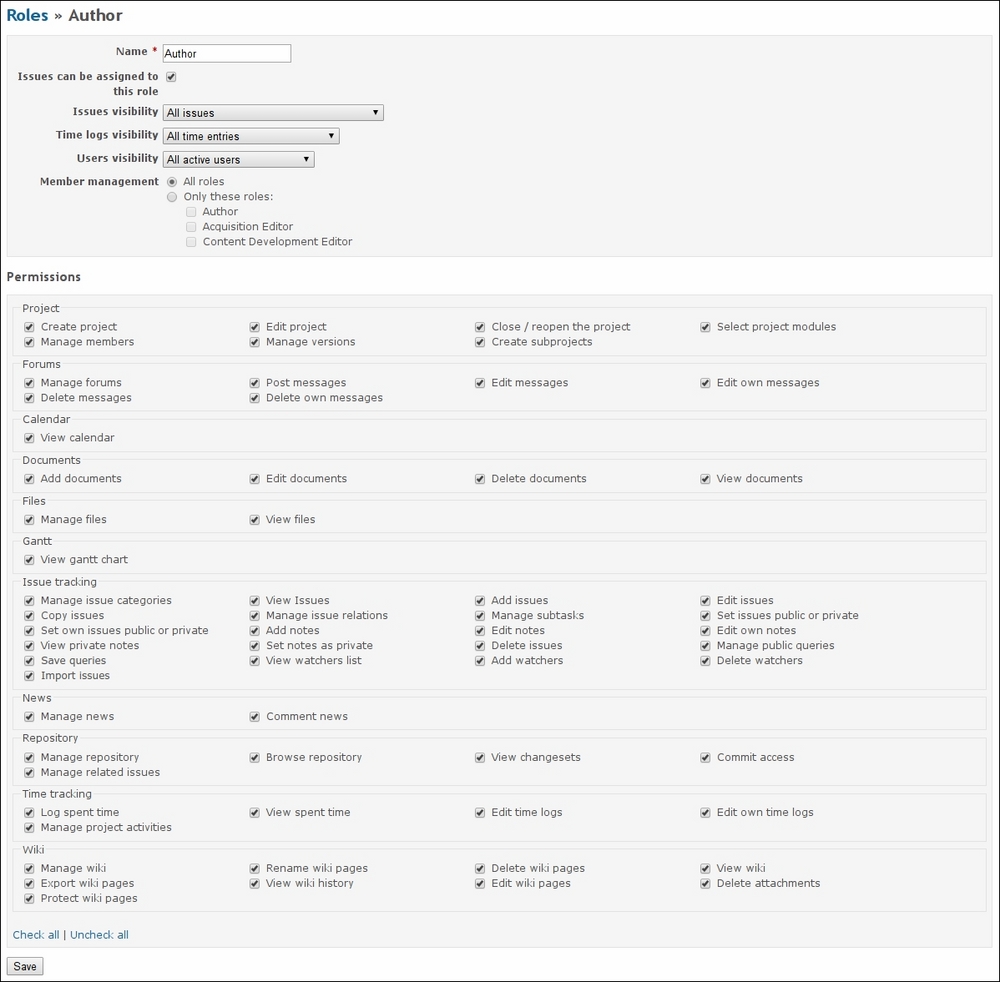
The Issues can be assigned to this role option determines whether members of the particular role will be available for the Assignee field of the issue form. Thus, this option can be disabled for a reporter or customer role, the members of which you will not likely want to make assignable.
The Issues visibility option specifies which issues are going to be visible to the project members of this role. It accepts the following values:
- All issues: All issues, including private ones, will be visible to the user
- All non private issues: All issues except private ones will be visible to the user
- Issues created by or assigned to the user: Only issues that are owned by the user will be visible
The Time logs visibility option controls the visibility of time tracking entries, which will be discussed in the next chapter. Its possible values are the following:
- All time entries: All time entries of all visible users (see the next option)
- Time entries created by the user: Only their own time entries will be visible to members of this role
The Users visibility option specifies which other users will be visible to members of the current role. This option can be set to one of the following values:
- All active users: All users will be visible (inactive users are visible only to administrators)
- Members of visible projects: Only users who are members of visible projects will be visible to the user
Users who have the Manage members permission (which is described in The Project block subsection) can add other members to their project. Thus, users with a restrictive role may appear to be able to re-add themselves to the project with a more privileged one. The Member management option was added to prevent such cases. With this option, you can control which roles can be added or removed from the project by members of the current role.
However, the most interesting and important part of the discussed form can be seen under the Permissions label.
Generally, Redmine access control is built on permissions. All such permissions (if they are editable) can be found in this form. Thereby, when a plugin adds a permission, it appears here as well.
As you can see in the previous screenshot, the list of permissions is split into blocks—Project, Forums, and so on. Each such block, except Project, corresponds to the appropriate project module. Thus, when a plugin adds a project module with some permissions, you see a new block with new permissions here. An exception is the Project block, which is not related to any project module and includes permissions for the projects themselves.
In Redmine, users can be divided into three types: unauthorized or not logged in users, who are represented by the Anonymous role; authorized users but not members of the project, who are represented by the Non member role; and project members, who are represented by other roles. Generally, permissions are defined for these three types and not all permissions are available for all of them. For example, Redmine cannot allow unauthorized users to create projects. Many permissions can be enabled for project members only. And all permissions are implicitly granted to administrators.
So let's discuss the permissions of each block now.
The Project block, as mentioned earlier, contains permissions for projects. However, if a plugin introduces any system permission (that is, the one that controls access to something that is not related to projects), such a permission will be added to this block as well.
Let's check out the permissions in this block:
- Create project: This is the only permission of this block that is available for all registered users. It decides whether the user is allowed to create new projects.
As you know, the user should be associated with a role in order to get permissions, and to be associated with a role, the user should be added to a project. Then how can users get the Create project permission if they have not been added to any project yet? The first project in the system should always be created by an administrator. Normally, this will be a general project of the organization, which can even be named after the organization. You can add users whom you want to grant this permission to such a project. Alternatively, you may want to grant the Create project permission to the Non member role, but note that in this case, any registered user will be able to create projects.
- Edit project: This permission controls whether or not the project member can change the properties of the project, which can be found under the Information tab of the project's Settings page.
- Close / reopen the project: This permission determines whether the project member is able to close or reopen the project, what can be done from the project's Overview page.
- Select project modules: This permission controls whether the project member can enable or disable the project modules under the Modules tab of the project's Settings page.
- Manage members: This permission specifies whether the project member is allowed to manage project membership under the Members tab of the project's Settings page.
- Manage versions: This permission determines whether the project member is able to add, edit, and delete project versions. This can be done under the Versions tab of the project's Settings page.
- Create subprojects: This permission determines whether the project member is able to add subprojects to the project. However, to be able to do this, the project member must also have the Create project permission.
The Forums block contains permissions for message boards. These boards are provided by the Forums project module and can be found under the Forums tab in the project menu.
So, here are the permissions of this block:
- Manage forums: This permission controls whether the project member has access to the Forums tab of the project's Settings page, where message boards can be added, edited, or removed.
- Post messages: This permission specifies whether the user can add messages to the message boards of the project. This also includes whether the user can reply to messages. The permission is available for all users, including not logged in ones.
- Edit messages: This permission controls whether the project member can modify forum messages, including those that were added by other users. It is suitable for forum moderators.
- Edit own messages: This permission controls whether users can modify their own messages. When granting this permission you should remember that the original text can be copied by other users into their replies as a quote. So generally, the Edit own messages permission should be used only to correct typos. Certainly, it is available only for logged in users.
- Delete messages: This permission determines whether the project member can delete forum messages, including those that were created by other users. Thus, this permission can be used for spam moderation.
- Delete own messages: This permission determines whether users can delete their own forum messages. As with the Edit own messages permission, when granting this one, you should consider that the message text can be copied into replies or replies can be based on the message. This permission is available only for registered users as well.
The Calendar block contains permissions that provide access control to the calendar, which can be found under the appropriate tab of the project, if the Calendar project module is enabled:
- View calendar: This permission is the only permission in this block. It specifies whether the user has access to the Calendar tab of the project menu. It can be specified for all users, including not logged in ones.
The Documents block contains permissions for access to the Documents tab of the project menu, which is provided by the Documents project module.
Let's check them out:
- Add documents: This permission controls whether the user can add documents to the project. It is available for all registered users.
- Edit documents: This permission, which is available for all registered users too, specifies whether the user may modify existing documents. Users with this permission will also be able to attach files to documents and remove such attachments.
- Delete documents: This permission determines whether the user can delete documents. It is available for all registered users.
- View documents: This permission determines whether the user can see documents and download their attachments. It can be granted to any user, including not logged in ones.
The Files block contains permissions for access to the Files tab of the project menu. This tab is available only if the Files project module is enabled.
The permissions in this block are the following:
- Manage files: This permission determines whether the user is able to add and remove project files.
- View files: This permission is needed for the user to be able to download project files. It can be granted to any user, including not logged in ones. But note that project files still won't be accessible for non-members if the project is private.
The Gantt block comes with permissions for access to the Gantt tab of the project menu, which contains the Gantt chart. This tab is available only if the Gantt project module is enabled.
- The View gantt chart: This permission controls whether the user has access to the Gantt tab of the project menu. It can be specified for all users, including those who are not logged in.
The Issue tracking block contains permissions for issue tracking. This is the largest and perhaps the most important block. Its permissions affect not only the functionality that can be found under the Issues tab of the project menu, but also many other pages that provide some functionality related to issues. Moreover, these are almost all project pages, including the overview page, roadmap, calendar, and Gantt. Certainly, these permissions take effect only if the Issue tracking project module is enabled.
So, here they go:
- Manage issue categories: This permission controls whether the project member can add, edit, or delete issue categories, what can be done under the Issue categories tab of the project's Settings page (or within the issue form).
- View issues: This permission controls whether the user can see issues. Without this permission the user won't be able to access any issue in the project. So, in most cases, you will want it to be set. It is available for all users, including not logged in ones.
- Add issues: This permission determines whether the user is able to add new issues. It is available for users who are not logged in as well.
- Edit issues: This permission controls whether the user is able to edit issues, what includes adding attachments. It is available for all users, including not logged in ones.
- Copy issues: This permission is used to determine, whether the user is allowed to copy issues. It is available for all users, including not logged in ones.
- Manage issue relations: This permission controls whether the user can add or remove related issues, what can be done on the issue page. This permission is available for users who are not logged in as well.
- Manage subtasks: This permission determines whether the user is able to add subtasks to the issue, what can be done on the issue page. But note that such users should also have the Add issues permission. Like the latter, this permission is available for not logged in users as well.
- Set issues public or private: This permission specifies whether the user is able to modify the Private flag of the issue or not. If this permission or the Set own issues public or private permission is set, the user will also be able to see the value of this flag in the issue list (by enabling the appropriate column) and filter this list by its value. The permission is also available for users who are not logged in (and can be used if an anonymous user reports a critical security issue).
- Set own issues public or private: This permission specifies whether users are able to modify the Private flag of the issue which was created by them. Users with this permission will also be able to see the value of this flag in the issue list and filter the list by its value. The permission is available for all registered users.
- Add notes: This permission controls whether the user can comment on issues. Moreover, it allows users to add attachments to issues (though as sometimes, users may need to show files in their comments). This permission is available for all users, including not logged in ones.
- Edit notes: This permission controls whether the user can edit issue comments. However, it does not allow users to remove files that were attached to the issue along with a comment. It is available for all registered users and is suitable for moderation.
- Edit own notes: This permission allows the user to modify comments that were created by that user. However, it doesn't allow the user to remove files that were attached along with such comments. Also, permissions like this one should be used only to correct typos, as the original text from the comment can be used in replies as a quote. The permission is available for all registered users.
- View private notes: This permission controls whether private comments of issues are visible to the user. Certainly, it's available only to project members.
- Set notes as private: This permission controls whether the user can add private comments to issues. But note that without the View private notes permission, users won't be able to see their own private comments. This permission is available for project members only.
- Delete issues: This permission controls whether issues can be deleted by the project member.
Tip
I believe that issues should never be deleted. Each issue is assigned a unique ID and can be referenced by this ID from other objects and pages. So if you delete an issue, its ID becomes unused. While most related objects are removed or unlinked by Redmine automatically, Wiki links to this issue will still remain and will become dead links. Therefore, issues can and should be closed instead.
- Manage public queries: This permission specifies whether the project member can add, modify, or delete public custom queries. Custom queries are a very powerful feature, and public custom queries can make a project more customer friendly. However, too many public queries per project can make this feature inefficient. So, this permission should be granted to users who really know what to do with it.
- Save queries: This permission determines whether the user can save custom queries. Custom queries are available for all users, including not logged in ones, but only registered users can save queries (if this permission is set).
- View watchers list: This permission controls whether or not the user can see who is watching the issue. It is available for all users, including those who are not logged in.
- Add watchers: This permission is available for all users as well. It specifies who is able to add watchers to the issue. (Anonymous users can be allowed to do this because, for example, they may know who will likely be interested in the issue.) However, while granting this permission, you should remember that watchers are going to receive email notifications. So, it may be not a very good idea to allow users, especially anonymous ones, to "configure" Redmine to send emails to other users.
- Delete watchers: This permission determines who will be able to remove watchers from the issue. It is available for all users, including not logged in ones, but you will most likely not want to grant this permission to anyone besides project managers. Also, the user who is watching the issue will expect to be notified about changes in the issue, so I don't think that it's good if someone besides this user removes him/her from the watchers.
- Import issues: This permission determines whether the user is able to import issues from a CSV file. It is available for all users, including not logged in ones. However, I would not recommend enabling it for users who are not members of the project.
The News block contains permissions for access to project news. They can be found under the News tab of the project menu if the News project module is enabled. The News tab is visible to everyone, including not logged in users, and there is no permission to change this (but you can still make the entire project private).
Here are the permissions:
- Manage news: This permission determines whether the project member is able to post, edit, and delete news in the project. A user with this permission will also be able to remove news comments (which makes it suitable for spam moderation).
- Comment news: This permission controls who can comment on news. It is available for all users, including not logged in ones. But I would not recommend granting this permission to anonymous users because, as I know from practice, this is where the spam goes most often.
The Repository block contains permissions that control access to repositories. Some of these permissions apply not only to Redmine (directly) but also to SCM servers if advanced repository integration has been configured (see Chapter 3, Configuring Redmine). Repositories are available under the Repository tab of the project menu if the Repository project module is enabled.
So, let's see what we have in this block:
- Manage repository: This permission allows the project member to add, edit, and delete repositories. Additionally, it allows the user to modify committer associations, what can be done under the Repositories tab of the project's Settings page.
- Browse repository: This permission determines whether the user can browse the content of the repository. If advanced integration has been configured for the SCM server, this permission also controls access to the repository on the SCM side. The permission can be set for all users, including those who are not logged in. Thus, if advanced repository integration has been configured in your Redmine and you want anonymous users of your SCM server to have read-only access to the repository, you should grant this permission to the Anonymous role.
- View changesets: This permission determines whether the user has access to the repository revision list and revision pages. To provide users with full read access to the repository, you need to grant this permission along with the Browse repository one. The permission is available for all users, including not logged in ones.
- Commit access: This permission has nothing to do with Redmine itself. It is used by the SCM server, if advanced integration has been configured, to determine whether write access to the repository should be given to the user. It is available for all users, including those who are not logged in.
- Manage related issues: This permission specifies whether the user should be able to add or remove issues that are related to the revision, what can be done on the revision page. It is available for all users, including not logged in ones.
The Time tracking block contains permissions that are used to control time tracking for the project. Time tracking will be reviewed in detail in the next chapter.
For the moment, let's check out the permissions that are available:
- Log spent time: This permission specifies whether the user should be able to add time entries to the project or not. Note that this also applies to time entries that are added via commit messages. The permission is available for all registered users.
- View spent time: This permission determines whether the user can see time entries in the project. This applies, not only to the time report, but also to the total hours on the project overview page, the spent hours on the issue page, and so on. The permission can be set for not logged in users.
- Edit time logs: This permission allows users to modify time entries of any user in the project. Certainly, it can be granted only to project members. Anyway, I doubt whether it's good to allow a user to modify the time entries of another user.
- Edit own time logs: This permission allows users to modify their own time entries. It is available for all registered users.
- Manage project activities: This permission determines whether the project member can enable or disable time tracking activities for the project, what can be done under the Activities (time tracking) tab of the project's Settings page.
The Wiki block includes permissions for access to Wiki pages, which can be found under the Wiki tab of the project menu (if the Wiki project module is enabled). These permissions, however, do not apply to other Wiki-syntax-enabled contents (such as issue description):
- Manage wiki: This permission controls whether the project member has access to the Wiki tab of the project's Settings page (which allows you to specify the name of the starting Wiki page).
- Rename wiki pages: This permission determines whether the project member is able to move the Wiki page to a different parent page and/or change its name.
- Delete wiki pages: This permission specifies whether the project member is able to remove the Wiki page.
- View wiki: This permission determines whether the Wiki page is visible to the user. So, you can unset it if you want to hide the Wiki for particular roles. It is available for all users, including those who are not logged in.
- Export wiki pages: This permission determines whether the user is able to export the Wiki page in PDF, HTML, or TXT format. Unsetting this permission actually makes no sense, as users can always save the Wiki page using the browser (if they have the View wiki permission, of course). It is available for all users.
- View wiki history: This permission is also available for all users, including not logged in ones. As you know, the Wiki page stores the history of changes. But sometimes, some sensitive data can get there, so it may be necessary to hide previous versions. This permission allows the user to see not only the change history but also previous versions of the page, differences between versions, and who authored each line of the page.
- Edit wiki pages: This permission specifies whether the user should be allowed to edit Wiki pages of the project. Additionally, it allows users to add attachments to Wiki pages. The Wiki system stores the complete history of changes and allows rolling back to a previous version, if needed. So, it's quite safe to grant this permission even to the Anonymous role.
- Delete attachments: This permission allows the user to remove attachments from Wiki pages of the project. While Wiki stores the history of changes of the Wiki text, it does not store the history of attachments, so this permission can be used to prevent removal of important files by untrusted users. The permission is available for all roles.
- Protect wiki pages: This permission determines whether the project member can lock or unlock the Wiki page. Having all of the project's Wiki system editable by anyone, you can make some pages editable only by trusted users by granting this permission to them. (Yes, a page that was protected by one user can be edited by another user who has this permission as well.)
Member roles are used to differentiate users with the help of permissions. In other words, the purpose of a role is often not only to hold permissions, but also to make sure that only one role has some specific permissions. Therefore, the role name does not have to replicate the real-life position—it is better to represent the granted permissions. In this case, it will be easier to manage Redmine, to determine which role should be given to a particular user, and so on. Thus, access to project settings may be granted to Project manager or Project administrator, editing permissions to Moderator or Content editor, and so on. Also remember that it's okay to assign several roles to a single project member.
However, in such cases, it can be hard to keep all the role names and their purposes in mind while editing permissions using the role page that has just been described. For this reason, many Redmine administrators prefer to use the Permissions report page, which can be accessed through the link with the same name on the Roles and permissions page. Check it out in the following screenshot:

This page allows you to quickly check which permissions are assigned to which roles. It also allows you to modify them. The green check marks (![]() ) in the column and row titles can be used to check or uncheck all the permissions in the column or row correspondingly. Like the role editing page, this page is divided into blocks by project modules, where each block can be collapsed or expanded by clicking on the minus
) in the column and row titles can be used to check or uncheck all the permissions in the column or row correspondingly. Like the role editing page, this page is divided into blocks by project modules, where each block can be collapsed or expanded by clicking on the minus ![]() or plus
or plus ![]() icon to the left-hand side of the block title correspondingly.
icon to the left-hand side of the block title correspondingly.
On this page, you can also clearly see that some permissions are not available for all types of user.