
Unfortunately, or fortunately, this chapter is not about the project management bit which is part of software engineering, but about managing projects in Redmine. Despite this, it is actually targeted at project managers (as well as project owners and the like). Thus, it describes what tools are available for projects and how they can be used. Even so, this chapter should not be ignored by regular users as it teaches them how to find the needed information, where to put requests, how to keep a track of changes in a project, and much more.
If the previous chapter described Redmine as an issue tracker, this one reviews it as a project management and project hosting solution. This is a kind of secondary role served by Redmine.
In this chapter, we will cover the following topics:
- Modules
- The global configuration
- Creating a project
- The project pages
- The project configuration
- Closing a project
- The project list
- Project maintenance best practices
- Administering projects
I have already mentioned modules several times, for example, the Issue tracking module that we discussed in the previous chapter. Thence, you have probably concluded that a module is a part of a functionality, and that's correct. But to be more precise, this is a part of the functionality that is used for projects. This is why Redmine modules are also often called project modules.
Actually, modules are like bricks, with which you can build a website for your project. On the other hand, they can also be used to disable functionality that is not needed. But generally, modules are nothing more than virtual units, as they are not plugins, their files are not stored separately from the core, and so on.
Certainly modules can also be provided by plugins, but we are going to discuss only core project modules here. Even so, not all of them will be reviewed in this chapter. Thus, as we have discussed the Issue tracking module in the previous chapter, we will skip it here. However, we will review the Roadmap tab of the project menu that is provided by the Issue tracking module because it has not been reviewed yet. Also, we will skip the Time tracking module, as it will be reviewed in Chapter 8, Time Tracking.
We start this chapter with reviewing modules because later you will have to choose which modules to enable for your projects. And how can you do this without understanding what is provided by those modules?
As I have already mentioned, the whole of the previous chapter was about what this project module does. However, the Issue tracking module also provides the Roadmap page, which we have not reviewed yet. So, let's do that now.
When enabled, in addition to the Issues and New issue tabs (which have been already discussed), the Issue tracking module adds the Roadmap tab. This is what it looks like:

This page shows the overall progress for versions of the project and lists the closed and open issues for some trackers, thus producing feature lists for the versions.
On the sidebar, under the Roadmap label, you can select trackers that should be listed on this page. By default, only those trackers for which the Issues displayed in roadmap option is enabled (on the Trackers page of the Administration menu) are selected and listed here.
Also by default, the roadmap shows only open versions. But you can change this by enabling the Show completed versions option (and clicking on the Apply button).
If the project has subprojects, there will also be the Subprojects option. This option can be used to make the roadmap include versions and issues of subprojects.
Under the Versions label, you can see a list of available versions (my project has only one version, which is Second edition). Completed versions, if they exist in the project, will be available under the toggle box with the title Completed versions.
The New version link that you see in the top-right corner of the content area is a shortcut for adding a new version (we will review this in The Version tab subsection of The project configuration section of this chapter).
As you might have guessed, the Second edition label near the yellow box icon (![]() ) is the title of the version. Below the title, you see the effective date, which is shown only if it has been specified for the version.
) is the title of the version. Below the title, you see the effective date, which is shown only if it has been specified for the version.
The progress bar—perhaps the main element of the roadmap page—uses a simple algorithm to show the done and completeness ratios (the latter has a slightly lighter color). The done ratio indicates how many issues are closed out of the total number. The completeness ratio indicates what percentage of the rest of the issues is completed. For both of these ratios, Redmine attempts to take the estimated hours into account.
Below the progress bar and above the issue list, Redmine shows the content of the associated Wiki page. We will review later what this page is and how can it be specified (The Version tab subsection of The project configuration section).
If you click on a version title on the roadmap page, you will be redirected to the version page, which looks like this:

As you can see, the version page contains generally the same information as the roadmap, but it's about a single version. Also, unlike the roadmap, the version page lists all issues of the version in the Related issues block.
Additionally, this page contains a contextual menu that can be used to modify the version (the Edit link), edit the associated Wiki page, or delete the version.
Also, it has the special Issues by block that allows you to check completeness ratios per different values of an issue attribute. Thus, it's possible to see completeness progress bars for different categories, trackers, statuses, priorities, authors, and assignees of issues of the version. To change the mode of this block, just select a different issue attribute in the drop-down list.
If you have enabled the Time tracking module, this page will also show the total estimated time and the total spent time for issues of the version in another separate block.
It's essential that all major changes made to a project are accompanied by official news from the owners of the project. Therefore, Redmine would not be a good project hosting solution without the News module.
When enabled, the News module adds the News tab to the project menu, as shown in this screenshot:

Under this tab, you can see the list of all news about the project. To subscribe to these news feeds, you can click on the Watch link in the top-right corner.
If you have the Manage news permission, you will also see the Add news link in the contextual menu. Clicking on this link shows the following form above the news list:

As you can see, the news description supports Wiki formatting. To ensure that the content will be rendered correctly, you can use the Preview link below the form.
The value of the Summary field is to be used as a short description of the news and should always be specified. It is shown along with the news title on the Redmine start page and the start page of the project, but note that unlike Description, this field does not support Wiki formatting.
If you click on the news title, you'll be redirected to the news page, which is shown in this screenshot:

If you have the Comment news permission, you will see the Add a comment link on this page. Clicking on this link opens the form containing only one text area, which also supports Wiki formatting. Using the trash ![]() icon to the right of the comment, users with appropriate permission can remove the comment.
icon to the right of the comment, users with appropriate permission can remove the comment.
If you are interested in getting notifications about new comments in the news, you can click on the Watch link in the contextual menu of the news page (after this, the link will change to the Unwatch link). If you have authored the news, watching will be enabled for you automatically. Other links in this menu can be used to edit and delete news.
The Documents module can be useful if the project has a lot of documentation. Let's see what this module can do for you.
When enabled, this module adds the Documents tab to the project menu, which is visible only if the user has the View documents permission. This tab is shown in the following screenshot:

Here, the Outline, Planning and writing a chapter, and Submitting your work links are document titles. Below each title, you can see the date when the document was added and an optional short description.
In the previous screenshot, the documents are listed by categories. Thus, Supporting documents and Author resources are their names. Document categories are global (that is, for all projects) and can be managed from the Enumerations page of the Administration menu, as shown here:

Additionally, it's possible to list documents by date, title, and author. To change the display mode, you just need to click on the corresponding link on the sidebar.
Thus, when documents are listed by titles, only the first letter of the document title is used for groups, as follows:

Now let's see how to add a document. To do this, you need to click on the New document link. It will open the following form:

In Redmine, a document is a documentation object that can include, for example, images, chapters, and so on as separate files. For this reason, the document form can be used to upload multiple files one by one—when you choose a file, it gets uploaded and the Choose Files button becomes available again.
To edit a document, click on its title to be redirected to the document page and then click on the Edit link there. In the same way, you can use the Delete link to remove a document.
You will need the Files module if you want users of your project to be able to download project files (for example, releases). When enabled, this module adds the Files tab to the project menu, which looks like this:

Project files can optionally be associated with a particular version. Thus, in the preceding screenshot, all the files belong to Second edition. The file list can be sorted by filename, date, size, and download count (that is, D/L).
If you click on the New file link, you'll get this form:

As you can see, with this simple form, you can upload multiple files at once.
Tip
What is the difference between files and documents?
Unlike documents, files can be added to a particular project version. Only for files Redmine provides MD5 hashes and saves the download count. Files are available right under the Files tab, whereas to download documents, you need to locate and open the documentation object first.
Under this subsection, we will review what is provided by the Wiki module. The Wiki syntax will be reviewed in the next chapter.
Note
Don't confuse Wiki formatting with the Wiki module. The former is a feature of Redmine that is widely used by its components, and the latter is a virtual module that implements the Wiki tab of the project. Thus, Wiki formatting still remains available for issues, project, and document descriptions, and so on if the Wiki module is disabled.
The Wiki tab plays the role of the entry point to the project's Wiki system. However, by default, there are no Wiki pages in the project, that is, the landing page for the Wiki system does not exist either. Therefore, when you click on the Wiki tab, you get the Wiki page edit form (or an error if you don't have permission to edit the Wiki page). This form looks as follows:

Certainly, the content field of this form supports Wiki syntax. A short description of this syntax becomes available when you click on the last button ![]() of the toolbar. When the page content is ready, you can click on the Preview link to check how it is going to be rendered. The preview of the page will be shown below the form.
of the toolbar. When the page content is ready, you can click on the Preview link to check how it is going to be rendered. The preview of the page will be shown below the form.
This form also has the special Comment field. This field should be used to specify what changes were made to the Wiki page. For new pages, I usually write Created here. A little later, I will show you what these comments are used for.
Using the file upload element of this form, you can add any number of files to the Wiki page. Usually, these will be images that will be shown on the page.
The Parent page field can be used to make the page a child of another page. This will affect the index of the Wiki pages (which we'll discuss later in this subsection). Additionally, child pages will get breadcrumbs:

Here, the breadcrumbs are the Wiki and Versions links in the top-left corner. They point to the corresponding parent Wiki pages.
Let's also discuss the layout of a Wiki page using the previous screenshot as an example.
To the right of the breadcrumbs, you can see the contextual menu. The Edit link in this menu redirects to the edit form, which is similar to the one that we discussed earlier. The Watch link allows subscribing to changes that will be made to this Wiki page. The Delete link can be used to remove the Wiki page.
The Lock link is only available for users who have the Protect wiki pages permission. The title of this link is a bit confusing, as it may be considered that no more changes are going to be allowed on the page if you click on it, but this is not so. You, as well as other users who have the Protect wiki pages permission, will still be able to modify the page. Also, only such users will be able to unlock it. So this link can be used to protect the page from other Redmine users, that is, to restrict its editing to trusted users only.
Before we discuss the Rename link, let's figure out how to create a Wiki page. Similar to many other Wiki systems, a Wiki page in Redmine can be created in the following two ways:
- By adding the page name to the URL: For example, if the URL for the project is http://mastering-redmine.com/projects/book, you can create a page with the name
Test-pageby adding this name to the URL as follows: http://mastering-redmine.com/projects/book/wiki/Test-page (note the additional/wiki/path). Going to this URL will invoke the previously discussed edit form, where you will be able to specify the content for the page (if you have permission to do this, of course). - By adding a link pointing to the new page on any existing page: The new Wiki page that you are going to create should be referenced from somewhere. So, just add a link to this not-yet-existing page there. The syntax for adding a link to a page is as follows:
[[Test-page|Any display text]]This link will be rendered in red, which means that the referenced page does not exist.

If you click on this link, you will be redirected to the edit form just as with the previous method (in fact, it's the same as going to the URL of a new page).
But what if you've made a mistake in the page name? This is what the Rename link is available for in the contextual menu. Clicking on this link redirects to the form shown here:

Title here is actually the name of the Wiki page, as it can be seen in the URL. This name is also used when you reference the page on other Wiki pages. Therefore, the Redirect existing links option has been checked. If this option is checked, the renamed page will still be accessible by the old name (and URL). Additionally, this form allows you to change the parent page and even the project of the page (that is, it allows you to move the page to another project).
Note
Always enable the Redirect existing links option if the page has been available under the old name for some time. This is recommended not only because users could have referenced it on other pages or have saved the old URL in their favorites, but also because search engines could have already indexed it.
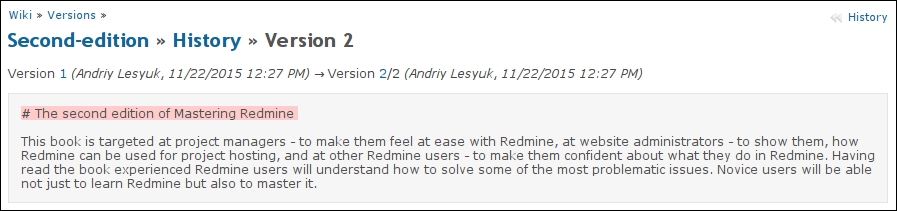
The last link from the contextual menu of the Wiki page that is to be reviewed is History. When you click on it, you will see something like the following:

This is where comments discussed earlier are shown. By choosing the versions (for example, 1 and 2) and clicking on the View difference button, you can see what changes were made between them:
The Annotate link, which is located to the right of the version on the History page, can be used to check who authored which line of the Wiki page. And the Delete link near it can be used to clear the history from redundant entries, if you have the Delete wiki pages permission. This, however, won't remove the changes themselves, unless you delete the latest version of the page.
On each Wiki page, below the content you can also see the Also available in: block of links. Using these links you can export the page content in PDF, HTML, and TXT formats.
On the sidebar of each Wiki page, you will see the navigation menu, which looks like this:
Navigation in a Wiki system is usually implemented using the Wiki syntax (that is, through links). But if the authors of Wiki pages have failed to maintain the navigation, you can always use this navigation menu to find the page you need.
Tip
Custom content on the sidebar under the Wiki tab
Redmine allows you to add custom Wiki content to the sidebar of the Wiki module. To use this feature, you need to create a Wiki page named Sidebar. Its content will be automatically shown on each Wiki page above the navigation menu. However, note that the sidebar content should start with a ### (h3.) title to look similar to other titles on the sidebar.
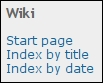
The index of Wiki pages mentioned earlier is available under two links—Index by title and Index by date. The index that can be accessed by the former link also displays the structure of the Wiki pages, like this:

As you might have noticed, this index can be watched. And if you watch it, you will be notified about every new Wiki page that gets added to the project. In addition to watching, you can subscribe to this list using the Atom link.
Tip
The Redmine Wiki Extensions plugin
You might want to install the Wiki Extensions plugin by r-labs. It allows you to add tags and comments to Wiki pages, use Wiki pages as tabs in the project menu, and much more. Check it out at http://www.r-labs.org/projects/r-labs/wiki/Wiki_Extensions_en.
Redmine was designed mainly for software projects. Each software project has source code, so it's essential for Redmine to have a source code browser. Nowadays, software projects use revision control systems for collaboration. Therefore, Redmine needs to support such systems as well. In Redmine, all such functionality is provided by the Repository module, which adds the Repository tab to the project menu and the Repositories tab to the project's Settings page.
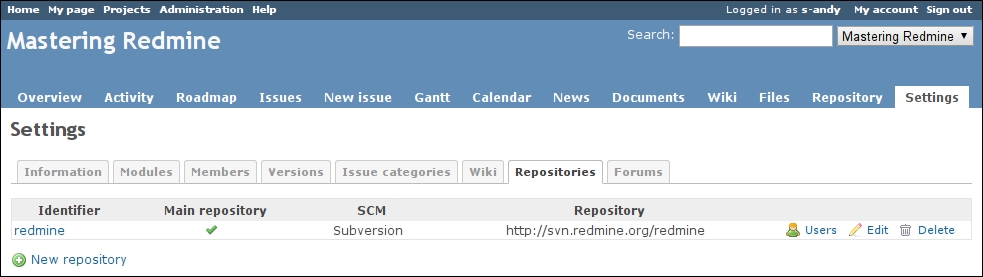
So, let's review the latter first. Go to the Settings tab of the project menu and select the Repositories tab. You should see something like the following:

By default, there is no repository in the project. To add one, you need to click on the New repository link. This is what you will see next:

The SCM field of this form contains only those SCMs that have been permitted by an administrator on the Repositories tab of the Settings page in the Administration menu. That page and tab were discussed in Chapter 3, Configuring Redmine.
The Main repository checkbox must be checked for one of the repositories of the project (it can be any). If you are adding the first repository for the project, the Main repository option will be enabled anyway, even if you disable it in the form. Then, if you enable it for any next repository of the project, this option will be automatically disabled for the previous main repository. In this way, Redmine ensures that there is only one main repository in the project.
The Identifier field is required if you have or are going to have many repositories in the project, as it is used to distinguish them.
What other fields are available in this form depends on the type of SCM (for example, Subversion). To determine the correct values for those fields, you need to contact the administrator of your repository.
Redmine expects all the repositories that you add using this form to be already available. In other words, this form just registers them in Redmine. However, you can configure the automatic creation of repositories using the reposman.rb tool, which was described in Chapter 3, Configuring Redmine.
Tip
The SCM Creator plugin
You can also use the SCM Creator plugin for Redmine. It allows you to create repositories directly from the discussed form. Check it out at http://projects.andriylesyuk.com/projects/scm-creator.
After you have registered a repository, it gets added to the repository list of the project, as shown in the following screenshot:
Every commit in revision control systems is associated with a username. This username, however, can differ from the one in Redmine. In such cases, Redmine won't be able to detect the correct users for commits. That's what the Users link is for. When you click on this link, Redmine opens a form that can be used to associate repository usernames with Redmine users. By default, Redmine assumes that the same username means the same user. And, if Redmine fails to find an appropriate user, it will just show the repository username as it is (without the link to a Redmine user).
I am not sure whether you have noticed, but in addition to the repository that appeared in the repository list, the project now has a new Repository tab (just before Settings). This tab is also provided by the Repository module, but it appears only when at least one repository is available in the project.
So, let's check out what's under this new tab:

The upper part of the screen can be used to browse the source code. You can either click on the directory names to go to a separate page with their content, or use the plus icon (![]() ) to show the content in place. The lower part displays the information about the last 10 commits that were made to the repository. To view all the commits, you can click on the View all revisions link. Finally, to view some basic statistics about when commits were made and who committed the changes, use the Statistics link in the top-right corner.
) to show the content in place. The lower part displays the information about the last 10 commits that were made to the repository. To view all the commits, you can click on the View all revisions link. Finally, to view some basic statistics about when commits were made and who committed the changes, use the Statistics link in the top-right corner.
If you click on a revision number, you will see a brief summary of the changes that were made in this revision. Here is a sample:

So, to see what exactly was changed, you can do any of these actions:
- Click on the View differences link on this page (for the entire commit)
- Click on the diff link near the filename on this page (for this particular file)
- Select the revisions and click on the View differences button on the main (previous) screen (for differences between revisions, which can include several commits)
You will get something like this:

If you click on a filename in the main screen of the repository browser, you will be redirected to a page about that file. It will contain the following four links in its upper part:
All of these links, except Download, open a separate page:
- History: This page lists only those revisions that have affected this file. On this page, you will also be able to select two revisions and click on the View differences button to see what changes were made to the file between them.
- View: This page just shows the content of the file with highlighted syntax.
- Annotate: This page shows the content of the file too, but additionally, it includes information about who authored each line of the file and in which revision, like this:

- Download: This link just triggers the file download.
Also, you're probably wondering how the Repository tab looks if more than one repository is used in the project. It looks the same. In the case of many repositories, the sidebar just contains links that allow quick switching between the repositories, as shown in the following screenshot:

Now, you can play with the repository browser more on your own to see all its pages and features. In my opinion, the Repository module is the most visually beautiful core module of Redmine, so it's really worth playing with. (If you don't have a repository to play with, you can check out http://www.redmine.org or http://mastering-redmine.com.)
The Forums module is often undeservedly ignored by Redmine users. Therefore, in practice it is underused. So what is the use of this module?
A project needs to provide some means to support its users, answer their questions, and so on. The Forums module adds discussion boards that make this possible. A board can have an unlimited number of threads, called topics. Each topic can have any number of posts, which are called messages.
However, in practice, users rarely use forums to ask for support. Most likely, they will use issues for this, especially if Redmine comes (and it does by default) with the Support tracker that is intended for such use. So, why not? Why should you use forums instead?
Let me explain:
- Firstly, support issues will get mixed in with others (bugs, features, and so on). This will make the issue list harder to read and will require users to configure filters.
- Secondly, when you resolve an issue, you should close it! And closed issues are going to be hidden, while forum threads remain open and visible even after they have been resolved. In this way, with forums, you will build a troubleshooting database, while with issues, you are going to get duplicates.
- Thirdly, topics can be categorized using boards. While issues also support categories, users can't subscribe to them. And they can subscribe to boards and topics. The possibility of subscribing will also let volunteers help you support your customers.
- Fourthly, forums and issues use different permission sets. This means that you can have a special role for community supporters and you won't need to take them into account when granting permissions for issues.
As you can see, forums are better for customer support to some extent.
Before we proceed with checking out the capabilities of this module, we need to configure it. Its configuration can be done on the project's Settings page under the Forums tab, which is shown here:

Click on the New forum link to add a new discussion board. This will open the form:

The value of the Name field should briefly describe the topic of the forum. The Description field should contain a longer description. Thus, good examples of the values are the following:
|
Name |
Description |
|---|---|
|
General discussions |
If no other forum fits, write here |
|
Help |
If things do not work, ask here |
|
Development |
Anything about development should be written here |
As soon as you create the first forum in the project, the Forums tab will be added to the project menu:

If you have only one forum, you will see its topic list under the Forums tab. But if you have more forums, then under the Forum tab, you will see the list of forums first.
You can watch the forum by clicking on the Watch link or by subscribing to the Atom feed. If you have more than one forum, you will also be able to subscribe to new forums using the Atom link on their index page.
Now, let's add a topic. If you click on the New message link, the following form will appear above the topic list:

Certainly, forum messages also support Wiki formatting.
If the Sticky option is enabled, the topic will always appear at the top of the message list. If the Locked option is enabled, no more replies will be allowed for that particular topic (consider it like closing the discussion).
When the message is saved, you are redirected to the page of the newly created topic, which looks as follows:

The first message in a forum creates a new topic. The user who creates a topic is automatically added to its watcher list (that's why we have the Unwatch link in the preceding screenshot).
To reply to a message, you can use either the Quote link, which will insert the quoted content of the original message into your reply, or the Reply link. In both cases, an additional form that contains just a text area is shown under the Reply link. Replies are added to the existing topic as messages.
Now let's check out the forum page again (I have added several other topics):

Here, you can see how sticky and locked topics are shown. The RE: A demo topic for the book link is a quick shortcut to the last message in the topic. The message list can be sorted by the Created, Replies, and Last message columns.
The Calendar module adds a tab with the same name to the project menu. It looks like this:

As you can see, the calendar shows the start and due dates of issues, if they are specified. Thus, the start date is shown with a green arrow pointing forward ![]() , and the due date with the red arrow pointing backward
, and the due date with the red arrow pointing backward ![]() . If the start and due dates are the same, a red rhombus (
. If the start and due dates are the same, a red rhombus (![]() ) is shown.
) is shown.
Hovering the mouse cursor over an issue opens a box with its details. These details include the assignee name, priority, status, and so on:

If a version has the due date, it will also be shown on the calendar, as follows:

Here, Second edition is the name of the project version.
Also, you might have noticed that the calendar page contains a filter similar to the one we saw on the issue list. In fact, this can be considered to be the same filter, as its configuration is retained when you move between the Issues, Calendar, and Gantt tabs.
The Calendar module is really useful if issue reporters and/or assignees always specify the start and due dates. But if an issue has neither, it won't be displayed on the calendar at all.
Tip
The Redmine ICS Export plugin
This plugin allows you to export issues and versions into ICS format, which is compatible with most major pieces of calendar software. Refer to https://github.com/buschmais/redmics.
It seems that no project management software is complete without the Gantt chart, as this type of bar chart is perfect for representing the flow of work in a project in terms of time and resource availability.
In Redmine, such a chart is available under the Gantt tab of the project menu, but only if the Gantt module is enabled, of course.

It's good that I worked on the book with quite a big delay (not so good, but…) as you can see how delays are displayed on the Gantt chart. The delay is marked in red on the graph. Also, issues that should have been closed according to their due date have red titles here (this time it's fine, as the chapters are going to be closed during the rewrite phase of the book). Finally, the issue that is in progress has an orange title.
The blue arrows on the Gantt chart indicate issue relations (next chapters follow previous ones).
Like the calendar, the Gantt module uses the same issue filter that is used by the issue list, what means that you can configure what to show on the Gantt chart using the Issues tab. The Zoom in and Zoom out links allow zooming of the chart down to weeks or days or up to months, respectively.
The Previous and Next links under the chart allow movement between periods. For example, if the chart shows January – June 2015, the Previous link will move to July – December 2014 and the Next link will move to July – December 2015.
Additionally, a Gantt chart can be exported as a PDF document or a PNG image.
Also, as with the calendar, when you hover your mouse cursor over a bar, a box with detailed information about the issue is shown.