
Audio Sequencing: Android SoundPool Class
In this chapter, we will take a look at a more specialized audio playback class in Android called: SoundPool. This class is significantly different from the Android MediaPlayer class, enough so that I have decided to put a specific chapter into this book that covers this useful audio class.
This chapter delves deeply into Android SoundPool, as well as defining what makes it different from MediaPlayer, and in what types of situations each of these classes should be utilized for digital audio asset playback.
In a nutshell, what makes SoundPool so special is that it allows the audio equivalent of image compositing (layering and blending). This means, like with image compositing, that audio-related new media assets can be broken down into their component parts and controlled individually.
Using SoundPool, these component parts can later be attached to, and even manipulated with, Java code. This allows developers to present these rich media digital asset components to the user as a single finished work, when in fact they are actually being seamlessly composited (or in popular audio terminology: mixed-down, pitch-shifted and sequenced) by your application.
This allows the Android developer to inject interactivity into their new media assets, whereas in the past, traditional media assets such as music, film, or television were just one long linear performance; repeatable but always the same, and thus, eventually, end-users tire of their user experience.
In this chapter, we will first cover the foundational principles of audio synthesis and sequencing, and then we will review the SoundPool class and what it can do, much as we did with the MediaPlayer class in the previous chapter. Then we will implement the SoundPool class in our Hello_World app and see how it can make our sounds play more quickly as well as giving us the flexibility to combine them and to change the way they sound.
MIDI and Audio Sequencing: Concepts and Principles
The earliest forms of audio sequencing utilized MIDI, which we learned in the previous chapter stands for Musical Instrument Digital Interface, and which allows performance data to be recorded and played back via computer.
The early computers that did this were the Amiga, the Atari ST-1040 and Apple Macintosh, and ran software packages called MIDI sequencers from software companies like Opcode (Vision), Steinberg (CuBase), Cakewalk (Sonar), Mark of the Unicorn (Performer), PropellerHead (Reason), and eMagic (Logic).
Most of these MIDI sequencer software packages are still around (a couple were acquired by other companies as well) and all remain extremely popular to this day with digital audio musicians worldwide.
MIDI sequencers allowed performance data sequencing, where one composer could play each instrumental part into the computer using a synthesizer set to that given instrument sample, say a guitar or a piano sample, and then the computer would play back this performance data later while the composer accompanied the computer-replayed version of his performance.
While the computer played out the composition tracks that had been created thus far, the composer would play in the next part or track, using the next instrument needed in that song, score, or jingle arrangement.
Eventually MIDI sequencers added digital audio capabilities, alongside the MIDI playback capabilities, as increased computer processing power as well as specialized digital audio adapters, such as Creative Labs’ SoundBlaster and X-Fi, became widely available at affordable prices.
It turns out that the concept of audio sequencing can be applied equally well to digital audio samples manipulated directly by the computer as it can to MIDI performance data sequencing. As computers became more powerful more digital audio could be sampled and played back, although not quite as easily as MIDI, since MIDI is performance data (note on, note off) only.
Computers kept getting more powerful, came with more memory to hold more samples (an issue with SoundPool as we’ll soon see), added more processors (64-bit multi-cores now allow 4/6/8/16 CPU cores per processor) and faster processing speed, 64-bit audio adapters and multi-core DSP (Digital Signal Processor) capabilities are all now both available and affordable.
For this reason, audio sequencers now allow a thousand times more options than the early MIDI sequencers of the 1980s, although they still support and play MIDI performance data right alongside of the audio sampling data. This is because MIDI is so very efficient, and it allows the samples to be played back using the synthesizer keyboard if the composer prefers to work that way. Audio sequencers then added a plethora of features usually found only in synthesizers; we’ll cover these features, terms, and concepts next.
Digital Audio Synthesis: Basic Concepts and Principles
Some of the first MIDI keyboards were really just digital audio samplers, which recorded and played back digital audio samples using various sample rates and sample frequencies. We learned about samples in the previous couple of chapters in the book, so what we’re going to focus on here is how those samples are taken to the next level, via further audio synthesis of those samples, or even of just a raw waveform, such as a sine wave or saw wave.
Synthesizers take wave audio, whether it’s a generated wave, born out of an oscillator on a circuit board in in a consumer electronics device, or a more complex sampled waveform, such as a sample of a plucked instrument string for instance, and then applies further waveform manipulations to that waveform in order to create new and different tonality, sound or even special effects. We’re all familiar with the new synthesized instrument sounds in today’s popular music; all that is done using math and code!
One of the core mathematical manipulations that can be applied to an audio waveform within the digital audio domain is called pitch-shifting, which can take a sound or a tone up or down an octave (or a small fraction of an octave, known as pitch or key), to provide us with a range of that sample much as though we were playing it up and down the keys of a synthesizer keyboard.
As we learned previously, the tone of a waveform can be determined by the frequency of that waveform itself, so it becomes a fairly straightforward mathematical computation to be able to accurately shift that pitch (wave) up an octave, by cutting that wavelength in half, or shift the pitch down an octave, by doubling that wavelength. Any fraction thereof would change the pitch, which is how we get different notes along the keyboard using a single sampled waveform. Digital audio synthesis is pretty amazing stuff!
SoundPool can do this (which is why we are learning about these concepts here in the first place) so it does have some audio synthesis capabilities and will probably add even more in future versions of the Android OS. You need to know these concepts to leverage what it can do effectively and optimally, which is why we are going over all this here at this level of detail, so that if you need to wield SoundPool, you will know how to do it correctly, and why you need to do it that way in the first place.
Another core audio synthesis mathematical manipulation is the combination (compositing) of two waveforms together, that is, playing two sounds at the same time out of a single oscillator hardware (speaker) scenario. Like with digital imaging or video compositing, here we’re adding two different sample data values together to achieve the final audible result.
Today’s audio hardware does have fairly impressive multi-channel support, and may have the capability to play stereo (two channels) or quadrophonic (four channels) of individual sounds (effects, music, vocal tracks, etc.) directly out of the audio hardware inside the consumer electronics device.
What if we want to combine 8 or 16 tracks of digital audio in real-time, like a sequencer does? This is where SoundPool can give you digital audio sequencing capabilities right inside your application.
What’s important, if you are going to attempt real-time audio compositing of 8 to 16 audio samples, is that each of these samples is very well optimized. This makes what we learned about in Chapter 13 regarding digital audio data optimization extremely important when it comes to using Android SoundPool. So you see, there’s a method to my madness!
For instance, if you don’t really need HD (24-bit sample resolution) audio to get the quality result that you can get in CD (16-bit) quality audio, you are saving a ton of memory while achieving the same end result.
Similarly, if you can get the same audio quality using a 32 kHz sample rate instead of a 48 kHz sample rate, you are using 50% less samples (memory) to do this. For voiceovers or sound effects, memory savings are there for the taking, as often you can sample a bomb or laser blast effectively by using 8-bit resolution with an 11 kHz sample rate and you won’t be able to detect any difference over a 16-bit 48 kHz sound effect, but you will be using 8.7 times less memory (16 times 48 divided by 8 times 11).
Just like with digital imaging and digital video playback, optimizing your digital audio assets is important for two completely different but related reasons. With digital audio samples, especially in regard to using Android SoundPool, it is the amount of your system’s memory that is needed to hold each sample once it has been decompressed by the codec, and put in its raw uncompressed state into your Android device’s memory, ready for playback.
The second reason that well-optimized audio is important is the processing part of the equation. It’s pretty obvious that with less audio to process, even if it’s just sending that audio to the audio hardware, there are less CPU cycles used. Thus, if you can get the same basic audio quality results using less sample resolution (fewer bits per slice of audio) or using less sample frequency (fewer slices of the waveform per second), you are saving on both your system memory resources and CPU processing cycle resources.
This becomes more and more important, where SoundPool is concerned, as the number of digital audio samples that you will require for use within your application increases. This is again true for both the system memory and the system processing cycle usage considerations, because as you add samples both of these resources are utilized more and more, and don’t forget that you have other things that your application is doing as well, such as user interface rendering, imaging, video, and possibly even 3D.
Another reason highly optimized digital audio samples are so important when using the SoundPool class specifically is because there is currently a one megabyte limit on digital audio sample data when using SoundPool. Although this limit might be increased in future Android API revisions of this audio class, it’s still always best practice to optimize any digital audio assets effectively and efficiently.
An Introduction to SoundPool: Class Rules and Methods
The Android SoundPool class is a direct subclass of the java.lang.Object class and is not a subclass of the MediaPlayer class, as one might assume.
Like the MediaPlayer class, it is a part of the android.media package, and thus the complete path to the class (as used in an import statement) would be: android.media.SoundPool.
Because SoundPool is a subclass of java.lang.Object we can infer that it is its own scratch-coded creation, if you will. It is also important to note that a SoundPool object (i.e., a SoundPool class) and a MediaPlayer object (i.e., a MediaPlayer class) can be utilized at the same time, if needed.
In fact, there are distinct applications for both of these audio playback classes. MediaPlayer is best used for long form audio and video data, such as songs, albums, or movies. SoundPool is best used for lots of short form audio snippets, especially when they need to be played in rapid succession and (or) combined, such as in a game or a gamified application.
A SoundPool collection of samples can be loaded into memory from one of two places. The first and most common would be from inside the .APK file, which I call captive new media assets, in which case, they would live in your /res/raw project folder. The second place samples can be loaded from is an SD card or similar static memory storage location (what one would term the Android OS file system).
The SoundPool internally uses the Android MediaPlayer Service to decode an audio asset into memory. It does this using uncompressed, 16-bit, PCM mono or stereo audio streams. For this reason, make sure to optimize your audio using a 16-bit sampling resolution, because, if you use 8-bit, and Android up-samples this to 16-bit, you’ll end up with wasted headroom. So optimize your sample frequency well, and don’t use stereo samples unless you really have to. It’s very important to conform your work process to how SoundPool works, to get the most optimal results, across the largest number of Android consumer electronics devices.
When a SoundPool object is constructed in Java, as we will be doing later on in this chapter, the developer can set a maxStreams integer parameter. This parameter determines how many audio streams can be composited, or rendered, at the same time. To use the digital image compositing analogy, this would equate to the number of image layers that would be allowed in a digital image composite.
Setting this maximum number of streams parameter to as small a number as possible is a good standard practice. This is because doing so will help to minimize the CPU cycles used on processing audio, and will thus reduce any likelihood that your SoundPool audio mixing will impact other areas of your application performance such as 3D, image visuals, or UI performance.
The SoundPool engine tracks the number of active streams to make sure that it does not exceed the maxStreams setting. If this maximum number of audio streams is ever exceeded, SoundPool will abort a previously playing stream. It does this based primarily on a sample priority value that you can set for each audio sample.
If SoundPool finds two or more audio samples with an equal priority value, it will then make a decision regarding which sample to stop playing based on sample age, which means the sample that has been playing the longest is the one that gets killed. I like to call it the Logan’s Run principle.
Priority level values are evaluated from low to high numeric values. This means that higher (larger) numbers represent a higher priority level. Priority is evaluated when a call to the SoundPool .play( ) method causes a number of active streams to exceed the value established by the maxStreams parameter that was set when the SoundPool object was created.
In this case, the SoundPool stream allocator stops the lowest priority audio stream. As I mentioned, if there are multiple streams with the same low priority, SoundPool chooses the oldest stream to stop. In the case where the priority of the new stream is lower than all the active streams, the new sound will not play and the play( ) function will return a streamID of zero, so be sure that your app Java code keeps track of exactly what is going on with your audio sample priority level settings at all times.
Samples are looped in SoundPool by setting any non-zero looping value. The exception to this is that a value of -1 causes samples to loop forever and under this circumstance, your application code must make a call to the SoundPool .stop( ) method to stop the looping sample. So a non-zero integer value causes a sample to repeat itself that specified number of times, thus a value of 7 causes your sample to play back a total of 8 times, as computers start counting using the number 0 instead of 1.
Each sample playback rate can be changed by SoundPool, which, as mentioned makes this class into an audio synthesis tool. Thus a sample playback rate equal to 1.0 causes your sample to play at an original frequency level (resampled, if necessary, to match up with the hardware output frequency).
A sample playback rate of 2.0 causes the sample to be played at twice its original frequency, which sounds like a full octave higher if it is a musical instrument note. Similarly, a sample playback rate set to 0.5 causes SoundPool to play that sample at half of its original frequency, which sounds like a full octave lower.
The sample playback rate range of SoundPool is currently somewhat limited at 0.5 to 2.0, but this could be upgraded in a future API revision to say, 0.25 to 4, which would give developers a four octave sample playback range.
Next we’ll go over a few caveats regarding the use of SoundPool, or rather how not to use SoundPool, and then we’ll dive into some fairly robust Java coding, so that we can implement this SoundPool audio engine in our Hello World Android application, inside our Attack a Planet Activity subclass.
Android Digital Audio Synthesis and Sequencing Caveats
Digital audio synthesis and sequencing using SoundPool in an Android app is a balancing act, both within the device that you are testing it on at the moment, as well as across all devices that your app will ever be run on. If a given hardware platform (smartphone, tablet, eReader, iTV) cannot handle playing a given audio data load, then it simply will not play back.
As we have learned up to this point, digital audio synthesis, sequencing, and compositing is heavily predicated on the speed of the processor, the number of processor cores available, and the amount of memory available to hold all the digital audio samples needed in their uncompressed format.
So bottom-line, you need to be extremely smart in how you are doing things in SoundPool. Not as much in how you write your code, although, certainly, that is important, but also in how you set-up your audio samples, so that they use less memory and can be leveraged farther within your application.
The primary mistake make by Android developers in regards to SoundPool is trying to use it more as an audio sequencer than as an audio synthesizer.
Users focus on SoundPool’s ability to load multiple audio file waveforms, but do not leverage its capability of creating a myriad of new waveforms by using those waveforms with the SoundPool pitch-shifting capability.
If you use SoundPool as an audio sequencer, system memory could overload, and this can shut down SoundPool’s functionality. Android developers must thus harness SoundPool features optimally and also optimize their samples.
Here’s a good example of this. SoundPool allows pitch-shifting across two full octaves, from a setting of 0.5 (down one full octave, or half of your original sample waveform) up to 2.0 (up one full octave, or twice of your original waveform width). Remember waveform width equates to frequency or pitch.
Most users don’t even use this pitch-shifting feature, but instead, will use different samples to achieve different notes, which fills up memory, and the result is the app works less and less well across older devices.
The correct way to use SoundPool is to take your samples, say a one string pluck from a guitar, one horn blow from a saxophone, one piano key strike, and one drum beat, and using only four 16-bit 32 kHz high-quality samples, you could make a basic synthesizer that had the four basic instruments.
Using this basic synthesizer set-up, your user could play instruments up and down two full octaves. This application would use only a megabyte of memory to hold these 16-bit 32 kHz uncompressed samples. If you use a high-quality microphone for your sampling, you would be amazed at the high-quality result that can be obtained these days using a 16-bit 32 kHz sampling format. Try it sometime, and see if you can hear any real difference between 16-bit 44 kHz CD quality audio and 16-bit 32 kHz audio.
Using SoundPool for Our Attack a Planet Activity
The logical area within our Hello_World app to leverage Android SoundPool is inside of our Attack a Planet activity, as this uses a number of audio samples, and these samples should trigger rapidly when our user clicks the icon ImageButtons to provide the most professional user experience.
The first things that we need to do are open up Eclipse, and then open our AttackPlanet.java class in an editing tab so that we can add our new code.
Let’s remove the code we wrote in the previous chapter declaring, creating, and starting the MediaPlayer objects. So, delete the statements at the top of the class, declaring the four special effects MediaPlayer objects, and then delete the setAudioPlayers( ) method we wrote and its method call, so that we are back to having no audio implementation in this Activity class.
Now we are ready to add in our all new audio processing Java code, using a single SoundPool class loaded with all of our sound effects samples rather than using four MediaPlayer objects. This should be far more efficient for this particular Activity class due to the number of sound effects that we need to implement within our animated user interface ImageButton elements.
Setting Up SoundPool: The SoundPool Object
The first thing that we need to do at the top of our AttackPlanet Activity class, to prepare our SoundPool audio engine for use is to instantiate the SoundPool object. We’ll declare it via classname, name it soundPoolFX, and apply private access control using the following single line of Java code:
private SoundPool soundPoolFX;
As you can see in Figure 15-1, when we write this line of code under our class declaration line of code, Eclipse underlines the SoundPool object with a wavy red line.
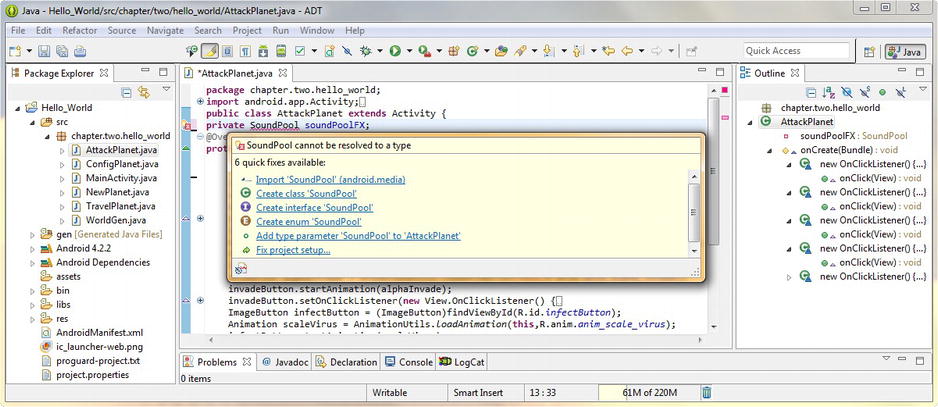
Figure 15-1. Declaring a private SoundPool object named soundPoolFX and using Eclipse helper to add import
Place your mouse over this error highlighting, and pop up the Eclipse ADT helper dialog. This dialog gives us several options for removing this error flag within our code.
Select the first option, Import “SoundPool” (android.media package) as the solution that you want to select and Eclipse then writes in our import statement for us.
Open up the import statement code block, located at the top of the editing pane, above the class declaration, but below the package declaration, and make sure that the import android.media.MediaPlayer;code statement has been removed. We do not need to explicitly declare (import) the MediaPlayer class for use with SoundPool, even though we know that the SoundPool engine uses Android’s MediaPlayer Service behind the scenes, so to speak, to play our digital audio samples.
Now that we have imported the SoundPool library for use you will notice that Eclipse has yellow underlined a warning under our SoundPool object name, soundPoolFX. Let’s place our mouse over this and find out what Eclipse thinks that the issue is with our code now.
As you can see in Figure 15-2, Eclipse pops up a helper dialog that tells us that our new SoundPool object named soundPoolFX isn’t being used. Well of course we know that, so we will not worry about this warning demarcation for now, and we will proceed and continue to declare our other classes and audio sample instance integer variables that we will need to implement this new SoundPool audio sequencing engine in the Java code for our AttackPlanet.java Activity subclass.

Figure 15-2. Checking our Eclipse warning message and showing an import android.media.SoundPool statement
Next, we need to declare and implement an Android utility class called HashMap, which we use to hold our data value pairs, representing our audio samples and their file reference URI data. This is done so that the Android OS can find and preload these audio assets quickly and easily.
SoundPool uses a more complicated data structure to do this audio content loading; this is so that your samples can be quickly found and loaded at runtime, as the name of the game with SoundPool is speed of execution.
If you want to research the HashMap utility class in further detail, you can find an entire webpage devoted to it located at the following Android Developer website URL:
http://developer.android.com/reference/java/util/HashMap.html
Now let’s take a look at how to implement a HashMap in our SoundPool code.
Loading the SoundPool Data: The Android HashMap Class
The first thing that we need to do at the top of our AttackPlanet Activity to prepare our HashMap utility for use is to instantiate a HashMap object. We’ll declare it via classname, name it soundPoolMap, and apply a private access control to the HashMap using the following short line of Java code:
private HashMap<Integer, Integer> soundPoolMap;
As you can see in Figure 15-3, when we write this line of code under our class declaration line of code, Eclipse underlines this HashMap object with a wavy red line. Place your mouse over the error highlighting, and pop up the Eclipse ADT helper dialog. This dialog gives us several options for removing this error flag within our code.

Figure 15-3. Declaring a private HashMap object named soundPoolMap and using Eclipse helper to add import statement
Select the first quick fix option, Import “HashMap” (java.util package), as the solution that you want to select, and Eclipse proceeds to write in our import java.util.HashMap; Java code import statement for us.
Next we need to declare four integer variables to hold our sample numbers that we will be using in SoundPool by using the following lines of Java code:
int sample1 = 1;
int sample2 = 2;
int sample3 = 3;
int sample4 = 4;
Now we have our SoundPool object, HashMap object and sample integers declared at the top of our Activity, before our onCreate( ) method, as shown in Figure 15-4. Now we are ready to use the new keyword and create a new SoundPool object for use sequencing audio in our Activity.
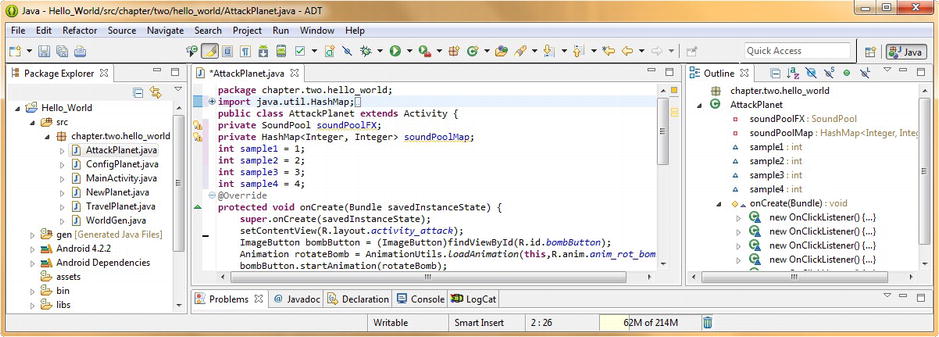
Figure 15-4. Declaring and Setting four sample integers and showing the import java.util.HashMap statement
Next we are going to learn about the Android AudioManager class, which, as you may have guessed, is used to access volume, as well as the ringer mode control, in your Android applications. AudioManager is also a subclass of java.lang.Object, and is part of the Android Media package, with an import statement path of android.media.AudioManager as we will see in the next section of this chapter when we create our new SoundPool object.
AudioManager is a collection of Android OS constants, which relate to the state of different audio-related features inside the Android OS. The class also contains an interface called: AudioManager.onAudioFocusChangeListener that is a Java Interface definition for a callback that gets invoked when the audio focus of the operating system is changed or updated at any time.
If you want to study the AudioManager class in greater detail, and see for yourself which of these AudioManager SCO, Vibrate, and Bluetooth constants have been deprecated, and in which of the API levels they were deprecated, the Android developer website has a webpage dedicated to it, at this URL:
http://developer.android.com/reference/android/media/AudioManager.html
Configuring the SoundPool: Using Android AudioManager
We need to create a new instance of the SoundPool object in our Activity’s onCreate( ) method that specifies the number of sounds that can be played at the same time, as well as the type of audio and the quality level. This is done via the SoundPool constructor, which takes the following format:
public SoundPool (int maxStreams, int streamType, int srcQuality);
So let’s add a line of space after our setContentView( ) method call, and construct a new SoundPool object, named soundPoolFX, using the following single line of Java code:
soundPoolFX = new SoundPool(4, AudioManager.STREAM_MUSIC, 100);
Notice that once you type this line of code into the Eclipse editing pane, that Eclipse red underlines the AudioManager class reference. So let’s get rid of this error by placing the mouse over the error highlighting and selecting the Import “AudioManager” (android.media package) option so that Eclipse writes the needed import android.media.AudioManager statement for you, as shown in Figure 15-5.
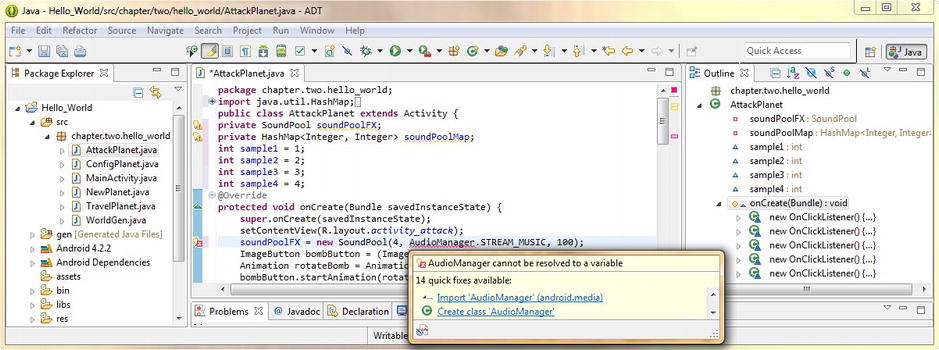
Figure 15-5. Configuring a SoundPool object and using the Eclipse helper to import the AudioManager package
Next, we need to do the same work process for the HashMap object, and call its constructor method, using the new keyword. If you’ve forgotten what a Hash table or a Hash map is, here’s a short overview.
Hash tables, also known as hash maps, are two-dimensional data structures. These specialized data structures are utilized to implement an associative array, which is a data structure that can rapidly map keys to values. Hash tables leverage a hash function to compute an index into an array of data entry slots, from which the correct value can be quickly found.
Configuring Your HashMap: Using the .put( ) Method
Let’s add a line of space under the soundPoolFX constructor that we just wrote and we’ll write our soundPoolMap HashMap constructor Java code next.
The constructor line of code to create an empty Hash table, which takes an integer key and an integer data value pair, would be coded as follows:
soundPoolMap = new HashMap<Integer, Integer>();
Now that we have an empty Hash table structure defined and created, it is time to load it with the audio data that we will be using in our SoundPool engine. This is done via the HashMap class .put( ) method, which allows us to put (insert) a data pair into the empty Hash table structure, which we now need to populate with audio asset data, as shown in Figure 15-6.
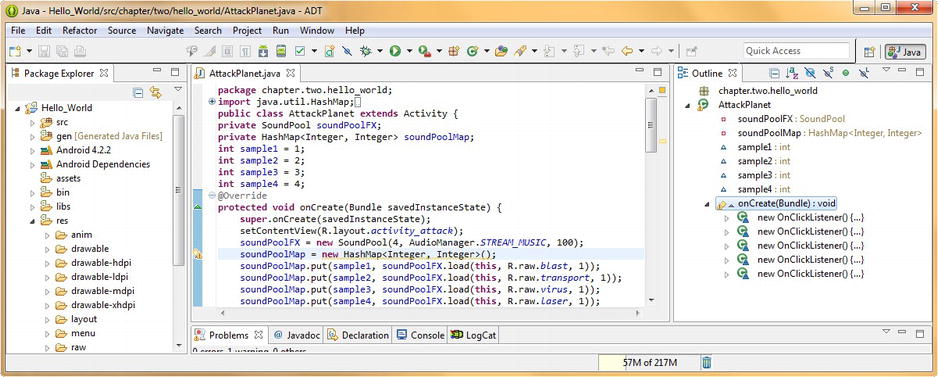
Figure 15-6. Using the .put( ) method to populate our soundPoolMap HashMap object
We’ll use four lines of Java code underneath our HashMap constructor that will leverage dot notation to call the .put( ) method from the soundPoolMap HashMap object.
The .put( ) method passes our sample1 through sample4 integer variables, along with the .load( ) function call to our soundPoolFX SoundPool object, which will pass over the current context, a R.raw reference data path to each of our digital audio asset files, and a sample priority value of 1.
These four soundPoolMap.put( ) method calls should look something like the following four lines of Java code:
soundPoolMap.put(sample1, soundPoolFX.load(this, R.raw.blast, 1));
soundPoolMap.put(sample1, soundPoolFX.load(this, R.raw.blast, 1));
soundPoolMap.put(sample1, soundPoolFX.load(this, R.raw.blast, 1));
soundPoolMap.put(sample1, soundPoolFX.load(this, R.raw.blast, 1));
Now we have created our soundPoolFX SoundPool object and our soundPoolMap HashMap object and wired the two together for each of the four samples, which are now loaded into the HashMap and ready for rapid access by the Android SoundPool audio engine.
Next, we’ll write a method which will allow us to configure and play our SoundPool audio engine using a single method and two parameters specifying the sample to play, and the pitch shifting value to shift the pitch by.
Coding a playSample( ) Method: Using SoundPool .play( )
Next we are going to write a method called playSample( ) that we will use to control our usage of the SoundPool engine. This method creates a manageAudio AudioManager object to get the AUDIO_SERVICE system service and uses this object to get current and maximum volume settings from the OS and then uses these data values to set the volume settings for our .play( ) method call for our soundPoolFX SoundPool object, as shown in Figure 15-7.
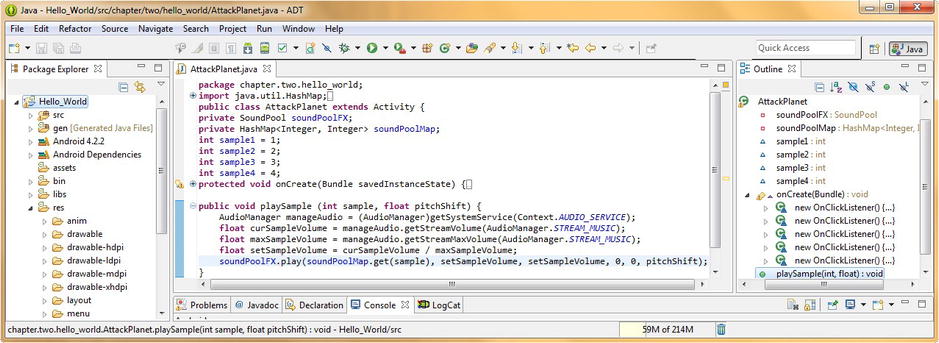
Figure 15-7. Coding a playSample( ) method that sets up and then calls our SoundPool object .play( ) method
The first line of Java code in our playSample( ) method creates an AudioManager object named manageAudio and sets it equal to a call to the getSystemService( ) method passing over the Context.AUDIO_SERVICE constant. This is done using the following line of Java code:
AudioManager manageAudio = (AudioManager)getSystemService(Context.AUDIO_SERVICE);
The next three lines of code create float variables. We set the first two float variables, curSampleVolume and maxSampleVolume, to the current audio stream volume and maximum audio stream volume data values, which we obtain via the manageAudio AudioManager object that we created in our first line of code. These two float variables are set using the following Java code:
float curSampleVolume = manageAudio.getStreamVolume(AudioManager.STREAM_MUSIC);
float maxSampleVolume = manageAudio.getStreamMaxVolume(AudioManager.STREAM_MUSIC);
We then use these two float variable data values to calculate our third float variable data value, using the following line of Java code, which calculates the setSampleVolume volume setting that we need to pass to the SoundPool engine by dividing the current volume by the maximum volume:
float setSampleVolume = curSampleVolume / maxSampleVolume;
Finally we are going to call the SoundPool .play( ) method on our SoundPool object, and configure it with these float volume variables, as well as the data that we passed into the playSample( ) method, which this final line of code is contained in. The single line of Java code should look like this:
soundPoolFX.play(soundPoolMap.get(sample),setSampleVolume,setSampleVolume,0,0,pitchShift);
So now a .play( ) method is called off our soundPoolFX SoundPool object, and passes over the sample soundID that is pulled out of the soundPoolMap HashMap object, based on which sample variable (the sample number is the key used to index which sample data we want) is passed over in the method parameter list.
The other parameters are the floating point volume levels for the left and right audio channels, specified by our final float calculation held in the setSampleVolume variable. Also specified in the .play( ) parameter list are the playback priority, the number of times to play loop value, and finally the pitch shifting factor, from 0.5 through 2.0, in floating point format.
Notice that in our code this pitch shifting factor that we’re passing over is specified using a lowercase f after each number. In our code currently this is written as 1.0f. This f stands for float and specifies the decimal number as a floating point value.
While we’re talking about this float value for our pitchShift variable, be sure and experiment with this value in your code, as you perform this next step in our work process of testing this code in the Nexus S emulator.
Fire up the Nexus S emulator using the Run As Android Application work process and use the menu key to go into the Attack a Planet Activity and click the ImageButton icons and trigger some of your samples. Notice that they play quickly and smoothly, almost like your user interface is a video game. This is what is known in the industry as UI gamification.
The last thing that we need to do is to address a warning highlight in our Eclipse editor, which is saying there is a better class to use for storing and accessing data pairs than a HashMap class. We’ll address this warning, now that we’ve shown you how to use HashMap and still gotten our code to work despite a warning message in our IDE editor. We’ll look into this warning in detail in the next section, as it’s asking us to change our Java code.
Android SparseIntArrays: Using the SparseIntArray Class
Open up the .onCreate( ) method contents by clicking the + symbol in the left margin of the IDE editing pane, and notice that there is still one wavy yellow underline highlighting your new HashMap<Integer, Integer>( ); portion of your Java code statement constructing your soundPoolMap HashMap object. Place your mouse over this warning highlight and pop up the helper dialog in Eclipse, as shown in Figure 15-8.
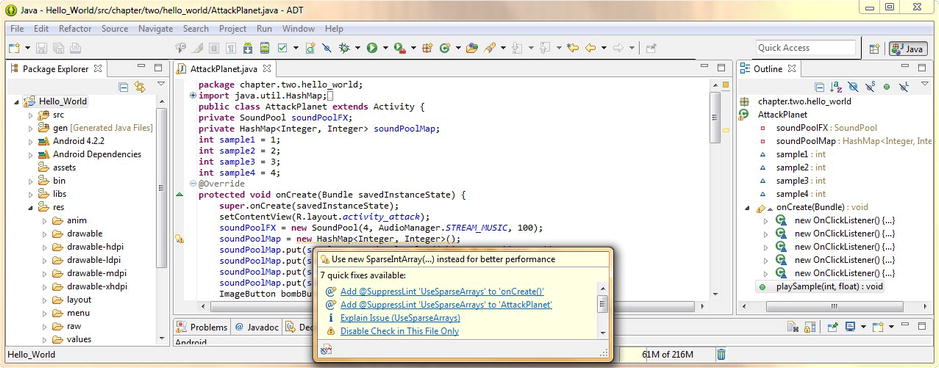
Figure 15-8. Examining warning message in Eclipse regarding HashMap and selecting the Explain Issue option
Notice that one of the options says: Explain Issue (Use SparseArrays). It looks like Eclipse is offering to teach us something that it knows about using SparseArrays instead of HashMaps in this particular implementation.
Let’s go ahead and click this option, and see what information Eclipse ADT has to offer us. Note that this particular information is coming more from the Android ADT plug-in portion of Eclipse, than it is from the core Eclipse IDE itself. We know this because the information in the dialog is relating to the use of Android Classes, and not to using the IDE functions themselves.
Once we click this Explain Issue link, it opens up yet another dialog, called More Info. This dialog tells us that there is an alternate class to HashMap called SparseIntArray that would be more efficient for us to use for our purpose of storing and accessing integer key values for the SoundPool audio engine.
The Issue Explanation essentially says that the Android SparseArray API is more efficient than the Android HashMap API because HashMap auto-boxes int values from int to Integer, whereas SparseArrays do not. You can see all this issue explanation text in Figure 15-9.
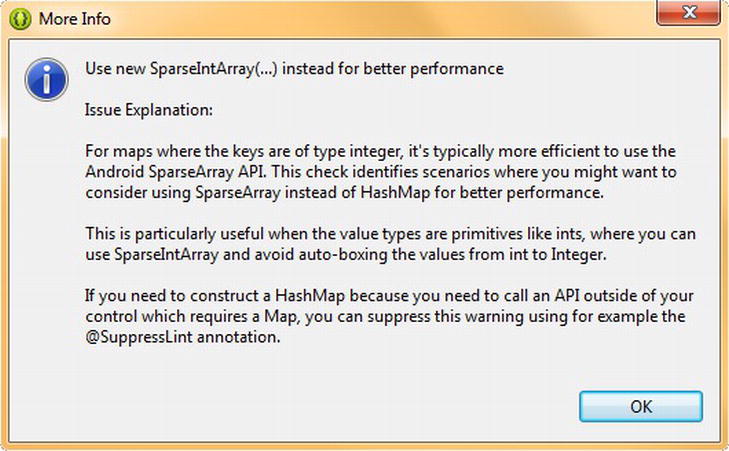
Figure 15-9. Viewing a SparseIntArray Issue Explanation in the More Info dialog
This switch can save processing time when using larger arrays, according to more detailed information found on the Android developer website. For this reason, and to expose you to the SparseArrays API, we will go ahead and upgrade our Attack a Planet Activity subclass Java code to utilize the SparseIntArray class instead of using the HashMap class.
If you want to read the more detailed information available regarding this SparseIntArray class on the Android developer website, it has its own page dedicated to the subject, which can be found at the following URL:
http://developer.android.com/reference/android/util/SparseIntArray.html
To make this change in our current Java code, we will need to remove the current line of code constructing our HashMap object, and replace it with a new line of code constructing a SparseIntArray object instead.
Let’s name our SparseIntArray soundPoolMap also, and call its constructor method using the new keyword, using the following line of Java code:
soundPoolMap = new SparseIntArray(4);
Notice that we are specifying the number of index values in this table, making the table hard-coded and thus more memory and processing efficient.
This is because there are two ways to construct SparseIntArrays, according to the developer website. One is to simply construct SparseIntArray( ) and the other is to construct SparseIntArray(int initialCapacity).
The second method of construction will create a new SparseIntArray( ) that initially contains no mappings, but which will not require any additional memory allocation to store this specified number of mappings, because by specifying this number, the API knows exactly how much memory to allocate.
In our case, we know exactly how many digital audio samples we are going to utilize with the SoundPool engine, so we select the more efficient option for our soundPoolMap SparseIntArray object construction in our Java code.
Once we type in the constructor method call via the new keyword we see that Eclipse gives us an error wavy red underline under our SparseIntArray that we know is a pathway to having Eclipse write some more code for us.
So let’s place our mouse over this error highlighting and pop up the helper dialog and select the Import SparseIntArray (android.util package) option and make that error highlighting in our code vanish forever.
Now that our soundPoolMap is constructed as a SparseIntArray, as Android wants it to be, we can modify the next four lines of code to use the proper method calls that need to be used for a SparseIntArray object.
This means changing the .put( ) method call, which is used with the HashMap object and shown in Figure 15-10, over to an .append( ) method call, which is the proper method call to use with a SparseIntArray object.
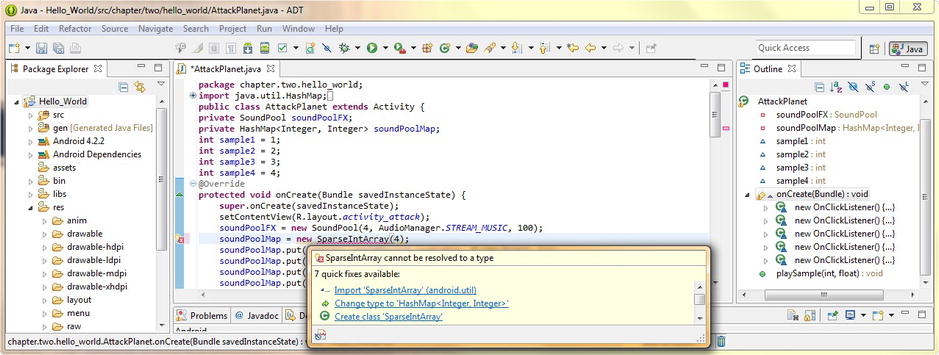
Figure 15-10. Changing HashMap object over to a SparseIntArray object and using Eclipse helper to add import statement
Fortunately, this is a fairly simple modification to our existing Java code, and so our four modified lines of Java code will look like this:
soundPoolMap.append(sample1, soundPoolFX.load(this, R.raw.blast, 1));
soundPoolMap.append(sample1, soundPoolFX.load(this, R.raw.blast, 1));
soundPoolMap.append(sample1, soundPoolFX.load(this, R.raw.blast, 1));
soundPoolMap.append(sample1, soundPoolFX.load(this, R.raw.blast, 1));
The new soundPoolMap SparseIntArray object is now completely implemented within our SoundPool engine logic, and our IDE is showing zero errors or warnings, as shown in Figure 15-11.
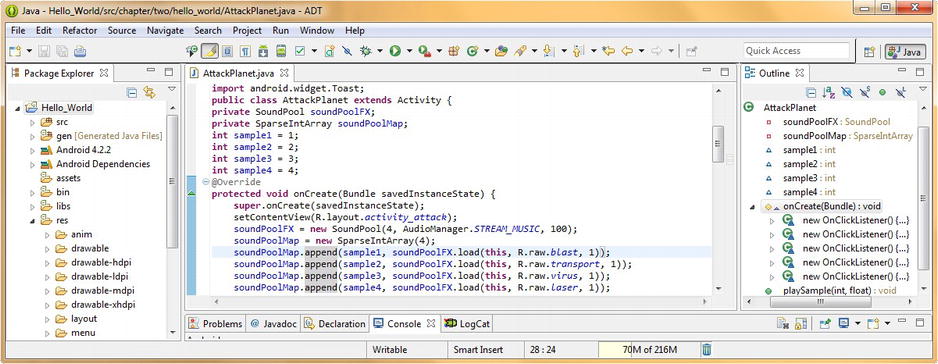
Figure 15-11. Changing our soundPoolMap.put( ) HashMap method calls over to soundPoolMap.append( ) SparseIntArray method calls
Finally we are ready to call our SoundPool engine inside our ImageButton onClick( ) event handling logic structures (code blocks) so that we can trigger the sample of our choice, and even pitch shift it, if we like.
Calling Our SoundPool Objects: Using Our playSample( ) Method
Let’s call our playSample(int sample, float pitchShift) method, which we wrote earlier in this chapter, inside of each of our ImageButton onClick( ) event handler methods next.
This involves a fairly simple line of code to be placed in each of four ImageButton onClick( ) event handler methods, right after (or before, if you prefer) the Toast.makeToast( ) object and method call.
Add the following lines of code to each of the bombButton, invadeButton, infectButton, and laserButton .setOnClickListener( ) methods, respectively, as shown in the following four lines of code (one goes in each handler):
playSample (sample1, 1.0f);
playSample (sample2, 1.0f);
playSample (sample3, 1.0f);
playSample (sample4, 1.0f);
The placement of these four lines of code inside each of the ImageButton onClick( ) event handing method code blocks is shown in Figure 15-12.
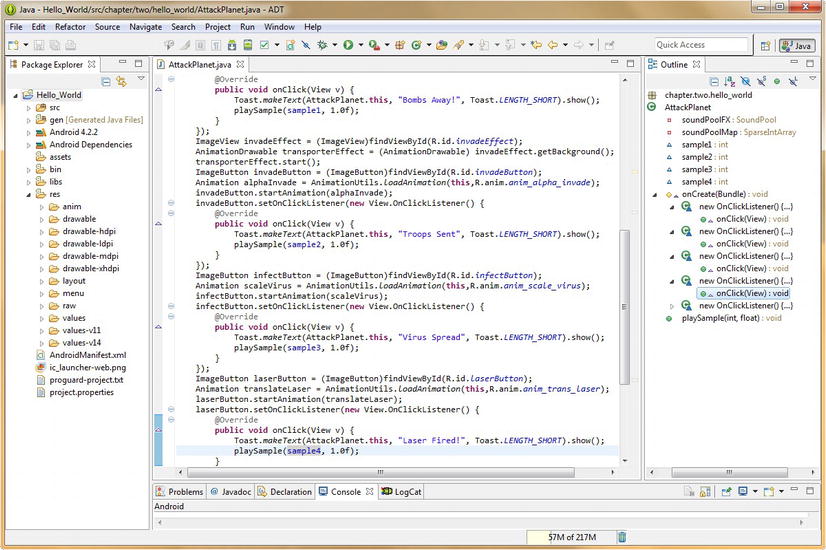
Figure 15-12. Calling our playSample( ) method with sample name and pitch shift parameter to play a SoundPool sample
Now that all the Java code constructs that would be needed to implement our soundPoolFX SoundPool object audio engine within our AttackPlanet.java Activity subclass are in place, it is time to utilize our Run As Android Application work process, and test all our code in the Nexus S emulator.
Once the Nexus S emulator launches, click the menu button, and select the Attack a Planet menu option, and launch the Activity subclass that we have just implemented SoundPool in. Click the animated ImageButton user interface elements, and trigger some digital audio samples. Pretty cool.
Now notice that your samples trigger immediately as SoundPool now has them preloaded into memory. Also note that you can now click the buttons in rapid succession, triggering audio in a more game-like fashion. Responsive feedback is important for this type of multimedia user interface design, which we’ve implemented in this Activity during the past several chapters.
This activity now implements a plethora of “trick” new media user interface elements, including: 3D multi-state image buttons, frame-based animation, vector or procedural animation, digital image and animation compositing, and an audio sample engine, all seamlessly integrated with great results.
Summary
In this final chapter covering digital audio in Android, we took a closer look at audio sequencing and audio synthesis concepts, as they relate to the powerful Android SoundPool digital audio engine class and API.
We started out by learning about the concept of MIDI and audio sequencers and sequencing, which is central to the Android SoundPool class. We also learned about how sequencing came about, where it is used today, and the concepts involved with it, including tracks, parts, and performance data.
Next we took a closer look at digital audio synthesis, including the basic concepts of waves, tones, pitch, octaves, oscillators, pitch shifting, and many of those fundamental concepts that need to be understood to turn the SoundPool class API into an audio synthesis engine.
Next we looked at the SoundPool class and API specifically, examining how it works and its methods and memory requirements. We took a closer look at the SoundPool maxStreams parameter as well as how it handles priority when the maxStreams sample streams number has been exceeded.
The next logical step was for us to look at some of the caveats regarding the use of a digital audio sequencing and synthesis engine, which happens to be very memory and processing intensive, and thus, if we are going to implement this in our application, there are certain factors that we must take into account, and optimize for, within our code and new media assets.
Finally, we were ready to implement a SoundPool audio engine in one of the Activity subclasses in our Hello_World Android application. We set-up our SoundPool object, loaded it with our audio sample data, and learned about the Android HashMap class API that allows us to create Hash tables.
Then we learned about Android AudioManager class and API, which allows us to manage audio focus in our Android application and devices, and then we used this knowledge to allow us to construct our SoundPool object.
Next we wrote a custom playSample( ) method, so that we could pass sample data parameters to our SoundPool, such as the samples we wanted to play and how much we wanted to pitch-shift those samples.
To get rid of a pesky warning flag in Eclipse we replaced our HashMap with a SparseIntArray object and learned about the differences between the two Android utilities. Then we implemented calls to our playSample( ) method in our ImageButton onClick( ) event handlers, and SoundPool was implemented.
In the next chapter, we will start learning about Android Services, and using background processing to off-load computationally intensive tasks, so that they don’t affect the responsiveness of our user interface designs or our application user experience in any way.