
Playing Audio in Android: The MediaPlayer Class
In this chapter, we will take the digital audio assets that we optimized in the previous chapter and teach you how to implement them for playback in your Hello_World AttackPlanet.java Activity event handling code.
We’ll add sound effects to the Attack a Planet user interface ImageButton elements, so that when users click these animated buttons the digital audio will playback, adding to the already impressive visual effects we created in the graphics design and animation chapters previously.
Now that you know how to optimize audio for use in Android, we’ll also use some higher-quality audio from world-renowned sound designer and music composer Frank Serafine, who is a friend of mine and was gracious enough to give me a few audio samples for us to use for this book.
These sound effects, background music, and ambient environment sounds will allow us to greatly enhance our other Activity screens to yet again take our user interface and user experience to an entirely new level.
We will also take a look at some more concepts in digital audio playback, which are very similar to those which we observed in the digital video and the frame and vector animation chapters, such as seamless audio looping, where you can’t tell where the background audio loop (seam) is in the audio playback cycle.
Since we’ve already gone over the basic origins of the Android MediaPlayer class in the previous chapter, we will now go ahead and cover the various Java methods that are available in this advanced class. We will do this in the first part of this chapter, and then we’ll get into writing some code that implements some of these core MediaPlayer functions. Once we do this, we’ll be able to give some of our user interface elements and our Activity screens some really cool digital audio features thanks to Mr. Serafine.
The Android Media Player: Methods and the State Engine
In Android, the MediaPlayer class is what could be termed a state machine, that is, a digital file playback entity that has certain states that it is in at any given time. I have generously included the state machine diagram from the developer.android.com website in this section (see Figure 14-1), so that you can reference it here, along with the text in this section, which discusses it in detail. You can find it on the developer website here:
http://developer.android.com/reference/android/media/MediaPlayer.html
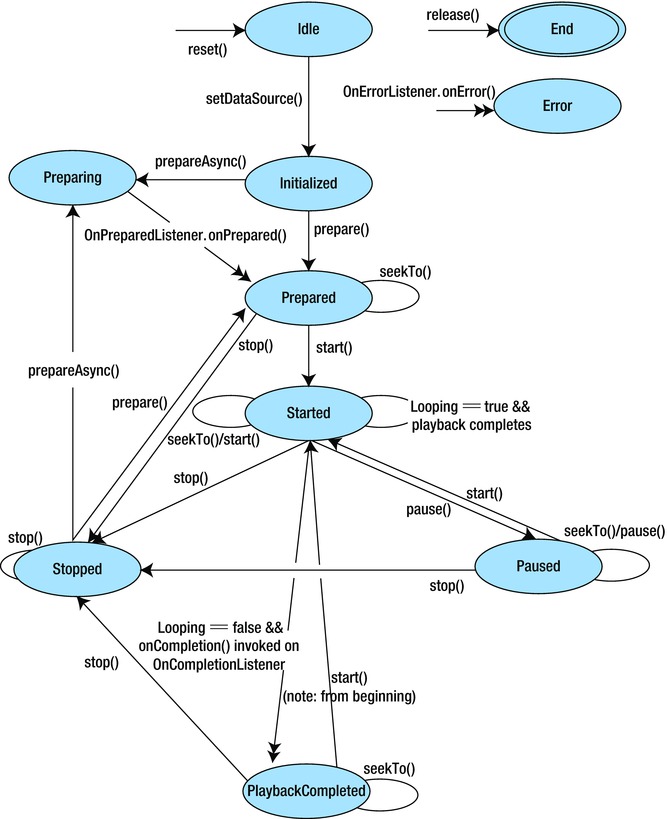
Figure 14-1. Diagram of MediaPlayer State Engine (from the MediaPlayer Class page on developer.android.com)1
We learned about states in one of the earliest chapters in this book, when we reviewed our Java programming principles. Your Android MediaPlayer will always be in one of these following states: Idle, Initialized (loaded with your audio or video data), Preparing, Prepared, Started (Playing), Paused, Completed (Playback has Completed), and Stopped.
There are also End and Error MediaPlayer states. Let’s cover these two special states first and get them out of the way. End happens once the MediaPlayer object has been released from the memory needed to use it in the first place, and Error is used for when something goes wrong with the media playback process.
The MediaPlayer End state comes about when the Java method .release( ) is called. So if our MediaPlayer object is named bombPlayer, as it will be, for our bombButton ImageButton object in the next section of this chapter, you would release the MediaPlayer from memory using this code statement:
bombPlayer.release( );
This clears the MediaPlayer object named bombPlayer from main memory, so that this memory can be utilized for other purposes.
The MediaPlayer Error state comes about when the OnErrorListener interface .onError( ) method is called via the following Java callback construct public abstract boolean onError (MediaPlayer mp, int what, int extra)
.The mp parameter contains the name of the MediaPlayer object, for instance bombPlayer, the what parameter contains the type of error constant, and the extra parameter contains the error-specific code constant.
What constants include MEDIA_ERROR_UNKNOWN and MEDIA_ERROR_SERVER_DIED and extra constants can include MEDIA_ERROR_IO, MEDIA_ERROR_MALFORMED, MEDIA_ERROR_TIMED_OUT, and MEDIA_ERROR_UNSUPPORTED.
Information on the OnErrorListener public static interface is located at:
developer.android.com/reference/android/media/MediaPlayer.OnErrorListener.html
Now let’s start at the top of the MediaPlayer state engine diagram, shown in Figure 14-1, and work our way down the state tree logic diagram by one state at a time, starting with the Idle state and its reset( ) Java method.
If you use the .reset( ) method via a bombPlayer.reset( ); line of code, the MediaPlayer object resets itself (simulates its initial launch) and goes into Idle state or mode. The next mode after Idle is the Initialized state or mode; this is achieved by using the .setDataSource( ) method to set the data source reference to the media file you want to use.
For data resources in the /res/raw folder, you should use the .onCreate( ) method (which we will implement in the next section), and specify the data file resource path using the second parameter in the format R.raw.filename.
The Preparing state is utilized when accessing data files from an external server, and is used in conjunction with an external server URL, parsed by the familiar Uri.parse( ) method. Even though we are using internal media data assets in our application, I will show you the code to do this here, to be complete in my coverage of this MediaPlayer state diagram.
You’d use an .setOnPreparedListener( ) that calls new OnPreparedListener( ), with a Java code block that uses the onPrepared( ) method something like the following:
MediaPlayer mp = MediaPlayer.create(this,Uri.parse("http://www.url.com/file.mp3"));
     player.setOnPreparedListener(new OnPreparedListener() {
          @Override
          public void onPrepared(MediaPlayer mp) {
               mp.start();
          }
     });
Once the MediaPlayer has reached the Prepared state, by using either the .onCreate( ) method or something similar to the above specified code block, you can then call the .start( ) method to put the MediaPlayer state into the Started state (or mode, if you’d rather look at it modally).
Note that these states are similar to the modes which we discussed earlier in this book, except that with the modes we discussed, there were multiple digital imaging modes that needed to be considered all at the same time when using GIMP 2.
The next level down in the diagram are the Paused and Stopped states, which depend on whether the .pause( ) method is called or whether the .stop( ) method is called. As you can see in the state diagram, once a MediaPlayer object is Paused, you can use the .start( ) method to restart your media playback.
The Playback Completed state is reached (or is set) when your media file finishes its playback. If the Looping flag is set to false (its default), then an onCompletion( ) method is invoked (if you have code defined inside it) by the OnCompletionListener, and those tasks would then be performed.
Notice that once your MediaPlayer reaches the Initialized or the Stopped state, that a .prepareAsync( ) method can be used to put your MediaPlayer object into the Preparing state.
This Preparing state is usually taking place while your media data file is being fetched (transferred) from a remote location, usually a media server of some sort, such as Amazon S3 or Akamai or your own custom data server.
Note that if you are going to center your application functionality around the MediaPlayer class, rather than just using it to play an audio or video asset, that you should review the MediaPlayer developer page referenced at the beginning of this section.
Using the MediaPlayer class to create your own advanced Media Player is beyond the scope of an introductory book on Android such as this one, as the MediaPlayer functionality in Android is complex enough to have its own book written about it.
There is another digital audio sequencing class inside Android called the SoundPool class, which might actually be more optimal for use if your app uses a lot of sounds, and these need to be mixed and matched in real time, such as you would do in a game or animated eBook or similarly robust new media application.
This Android SoundPool class will be covered in the next chapter, so rest assured that you will be exposed to the key, primary digital audio classes and work processes in Android within this section of the book.
Setting Up a MediaPlayer Object and Loading It with Digital Audio Data
The first thing that we need to do in implementing our MediaPlayer object is to declare it at the top of our AttackPlanet.java Activity subclass in a line of code that declares it as a private access object and sets it to a null value for now (until we use it later on) via the following code:
private MediaPlayer bombPlayer = null;
You will notice that Eclipse ADT red underlines your code with a wavy line under the word MediaPlayer. This is because we have not imported its library at the top of our code as yet. Place your mouse over this wavy red underline and select the Import android.media.MediaPlayer package reference link, and let’s have Eclipse write this code for us.
This import statement and the MediaPlayer object declaration can be seen in Figure 14-2.
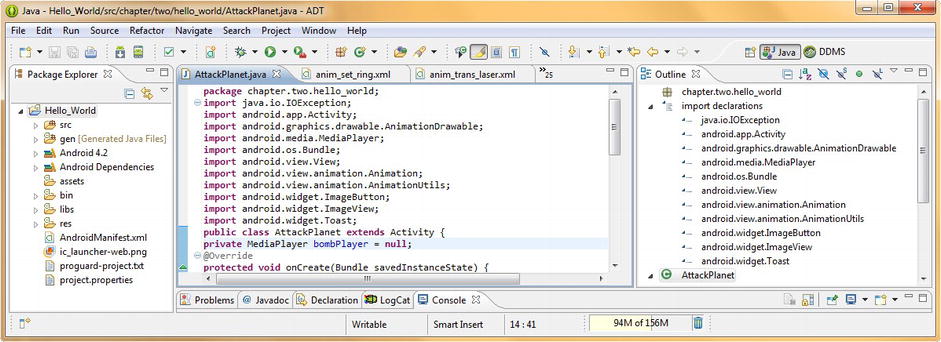
Figure 14-2. Declaring a MediaPlayer Object named bombPlayer and setting its value to null
Next, we need to write a method that sets up our MediaPlayer objects for use in our Attack a Planet user interface ImageButton icons. We will do this so that a different sound effect is played back when each button is clicked.
Writing Our Custom setAudioPlayers( ) Java Method
Let’s call this custom Java method setAudioPlayers( ) and add in our first bombPlayer MediaPlayer Object, which plays back our blast audio asset.
First, let’s add in the line of code that invokes our new method at the top of our AttackPlanet Activity right after the setContentView( ) method, using the following Java method call statement:
setAudioPlayers();
Next we need to write the setAudioPlayers( ) method itself, and we will do this at the very bottom of the editing screen, just after all our other ImageView, ImageButton, Animation, and AnimationDrawawble object(s) code.
We declare the setAudioPlayers( ) method as private as it is used only by this class to set up all the MediaPlayer objects for our digital audio samples, and as void, as it does not return any values when it is called.
Inside of the two curly braces we add our MediaPlayer object creation code, using the .create( ) method from the MediaPlayer class. This method requires the current context, which could be written as follows:
AttackPlanet.this
Alternatively, you could also utilize the getApplicationContext( ) method, which we will implement here, so that you can see this method in use as well. The second parameter required by the .create( ) method is the asset file reference, which we know is R.raw.blast, and so our line of code that creates our bombPlayer MediaPlayer object and loads it with our digital audio data would be written as follows:
bombPlayer = MediaPlayer.create(getApplicationContext( ), R.raw.blast);
As we add in our other sound effects digital audio assets, we add similar lines of code for each of these inside this method. In this way, when this method is called on our Activity start-up, the MediaPlayer objects will all be created up-front, and will be ready for use.
Then, all we will have to do in our individual UI button code is to call each MediaPlayer object (digital audio sample) from our event handling code at the time that respective button is clicked by our end-user. The new method call and the body of the method with its first MediaPlayer object already coded are shown in Figure 14-3.
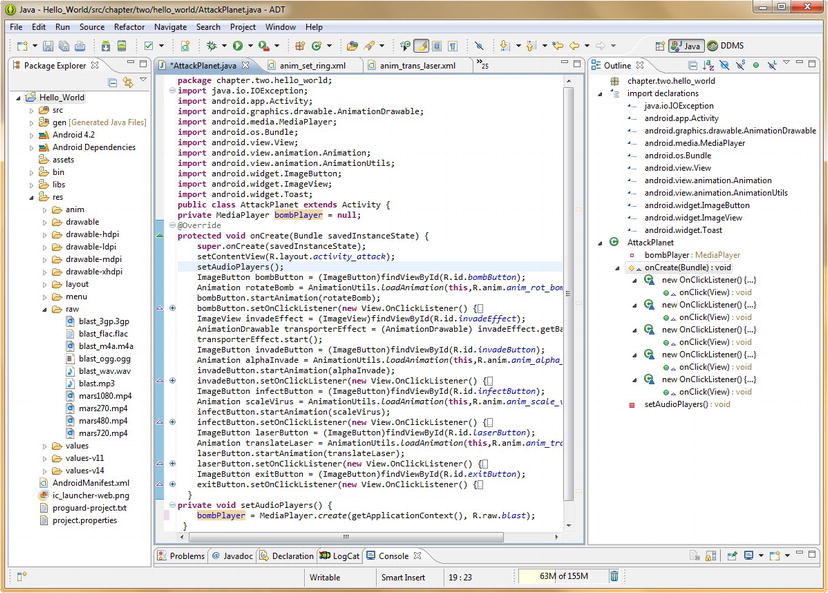
Figure 14-3. Creating a setAudioPlayers() method to set up and create our MediaPlayer objects for sound effects
Next we will add the programming logic that is needed to start (play) the MediaPlayer object. This Java code exists inside each onClick( ) event handler routine in each of the ImageButton objects. Let’s write that code next for the bombButton ImageButton object so that you know how the basic format for this is coded and what method to use.
Using Our Media Player Object: Starting Audio Playback Using the .start( ) Method
Click on the + icon (in the left margin, beside your bombButton object) in Eclipse and expand that block of Java code (if it is not expanded for view already). Inside this block of code you have your onClick( ) event handling method that contains your Toast object and soon we will add the code that triggers the audio sample when the button is clicked as well.
Add a line of code underneath your Toast.makeText( ) method call (or above it, if you prefer) that references the bombPlayer MediaPlayer object that we created inside our setAudioPlayers( ) method, which is shown at the very bottom of Figure 14-4. Use Java dot notation to append the .start( ) method call to your bombPlayer MediaPlayer object, by using the following line of Java code:
bombPlayer.start();

Figure 14-4. Adding bombPlayer MediaPlayer Object start( ) method call to bombButton onClick() event handler method
This starts, or more accurately, plays, your blast digital audio sample, which is referenced in your .create( ) method call in the setAudioPlayers( ) method.
Now we have created the MediaPlayer object that contains our blast digital audio sample, and we’ve wired it up to the audio data file that we placed into our Hello_World project’s /res/raw folder in the previous chapter, and finally triggered the audio sample for playback within our onClick( ) event handling method for the bomb button that we want to play that audio sound effect.
We have imported the Android MediaPlayer library and class, coded a custom setAudioPlayers( ) Java method, wired the MediaPlayer object to our digital audio sample, and triggered it for playback using only a half-dozen lines of Java code.
Now all we have to do for our other three sound effects is add them to our setAudioPlayers( ) method, and then use the start( ) method in our onClick( ) handler methods to start the audio playback when each of our UI buttons is clicked.
Coding the Other Special Effect Audio MediaPlayer Objects
Copy the private MediaPlayer bombPlayer = null; line of code at the top of your AttackPlanet class, and paste it underneath itself three more times. Change your MediaPlayer object names from bombPlayer to transportPlayer, virusPlayer, and laserPlayer, respectively, as shown at the top of Figure 14-5.

Figure 14-5. Completing our setAudioPlayers() method and declaring our other sound effect MediaPlayer objects
Next, copy the bombPlayer object and MediaPlayer.create( ) method call from the first line of your setAudioPlayers( ) method, then paste it underneath itself three more times. Again change the object names from bombPlayer to transportPlayer, virusPlayer, and laserPlayer, respectively.
Now we are ready to add a MediaPlayer object .start( ) method call in each ImageButton onClick( ) event handling code block, as shown in Figure 14-6.
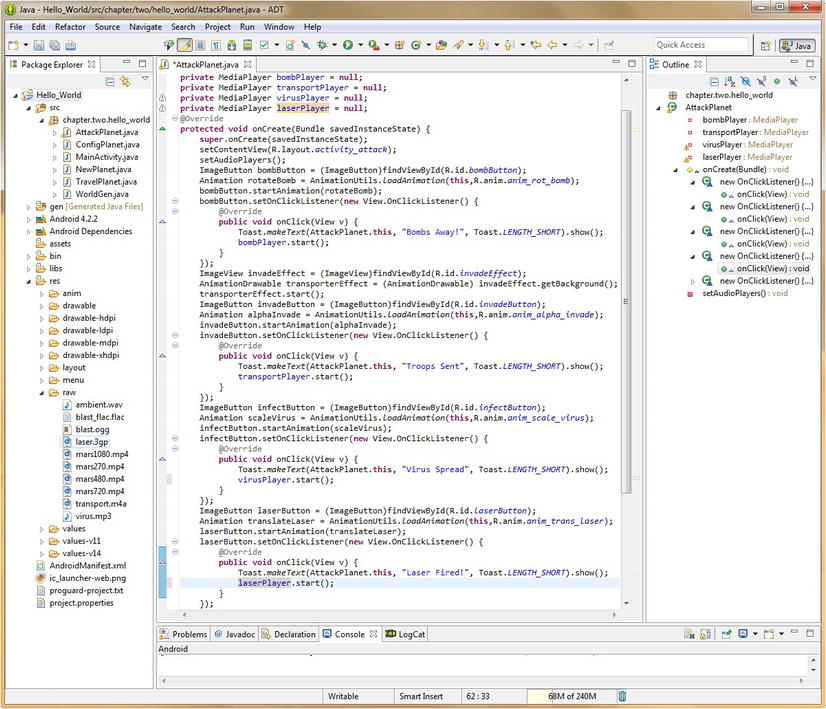
Figure 14-6. Adding the MediaPlayer .start() method calls to our other three ImageButton UI elements
Next we need to take a look at how to add seamlessly looping audio to our Home Screen MainActivity.java Activity subclass. In that scenario, we can simply write one setStartUpScreenAudio( ) method that will do everything on Activity launch, such as declare an object, set loop parameters and start.
Looping Background Ambient Audio for Our MainActivity
Add a line of code into the top part of your MainActivity class, in the onCreate( ) method, so that your audio MediaPlayer object is initialized along with your World object values, screen text, and screen animations.
Let’s call our new method setStartUpScreenAudio( ), and notice than when you type in the setStartUpScreenAudio( ); line of code that Eclipse underlines it with a wavy red line. Place your mouse over the red-underlined text and the Eclipse helper dialog pops up and offers to write your new method for you. Select the last link of the three that are shown, Create method setStartUpScreenAudio( ), and voila instant method (see Figure 14-7)!

Figure 14-7. Creating our setStartUpAudio() method for our MainActivity.java Home Screen to play an audio loop
Next, we will fill in the interior of the setStartUpScreenAudio( ) method with three statements. The first will instantiate, name, and .create( ) our new audioPlayer MediaPlayer object, and the second will use the new object to call the .setLooping( ) method to a true (looping) state, and the third will call the looping audio to play back in the background using the .start( ) method, which we will also call off of the new audioPlayer object. These three new lines of Java code will look like this:
MediaPlayer audioPlayer=MediaPlayer.create(getApplicationContext(), R.raw.ambient);
audioPlayer.setLooping(true);
audioPlayer.start();
The final code inside the Eclipse IDE can be seen below in Figure 14-8. Notice that we set the .setLooping( ) method to a value of true after the MediaPlayer is instantiated, but before it is called for use via .start( ).
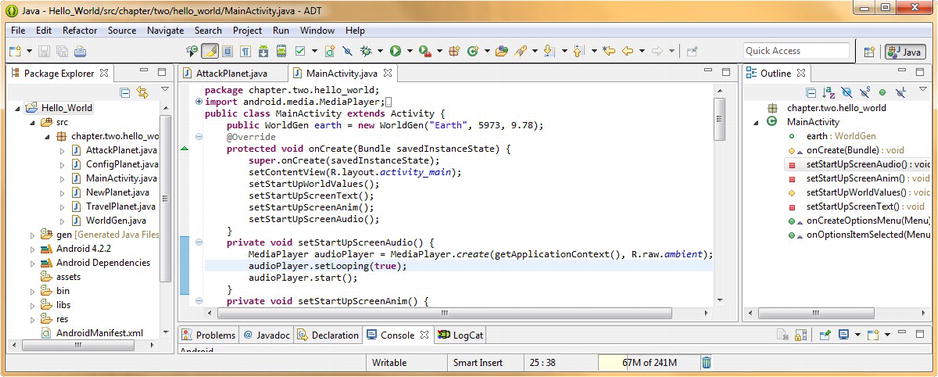
Figure 14-8. Coding audioPlayer MediaPlayer object and .setLooping() and .start() methods in setStartUpScreenAudio()
Next we need to add a cool alien voice to our Add a Planet Activity so the user can get some audio feedback when they click the Planet Mars to create it. We do this by getting set up with a popular open source speech synthesis software package called eSpeak and then use it in conjunction with Audacity to create an alien phrase in under 60KB of data.
Creating Voice Synthesis for Our NewPlanet.java Add a Planet Activity
Let’s go to SourceForge and download the eSpeak Voice Synthesizer, or TTS (Text To Speech) technology software. It is located at the following URL:
http://espeak.sourceforge.net/
Once you finish downloading the version needed for your OS, install the software, and then launch it, so that we can create our alien voiceover.
In the top-center area of the eSpeak dialog, enter the text that you want the voice synthesizer to speak or synthesize for you. We want our alien to say “Planet Mars Created” so enter that (without the quotes) into the text field area, as shown in Figure 14-9 as highlighted in blue.

Figure 14-9. Running the eSpeak open source application to generate an alien voiceover
To test your alien voice, utilize the Speak button, which is located on the top-right of the eSpeak dialog, second button down. If you would like to change the current speech synthesis voice font to a different voice, use the Voice drop-down menu, it’s right underneath the text entry area. You can use this menu to select and test different voice fonts by changing the voice font and then using the Speak button to test each one.
Similarly, if you want to fine-tune your voice, there are sliders at the bottom middle of the eSpeak dialog for speech rate and volume (amplitude).
Now that we have fine-tuned all our settings, let’s generate a digital audio data file. At the very bottom of eSpeak’s dialog, there is a drop-down selector that we will use for selecting our target audio sample rate and our target audio sample frequency.
I selected the highest quality possible, 48kHz 16-bit Stereo, so that we could go into Audacity and see what kind of data footprint reduction we could get using stereo (two tracks) audio at a full 16-bit resolution and 48 kHz professional level sampling rate.
Finally, we need to click the Save to .wav button, to save our alien voiceover audio sample in a 48 kHz uncompressed 16-bit PCM Wave sample format.
When the Save Dialog appears, navigate to the same Audio folder that we have been using for our audio assets and save the file with a mars.wav filename. Next we’ll use our Audacity audio editing and optimization software to take this sample size from nearly 300KB down to less than 60KB and yet still have the maximum quality maintained for our application.
Optimizing Our Alien Voiceover Audio Sample Using Audacity 2.0
Let’s launch Audacity now, and use the File ![]() Open menu sequence to find and open our mars.wav digital audio file, which we just created previously using eSpeak. As you can see in Figure 14-10, there are two audio samples.
Open menu sequence to find and open our mars.wav digital audio file, which we just created previously using eSpeak. As you can see in Figure 14-10, there are two audio samples.
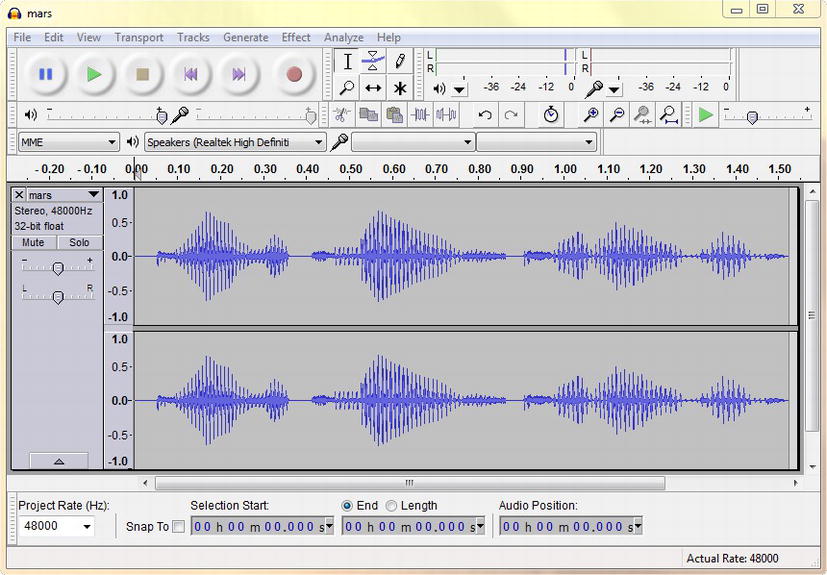
Figure 14-10. Opening our synthesized voice sample in Audacity to optimize an MPEG-4 AAC data file
The reason there are two samples is because this is a Stereo audio sample, which means that we now have left channel and right channel audio samples.
This also means that there is twice as much audio data, so, if you can use Mono samples, such as we have in our sound effects, you will obtain a much more compact data footprint in the end.
Let’s see what kind of data footprint optimization we can get on this alien voiceover. As we remember from the previous chapter, MPEG-4 AAC gave us the best data footprint reduction, even when we used the highest (500) quality setting, so let’s use that here, and see what happens.
If you look at our mars.wav uncompressed audio sample in your operating system file management utility, you will see that the original data size is 293,894 bytes of data, or close to 300 kilobytes of raw audio data.
Let’s use the Audacity File ![]() Export menu sequence to open the Export File dialog, shown in Figure 14-11, and select the drop-down to: M4A AAC FFmpeg codec selection. Then click the Options button, and select the highest quality level of 500 and let’s see just how efficient this MPEG-4 codec is at compressing professional quality 48 kHz 16-bit stereo audio samples.
Export menu sequence to open the Export File dialog, shown in Figure 14-11, and select the drop-down to: M4A AAC FFmpeg codec selection. Then click the Options button, and select the highest quality level of 500 and let’s see just how efficient this MPEG-4 codec is at compressing professional quality 48 kHz 16-bit stereo audio samples.

Figure 14-11. Exporting our MPEG-4 AAC mars.m4a audio data file with a setting of 500 highest quality (59KB)
Go into your file management utility again and look at the mars.m4a file that we just saved. The file size is 60,638 bytes, or 59.2 kilobytes. This is an 80% reduction in data footprint with no audible loss of quality, which is a great result.
If you are wondering how I figured that, divide 60,638 by 293,894 and you will get .206326 which means that 60,638 is around 20% of 293,894. 100% minus 20% gives us an 80% data footprint reduction for this audio file.
The next thing that we need to do is to implement this new mars.m4a audio asset into the Java code for our NewPlanet.java Activity subclass.
Fire up Eclipse, if it’s not open already, and open the NewPlanet.java tab in the central editing pane. At the top of the Activity class, add a line of code that declares the MediaPlayer object as private and also names it marsPlayer and sets it to null. The line of code should look like this:
private MediaPlayer marsPlayer = null;
Next, we need to create the MediaPlayer, in the onCreate( ) method of our Activity class, so that the MediaPlayer functionality has been created for our marsPlayer MediaPlayer object. That line of code looks like this:
marsPlayer = MediaPlayer.create(this, R.raw.mars);
Notice that I used this to reference the current context in this example, just to show you both ways that the context can be referenced, either by using the keyword this, or by using the getApplicationContext( ) method.

Figure 14-12 . Creating the Java code to implement our synthetic voice to speak “Planet Mars Created” in onClick()
Next, we’re going to go into our marsImage ImageView object’s onClick( ) event handling method, and add in the line of code that starts up our marsPlayer MediaPlayer object. This line of Java code will look like this:
marsPlayer.start();
Now we should be ready to use the Run As Android Application work process, and test all of the audio work that we have done thus far in this chapter inside of the Android Nexus S emulator.
Once your emulator launches, you should hear the ambient background audio loop on the Home Screen. Next, click the menu button on the emulator, and go into the Attack a Planet Activity, and click on each of the ImageButton icon buttons to hear the cool audio effects that each of these trigger.
Exit the Attack a Planet screen and go back to the Home Screen and again use the menu button in the emulator to go to the Add a New Planet Activity and click the Planet Mars and listen to our alien voiceover say “Planet Mars Created” and as you can see all of our audio assets are implemented!
Creating Button Click Audio FX for Our Configure a Planet Activity
Next let’s add a user interface button feedback audio effect; so that you have experience in this chapter with implementing all the different types of audio, for all the different reasons you would use audio, within your user interface designs or user experience designs, for your Hello World Android applications development or any other application for that matter.
Let’s start by declaring a private MediaPlayer object, name it clickPlayer and set it to a null value for now, using the following line of Java code:
private MediaPlayer clickPlayer = null;
Next we need to initialize our clickPlayer MediaPlayer object by using the .create( ) method with our context and data resource reference, as follows:
clickPlayer = MediaPlayer.create(getApplicationContext(), R.raw.click);
As you can see in Figure 14-13, we’re creating our clickPlayer MediaPlayer object at the very top (first line) of our ConfigPlanet Activity, and we are initializing our MediaPlayer object using the .create( ) method right after we set our Activity content view using the setContentView( ) method.
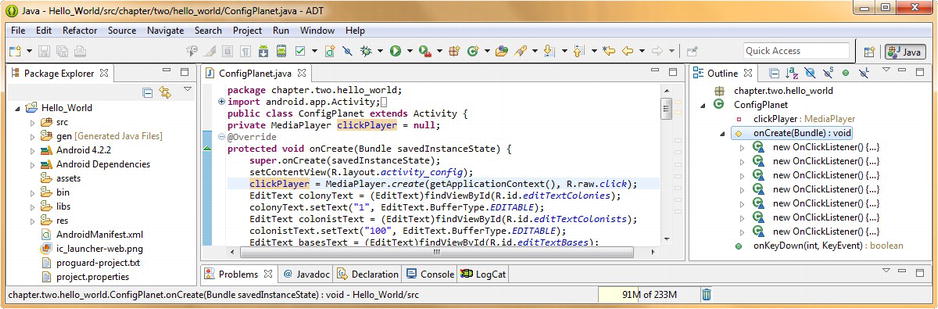
Figure 14-13. Adding the clickPlayer MediaPlayer object to our ConfigPlanet.java Activity and invoking .create()
Next, we need to add in the code that starts up the MediaPlayer object in each of our user interface Button objects onClick( ) event handling method code blocks, using the following line of Java code:
clickPlayer.start();
We need to add this line of Java code for all seven of our Button objects, as is shown in Figure 14-14. Once we have completed this, we can test our Hello_World Android application in the Nexus S emulator, and then we will be finished implementing audio in each of our primary Activities.
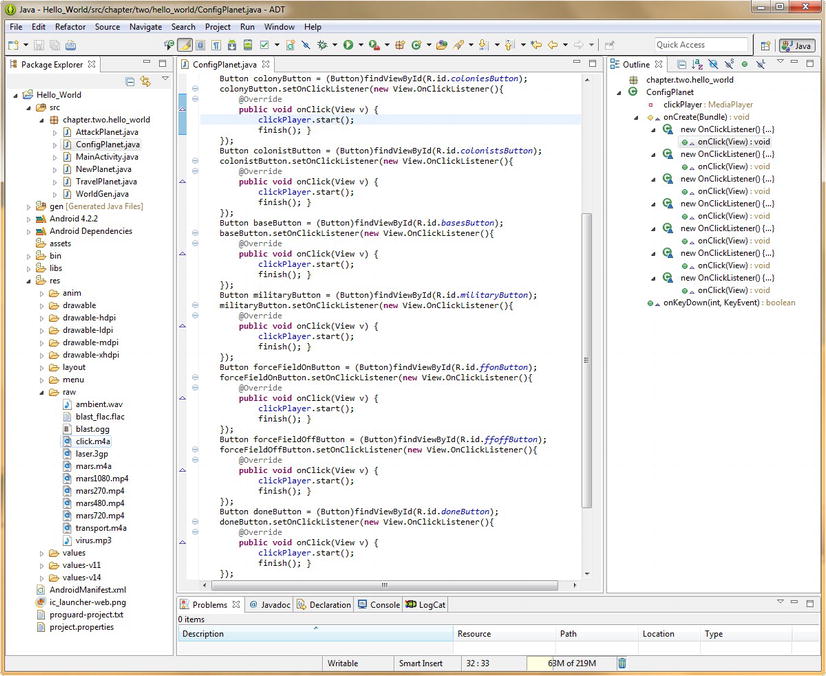
Figure 14-14. Adding the clickPlayer.start() method to the Button UI element onClick() event handling methods
This code set-up is more highly optimized than the others we have put in place so far in the chapter in the sense that we only have to create one object and initialize it, but seven of our user interface elements can leverage the object and the MediaPlayer functionality via one short line of Java code in the their event handling method.
Use the Run As Android Application work process to launch your Android ADT Nexus S emulator, then click the menu button, and select your Configure a Planet menu option and click each of the user interface buttons to make sure that they work properly.
Summary
In this chapter, we took a closer look at the Android MediaPlayer class, which can be used to play back audio samples, implement sound effects for our user interface buttons, and play looping ambient background audio or looping background music.
We took a close look at the MediaPlayer state engine diagram that is on the Android Developer website, and we went through it from top to bottom, state by state, method by method, to get a good feel for exactly what the MediaPlayer is capable of.
We learned that the MediaPlayer is Idle until Initialized, that it needs to be Prepared by using the .prepareAsync( ) (streaming) or the .create( ) method (captive), that during streaming from a remote server it will be in a Preparing state, and that once prepared, it can be in either Started, Stopped, or Paused states.
We took a look at which methods, interfaces, and callbacks are implemented to control those various states for the MediaPlayer, either for playing a captive audio data file from your /res/raw folder, or for streaming audio into your apps, from a remote audio media server of some kind or another.
We then wrote a custom method called setAudioPlayers( ) for our Attack a Planet Activity subclass, so that we could implement several short burst audio sound effects for our user interface buttons. We did this so that when our user clicks an animated button there’s an audio representation of what that animated object actually sounds like.
We then wrote a custom method called setStartUpScreenAudio( ), for our Main Activity Home Screen, and set the .setLooping( ) method to true, so that we could loop ambient space background audio for a special audio effect.
Next, we utilized an open source TTS technology voice synthesizer software package called eSpeak to create an alien voice for our NewPlanet.java Planet Mars creation tasks in our Add a Planet Activity subclass.
We then learned how to use eSpeak to synthesize, and fine-tune, our alien voice sample, and we then optimized this audio data that we created using Audacity. Finally, we wrote the Java code necessary to implement this cool alien voiceover inside of our Add a Planet Activity.
Finally, we added a click button sound effect to our Configure a Planet Activity user interface, to give our users audio feedback when they click a data entry button. In this instance we utilized a single MediaPlayer object to provide digital audio effects for seven user interface elements.
Thus we have added sound effects, clicks, background ambient audio, and synthesized alien voiceovers to our Hello World Android application. I think that pretty much covers the gamut of digital audio use fairly well.
In the next chapter, we will take a look at a more advanced audio playback class called SoundPool, which can be utilized as an audio sequencer. Audio sequencing and real-time mixing is the audio equivalent of the compositing that we learned about earlier in the book in our digital imaging, bitmap (frame-based) and procedural vector animation, and digital video chapters.
Android SoundPool can store, trigger, and mix, in real-time, a ton of audio samples (not really, as audio doesn’t weigh a whole lot). This audio class is utilized for more advanced applications, such as a game. It could also be used for other advanced audio applications that might require more granular management of a large number of samples, without having to create an Android MediaPlayer object for each of them, which, as we have see, could get unwieldy with a lot of digital audio samples.
1 Portions of this page are reproduced from work created and shared by the Android Open Source Project and used according to terms described in the Creative Commons 2.5 Attribution License.
http://developer.android.com/reference/android/media/MediaPlayer.html