
An Introduction to Video: Concepts and Optimization
In this chapter, we will give you the foundational knowledge that you will need to understand how digital video works, as well as to be able to work competently with digital video inside your Android applications.
This chapter includes a number of advanced concepts that will build on top of all the knowledge regarding digital imaging concepts and techniques that you learned about back in Chapters 7 and 8.
This new media asset is more difficult to understand and optimize because digital video is essentially a moving collection of static digital images. Because digital video is always moving, it introduces the fourth dimension, or time, into the equation. This, along with the complexities introduced by today’s powerful but complicated digital video encoding and decoding algorithms makes digital video inherently more difficult to learn about than digital imaging, and even more difficult than procedural animation.
Optimizing a digital video is also complicated, primarily because digital video applies compression across all the frames within the video, which requires even more advanced mathematics, and therefore a far more advanced knowledge of what exactly is going on during the compression process, to implement those compression algorithms effectively.
We are going to look at all this within a context of how it applies to creating an optimal user experience for your Android application end-user.
This means not only learning about underlying principles of digital video editing and its data footprint optimization, but also about which digital video formats are best to use for Android, as well as what resolutions to use them in. These topics are so advanced that we are going to utilize two chapters to effectively cover everything thoroughly, so that you will have an excellent handle on digital video, and how to optimize it for Android.
The Foundation of Digital Video: Pixels, Frames, FPS, and Codecs
All the concepts that you learned about in Chapter 7 that apply to your digital imagery (pixels, resolution, aspect ratio, color depth, alpha channels, layers, blending, and compositing) will apply equally as well to digital video, and they are equally important for you to consider when you are working with digital video, if not more so.
Some of the concepts that you learned about back in Chapter 9 regarding frame-based animation are also applicable to digital video. This is due to the fact that digital video, like raster animation, is frame-based content that is rapidly displayed over time. For this reason, the concept of frame rate, expressed as frames per second, or FPS, is also quite important when it comes to your digital video data footprint optimization work process.
Digital video files are created using a piece of software called a digital video codec, which is short for code-decode. The DV codec is a collection of complex algorithms that both encode and decode a container (file) full of digital video frames, so that they can be stored, transmitted, and later viewed by your end-users. Note that your end-users must have access to the same codec that encoded the video frames to be able to decode them; this is usually done via an OS (Android) or a browser (Chrome or Firefox).
Because the same codec (algorithm) that encodes any given digital video data file must also be utilized to decode that digital video data, this proves that each digital video codec has an encoding component, or side, as well as a decoding component or side that can decipher what its encoder wrote.
For this reason, MPEG4 H.264 encoded digital video files can only be read (decoded) using the MPEG4 H.264 codec, which is a part of your Android OS. Similarly digital video frames encoded by the VP8 codec can only be played back (decoded) using the VP8 codec, which is also supported by Android OS.
Digital video files have different types of file extensions that tell the developer and Android OS what type of digital video data is inside that file, and thus, which type of codec (decoder) to use to read (decode) that type of video data. The MPEG4 H.264 file we mentioned earlier has an .mp4 file extension, so our Mars Travel video would be called mars.mp4 if we were to use this particular video codec to encode that video data.
Different types of digital video codecs exhibit different capabilities and performance specifications. Thus, the key thing that we want to look at is the quality to file size ratio that any given codec gives us. Some digital video codecs such as MPEG4’s H.263 codec are of lower quality and suitable for applications such as low-resolution video conferencing, whereas others such as MPEG4 H.264 and VP8 were developed more for higher quality content, such as movies and television programs. At the time this book was written, an MPEG4 H.268 codec had also been released, but was not yet adopted. Why? Because: the H.268 codec would have to be present to decode H.268 content!
Important Digital Video Attributes: SD, HD, Streaming, and Bit-Rates
So, now we know that video codecs turn the pixels in the frames into math; where does resolution come into play and how is video stored and accessed?
Storing Video: Resolution
The original video resolution used before HD became popular was called SD, or Standard Definition digital video. In the United States, SD video originally used 480 lines of resolution in height, so 4:3 aspect ratio was VGA resolution or 640 by 480 and wide-screen aspect ratio SD video was 720 by 480. In Europe, SD video uses 576 lines of resolution in height, so 4:3 SD video in the EU would be 768 by 576 and wide-screen aspect ratio SD video in Europe would be 1024 by 576.
Recently High Definition (HD) digital video has become popular and uses the wide-screen 16:9 aspect ratio. There are two HD resolutions, the first was 1280 by 720 pixels, which I call Pseudo HD resolution, and the second, and now more common HD resolution, is 1920 by 1080 pixels, which is called True HD in the video industry.
Interestingly, all these resolutions are very close to common screen sizes found on Android consumer electronics devices. There are entry-level Android phones with 640 by 480 VGA screens, and mainstream Android phones with 800 by 480 WVGA screens, which are close to the 720 by 480 wide SD standard resolution. There are also 1024 by 600 entry-level (a smaller form factor) Android tablets, which are close to the European wide SD resolution of 1024 by 576.
The newer Android HD phones are 1280 by 720, or Pseudo HD, and the newest Android tablets are True HD 1920 by 1080. This is pretty convenient, as we can use the broadcast resolution standards for our video content and still hit most of the popular Android screen resolutions pixel for pixel.
Accessing Digital Video Data: Captive and Streaming
So, how do Android devices access digital video data in the first place? This can be done in one of two ways. The digital video data (file) can be captive within your application itself, in which case, it is a new media asset in your resource folder, just like your images and animation data.
The second way that digital video can be accessed is via a concept called streaming, where a digital video file is decoded (played) from an external video server outside your Android devices and applications.
The upside to streaming digital video data is that it can greatly reduce the data footprint of your application. This is because you do not have to include all that heavy new media digital video data in your .APK file.
The downside to streaming digital video is that if your user’s connection (or the video server) goes down, your video file may not always be present for your end-users to play and enjoy; thus reliability and availability of video content is a factor to be considered on the other side of this coin.
One of the central concepts in streaming digital video is the bit-rate of the digital video data. Bit-rate is defined during the compression process and thus we will be getting into that in more detail in future sections of this chapter, but let’s define it here as it’s an important video concept.
Bit-rate essentially defines how much compression your digital video data is going to have applied to it. The bit-rate is defined during the digital video compression process, which is why I am going to cover it in greater detail in the section of this chapter on data footprint optimization.
Digital video files that feature lower (small number) bit-rates are going to have more compression applied to the data, which will result in a lower level of quality, but which will play back more smoothly, across a greater number of consumer electronics devices.
This is because the bit-rate is a measure of the bits per second, or BPS, that can be processed or transmitted effectively. As a computer processor gets faster it can process more bits per second, and similarly, as a data bandwidth connection gets faster it can comfortably send or receive more bits per second as well.
So as you can see, bit/s is important not only for streaming digital video content, due to what will fit through the bandwidth, but also once it gets to the Android device it also affects what can be processed (decoded) fast enough to allow smooth playback by processors inside an Android device. Thus, the bit-rate is important for two reasons with regards to streaming video, and important only in one regard (the decoder processing speed) to captive (imbedded) video files inside your Android application.
Thus, with a captive or imbedded video inside an Android app, the lower the bit-rate that a video asset has, the more Android devices that can decode that video asset smoothly (without dropping frames).
The reason for this is fairly obvious, as fewer bits per second of digital video data to process will obviously lead to a reduced processing load on your processor. This results in superior performance, not only for the video playback, but for the Android application as a whole, and everything else that is going on inside that Android device, for that matter.
For this reason, our data footprint optimization for digital video is very important, and getting good video image quality at lower bit-rates becomes our ultimate goal, which is why we want to use the best codec available.
A bit per second is written in the video industry as: bit/s and it usually includes a size modifier, like kbit/s in front of it. This k would signify kilobits per second, which means thousands of bits per second. Most video compression bit-rates are set between 256 kbit/s (256kbps) and 768 kbit/s, although we are going to try and optimize our digital video data for our Android app to a lower range, between 192 kbit/s and 384 kbit/s, and still obtain great image quality. If we can do this, our digital video will play smoothly, and will look great across all the different types of Android consumer electronics devices. That is why this chapter is very important.
Digital Video Formats: Support for Digital Video Codecs in Android
There are three primary digital video data formats supported in Android: MPEG4 H.263, which is the lowest quality (poorest performance) codec, and can have a .3gp or an .mp4 file extension; MPEG4 H.264 AVC, which can have an .3gp or .mp4 file extension; and VP8, which can have a .webm or an .mkv file extension, and is supported in Android 2.3.3 (and later) for captive playback, and in Android 4.0 (and later) for video streaming playback.
The first codec MPEG4 H.263 is primarily for video conferencing, so we are going to focus more on the higher quality and more common and far reaching codecs, MPEG4 H.264 AVC and VP8. AVC stands for: Advanced Video Coding.
Both of these popular codecs are well supported in HTML5, and thus in all popular browsers. MPEG4 H.264 AVC is supported in all versions of Android for playback, and in Android 3.0 (and later) for encoding video using the digital camera hardware, if the Android device includes one, that is.
VP8, also known as WebM, is included in Android 2.3.3 for the playback of captive digital video files, and in Android 4.0 and later for the playback of streaming digital video files. Current versions of Android do not support the encoding of camera data into the VP8 format, but maybe that feature will be a part of Android 5.0, it should be interesting to see.
Because we are focusing on the decoding of digital video for our Hello World app, and we are optimizing for and using captive or imbedded digital video files in our project resource folder, we’re going to focus on optimization for MPEG4 H.264 AVC and VP8 in this chapter, since those are currently the superior codecs which are available to us.
The most common digital video codec of these two is the MPEG4 H.264 AVC codec, and for that reason most of the digital video editing software in the market, software such as Final Cut Pro or After Effects, can encode digital video into this format. This is because almost everyone on the internet is currently using HTML5 for their digital video, so H.264 codec support is included in most popular digital video editing packages.
I am going to be using the open source Lightworks digital video editing software package from EditShare in London, England. EditShare was gracious enough to make their formerly six-figure non-linear digital video editing software package open source a couple years ago, and the new version 11 should be released by the time this book publishes, and they have just added H.264 support in version 11.1 that I recently downloaded. We are also going to take a look at digital video encoding using the popular Sorenson Squeeze Pro software, the industry standard for Internet 2.0 video encoding.
VP8 codec support is a little bit newer, and not currently in Lightworks, so I am going to use the popular Sorenson Squeeze video encoding software package in this book, so that you can see an encoding package that supports all of the formats currently supported in Android.
Digital Video Optimization: Playback Across Devices and Resolution
Now that we have decided which of the supported digital video codecs that are included in the Android OS would be the most optimal for our usage in our Hello World application, we now need to determine which resolutions we are going to support for different density-level Android device screens.
We need to select three or four key resolutions that are spread far enough apart to perfectly hit the wide array of screen sizes from the entry-level 320 by 480 pre-paid el-cheapo phone all the way up to the new mega-tablets and iTVs that support True HD 1920 by 1080 or even higher resolutions.
If we’re going to support True HD at a native XXHDPI resolution of 1920 by 1080, then we should have four different resolutions (and bit-rates) one of which would be that one. I would use VP8 in this circumstance because each frame of video would have 1920 (width) times 1080 (height) times 3 (R,G,B) or 6,220,800 pixel values per frame to compress. If we want a fast, 30 FPS frame rate, we need to multiply that value by 30, giving us a total amount of pixel data per second to compress of 186,624,000 pixels per second.
The next resolution level that is logical to support is the Pseudo HD 1280 by 720 XHDPI resolution level, used on HD smartphones, on most tablets and on some iTVs. If you are only going to use three target resolutions, this one would become the top level, and could be scaled up to fit 1920 by 1080 displays, and still look relatively decent, given that you did a great job getting a lot of quality out of the codec settings. This would actually be quite possible using VP8, which can yield an amazing level of quality, and a great data footprint, at low bit-rates, if you know what you are doing.
The next target resolution level which would be logical to support is also a popular broadcast resolution, the American Wide SD format, or 720 by 480 pixels for HDPI screens. So far, three of our four target resolutions are also very common target video broadcast resolutions, so your work process in preparing digital video files for your Android application support can conveniently also provide optimized digital video assets for other mediums and purposes as well, all with zero loss of effort. This target resolution will work well on Android devices that feature the 800 by 480 and 854 by 480 screen resolutions, primarily mid-level smartphones and mini-tablets.
The final target resolution that would be logical to support is Quarter HD, which is 480 by 270 pixels for MDPI screens. This fits the original smartphone resolution of 480 by 320 because there are inexpensive pre-paid smartphones still in production that use this resolution.
Note that 480 by 270 is exactly one-quarter of HD (thus the QHD or Quarter HD), and that scaling down resolution by a factor or 2 or 4 gives the most optimal quality results. As long as we do a great job of video compression optimization, we should be able to get this MPDI into a 192 kbps bit-rate. Then we will target a 384 kbps bit-rate for HDPI and a 768 kbps for XHDPI.
Digital Video Creation: Creating our Mars Planet Surface Fly-Over
Before we can actually go into a video compression software package, such as Sorenson Squeeze Pro, we need to create a fly-over of our planet surface. Since Mars is popular these days, we’ll use the popular terrain editing software package called Bryce 7 Professional to create 900 frames of video content. We’ll create this video content at 15 frames per second, giving us one minute of fly-over of a red planet surface which we can use to learn about some of the concepts of digital video optimization.
If you don’t have it already, go to the DAZ 3D website and download Bryce 7.1 or Google “Bryce 7 Download” and go to one of the sites that has a download hosted for this software. Install the software and launch it, and you will see the Bryce 7 Pro start-up screen shown in Figure 11-1.
Figure 11-1. Bryce 7 Pro from DAZ 3D is terrain generation software
Go to the Bryce folder in the resource .zip file for this book and open the Mars.br7 file there. This is a simple surface terrain, mapped with Mars-like material, with some thin orange clouds, horizon haze, and a yellow sun. I have placed a camera near the surface that shows the ground as well as the sky and sun, and animated that camera in a straight line to simulate flying rapidly over a planet surface.
Generating Uncompressed Frames
In the next chapter, where we will get into using some more advanced Media Player controls via Java code, we can adjust our playback speed. For now, we will generate the uncompressed frames that we need inside an .AVI file format Squeeze can read to practice video compression.
- Once Bryce has launched, use the File
 Open menu sequence, and locate the book resources folder and the Bryce sub-folder, and then open the Mars.br7 file, as shown in Figure 11-2. Notice the 3D data is only 77 KB.
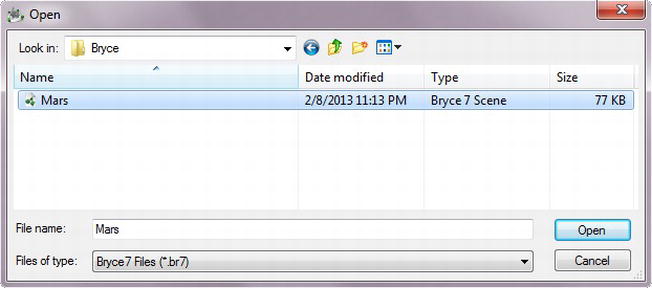
Figure 11-2. Using the File
Open menu sequence in Bryce 7.1 to open Mars file - Once this file is open, you will see a flat land terrain mesh and horizon line; you won’t see the image this will generate until you render this 3D scene. If you want to render the first frame of the 3D Mars scene, you can click the larger (lowest centered) green sphere, in the left UI panel.
- Next, we use the File Animation Setup . . . menu sequence to set-up our 3D animation parameters, including the Current start time or frame number, Duration, or ending time or frame number, our frame rate using FPS, and our playback parameters and type of frame display (Frame Count or SMPTE Time).
- Set the Current time to 0:00:00.00 Frame Number 0 and the Duration time to 0:01:00.00 Frame Number 900 and set the FPS to 15 as shown in Figure 11-3.
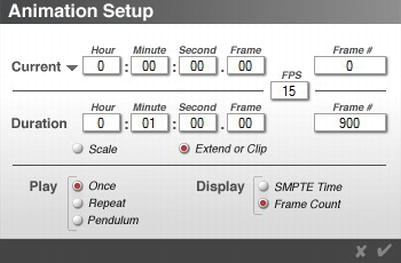
Figure 11-3. Setting animation parameters
Note Notice that Bryce describes Pong animation using the term: Pendulum animation!
- I guess Pendulum animation is a clever improvement on the Pong animation description, but we are going to set our animation to Play Once and control any other playback parameter in Android. Also, set the Display parameter to Frame Count, so you will be able to see which frame is currently rendering in Bryce, once you actually render this Mars animation. First, we must configure our rendering engine.
Configuring the Render Engine
Next let’s set up our Render Options. These control 3D features, determining how long each frame of video takes to render, as shown in Figure 11-4.
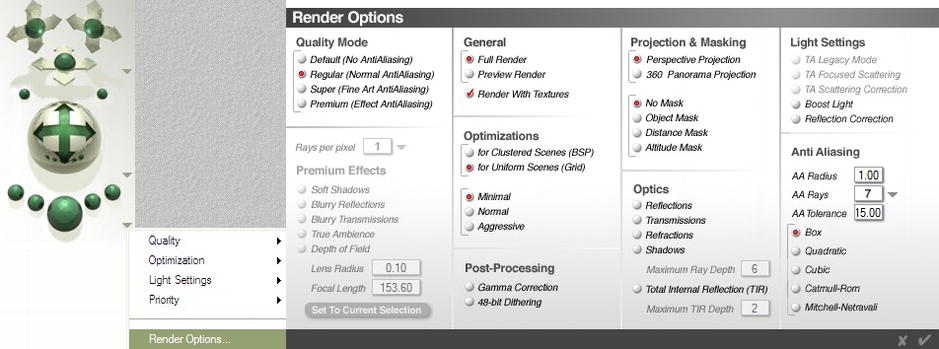
Figure 11-4. Setting our Mars 3D animation rendering options for the Mars planet surface fly-over animation
- Access the Render Options dialog by clicking the down-arrow next to the Render Sphere, opening a menu, and selecting Render Options.
- The main determination of rendering time (or speed of frame rendering) for our Mars animation at each resolution level is set using Quality Mode settings. The more Anti-Aliasing passes we do on each frame, the longer it takes to render. To get top-quality video and a reasonable render time use the Regular setting shown in the upper-left corner of the dialog.
- We do a Full Render on each frame, and Render With Textures so that our Mars planet surface has its reddish-rock look. We also Optimize for Uniform Scenes and Minimal Optimizations to save on per-frame render time.
- We turn all the Post-Processing options off, because we do not need Gamma Correction, and we do not want the extra noise introduced into each frame via 48-bit Dithering, as that option makes our file size larger, as learned previously in this book.
- We are using Perspective Projection (a normal camera lens) and No Masking as we are not using any alpha channels. Finally, we will turn off all the “expensive” calculation intensive options under Optics and Light Settings, as these are not needed for this simple planet surface fly-over, and mostly involve scenes with water, and there’s not too much water on Mars.
- The final section, on the lower-right section of the dialog, controls the Anti-Aliasing settings, as well as the type of algorithms used to perform the Anti-Aliasing function on each frame of the 3D animation video we are creating. The algorithms get more complex (and time consuming) from top to bottom, but provide a better result, at the expense of processing cycles.
- Finally, the AA Radius defines the number of pixels surrounding each pixel that need to be anti-aliased. Leave this set for: 1.0. AA Rays determines the number of rays or the number of ray-tracing calculations if you will that the rendering engine uses to do its anti-aliasing. Higher AA Rays values yield longer rendering times. Finally, leave AA Tolerance set to 15, and the algorithm set to the Box algorithm, as the other algorithms use far more processing time and increase your render times.
Now, we are ready to render our Mars planet surface fly-over 3D animation, so drop-down the File ![]() Render Animation menu sequence and enter the duration of the animation and specify output parameters and file location. Refer to Figure 11-5 for the sequence we are about to go through.
Render Animation menu sequence and enter the duration of the animation and specify output parameters and file location. Refer to Figure 11-5 for the sequence we are about to go through.
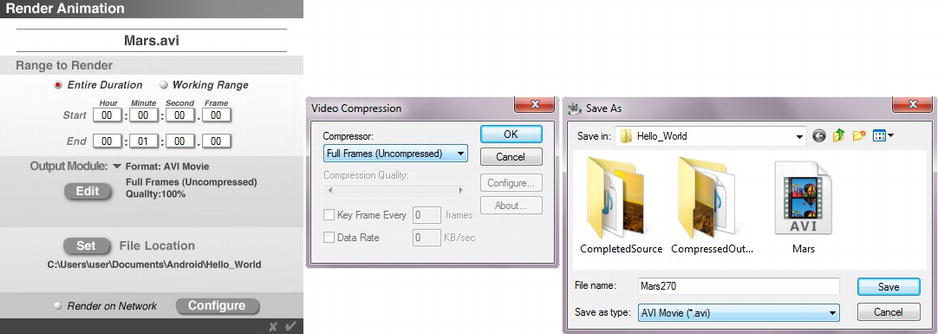
Figure 11-5. Render Animation dialog and sub-dialogs for Edit button (center) and the Set button (right)
- Select the Entire Duration option, which shows the information that we entered in the Animation Setup dialog, shown in Figure 11-3.
- Next click the Edit button, and select the Full Frames (Uncompressed) setting for our video data, and store it in an AVI (Audio Video Interleaved) container. This means we don’t have to use numbered files, which can get a bit tedious with 900 frames, as you might well imagine.
- Next click the Set button, and specify a file location for our Mars.avi file, in your User folder, under Documents. Create a folder called Android if you don’t have one already, and then a Hello_World sub-folder inside that for this particular application’s work-in-process data files.
- If you have a network set up and want to render across all the machines on your network, then you will need to install Bryce 7.1 Pro across all your workstations. Once this is done, you can use the Configure button at the bottom of the dialog to configure your render farm. Then, all you have to do is select the Render on Network radio button to enable this feature.
- Once everything in this dialog is configured, as shown in Figure 11-5, you can click the check mark at the bottom right of the dialog, and the rendering of the 900 frame Mars surface animation video will commence. On a Hexa-Core 64-bit workstation at 1080×1920 resolution it took 8 hours.
Creating the Resolution Files
The next step in the work process is to create the other three resolution source files for the 270 by 480 (MDPI), 480 by 854 (HDPI), and 720 by 1280 (XHDPI) Android device resolution densities. This is done in the Document Setup dialog, which as you already know is accessed by double-clicking the green Bryce Render Sphere, as shown in the left side of Figure 11-4.
- For each of our target DPI resolutions, we need to enter our desired target resolution into a Document Resolution field in this Document Setup (see Figure 11-6).
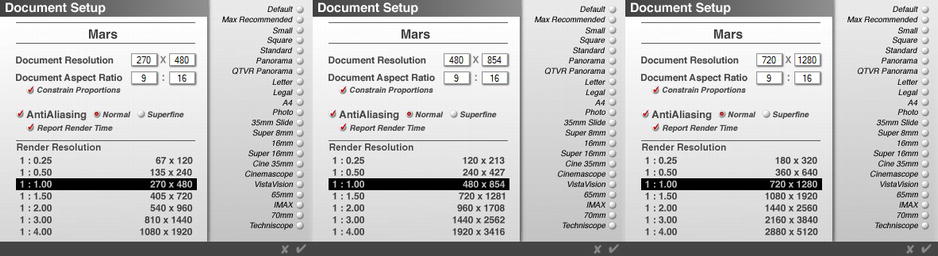
Figure 11-6. Setting Document Resolution, Aspect Ratio, Anti-Aliasing, and Report Render Time options in Bryce
- Make sure that your Document Aspect Ratio is 9:16 widescreen (in this case our app is utilized in portrait mode, or using a vertical orientation) and that the exact Android device screen resolutions shown above are utilized.
- If your resolution is off by one pixel, uncheck your Constrain Proportions option (this keeps your aspect ratio locked), and change the pixel by one, and then re-check that same Constrain Proportions radio button to turn it back on again once you have made the change. As you know, we are trying to hit these mainstream (common) Android device screen resolutions pixel-for-pixel when we play our video full-screen to obtain the best quality by not needing Android to scale the data for us, which can introduce artifacts. The one thing Android is not currently really good at is scaling images and video.
- When you click the check mark at the bottom of the dialog, shown in Figure 11-6 each time you set one of the target resolutions, you will notice that Bryce 7 scales your viewport to that number of pixels in resolution.
Next, repeat the work process shown in Figures 11-3 through 11-5 to render the three smaller resolutions, and name the files Mars270.avi, Mars480.avi, and Mars720.avi, respectively.
Notice that in Figure 11-5, the Mars.avi High Definition HD digital video file (1080 by 1920 resolution) has already been rendered, and that we are setting the filename for our Mars270.avi file in the dialog on the right-side of this screen shot. Also notice that we selected an option to Report Render Time, so that we can see what the rendering engine is doing, from a mathematical standpoint. This is shown in Figure 11-7 and I included it so we can see why our 3D rendering process is taking so much time on each of the 900 frames of digital video that we are generating.
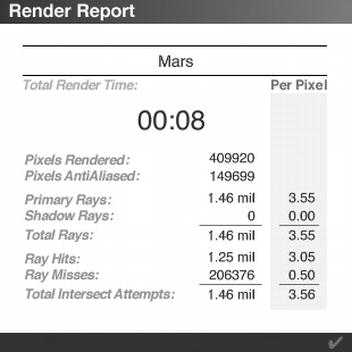
Figure 11-7. Render Report information
I generated this screenshot during the 480 by 854 rendering, and since we know that 480 times 854 is 409,920, we already know how this first number was calculated. The second number is the number of pixels that were anti-aliased, and we already know that means that there are 149,699 pixels in the image where there are drastic color changes between two pixels (which simply equates to edges between different objects or colors in the image).
The rendering engine cast out 1.46 million rays to be able to define the color values for each pixel in this image, or an average of 3.55 rays per pixel. If you want the exact number, 3.55 times 409,920 yields 1,455,216.
Because we turned shadows off there are no shadow rays cast by the rendering engine; as you can imagine, that saved us some rendering time! Of the 1.46 million rays cast, 1.25 million of them hit something, and 206,376 did not hit anything, and thus were not used to create pixel data values with.
Digital Video Compression: Key Concepts and Techniques
Now that we have one of our source planet’s (Mars) fly-over animation data rendered in 3D we can use it to create digital video files that we can use in the next chapter, where we’ll be learning how to implement this digital video content, as well as how to control it in our Android Hello World app via the Android VideoView and MediaPlayer classes.
Before we can do this, we must optimize these files that we have rendered in the previous section, as they range from 400MB to 4GB in file size, and our .APK file can only be 50MB, so we must learn about digital video codec settings and digital video compression concepts, settings and techniques.
The best software to use for optimizing digital video is called Sorenson Squeeze. If you have ever developed for the Adobe Flash platform, you may be familiar with this software package, now in its ninth revision.
The first thing we want to do is to launch Sorenson Squeeze Pro, version 8.5.1. When you do, you will see a start-up screen as shown in Figure 11-8.
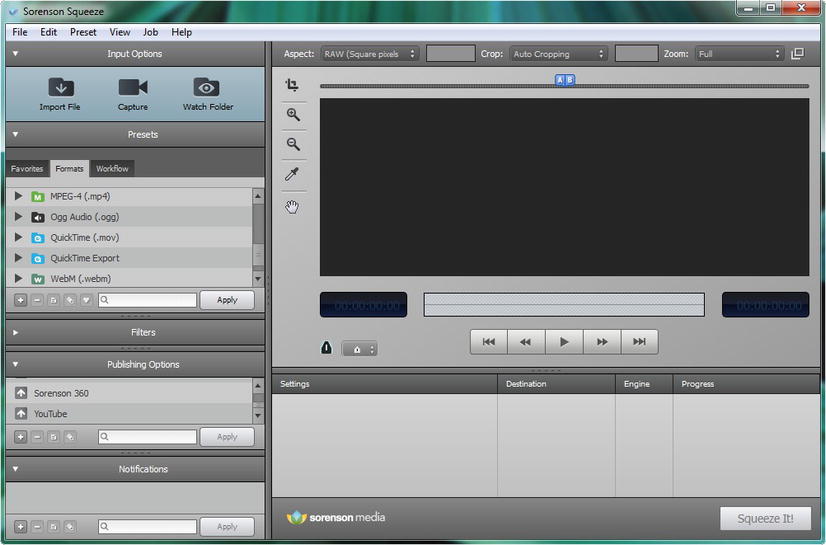
Figure 11-8. Launching Sorenson Squeeze Pro to compress and optimize our MPEG4 and WebM video files
There are seven primary areas of this video compression software tool, as you can see above in Figure 11-8, including Input Options, Codec Presets, Effects Filters, Publishing Platforms, Notifications, a Sequencer Window (bottom right) and a Video Editing Window (top right).
The first thing that we need to do is to import our digital video AVI full frames uncompressed format file.
- This is done by clicking the icon on the upper right labeled Import File. This opens a file navigation dialog window, shown in Figure 11-9, which allows us to navigate through the hard disk drive, and find the 3D Mars.avi source digital video files that we created earlier in Bryce 7.1 Pro.
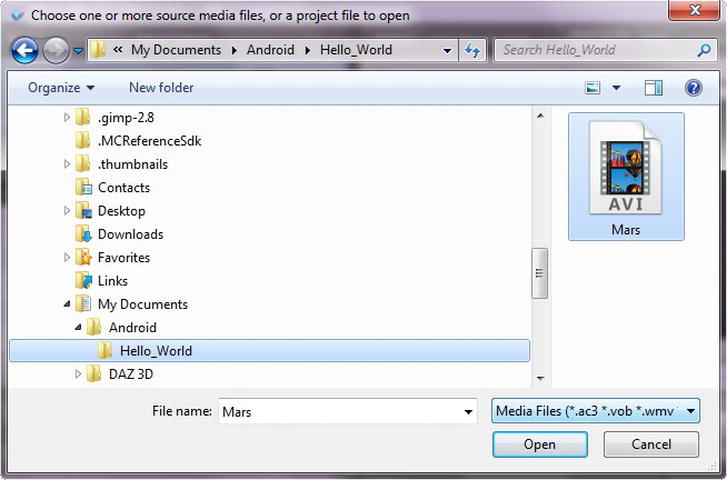
Figure 11-9. Using the Import File dialog to locate our Mars.avi source file
- Find your My Documents folder (it should be in your Users folder) and the Android folder underneath it, which contains your Android related working assets. Find the sub-folder that you created earlier for your Hello_World application new media resources, and select the Mars.avi file and click the Open button. Once you do this you will see the first frame of the Mars video in the Video Editing portion of Sorenson Squeeze (see Figure 11-11).
- Locate the + icon on the left at the bottom of the Presets Pane, and click it to open a new presets dialog, so that we can develop a codec that is Android specific, as shown in Figure 11-10. Type Android 1080x1920 15 FPS in the Name: and Desc: fields, to label our custom settings, which will be saved for future use with other digital video. The Format Constraints are set to None, and the Stream Type is set to Non-Streaming as we are optimizing to a .MP4 file. The best Codec to use for H.264 is MainConcept.
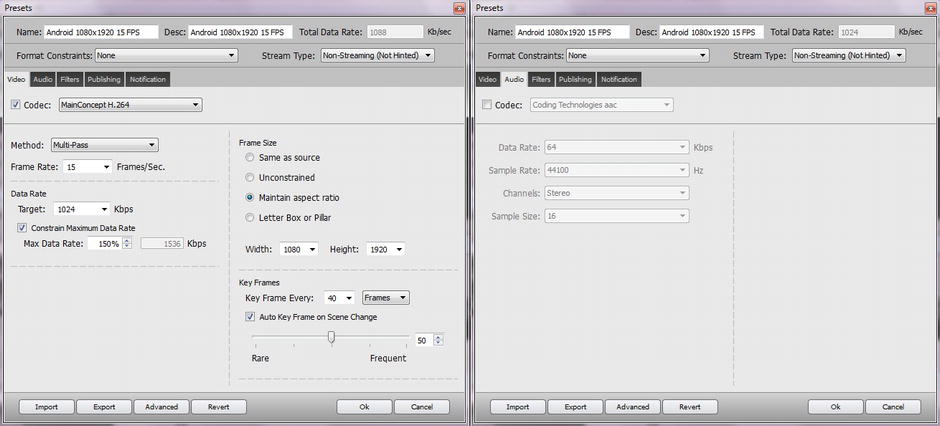
Figure 11-10. Creating a 1080×1920 Android video compression settings preset for 15 FPS and 1 Mbps data rate
- The reason we are using the MainConcept H.264 codec is because it is the most advanced, and features a Multi-Pass Method, which makes several passes over the video data to achieve the best quality to file size ratio possible. This takes more time, but I assume here that you have at least a quad-core workstation (if not an octa-core), and that quality is your ultimate concern. Once you select Multi-Pass set the Frame Rate: to 15 FPS and set a Target Data Rate of 1024 Kbps (which is also 1 Mbps).
- Select Constrain Maximum Data Rate and set the Max Data Rate to 150% of 1024 Kbps, which is 1536 Kbps. This allows some wiggle room for our data to burst, if it needs a little more headroom on any given frame.
- Set the Frame Size to 1080 by 1920 to prevent scaling and Maintain Aspect Ratio and let’s make sure the codec looks at KeyFrames every 40 frames. Finally, select Auto KeyFrame on Scene Change, and select an average keyframe frequency of 50 to start with, for this compression setting preset.
- Once everything is set click the OK button shown in Figure 11-10 and you will be returned to the main Squeeze Pro program screen where you can now click the Apply button in the top left panel to apply these settings (see Figure 11-11).
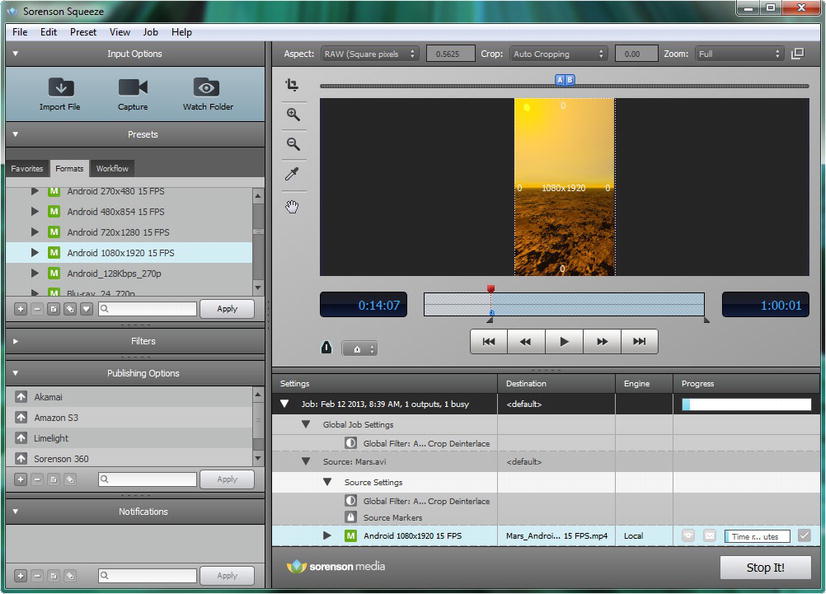
Figure 11-11. Applying the Android 1080×1920 15 FPS video compression preset to the imported Mars.avi file
- Finally, we can click the Squeeze It! button, on the lower-right of the software screen, and start our video compression process.
While your video data is compressing, we will talk a little bit about what keyframes are, and what exactly they do in the overall video compression process.
A keyframe is a frame of your animation data that the codec looks at to store an entire image of your video at that exact frame in time, which is why, of course, it is called a “keyframe!”
The way that a codec saves space (reduces data footprint) for your video is to not have to save every single frame in the digital video, in this case, it’s a 3D animation of a fly-over of the surface of Mars.
This is done via some of the most complex mathematics in new media algorithms today, and beyond the scope of a Learn Android book to be sure. It is essentially going into the fourth dimension (time) and looking at frames after each keyframe that it encodes to see what has changed on the next frame, relative to the keyframe that it just sampled.
The codec then encodes only the changed data from frame to frame, and this can save a significant amount of encoding data in many video scenarios. A great example of this would be talking head videos, for example a teacher or a politician. If the person remains calm, still, and fixed in place, then only their mouth (speech) movements would change from frame to frame.
In this case, because that area of pixels that contains the mouth represents only a very small percentage of the entire video frame’s pixels, the codec could end up encoding only those pixels from frame to frame instead of the entire image. Much of the video frame’s pixels are frozen over time in this type of scenario, and that is something that a codec can turn into reduced data footprint, which is the name of the game where codecs are concerned.
Thus, a very still (zero head movements) talking person encodes very well, as long as the background behind them is not too noisy or does not have a lot of fast-paced movement that the codec would need to address. So a talking head in a busy newsroom would thus not encode as well as a talking head on a special set with a solid color, evenly lit background.
The things that codecs cannot transcode (code across frames) very well are noise, just like with static image codecs, and full-frame movement. Full frame movement is where every pixel in a video frame changes its location on each frame of video. Examples of this would include a very rapid camera panning, such as is used in the filming of car racing; camera zooming in or out, such as is used in the filming of nature documentaries; and camera fly-throughs, such as are used in action films and in our Mars fly-overs.
By now your digital video should be finished encoding and you will see a playable video icon in the bottom of the Squeeze Pro working area on the bottom right of the software screen, as shown in Figure 11-12.
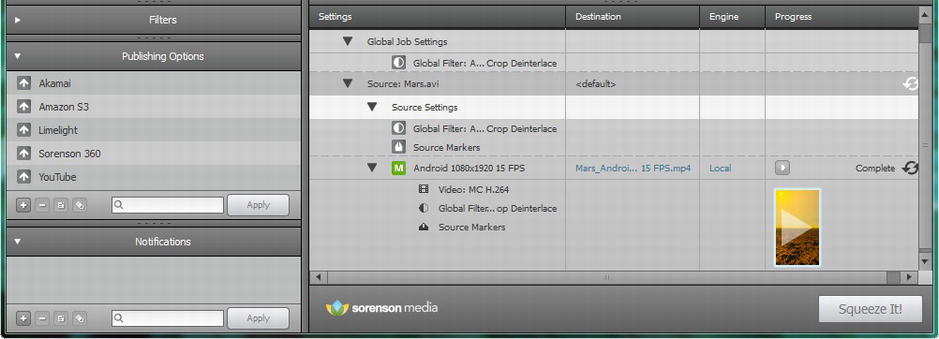
Figure 11-12. Finished video compression (bottom area of screen shot only) showing MP4 video ready to play
Compressing the Video
Next, we need to compress our MDPI resolution Android screen’s video asset:
- Use File Save to save your Squeeze Pro environment as it sits now. Next use File New to set out a new blank canvas, so we can use the Import File button to bring in our Mars270.avi raw video data file to compress into H.264 MPEG-4 data, as shown in Figure 11-13.
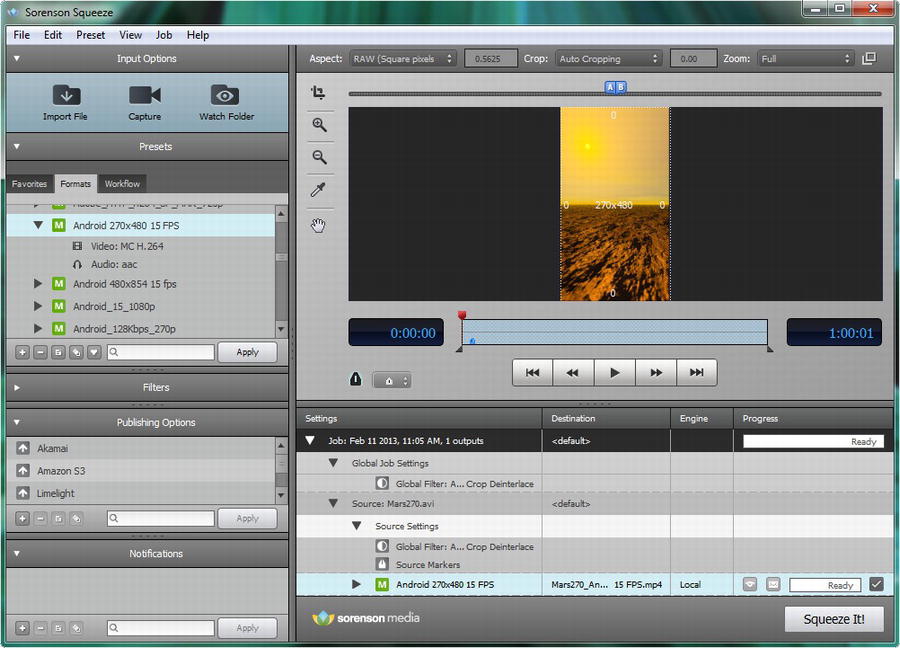
Figure 11-13. Compressing 270×480 digital video source at 15FPS in Squeeze using 192 Kbps Multi-Pass H.264
- Follow the same work process that we did for the 1080 version and click the + button in the Presets Panel and set up a preset for our 270 by 480 resolution video that uses a Target Data Rate of 192 Kbps and a Max Data Rate of 256 Kbps, or a 133% burst data rate ceiling. Keep KeyFrames every 30 frames (30 total per 900 frames), and be sure to lock in the resolution by specifying it, and then using Maintain Aspect Ratio, or Same as Source, as shown in Figure 11-14.
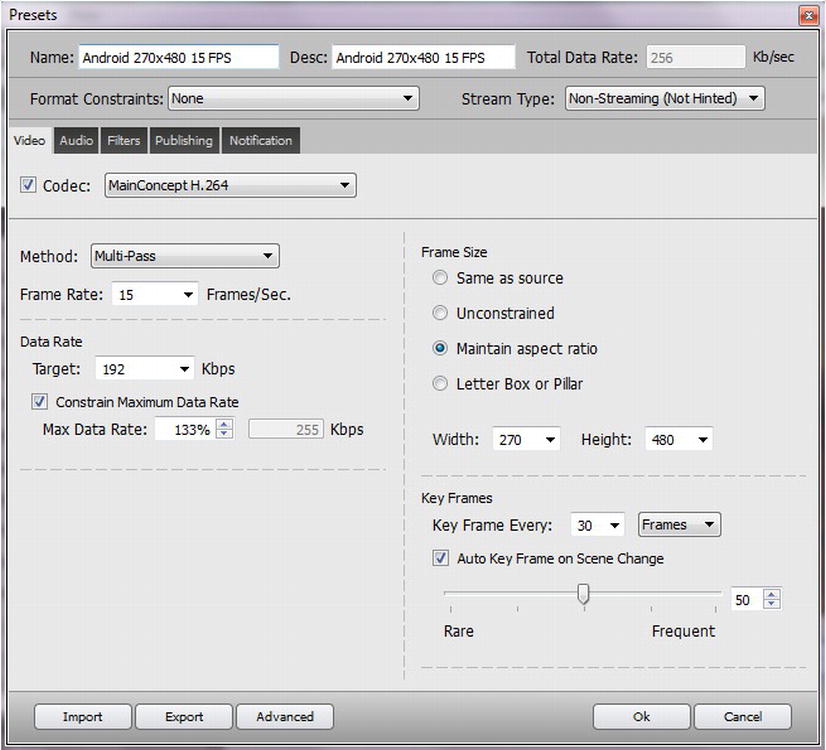
Figure 11-14. Setting the codec settings for our 270×480 video file output
- Be sure to label your new MDPI codec settings using the Name and Desc fields at the top; I used the label Android 270×480 15 FPS as it was short and descriptive and would fit well in the Presets Pane. Once everything is configured click the OK button and then select the new codec definition in the Presets Pane and click the Apply button to apply it to your Mars project settings window. Now, you are ready to click the Squeeze It! button, and compress your full frames uncompressed .AVI into an MP4 file.
The MPEG-4 file that was created was only 1.3 megabytes, so we obtained some amazing compression with these settings, given that our source (raw) data in the .AVI file was close to 342 megabytes. As we learned earlier, this gives us a 263:1 compression, and it takes the amount of data that an Android device has to deal with processing from a couple hundred megabytes in one minute, to not much more than one megabyte processed over the span of one minute, which an Android device processor should be able to handle.
It is important to note that optimizing video is never a one-time process, and if you find the video plays back smoothly across all devices, you can add in quality, by specifying a higher data rate. For example 256 Kbps with a 384 Kbps ceiling would be the next setting you would try, and more keyframes, say, use keyframes every 20 frames, instead of 30 (which would equate to 45 keyframes sampled and stored, instead of 30 over the total 900 frames). The file size goes up, as will the visual quality of the video data, and there will be more video data for the processor to decode and display.
Next, we need to compress our HDPI resolution Android screens video asset:
- Use File Save to save your Squeeze Pro environment as it sits now. Next use File New to set out a new blank canvas, so we can use the Import File button to bring in our Mars480.avi raw video data file to compress into H.264 MPEG-4 data, as shown in Figure 11-15.
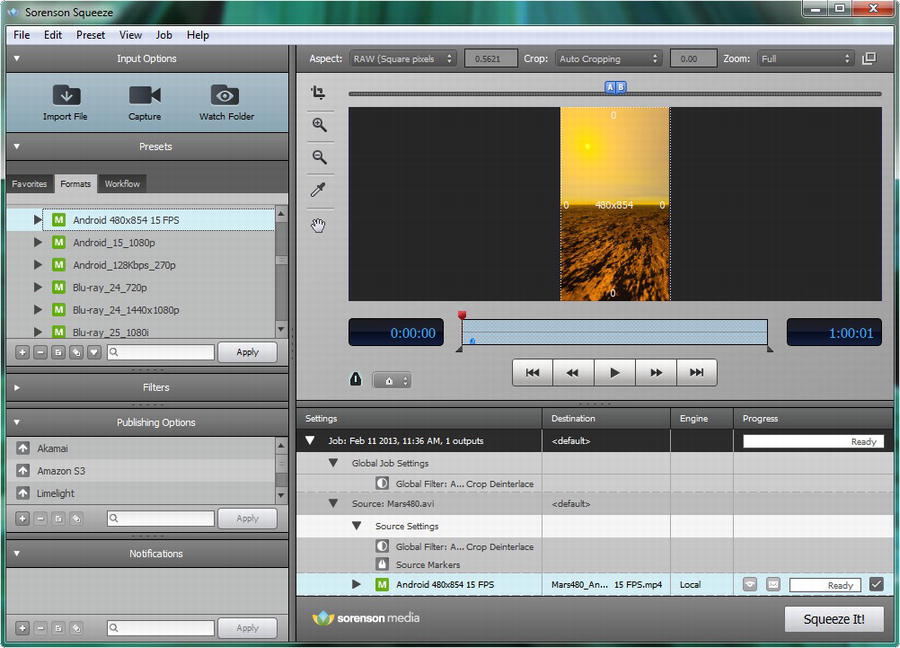
Figure 11-15. Compressing 480×854 digital video source at 15FPS in Squeeze using 384 Kbps Multi-Pass H.264
- Follow the same work process that we did for the 1080 version, and click the + button in the Presets Panel, and set up a preset for our 480 by 854 resolution video that uses the Target Data Rate of 384 Kbps and a Max Data Rate of 512 Kbps, or a 133% burst data rate ceiling. Keep KeyFrames every 30 frames (a total of 30 per 900 frames), and be sure you lock in the resolution, by either specifying it and using Maintain Aspect Ratio, or by using the Same as Source option instead, as shown in Figure 11-16.
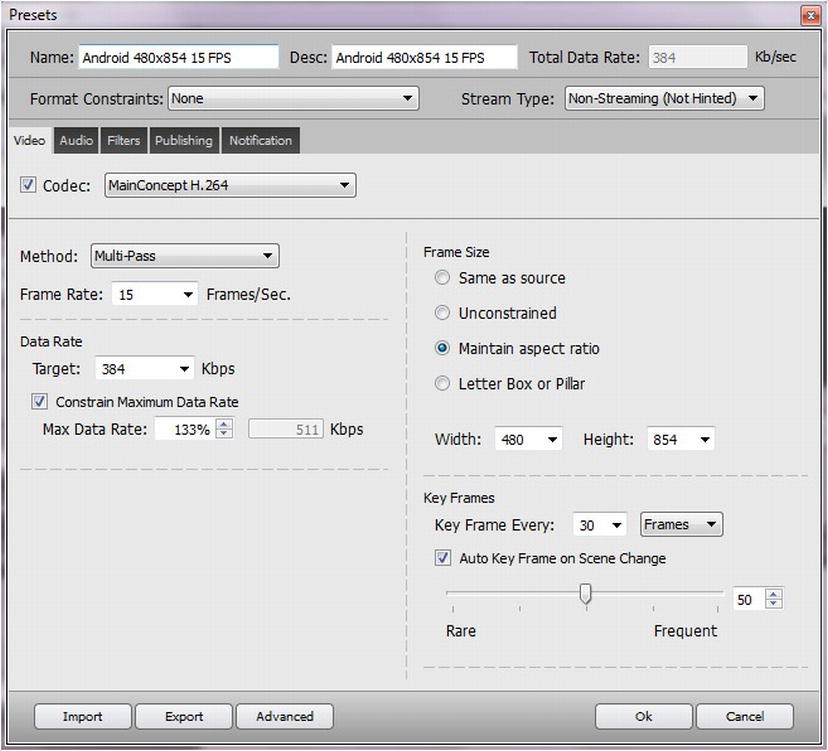
Figure 11-16. Setting the codec settings for our 480×854 video file output
- Finally, we need to compress our XHDPI target resolution Android screen’s video asset, so again, use File Save to save your previous Squeeze Pro environment. Next use File New to set out a new blank canvas, so we can use the Import File button to bring in our Mars720.avi raw video data file to compress into an H.264 MPEG-4 MP4 data file, as shown in Figure 11-17.
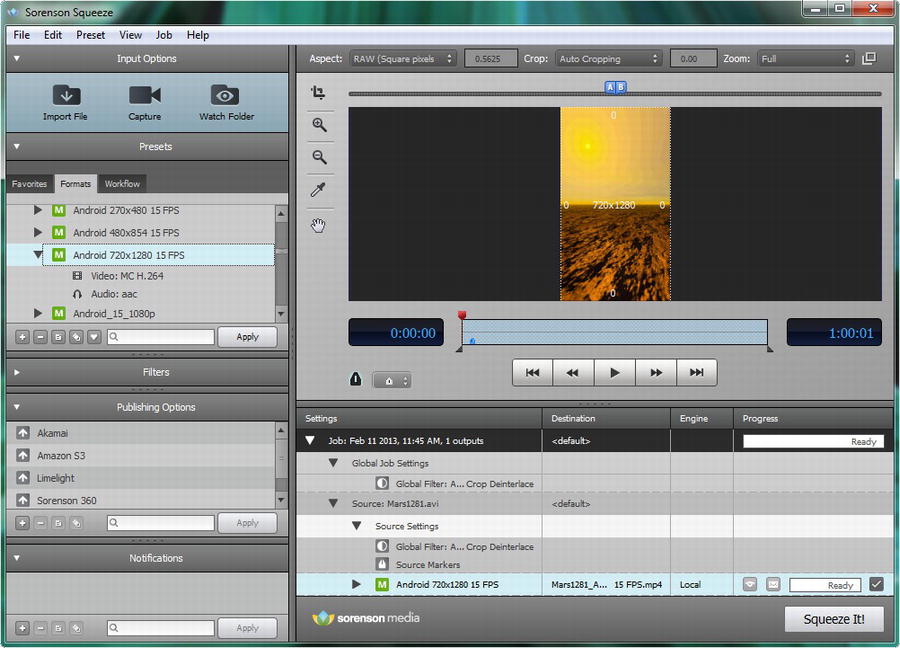
Figure 11-17. Compressing 720×1280 digital video source at 15 FPS in Squeeze via 768 Kbps Multi-Pass H.264
Follow the same work process that we did for the 1080 version and click the + button in the Presets Panel and set up a preset for your 720 by 1280 resolution video, which uses the Target Data Rate of 192 Kbps and Max Data Rate of 256 Kbps, or a 133% burst data rate ceiling. Keep KeyFrames every 30 frames (30 total per 900 frames), and be sure to lock in the resolution by either specifying it in the dialog UI, and using Maintain Aspect Ratio, or by using the Same as Source option instead, as shown in Figure 11-18.
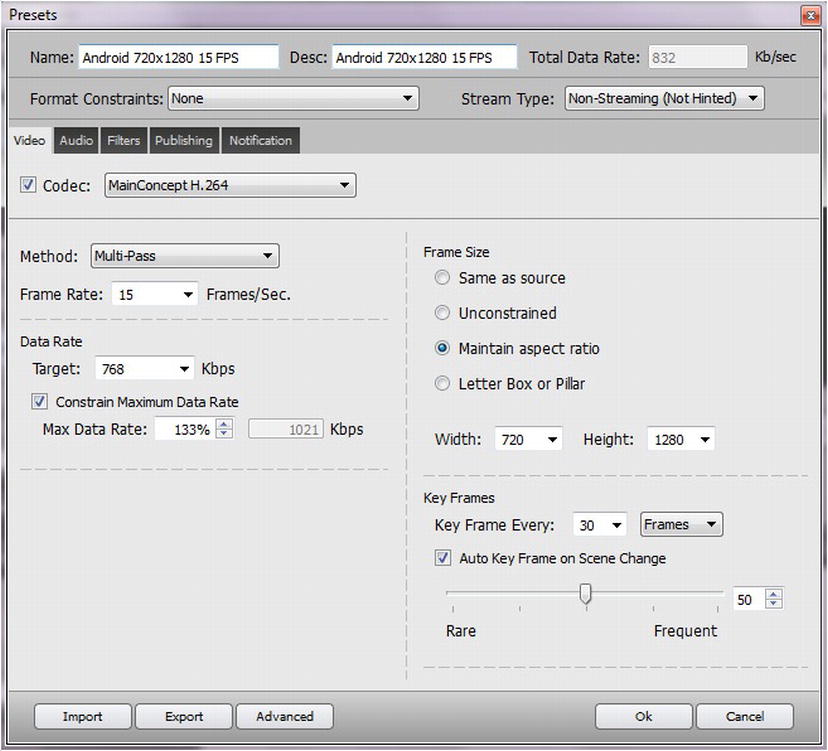
Figure 11-18. Setting the codec settings for our 720×1280 video file output
Next we need to put the MPEG-4 H.264 video assets we have created into the proper Hello_World project resource folder, or Hello_World/res/raw for raw video data files that have already been optimized, and do not need to be further optimized by Android. This is a concept we covered earlier in the book, and that we will now go into in detail in the next section of the book. Once this is done, our video data will be ready to utilize.
Using Digital Video Assets in Android: The Resource’s Raw Folder
Now that we have our four resolution density (DPI) target resolution video files created, we can copy them into their proper resource sub-folder, and then we can access them via XML mark-up and Java code in Chapter 12.
- Open your OS file manager utility, for Windows 7 or Windows 8 it’s Windows Explorer, and go to your C:/Users/YourName/workspace/Hello_World/res resource folder and right-click it to get a context-sensitive menu, shown in Figure 11-19.

Figure 11-19. Creating a New
Folder under Hello_World resources (res) folder named /raw to hold video files - At the bottom of this menu, select the New Folder sub-menu sequence to create a new folder under the res (resource) folder and name it raw. Once created, the folder shows up under your menu sub-folder (see Figure 11-20).
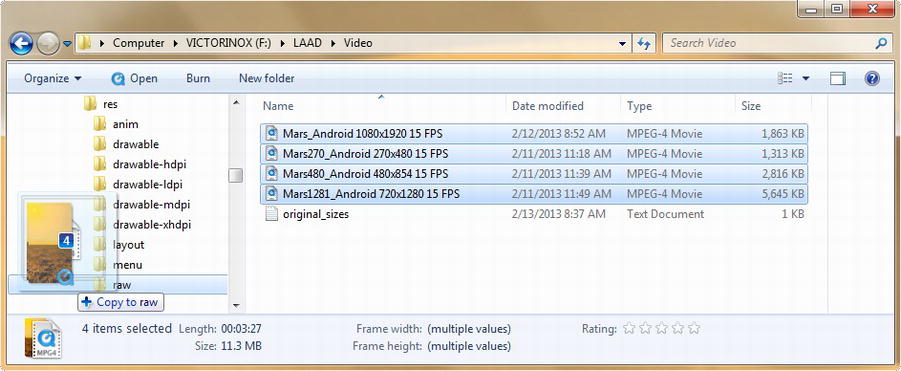
Figure 11-20. Drag and drop the four DPI resolution versions of our Mars planet surface fly-over into /raw
Note As I mentioned earlier in this book, this raw resource sub-folder is used in Android to contain new media assets that have already been optimized by the developer, and which do not require any further optimization or other intervention by the Android OS. Essentially new media assets in the /raw folder are assets that we are telling Android to store in the .APK file for our application, and access and use them as-is within the application code without further alteration of any kind.
- Once the /raw folder is created and showing in the left pane of the file management utility, select the first of the four files and then hold down the Shift key and select the last file in the group. This serve to group-select the entire group of files, and you can then drag and drop all four files onto, and into, the /res/raw folder, as shown in Figure 11-17.
- Next, we need to go into the /res/raw folder, and use the file manager to rename all the files from the detailed names assigned by Squeeze Pro to use simpler filenames, as we’ve been doing previously in this book. This process is shown in Figure 11-21 showing our new lower-case names and the raw folder.

Figure 11-21. Renaming the four resolution versions for Mars video to: mars270, mars480, mars720, mars1080
Note As we have done in the past, we will follow Android’s lowercase letters and numbers asset naming convention, use planet name (in this case, mars) and the horizontal resolution of the digital video in pixels as our video file naming convention.
- Now let’s launch our Eclipse ADT IDE, and make sure that we did everything correctly and that our digital video assets are in place and ready for use in our next chapter covering how to code Java and XML mark-up to implement digital video in our Android application. As you can see in Figure 11-22, we now have our /raw folder in our Android Hello_World project resource folder and it has four MPEG-4 files inside it that we can use to play video in our Travel to Planet Activity screen. If you already had Eclipse running, be sure and use the F5 (or Refresh) work process.
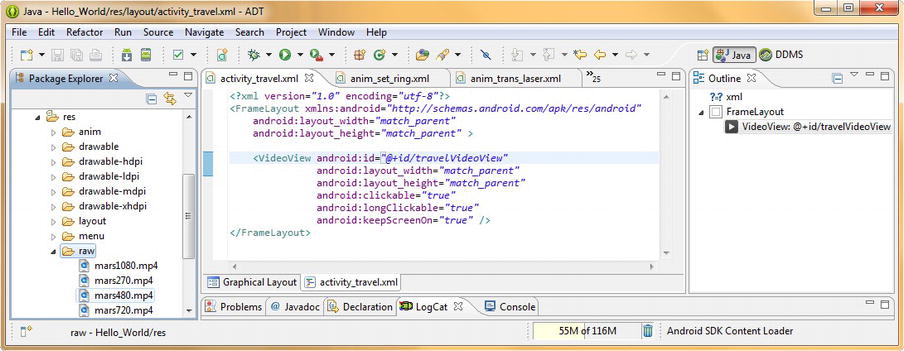
Figure 11-22. View of the four resolution versions of the digital video MPEG-4 files in the project’s /res/raw/ folder
Next, we’ll talk a little bit about the Android VideoView class, which we will utilize in the Chapter 12 to hold and play our digital video assets and then we’ll have the foundational knowledge that we will need to begin coding our digital video assets into our Hello_World Android application.
Playing Digital Video in the UI Design: Android’s VideoView Class
Android has designed a user interface widget that makes the digital video playback inside our application a fairly straightforward proposition.
It is called the VideoView class, and it uses the <VideoView> tag in XML to implement its UI properties via various parameters, as we have already seen in earlier chapters in this book when we implemented our TravelPlanet Activity class in Java and XML.
The Android VideoView class is a subclass of the SurfaceView class, which is itself a subclass of the View class, which as we know, is a subclass of the Java Object class.
The VideoView class implements the MediaPlayerControl interface so that we have access to methods relating to controlling our digital video playback.
This interface is provided by the android.widget.MediaController package, so its full path is android.widget.MediaController.MediaPlayerControl and thus we’ll be able to play or pause our video in our Java code if we want to.
In fact, implementing the VideoView and MediaPlayer functionality in XML and Java is what our next chapter on Digital Video in Android is all about, now that we have the foundational knowledge to know what exactly we are talking about regarding digital video concepts, codecs, features, and playback.
Summary
In this chapter, we built up a solid foundation for understanding digital video new media assets, so that we can implement them optimally within an Android application.
We learned how pixels, the video frames they live in, and the codecs that compress and decompress them into usable files all work together to make a huge amount of moving digital image data more manageable and usable.
Then we learned about some important concepts and standards in the digital video world, such as Standard Resolution SD video and its native resolution and about the newer HD video and its two common resolution specifications. We learned the digital video in Android can be captive, or held in a resource folder and included inside our application .APK file or that it can be streaming video and served up remotely, via a video server.
We talked about the important concept of bit-rate and bits per second and how this measurement was used in the data footprint optimization process for digital video. We also learned that the bit-rate not only determined what types of bandwidth speed environments can accommodate digital video but also what types of Android device data processing (CPU) capabilities can decode that video stream once it actually gets across that bandwidth.
We discovered that even with captive video files inside an Android .APK container, that the bit-rate and quality levels were the key components to obtaining crystal clear video that played smoothly without dropping frames to try and keep up with the frame rate required by the digital video file.
Next we took a look at digital video codecs and formats that are supported in Android, such as the MPEG4 H.263 and H.264 codecs, as well as VP8, and how these codecs differ in their level of support both inside Android OS, as well as outside of Android OS, and as part of the HTML5 specification.
We also looked at the optimal digital video resolutions that we will need to support across all Android consumer electronics devices, and discovered that the major broadcast resolutions for SD and HD digital video, in both the United States and Europe, match up exceptionally well with most current Android device screen resolutions.
We learned how to use Bryce 7 Pro and created our basic Mars planet surface animations. We practiced implementing digital video file asset generation, for some of the key Android device resolutions using 3D terrain generation software. We learned some basic concepts about 3D rendering as well.
Next we covered the key concepts in digital video optimization and learned about the types of things besides resolution that affect video compression, such as panning and zooming, as well as things that introduce noise into the frame image data, such as previous compression artifacts.
We learned about keyframes and bit-rates by actually using these settings in the MainConcept H.264 codec inside Sorenson Squeeze Pro, to optimize our digital video from a native, uncompressed, raw data state into a highly compressed digital video asset that we can use in our Hello_World app.
We practiced this compression process by optimizing video assets for four target resolution density levels, ranging from a medium resolution (MDPI) 480 pixel screen, to a high resolution (HDPI) 800 pixel screen to an extra high resolution (XHDPI) Pseudo HD 1280 pixel screen, all the way up to an ultra-high resolution (XXHDPI) True HD 1920 pixel screen density.
We then copied these four optimized digital video assets into the resource folder, into a /raw sub-folder that we created to hold these digital video assets inside our Hello_World project folder. We renamed these files, for easier access within our code, and then entered Eclipse ADT, to make sure everything was in place and ready for us to start coding, implementing and testing these digital video assets inside our application.
To learn how digital video is implemented in our Hello World Android app, we learned about the user interface widget VideoView, which we initially implemented earlier in the book in our TravelPlanet Activity screen user interface.
We learned about the Android VideoView class hierarchy, and corresponding <VideoView> tag elements in XML. We learned that VideoView was actually a SurfaceView container that was connected to the MediaPlayer class and next we will learn how to implement it within our TravelPlanet.java Activity class.
In the next chapter we will get more advanced with digital video new media elements, by getting deeper into the XML and Java coding needed to implement digital video using the Android VideoView and MediaPlayer classes and their methods. We will also build Java code that controls our VideoView XML UI definition and ultimately the user experience.