
Working with Image Capture
Image Capture is a great tool that may surprise you with its versatility. You can use it to do any of the following:
![]() Transfer images from your digital camera.
Transfer images from your digital camera.
![]() Delete images from your digital camera.
Delete images from your digital camera.
![]() Scan and import images with your scanner.
Scan and import images with your scanner.
![]() Find shared devices on your network.
Find shared devices on your network.
To open Image Capture, press ![]() +Shift+A from within the Finder. Find Image Capture in the resulting Finder window and double-click its icon. If you don’t have a digital camera or scanner attached to your Mac when you start Image Capture, you are notified in the main window that no device is connected. If this is the case, read on to discover how to connect your device.
+Shift+A from within the Finder. Find Image Capture in the resulting Finder window and double-click its icon. If you don’t have a digital camera or scanner attached to your Mac when you start Image Capture, you are notified in the main window that no device is connected. If this is the case, read on to discover how to connect your device.

You may wonder why iPhoto, the amazing Apple photo-organizing and editing program, isn’t covered in this book. iPhoto is actually part of the iLife application suite, which Apple sells separately from Mountain Lion. Because I concentrate on Mountain Lion in this book, Image Capture gets all the glory.
Connecting your device
If you haven’t already done so, attach your device to the Mac with whatever connection its manufacturer recommends (most use a USB). If Image Capture is already open, when you attach a camera or scanner it should automatically display under Devices on the left side of the Image Capture window.
If you have multiple devices attached to your Mac, you can choose the device you want to use by selecting it in the Devices menu.
In addition to pictures, Image Capture is also versatile enough to import movies and MP3 files, assuming your camera has the ability to record such files.
Using a digital camera
A digital camera is your window to the world and it allows you to keep your memories for a lifetime. However, the memory cards that cameras use to store your precious keepsakes have a finite amount of space. Therefore, they need to be emptied of their contents every now and again. This is where Image Capture comes in handy.
Transferring images from your camera
As stated earlier in this chapter, when you connect your camera to your Mac with Image Capture already up and running, a window opens similar to the one shown in Figure 12.18. This gives you access to — and a measure of control over — your camera.
Three of the options are:
![]() Connecting this camera opens. This pop-up menu lets you choose an application to open automatically when the camera is connected to your Mac.
Connecting this camera opens. This pop-up menu lets you choose an application to open automatically when the camera is connected to your Mac.
![]() List or Icons buttons. Click one of these viewing options at the bottom left of the window to change the view.
List or Icons buttons. Click one of these viewing options at the bottom left of the window to change the view.
![]() Rotate buttons. Click these to rotate images before downloading them.
Rotate buttons. Click these to rotate images before downloading them.

12.18 Control your camera with the options in the Image Capture window.
Importing files
Click Import All to do just that: Import all of the pictures and files from your camera to your Mac. However, if you only want to import a few files, the Import button is your best option.
To import only certain files from your camera, click those you want to import from within the Image Capture window. To choose multiple files, as shown in Figure 12.19, hold down the ![]() key while making your selections.
key while making your selections.
Next, click Import to proceed with the transfer. The files you downloaded can then be found in the Pictures folder of your home directory. You can change the location to which your pictures are imported by clicking the Import To pop-up menu at the bottom of the window.
Deleting images from your camera
Sometimes you may only want to delete some of the images on your digital camera as opposed to all, but deleting individual images can be a chore. Image Capture comes in handy in this situation. To delete individual files from your camera, follow these steps:
1. Select the files you want to remove from your camera. Hold down the ![]() key while clicking to choose multiple files.
key while clicking to choose multiple files.
2. Click the Delete button at the bottom of the window.
3. Click OK to confirm the deletion or click Cancel to stop it.
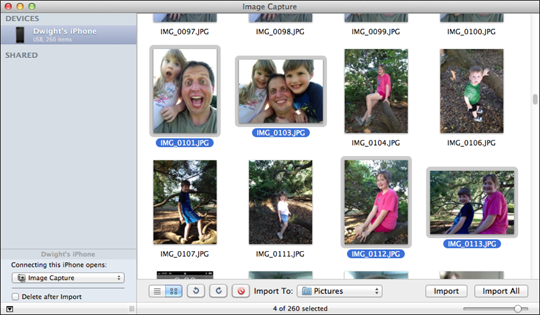
12.19 You can select only the pictures you want to download rather than downloading them all at once.
Scanning images
Your Mac happily uses Image Capture to import images and documents from a scanner. Simply connect your scanner to get started.
You need to install the scanner software before connecting the scanner to your Mac. The software probably came on a CD with the scanner, but it’s always a good idea to visit the manufacturer’s website for any updated drivers it may have released.
Open the Applications folder on your hard drive, double-click the Image Capture icon, and then choose the scanner from the list. Place the item you want to scan onto the glass of the scanner if it is a flatbed scanner, or into the feeder if it is a document-feed scanner. This is where the fun begins!
Using the Image Capture scanning options
The default scan window that opens offers a few basic options for scanning your documents into your Mac, as shown in Figure 12.20.
To scan an item using these options, follow these steps:
1. Highlight the scanner under Devices on the left side of the Image Capture window.
2. Choose the type of scanner you are using from the Mode pop-up menu.
3. Select the paper size of the original from the Scan Size pop-up menu.
4. Choose a location in which to store the scanned file or an application with which to open it using the Scan To pop-up menu.
5. Click Scan. After the scan is completed, you can find the document in the location you chose in Step 4.

12.20 The Image Capture default scan window.
Using the scanner software options
Your scanner software may offer many options that are not available in the Image Capture standard scan window. To access those features, follow these steps:
1. Highlight the scanner under Devices on the left side of the Image Capture window and click Show Details in the lower-right corner to see the scanner options, as shown in Figure 12.21. Your options may be different, depending on the driver it uses.

12.21 You have more control over the quality of your scans when using the software provided by the scanner manufacturer.
2. Select the type of scanner you are using from the Scan Mode drop-down menu.
3. Choose what type of image you are scanning from the Kind drop-down menu.
4. Select the Resolution you want to use from its drop-down menu. Resolution plays a major role in the quality of the image. Again, the higher the better, but this also increases your file size.
5. Determine the size and orientation of your image.
6. Choose a location on your Mac in which to save the scanned images or an application you want to use to open them by using the Scan To drop-down menu.
7. Name the file and select the format in which you want to save the scanned image.
8. If your scanner offers other options, such as Image Correction, Unsharp Mask, and so on, make any corrections you feel are necessary using these options.
9. If you are using a document-feed scanner, simply click Scan to begin scanning the pages and skip the rest of the steps. If using a flatbed or transparency scanner, continue to Step 10.
10. Click Overview scan to see a preview of the item on the glass.
11. Click and drag your mouse over the portion of the preview that you want to scan and then click Scan.