
Working with Software Utilities
Software utilities help you with matters related to software functions, such as monitoring color profiles and taking screenshots. Even though some of these utilities may touch hardware from time to time, typically their work is software-centric.

All the utilities in this chapter have Help systems that can teach you much more about those that interest you the most. To access the Help system for any application, simply click Help in the menu bar.
Using AppleScript Editor
AppleScript Editor is a tool that helps you write and edit AppleScripts. “Great,” I can hear you say, “but what are AppleScripts?” AppleScript is a scripting language built in to OS X. The scripts you can produce with it are called AppleScripts. You have most likely already used an AppleScript without being aware of it. This is because they are generally used by applications (and other utilities) to perform tasks and commands behind the scenes. AppleScript Editor is typically used by application developers, but some savvy Mountain Lion users may find it useful to write their own AppleScripts to automate repetitive tasks. For much more about AppleScript and AppleScript Editor, go to the AppleScript Help by clicking the Help menu and making a selection, or visit some (or all) of the following websites:
![]() www.macosxautomation.com/applescript/
www.macosxautomation.com/applescript/
![]() http://mac.appstorm.net/how-to/applescript/the-ultimate-beginners-guide-to-applescript/
http://mac.appstorm.net/how-to/applescript/the-ultimate-beginners-guide-to-applescript/
Managing color profiles with ColorSync Utility
This utility manages the Mac color profiles for devices such as monitors and printers. If you have to ask what a color profile is, you probably don’t want to mess with this one. However, if you do know what a color profile is, you can open ColorSync by choosing Applications→Utilities and double-clicking its icon.
Repairing color profiles
Sometimes your color profiles may catch a bug or need other repairs, and ColorSync Utility is up to the role of color profile doctor. To find problem profiles and repair them, follow these steps:
1. Click the Profile First Aid tab at the top of the ColorSync Utility window.
2. Click Verify in the lower-right corner and ColorSync Utility finds any profiles with health issues, as shown in Figure 6.1.
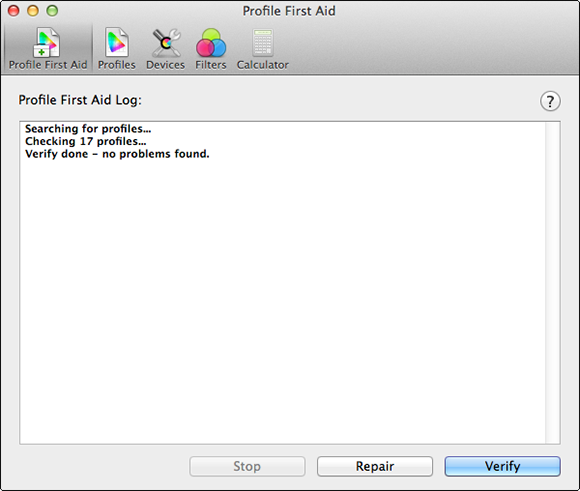
6.1 ColorSync Utility finds profiles with problems and resolves their issues.
3. Click Repair to have ColorSync Utility provide proper care to the sickly profiles.
Viewing installed color profiles
It’s simple to view all the color profiles installed on your Mac. To do so, follow these steps:
1. Click the Profiles tab at the top of the ColorSync Utility window.
2. Decide which profile category you need: System, Computer, User, or Other. Click the arrow to the left of the category to see its profiles.
• Profiles in the System category are those installed and used by Mountain Lion itself, and they are located in the System→Library→ColorSync→Profiles directory.
• Profiles in the Computer category are those installed by you or another administrator for use by all account holders on the Mac, and they are located in the Library→ColorSync→Profiles directory.
• User profiles are those installed by you or another administrator for use by an individual account holder on the Mac, and they are located in the account’s Home folder→Library→ColorSync→Profiles directory.
• Profiles in the Other category are those installed by third parties in directories other than those mentioned above.
3. Select a profile to see all its attributes, as shown in Figure 6.2. Click Open, located on the upper right of the Profiles window, to see even more detailed information about the profile.
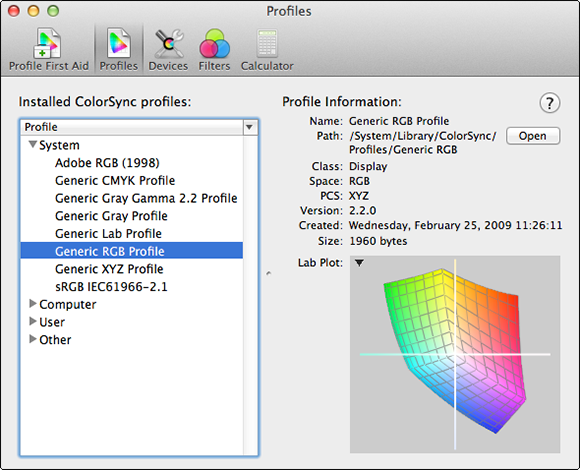
6.2 View color profile information in the Profiles tab.

You can see a really neat 3-D rendering of the profile color gamut in the graph that appears in the lower right of the window. Click and drag your mouse anywhere in the graph and the color gamut rotates for you.
Assigning profiles to devices
A nice feature, especially when it comes to high-end printing and color matching, is the ability to assign a profile to a device, such as a printer or display. To assign a profile to a device, follow these steps:
1. Click the Devices tab at the top of the ColorSync Utility window.
2. Browse the list of devices to find the one to which you want to assign the profile and then select it, as shown in Figure 6.3.

6.3 You can assign profiles to a device for more precise color management.
3. Click the arrow next to Current Profile and choose Other from the pop-up menu.
4. Browse your Mac for the profile to which you want to assign the device and then click Open.
Editing Quartz filters
Quartz filters can be used when printing to customize the color of a file, among many other things. ColorSync Utility affords the ability to edit these Quartz filters and even create new ones.
To edit existing Quartz filters or create new ones, follow these steps:
1. Click the Filters tab in the toolbar.
2. Click the disclosure triangle next to the filter that you want to edit or click the plus sign (+) at the bottom left of the filter list to create a new one.
3. Adjust the settings for each part of the filter by clicking the disclosure triangles next to each part and using the pop-up menus to change the settings as required.
Calculating colors on your screen
If you really like one of the colors you see on your display, you can use the ColorSync Utility Calculator to calculate its color percentages. Follow these steps:
1. Click the Calculator tab in the toolbar.
2. Click the magnifying glass at the bottom of the window.
3. Drag your mouse pointer (which now looks like a circle with a cross hair in the center) over the pixel on your screen with the color values you want to see.
4. Click the pixel to see the color values represented, as shown in Figure 6.4.
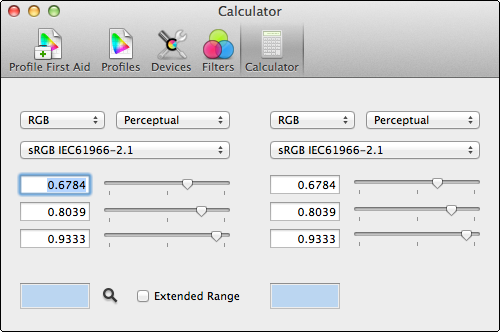
6.4 Calculate the color values of any pixel on your screen.
Measuring color values with DigitalColor Meter
DigitalColor Meter measures the color values on your display so that you can enter them into other programs, such as graphics applications.
To see the values associated with a particular pixel on your screen, simply hold your mouse pointer over the pixel. DigitalColor Meter shows you the color and the values represented.
Using Grab
This utility takes screenshots of items on your Mac. In fact, Grab was used extensively in the creation of art files for this book. For more in-depth information about Grab, see Chapter 12.
Working with Grapher
Grapher is an algebra geek’s dream come true, and it’s also a neat utility that graphs equations, visualizing them in two or three dimensions. You can even animate your graphs with this baby and share them as QuickTime movies. For more information about Grapher, please go to its help center by clicking the Help menu.
Setting the Java Preferences
The Java Preferences, shown in Figure 6.5, allow you to determine which Java Virtual Machine to use with your browser and Java and web applications. You can also set up any necessary security settings for using certain Java applications. A Java runtime is essential if you plan to run Java-based applications on your Mac; whether this is a need for you is something that only you (or your IT administrator) can answer.

6.5 Determine which Java runtime environment to use with Mountain Lion.
When you first launch Java Preferences, you are asked if you want to install a Java runtime. In order to use Java Preferences, you must click Install to continue. When you click Install, Software Update finds and downloads a Java runtime environment. After the installation is complete, you can open Java Preferences and tell your Mac how it should function.
Storing passwords with Keychain Access
Keychain Access manages your plethora of passwords in one convenient location. Keychain Access can store passwords of any type (including those used for accessing servers and websites), as well as other sensitive information, such as bank accounts and credit card numbers. The purpose of Keychain Access (along with securely storing private information) is to remember your passwords for you, which is very helpful given the crazy number of passwords the typical Internet user is required to have these days.
When you first log in to Mountain Lion, a default login keychain is created. This keychain uses the same password as your user account. I strongly suggest perusing the Help feature of Keychain Access if you want to get more familiar with its functionality.
Setting up VoiceOver
VoiceOver allows your Mac to describe the contents on your screen verbally. Your Mac literally speaks to you and reads the contents of your open documents and windows. This is obviously a fantastic utility for anyone who has difficulty seeing what is on the screen.
You can configure VoiceOver to your specific needs by customizing its many options, including:
![]() Have your Mac speak a greeting to you upon login. Among other uses, this feature is helpful if some instructions need to be provided for a user before he can get started working with the computer.
Have your Mac speak a greeting to you upon login. Among other uses, this feature is helpful if some instructions need to be provided for a user before he can get started working with the computer.
![]() Configure Mountain Lion to tell you when the Caps Lock key is pressed, which can wreak havoc for you if trying to enter a case-sensitive password.
Configure Mountain Lion to tell you when the Caps Lock key is pressed, which can wreak havoc for you if trying to enter a case-sensitive password.
![]() Adjust the rate, pitch, volume, and intonation of your Mac’s voice, which is helpful for various hearing difficulties.
Adjust the rate, pitch, volume, and intonation of your Mac’s voice, which is helpful for various hearing difficulties.
![]() Configure the layout of a connected braille display.
Configure the layout of a connected braille display.
Working with Terminal
Terminal is your gateway to entering the command-line world of UNIX. In my opinion, in order to even think of yourself as an OS X aficionado, you must have at least attempted some basic UNIX commands using the old-fashioned way. To take a step back in computing time, open Terminal by choosing Go menu→Utilities (or press ![]() +Shift+U). Next, double-click the Terminal icon to open a new window, as shown in Figure 6.6.
+Shift+U). Next, double-click the Terminal icon to open a new window, as shown in Figure 6.6.

6.6 This is what computing looked like before the advent of the graphical user interface.
Terminal, like other applications, can be modified to work the way you want it to. Click the Terminal menu and select Preferences (or press ![]() +,) to open the Preferences window.
+,) to open the Preferences window.
Startup
When you first open Terminal, it automatically opens a new Terminal window. The Startup options in the preferences window, shown in Figure 6.7, enable you to define the state in which Terminal starts up.
Choose one of the following:
![]() On startup, open. Decide which settings to use for the new window, or open a series of windows called a window group (more on window groups a little later in this chapter).
On startup, open. Decide which settings to use for the new window, or open a series of windows called a window group (more on window groups a little later in this chapter).
![]() Shells open with. Determine whether to open Terminal in its default shell, which is called bash, or in a different shell. A shell is software that allows a user to interact with the UNIX services and provides the commands that can be executed by the user. You can download and install other UNIX shells from the Internet. To use a shell other than bash, select the Command (complete path) radio button and type the path to the directory in which the shell is located.
Shells open with. Determine whether to open Terminal in its default shell, which is called bash, or in a different shell. A shell is software that allows a user to interact with the UNIX services and provides the commands that can be executed by the user. You can download and install other UNIX shells from the Internet. To use a shell other than bash, select the Command (complete path) radio button and type the path to the directory in which the shell is located.
![]() New windows open with and New tabs open with. Determine which settings to use when opening new windows or new tabs.
New windows open with and New tabs open with. Determine which settings to use when opening new windows or new tabs.
If you are someone who uses Terminal quite a lot (and you’re an official card-carrying geek, if you do), it’s a good idea to keep a shortcut to it in your Dock. That way, the comfort of the command line is within easy reach. I’ve used OS X for years and I like to keep the Terminal feature close by my side. You never know when the uncontrollable urge to chmod, mkdir, or ping might strike you!
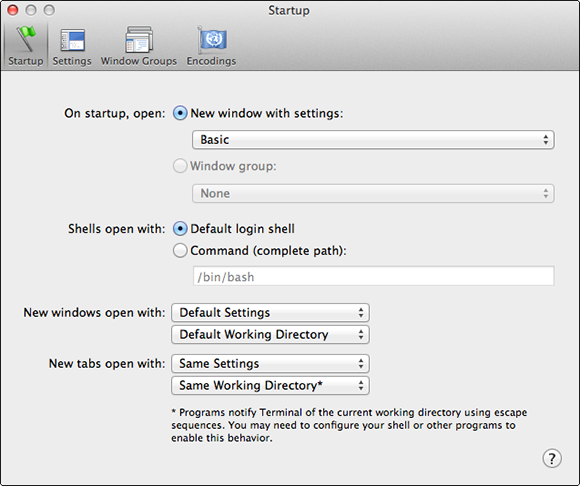
6.7 Decide how Terminal reacts when you first start it up.
Settings
The Settings section, shown in Figure 6.8, lets you adjust the look and behavior of your Terminal windows.
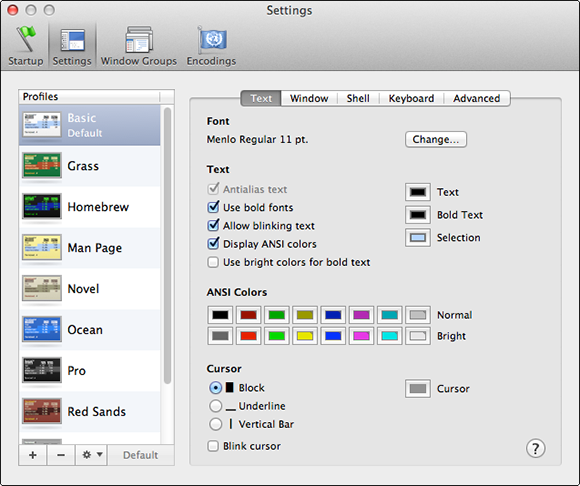
6.8 Even geeks like to customize their work environment!
The list on the left side of the Settings window contains preformatted window settings that you can choose. Set one as your default by highlighting the desired setting and clicking Default. Add or delete saved settings by clicking the plus (+) or minus (–) sign.
Table 6.1 gives a brief description of what each tab in the Settings section allows you to modify.

Window Groups
In the Window Groups window, you can delete, import, and export your window groups. Window groups are useful for users who utilize several windows, allowing them to run multiple tasks during their Terminal sessions.
Creating window groups causes Terminal to keep each window’s individual settings intact, so that they are in the same state when you reopen them as they were when you closed them. To create a window group, follow these steps:
1. Open the windows you will be working with and make sure that they are set up in the format that you need.
2. Choose the Window menu and select Save Windows as Group.
3. Give the window group a descriptive name, such as “Network diagnostics” and click the Save button. Select the check box in the save window to have this window group open automatically when you first open Terminal.
Encodings
The options in the Encodings window allow you to enable and disable international character encodings so that Terminal can display international characters.
Tabbed windows
Some users may prefer to have several Terminal windows open at once, but I like the simplicity of having one window running multiple tabs, as shown in Figure 6.9.

6.9 Tabbed Terminal windows are the way to go for me.
To create a new tab, choose Shell→New Tab and select the setting for the new tab. For example, choose Basic to select a default shell interface. Close tabs by clicking the X in the upper-left corner of the tab. You can also save tabbed windows as a window group by choosing Window→Save Windows as Group and giving the group a descriptive name.
Entering UNIX commands
To effectively navigate in a CLI (command-line interface), you need to understand how UNIX views the structure of your files and folders on the hard drive. UNIX calls each folder on your Mac a directory, and it recognizes the drives as volumes. The beginning — or top — level of your start-up drive is known as the root directory, which is represented by a slash (/).
Let’s begin learning how to get around in UNIX by opening a new window. To do so, choose Shell→New Window and select the setting for the new window.
When you first bring up a Terminal window, it opens in your home directory, which is represented by a tilde (~). To move to another directory, type its path on the command line. For example, to move to the root directory of your hard drive, simply type cd / and press Return (cd stands for change directory). To move back from the root directory to your home directory, simply type cd ~ and press Return.
Moving to a subdirectory can be a little trickier; however, knowing where directories are located on your drive helps immensely. Directories are separated by slashes when typing their path. For example, type the following to move to the Utilities folder on your hard drive and press Return:
cd/Applications/Utilities
Common commands
You can bend Mountain Lion to your will using the Terminal just as you can with the mouse. Typing commands in the CLI executes functions that range from listing items in a directory to performing diagnostics on your network. As I covered in the previous section, entering and executing a command is as simple as typing it and pressing Return — that’s it!
Table 6.2 lists some of the most commonly used UNIX commands and gives a brief explanation of the functions they perform.

X11
Also known as the X Window System, X11 allows you to run UNIX applications alongside those in OS X. Because the Mountain Lion version of UNIX, Darwin, is a fully compliant and certified UNIX variant, it can compile and run the full gamut of your UNIX applications. Thousands of applications are available, many of which use graphical user interfaces.
Finding Additional UNIX Information
UNIX adds a whole other dimension to Mountain Lion that many regular users may never discover. However, you can find hidden treasures in UNIX that are well worth learning about. Here are some additional resources on UNIX:
![]() http://developer.apple.com/opensource/
http://developer.apple.com/opensource/
All these links are accurate at the time of this writing. The Internet is chock-full of more UNIX goodness, so feel free to scour it for all the command-line enlightenment you can stand.