
5
Creating and Configuring Excel Services Applications
Excel Services is a feature set for SharePoint 2010. With Excel Services you can take sharing Excel workbooks to the next level. Excel Services allows easy collaboration among an entire organization without the need to worry about pulling down the latest version of the file or even having Excel 2010 installed on a workstation. The service has three main parts:
- Excel Calculation Services — Used to load and calculate workbooks
- Excel Web Access — Renders the HTML page the user sees in the browser
- Excel Web Services — A web service designed to separate calculations from the front end
Using these three components, workbooks can be viewed online through a web browser, data permissions can be set, and reports can be created.
CREATING AN EXCEL SERVICES APPLICATION
The first step to working with Excel Services in SharePoint 2010 is to create an Excel Services application. Application management is done through the SharePoint Central Administration site. To open Central Administration navigate to the following location Start ![]() All Programs
All Programs ![]() Microsoft SharePoint 2010 Products
Microsoft SharePoint 2010 Products ![]() SharePoint 2010 Central Administration. Under the heading Application Management is a Manage Service Applications link as shown in Figure 5-1. This is a list of all the service applications currently configured. Here you can create and configure your entire Excel Services application, including trusted locations, caching options, and the unattended service account.
SharePoint 2010 Central Administration. Under the heading Application Management is a Manage Service Applications link as shown in Figure 5-1. This is a list of all the service applications currently configured. Here you can create and configure your entire Excel Services application, including trusted locations, caching options, and the unattended service account.
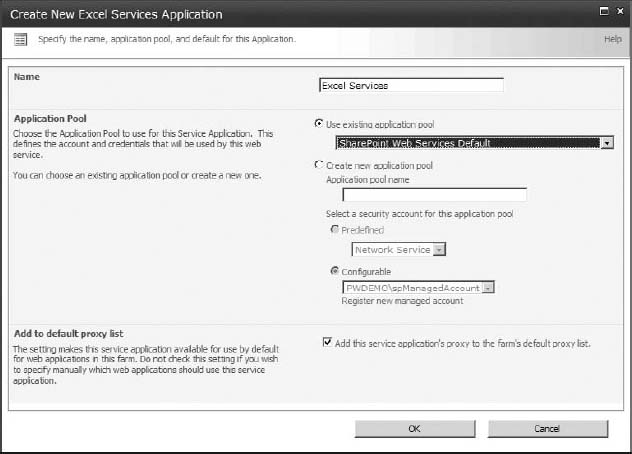
The first step is to create a new Excel Services application if one is not already present. To do this click New on the ribbon in the top left. The drop-down menu has a list of all the service applications that can be created; select Excel Services Application. The Create New Excel Services Application screen will appear. Choose a name for the application, enter a name for the new application pool, configure the security account, and whether you want the application to be added by default to the farm's proxy list. Finally, click OK and the Excel Services Application will be created.

ENABLING EXCEL SERVICES
Once you have an Excel Services application set up, the next step is to allow your site to be able to use the features. To do this you must add the site that will be using the application to the trusted locations list.
Inside Central Administration under Manage Service Applications, click the name of the Excel Services application you want your site to be associated with. Next, select Trusted File Locations from the list of configuration options. This lists all the locations where Excel workbooks can be stored and accessed by Excel Services. Click the Add Trusted File Location button and enter the location where the workbooks will be stored. This can be the site URL or the URL of the library where they are housed. If the site URL is selected be sure to check the box next to Children Trusted so that all URLs inside your site will be trusted automatically as shown in Figure 5-2. Click OK and the location will be added to the list. Any workbooks not listed in the trusted locations will not be allowed to be accessed by Excel Services.
The final step is to be sure that the Excel Services service application is associated with your site or web application. Back in the Application Management section of Central Administration choose Configure Service Application Associations. Locate your site on the list and click its name. The Configure Service Application Associations screen will appear with a list of all the service applications. If Default is selected, all the default applications will be checked. If the Excel Services application is not selected, change the drop-down to Custom and place a check in the box next to Excel Services.

CONFIGURING EXCEL SERVICES SECURITY AND AUTHENTICATION
The Excel Services trusted file locations, data providers, and data connection libraries are the main ways that security for Excel files will be handled on your SharePoint site. In the trusted file locations you will need to put any document libraries, filesystems, and websites from where Excel workbooks can be opened. If you try to open a file not listed in the location an error will be displayed letting you know that it is not a trusted Excel location. This will occur only if you attempt to open the file in the browser. If the file is not in one of these locations it can still be downloaded to your local machine or opened directly in Microsoft Excel, but Excel Services cannot access it. By default the location of http:// with Children Trusted is configured when an Excel Services application is created. For instructions on adding any specific libraries and locations to the trusted locations list, see the “Enabling Excel Services” section of this lesson.
The trusted data provider list is a set of connections that will be used by Excel Calculation Services. Just like the trusted file locations, Excel Services can use the data provider only if it is on this list. If outside data is needed for the Excel workbook for use by Excel Calculation Services, such as a connection to a SQL Server, the connection can be stored in a library on the SharePoint site in the form of an .odc (Office Data Connection) file. These files can be generated from within an Excel workbook and exported to a library. Any connections that are used by Excel Services will need to be inside a trusted data connection library.
To add a new trusted connection library for Excel Services, open Central Administration and navigate to your Excel Services application under the Manage Service Applications section. Click Trusted Data Connection Libraries and select Add Trusted Data Connection Library in the top-left corner. Next, enter the URL of the document library that contains your .odc files and click OK. The library will need to exist before adding the URL to this list. For more information on deploying the.odc file see Lesson 12.
Excel workbooks can be stored in a number of locations including the content database, a UNC path, or an HTTP website. This will affect the security settings that are chosen under the Global Settings for your application. The file access methods include Impersonation and Process Account. Selecting Impersonation requires user authentication when connecting to a workbook. Process Account, however, allows anonymous access by using the Excel Services process account to access files stored in a UNC location. This is not a recommended solution because it allows access to all files in which the process account can see affecting all trusted file locations, thus causing a security issue.
You have several options for authentication when creating data connections for Excel. These include Windows authentication, Secure Service Store authentication, and None. See Figure 5-3 for an example of the authentication options in Excel. Windows authentication uses the user's Windows account to authenticate data connections. Secure Store Service can be used to assign a single user or a group of users access by using the secure store database similar to how credentials are assigned for the unattended service account. Finally, you can choose the authentication type None. When you choose None the provided connection string is used. If a user name and password are already supplied in the connection string, a connection is made under that user. If the connection string uses Windows authentication, the credentials of the unattended user account are used.

The unattended service account is used when connecting to non-Windows environments, as well as when the authentication method is None in the Excel Services authentication setting for a data connection. This account is linked to Excel Services by entering the application ID of the unattended service account created in the Secure Store Service. To create an unattended service account access Central Administration ![]() Manage Service Applications
Manage Service Applications ![]() Secure Store Service.
Secure Store Service.
If it is your first time doing any setup in the Secure Store Service application a message will be displayed that reads “Before creating a new Secure Store Target Application, you must first generate a new key for this Secure Store Service Application from the ribbon” as shown in Figure 5-4. To do this click Generate New Key on the ribbon and enter a passphrase that will be used as part of the database encryption. Be sure to remember this or store it in a secure location in case you need to reference it again later. Once the processing is complete click New in the top-left corner of the page. Enter a name for the service Application ID, which must be unique and cannot be changed. Enter a display name, which will only be used for identification, and an e-mail address for an application contact. From the Target Application Type drop-down select Group, then change the Target Application Page URL to None.

On the next page verify that the Field Type of Windows User Name and Windows Password are selected. Add the application administrators, which can edit the users assigned to the application at a later date, and at least one user that you would like to be added now. These values can be modified at a later date by those assigned to the administrators group. Click OK and the application will be created. Next place a check in the box next to the Application ID that was just created and click Set Credentials from the ribbon. At this point enter the credentials of the user to be assigned as the unattended services account.
The final step is to assign the unattended service account to the Excel Services application. Back on the Global Settings page of the Excel Services application (available from Central Administration ![]() Application Management
Application Management ![]() Manage Service Applications
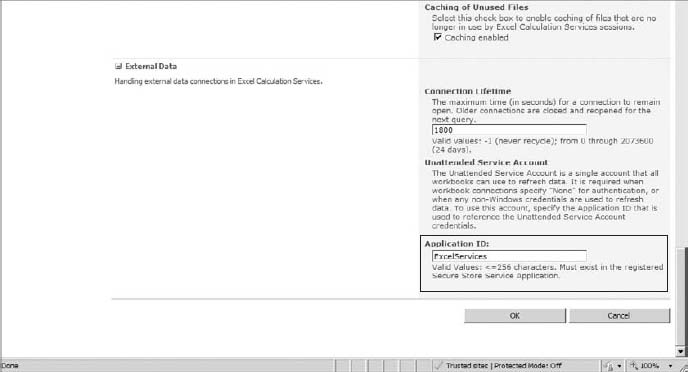
Manage Service Applications ![]() Name of Excel Services Application) enter the Application ID of the newly created application from the Secure Store Service in the External Data section and click OK to apply the settings.
Name of Excel Services Application) enter the Application ID of the newly created application from the Secure Store Service in the External Data section and click OK to apply the settings.
REPORTING AND CACHING OPTIONS
Excel workbook caching is also controlled through the Global Settings for the Excel Services application. This is handled by setting the memory utilization and workbook cache options.
Under the Memory Utilization section there is an option for maximum private bytes. This is the number of megabytes of available memory that Excel Calculation Services will be allowed to use on the server where the application is running. By default this is set to a value of −1, which represents 50 percent of physical memory. If there is 2048 MB of physical memory, then by default Excel Calculation Services would be allowed to use 1024 MB of that.
The next option, Memory Cache Threshold, is the percentage of the maximum private bytes that inactive objects are able to take up. Therefore Excel Calculation Services can store information that is currently not being used up to a certain percentage. Assuming the 1024 MB of memory available and a 50 percent threshold, 512 MB of memory can be used for inactive objects. If the threshold is exceeded, unused objects will be dropped from the cache to make room for new objects. This value can be set to zero to disable calculation services from caching inactive objects.
Finally, the Maximum Unused Object Age value will set how long objects are kept in the cache. If set to −1 they will be kept indefinitely. Alternatively, a number of minutes can be entered from 1 to 34560, or 24 days.
In the Workbook Cache section of Global Settings are three more caching options. A filesystem location can be specified to cache files in the Workbook Cache Location box. This is the location where any workbooks that are currently in use by Excel Calculation Services will be stored. If this is left empty the cache will be in the default system temporary directory. The Maximum Size of Workbook Cache sets the amount of disk space that the cache location is able to use. This is a value in MB and can be any positive whole number. Finally, a check box for caching unused files will allow workbooks that are no longer used by Calculation Services to be stored in a cache location. If the location fills these, workbooks will be dropped first. An example of the cache settings is shown in Figure 5-5.

Now that you have learned about creating an Excel Services application and how to configure the security options, try creating your own in the next section.
TRY IT
In this Try It you learn how to create an Excel Services application, associate an unattended service account, and add a document library as a trusted location.
Lesson Requirements
For this lesson you will need a SharePoint site already created that contains a document library where Excel files will be stored. You will also need access to the Central Administration site to create the Excel Services application. You will create the Excel Services application and add an unattended service account for access purposes as well as the location of your document library to the trusted locations.
Hints
- You will need credentials for setting up the unattended service account.
- The Excel Services application will be created in the Central Administration site.
- You will add a specific document library to the trusted file locations.
- The document library should already be created and contain an Excel file.
Step-by-Step
- Open the SharePoint 2010 Central Administration site.
- Click Manage Service Applications under the Application Management section.
- From the ribbon click New and select Excel Services Application.
- In the Name box type Excel Services. For Application Pool switch to Use Existing Application Pool and select SharePoint Web Services Default from the drop-down. Your screen should now look like Figure 5-6.
- Click OK.
- Click Secure Store Service where you will create the unattended service account.
- If necessary follow the instructions on the screen to create a key for the application.
- Click New from the ribbon.
- Enter ExcelServices in the Application ID box, Excel Services in the Display Name box, an administrator's e-mail address in the Contact e-mail box, select Group on the Target Application Type drop-down, and set the Target Application Page URL to None as shown in the Figure 5-7.

- Click Next.
- Verify the fields listed are Windows User Name and Windows Password. Click Next.
- Add a list of application administrators in the Target Application Administrators box.
- In the Members box add all users and user groups that should be mapped to the unattended credentials and click OK.
- Check the box next to the newly created entry and click the Set icon above Credentials on the ribbon.
- Enter the user name and password of the account you want to map to and click OK.
- Return to the Manage Service Applications page (available by clicking Application Management on the left pane).
- Select Excel Services from the list.
- Select Global Settings and scroll down to the bottom and locate the External Data section.
- In the Application ID box type ExcelServices exactly how it was entered in the Secure Store Service screen.
- When your screen looks like Figure 5-8 click OK.
- Click Trusted File Locations on the Application Management screen.
- Click Add Trusted File Location in the top left of the screen.
- Enter the URL to your document library and check the box next to Children Trusted as shown in Figure 5-9.
- Scroll down and switch Allow External Data to Trusted Data Connection Libraries And Embedded under External Data.
- Click OK.

You have just allowed your Excel workbooks in the document library to use the resources of your newly created Excel Services application! If your library is set up to open documents in the web browser you can now click an Excel workbook and it will open in the browser.
 Please select Lesson 5 on the DVD to view the video that accompanies this lesson.