
Lesson Files | Motion3_Book_Files > Lessons > Lesson_07 |
Time | This lesson takes approximately 75 minutes to complete. |
Goals | Create, format, and style text |
Save custom text styles | |
Animate text with behaviors | |
Create custom text animation with the Sequence Text behavior | |
Save custom text animation | |
Animate text on a path | |
Animate text in 3D |
Text is intrinsic to many, if not most, motion graphics projects. The opening sequence for a feature film, the 30-second car commercial, and the documentary interview all use text to communicate. Choosing a text style that integrates with the composition, and animating that text to engage viewer attention, is an art in itself.
In this lesson, you’ll composite animated text into a section of a Ducati promo. You’ll create text and format it using the Heads Up Display (HUD) and the Inspector. You’ll browse, apply, and modify preset text styles, and save a customized style. While exploring methods for animating text, you’ll use a powerful behavior called Sequence Text and learn how to animate text along a custom path. Last, you’ll add some animated text in 3D space to the news open that you worked on in Lesson 5.

Using the Text tool, you can create text directly in the Canvas and format it using the HUD. Let’s start by viewing the completed project.
Open Motion3_Book_ Files > Lessons > Lesson_07 > Ducati Text Finished.mov and play it.

This movie shows the animated text that you will create and animate in this lesson.
Open Motion3_Book_ Files > Lessons > Lesson_07 > Ducati Text Start and play the project a few times.
This project contains a short sequence that includes several 1920 x 1080 24p HD video clips encoded with the Apple ProRes codec. You’ll composite animated text over this sequence.
Stop playback and press Home. Choose File > Save As or press Command-Shift-S and save the project to the Student Saves folder within the Lesson_07 folder.
Press F5 to open the Project pane.
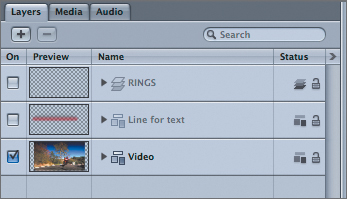
In the Layers tab are three groups. The Video group contains the five video clips you just previewed. The “Line for text” and RINGS groups contain graphical elements that you’ll turn on as you create and animate the text.
Click below all the groups to deselect everything, then click the Add (+) button.

Rename the new group Text. and then press Command-[ (left bracket) to move it down one level, between the RINGS and Line for text groups.

You’ll place your text layers in this group, which will composite nicely over the line graphic and under the RINGS animation.
Open the Video group, select the Aerial MS layer, and then press Shift-I to move the playhead to the In point of this layer.

The first line of text will start over this clip.
In the Layers tab, select the Text group. In the Toolbar along the top of the Canvas, click the Text tool button, or press T.

Click anywhere in the Canvas to set an insertion point, and enter Engineered by the Stopwatch.
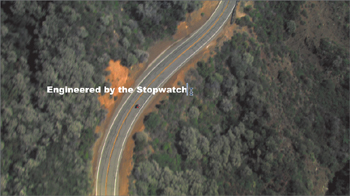
The text appears in the Canvas as you type.
Press Esc (Escape) to exit text-entry mode.
In the HUD (F7), drag the Size slider to about 80pt.
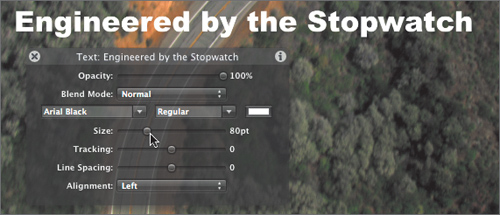
The final text size will be smaller, but this is a good size to work with as you experiment.
Click and hold the down-arrow button next to the font pop-up menu to reveal the font-family list. With the mouse button held down, drag the pointer over the list of font families while you watch the text in the Canvas.
The text updates as you select each font family, showing how each font looks when applied to the text.
Choose Gill Sans.

Click and hold the down-arrow button next to the typeface pop-up menu to open the list of typefaces. Drag the pointer to preview each typeface. When you’re through previewing, choose Regular.
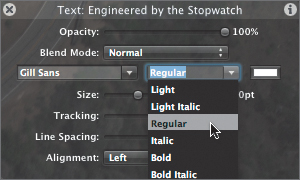
This simple, clean style should work well in the context of the project.

The Mac OS X Colors window appears; in it you can select, sample, and save colors using a variety of tools. In this case, you’ll leave the text white.
Close the Colors window. Control-click the color well, and in the pop-up color palette choose white.

Control-clicking to open the pop-up color palette allows you to quickly apply a color to the text.
Set the Size slider to 64 and the Tracking slider to 6.

Save your work.
The HUD allows you to apply basic formatting to your text layer, but for access to more options you’ll need to use the Inspector.
Press F4 to open the Text tab of the Inspector.
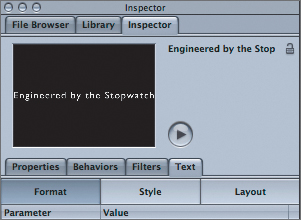
The Text tab contains three panes: Format, Style, and Layout.
The Format pane includes many of the parameters available in the HUD, as well as a few additional ones.
In the Format pane, select the All Caps checkbox.

Every character is now capitalized; however, the originally capitalized letters E and S are larger than the rest of the letters. They also appear uncomfortably close to their neighbors, so let’s deal with that.

When working with text, it’s frequently necessary to change the spacing between letters to improve the overall text appearance. This process is called kerning.
In the Canvas, double-click the text to activate the Text tool; then click once to place the insertion point between the first E and N of ENGINEERED.

Hold down the Control key and press the Right Arrow key a few times.

Additional space is inserted between the letters, matching the spacing of the rest of the text.
Release Control, and tap the Right Arrow key to move the insertion point over between the S and T of STOPWATCH. Press Control–Right Arrow a few times to add some space, and then press Esc.
The text is now formatted nicely; it’s time to see how it works with the graphic element.
In the Layers tab, select the activation checkbox for the “Line for text” group. Open the group and its layers; then play the project.

The group contains two shape layers, each with a mask and a Fade In/Fade Out behavior applied. The first shape has a hard line along the bottom; the second has a hard line along the top. These lines will reinforce the line beneath the first line of text and over the second.
However, for the lines to work well, the text should have a straight line along the bottom and the top. So, although selecting the All Caps checkbox creates a nice effect, it’s not quite appropriate in this context.
Stop playback and move the playhead to around 2:10. In the Inspector, deselect the All Caps checkbox.
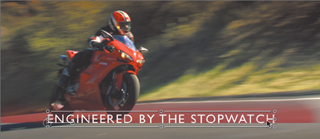
In the Canvas, double-click the Text layer to select all the text. Enter ENGINEERED BY THE STOPWATCH. Press Esc to exit the Text tool.

The text is now perfectly flat on top and bottom, and will align cleanly with the graphic.
In the Canvas, drag the text to align it with the graphic.
Tip
There are a few things you can do to align the text more easily and precisely. First, press N to turn off snapping so that the text won’t snap to alignment with the bounding box of the graphic. Next, press Command-/ (slash) to toggle off the bounding-box overlay, which can obscure the bottom line of the text. Now hold down the Command key and tap the Up Arrow and Down Arrow keys to move the text in small increments. You can also press Command-Spacebar and drag right in the Canvas to zoom in on the text. The more zoomed in you are, the smaller the movement increment will be for each tap of the arrow keys. Remember to press Command-/ (slash) after you are done to toggle on the overlay.
In the Text tab of the Inspector, click the Style button.

In the Style pane, you can activate and modify the parameters for four text attributes: Face, Outline, Glow, and Drop Shadow. You won’t need to change these attributes for this project, but they allow you to create highly customized text styles, so take a moment to explore them.
Select the activation checkboxes to enable the parameters for the Outline, Glow, and Drop Shadow attributes. Adjust each of the parameters. When you are done experimenting, click the reset button (the hooked arrow) to the right of each attribute to reset it, and deselect the activation checkboxes for each attribute except Face.

The text looks good without any additional styling, but it could use one small modification.
In the Canvas, click the center top control handle and drag down to scale the text in the Y direction by about -10%.

Watch the tooltip to decide when to stop. This downscaling gives the text a slightly more modern and racelike feel. However, the adjustment also moved the text slightly out of alignment with the graphic.
Press Command–Up Arrow a few times to realign the text with the edge of the graphic.
Note that this scale change didn’t affect any parameters in the Format or Style pane of the Text tab—it changed only the Scale parameter in the Properties tab. Keep this in mind when you save the text style in the next exercise.
In the Layers tab, close the Video and Line for text groups, and reselect the text layer if necessary. Save your work.
The text you are using for this project is built primarily by making changes in the Format pane, and no changes in the Style pane. Still, by saving the formatting to the Library, you can quickly apply it again in this or other projects.
At the top of the Style pane, click the Style Preset pop-up menu.

The first three options allow you to save a text style. You can choose to save just the Format pane parameters or just the Style pane parameters, or choose Save All, which saves parameters from both panes. For example, if you created a style with a colored outline and a drop shadow, and you want to apply it to some text without changing the text’s current font, you would choose Save Style.
The other items in the menu are preset styles from Motion’s Library. Choosing one here applies it to the currently selected text layer, but you can also do that in the Library, as you will shortly.
Choose Save All.
The Save Preset To Library dialog appears.
Name the preset Ducati Text and click Save.

Press Command-2 to open the Library, and select the Text Styles category.

The text styles appear in the file stack at the bottom of the Library. Your style, Ducati Text, appears with a small icon in the corner, indicating that it is a user-defined preset. Let’s use it.
Note
To see preset styles without selecting each preset, click the Icon View button at the top right of the Library.
This new preset is also available in the Style pane of the Text tab, in the Style Preset pop-up menu you just used to save the text.
You can now apply this preset to a second text layer.
In the Toolbar, choose the Text tool. Click in the Canvas, and enter DESIGNED BY THE RACETRACK. Press Esc.
In the HUD, change the font family, typeface, size, and tracking to anything you want in order to make the text look different.

In the Library, drag a few preset text styles onto the DESIGNED BY THE RACETRACK text layer in the Canvas.

Tip
The pointer needs to be directly over one of the characters for the preset to be applied. Move the pointer until a + (plus) sign appears.
The Format and Style parameters for the text update based on the applied preset. The text styles that ship with Motion are primarily saved as Style pane parameters only, so they don’t change the font itself.
Drag the Ducati Text preset onto the Text layer.

Press F1 to open the Properties tab of the Inspector, and open the Scale parameter.

X, Y, and Z are all set to 100%.
Select the ENGINEERED BY THE STOPWATCH text layer and watch the Inspector.

The Scale Y parameter has a value of about 90% because you scaled it down earlier. This scale change in the Properties tab was not applied to the new text because text styles save parameters from only the Format and/or Style pane of the Text tab—they don’t save anything from the Properties tab.
Luckily, you can save the text in a way that retains all its attributes, including those in the Properties tab.
Select the DESIGNED BY THE RACETRACK text layer and delete it.
You’ll see why shortly.
Press Command-2 to return to the Library, and then select the Favorites category. (You may need to scroll down to see it.)

Literally anything you create in Motion can be saved to the Library into either the Favorites or Favorites Menu folder.
In the Layers tab, drag the ENGINEERED BY THE STOPWATCH text layer to the file stack in the Library.

In the Library, Control-click the file, choose Rename, name the file Ducati Still. and press Enter.

The new name will distinguish this item from the animated version you’ll create later in this lesson.
Drag your new favorite from the Library to the Text group in the Layers tab.

A new copy of the ENGINEERED BY THE STOPWATCH text layer appears in the Canvas, with all attributes intact.
Double-click the text to select it, enter DESIGNED BY THE RACETRACK. and press Esc.

Saving a layer to the Favorites folder saves the object itself, so it can’t be applied to an existing layer as a text style can. But the benefit is that all attributes of the layer are saved, including effects such as behaviors, filters, and masks, along with any keyframed animation.
While you could have achieved the same result faster by duplicating or cloning the text layer, saving a favorite makes that favorite available in other projects. The favorite can be moved to another computer running Motion and even emailed to another Motion artist.
Preset text behaviors make fast work of animating text—and if you don’t find exactly what you want, you can modify them or even create your own.
Delete the DESIGNED BY THE RACETRACK text layer.
You’ll save a new favorite once you’ve animated the original ENGINEERED BY THE STOPWATCH text layer.
Select the ENGINEERED BY THE STOPWATCH text layer, press Shift-I to move the playhead to the In point of the layer, and then press Command-Option-I to set a play-range In point.

Move the playhead to 2:15, press O to trim the layer’s Out point, and then press Command-Option-O to set a play-range Out point. Start playback.

With playback looping over the duration of the text layer, you can experiment with different animations.
In the Library, select the Behaviors category.

The last two subcategories, Text Animation and Text Sequence, contain all the preset behaviors specifically designed for animating text.
Select the Text Sequence subcategory, and click the List View button.

Seven folders of text sequence behaviors are available.
Click the disclosure triangle of the Text-Fade folder and select the Blur Fade In behavior.
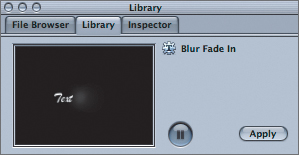
Note the animation in the Preview area at the top of the Library.
Drag the Blur Fade In behavior onto the ENGINEERED BY THE STOPWATCH text layer in either the Layers tab or the Canvas.

Tip
If you drag the behavior to the text in the Canvas, make sure you see the small + (plus) sign before releasing the mouse button. You must have the pointer positioned directly over a letter to apply the behavior. For this reason, it can be easier to drag the behavior to the Layers tab or to click the Apply button in the Library.
It’s a nice effect, but it’s a little too smooth and calm for the fast pace of this project.
Press Command-Z to undo, and then experiment using behaviors from a few folders. Undo or delete after you apply each behavior.
You’ll soon create your own text behavior to animate the text onto the screen, but there’s a perfect preset for animating the text off the screen.
In the Text-Fade folder, locate the Blur Out Random behavior and apply it to the text.

In the mini-Timeline, the behavior is actually longer than its text. While just about all other behaviors, filters, and masks conform to the duration of the layer to which they are applied, text behaviors each have a default duration, because they bring the text on and off the screen, rather than animate text for its full duration.
Here, you want the behavior to animate the text off the screen, so you’ll trim its duration in the mini-Timeline.
Stop playback. Move the playhead to 2:05 and press I; then move the playhead to 2:15 and press O.

The behavior now lasts for a brief and dynamic 11 frames, and ends at the text layer’s Out point.
There are over 200 text behaviors in the Library’s Text Sequence folder, and, believe it or not, they are all created from a single source behavior. This powerful little guy can be found hiding quietly in the Text Animation folder. His name is Sequence Text, and once you get to know him, you will not only be able to create unique text animations from scratch, but you’ll also be able to quickly modify any preset behavior to do just what you want.
Select the ENGINEERED BY THE STOPWATCH text layer.
In the Toolbar, click the Add Behavior icon and choose Text Animation > Sequence Text.

Tip
Once you are familiar with the behaviors in the Library, you can apply them more quickly by choosing them from the menus you access through the Toolbar’s Add Behavior icon.
This text behavior applies itself to the full length of the layer, but you want it to animate only the beginning of the text to bring it onscreen.
Move the playhead to 1:10 and press O. Press Command-Option-O to tighten up the play range to the behavior’s Out point. Start playback.

The behavior now lasts about 20 frames, but nothing appears to be happening.
Stop playback somewhere over the middle of the behavior.

Note the four vertical lines between some of the letters. The thicker inside lines indicate the location of the animation—which part of the text is animating at the current frame. The faint outer lines indicate the spread of the animation–how much of the text is animating at each frame. This will make more sense after you see the lines in action.
Start playback again, and press F2 to open the Behaviors tab of the Inspector.
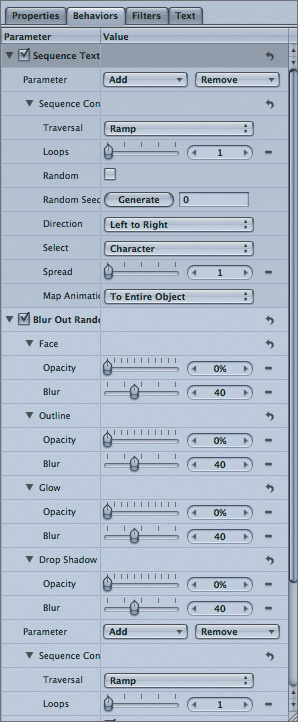
The two behaviors applied to the text layer appear in the Behaviors tab: Sequence Text and Blur Out Random. If you look closely at the Blur Out Random behavior, you’ll see that it looks a lot like the Sequence Text behavior—at least the bottom part of it does. That’s because it is a sequence text behavior; it’s just been modified and renamed.
Click the disclosure triangle next to the Blur Out Random behavior to hide its parameters.
You will be adding several parameters to the Sequence Text behavior, and you don’t want to be distracted by the other behavior.
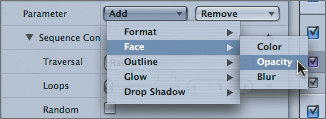
In the Behaviors tab, click the Add pop-up menu next to the Parameter parameter (I know, I know, but it really is a parameter named Parameter).

The pop-up menu includes all the parameters that you can animate with this behavior. These include many parameters from the Format pane in the Text tab and almost all the parameters in the Style pane.
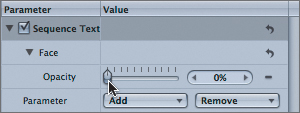
From the Add pop-up menu choose Face > Opacity.
The Opacity parameter appears at the top of the Behaviors tab with the same value as the text, 100%. In the Canvas, nothing has changed.
Drag the Opacity slider to 0%.
The text now quickly fades out and back in again, one letter at a time.

It’s a neat effect, but you want the letters to start with 0% Opacity and fade in.
Click the Select pop-up menu and choose All.

That’s more like it—each letter starts at the Opacity parameter’s value of 0% and ends at its original value of 100%.

To have the letters animate on more smoothly, adjust the Spread parameter.
Set Spread to 8.

As the Spread value increases, the faint outer vertical lines in the Canvas spread farther apart; and at any given frame, more of the letters are in the process of animating. In fact, eight letters are animating, creating a more fluid movement.
In this exercise, you’ll add and adjust several more parameters. You’ll even keyframe one of them to achieve a more dramatic look.
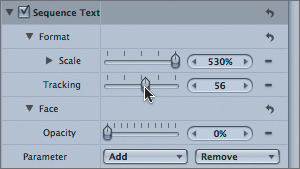
In the Behaviors tab, click the Add pop-up menu, choose Format > Scale, and set the Scale value to 530%.

The letters now start very large and appear to fly down onto the Canvas.
Note
Alternatively, you could move the letters in 3D space by choosing Format > Position and adjusting the Z value. You’ll work with 3D text animation later in this lesson.
The letters are awfully close together, so you’ll spread them out a bit.
Click the Add pop-up menu, choose Format > Tracking, and drag the Tracking slider to set a value of 56.
The letters now start out spread farther apart and come back together as they scale down.

They still look a bit crowded, however.
Click the Add pop-up menu, choose Format > Position, and set the X Position value to -266.

Every letter now starts 266 pixels to the left and moves into position. Combined with the tracking change, they seem to come in right on top of each other.
It would look interesting if the Position value changed over time. In other words, the early letters would come in from the left, and the later letters would come in from the right. You can accomplish this by keyframing the Position parameter.
Stop playback and press Shift-O to move the playhead to the Out point of the behavior.
Click the Record button or press A to turn on Recording.

The value fields in the Inspector turn red to remind you that recording is turned on and that any change you make will be recorded as a keyframe at the current playhead location.
Change the X Position value to 1466.
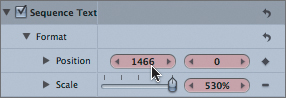
The Animation menu, to the right of the parameter, displays a solid diamond, indicating that a keyframe has been set at the current playhead location.
Note
A keyframe has also automatically been set at the In point of the behavior. You’ll work more with keyframes in Lesson 10.
Press A to turn off recording and resume playback.

The first letter starts 266 pixels to the left, and then each subsequent letter starts farther toward the right, until the last letter starts 1,466 pixels to the right, creating a sweeping effect. Adding a little blur will fade in the letters more gracefully.
Click the Add pop-up menu, choose Face > Blur, and set the Blur value to 15.

Tip
Increasing the blur amount any further will diminish playback performance and add little visual impact, since the letters have 0% opacity when they are blurriest.
You now have a sense of how flexible the Sequence Text behavior is. Even if you most often use preset behaviors, understanding how they are built with this behavior will allow you to easily modify them to suit your needs.
To finish the animation, you’ll apply the Throw behavior to keep the text moving across the screen after it appears.
In the Toolbar, click the Add Behavior icon and choose Basic Motion > Throw.
The behavior is applied to the full duration of the text layer, which is what you want.
In the HUD, drag the Zoom slider slightly above its lowest level; then, in the center of the circle, hold down Shift while dragging to the right to constrain horizontal movement as you drag the arrow out to the edge of the circle.

In the Inspector, the X Throw Velocity value should be about 50. If it isn’t, open the parameter to view the X, Y, and Z values, and set X to 50.
Great—the first line of text animation is complete. Rather than repeat it all for the second line of text, you can duplicate the text layer, reposition it in space and time, and reverse the Throw behavior already applied.
Stop playback and choose Mark > Reset Play Range, or press Option-X.
In the Layers tab, select the ENGINEERED BY THE STOPWATCH text layer and press Command-D.
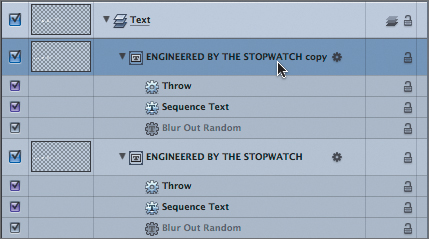
In the Layers tab, a copy appears above the original.
Move the playhead to frame 2:10, and then choose Mark > Move Selected In Point, or press Shift-[ (left bracket) to move the In point of the duplicate text layer and its three behaviors to the playhead.

At 2:10, the animation of the first line of text is halfway through the Blur Out Random behavior’s animation, so the second line of text will come on just as the first is going out, creating a dynamic transition.
Move the playhead to frame 3:03 so that you can see the graphic clearly; then, in the Canvas, drag the text down and to the right so that the tops of the letters touch the top of the red graphic.

Double-click a letter to select the text, and then enter DESIGNED BY THE RACETRACK. Press Esc. Resume playback.

It’s looking good, but the second line would look better if it drifted toward the first line.
With the DESIGNED BY THE RACETRACK text selected, in the Behaviors tab open the Throw Velocity parameter and change the X value to -50.

The two lines of text now move toward each other, holding tight against the line formed by the graphic.
In the Layers tab, close all open groups, and then select the activation checkbox of the RINGS group.

This animated design elements complement and complete the composition.
After all the effort you put into creating, styling, and animating the text, it’s a good idea to save it in case you’ll need it again. Ducati is sure to introduce a new bike, and you want to be prepared.
Press Command-2 to open the Library, and select the Favorites folder.
In the Layers tab, open the Text group, and drag either one of the text layers to the file stack in the Library.

The file appears with the user preset icon and has the same name as the layer. The animation plays in the Preview area.
Control-click the file, choose Rename, enter Ducati text animation. and press Enter.

If you need the same animated text in a future project, it’s just a drag and drop away.
Great job! You’ve created, styled, and animated text to produce a complex and unique animation. You’ll now explore two more options for animating text: text on a path and 3D animation.
Usually, text is laid out on a straight, horizontal line. But sometimes a graphic element just begs you to turn and bend the text along a path. Once you’ve set the text on that path, you can animate it.
With the Canvas selected, press Command-W to close the project.
Press Command-O and open Motion3_Book_Files > Lessons > Lesson_07 > Path Text Start. Save it to the Student Saves folder.
Press F5 to open the Project pane.

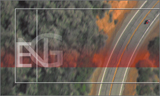
This project consists of just two layers, each in its own group: a still image exported from one of the Ducati video clips, and a text layer. You will position and animate the text along the double yellow line in the still image.
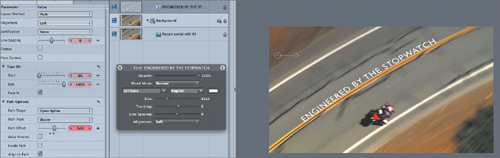
Select the text, press F4 to open the Text tab of the Inspector, and click the Layout button.

Notice that the Path Options in the center of the pane are dimmed, so you can’t get to those parameters.
At the top of the pane, click the Layout Method pop-up menu and choose Path.
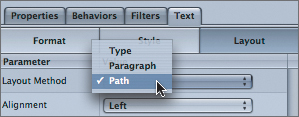
The Path Options are no longer dimmed. Great, but where’s the path?
Hold down Command-Spacebar, and, in the Canvas, drag left to create more room around the frame.

You’ll need the extra space as you work with the path.
In the Canvas, double-click the text.

The text is selected, and a path with three control points appears below it.
Drag the beginning and ending control points off the edge of the Canvas, aligning them to the top of the double yellow line.
Drag the middle control point to the double yellow line; then change the angle and length of the Bezier handles to adjust the curve so that it touches the upper part of the line along its full length. Readjust the endpoints as needed.

Don’t worry about the position of the text; you’ll address that in a moment.
Tip
Three control points are all that you need here, but you can easily add more by double-clicking or Option-clicking anywhere along the path. Control-click a point to remove, disable, or lock it, or to toggle the shape of the path through the point between Smooth and Linear. Option-drag a Bezier handle to move it independently of the opposite handle. Option-click again to force it to match.
Press Shift-S to choose the Select/Transform tool.
With the text positioned on a path aligned to the yellow stripe, you’ll animate it with a combination of recorded and manual keyframes.
Press A to turn on recording.
In the Text tab, deselect the Wrap Around checkbox.
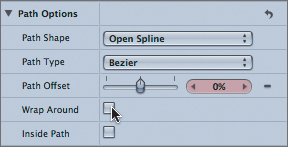
With the playhead placed at the beginning of the project, drag right in the Path Offset value field to move the text along the path, up and to the right, until it is completely off the Canvas.

Move the playhead to frame 13.
In the Path Offset field, drag left to change the value and position the text in the center of the Canvas.
Move the playhead to frame 34; then Option-click the Path Offset parameter’s Animation menu to manually set a keyframe.

You want this keyframe to have the same value as the keyframe on frame 13 so that the text remains rock solid between the keyframes. Recording won’t set a keyframe unless you change a value. While you could change the value, then change it back to record a keyframe, you’d risk having a slightly different value for each keyframe and introducing unintended movement. Manually setting the keyframe ensures that the value does not change.
Press Shift-O to move to the end of the clip, and then drag left in the Path Offset value field to change the value and move the text along the path, completely off the Canvas.

Press A to turn off recording; then play the animation.
The text now flies in along the path, holds for a second, and flies out.
You can use the Keyframe Editor to adjust how the text moves into and out of each keyframe and give it a little more personality.
Make sure your text is still selected in the Layers tab. Press F5 to close the Project pane, and then press Command-8 to open the Keyframe Editor.
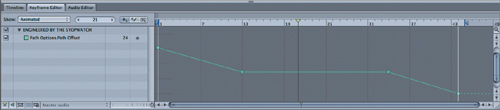
Because Linear is the default interpolation of the Path Offset keyframes, the text comes to a jarring halt and then takes off again without ceremony.
Control-click the second keyframe, and from the pop-up menu choose Interpolation > Ease In.

The text now comes to a smooth stop.
Control-click the third keyframe and choose Interpolation > Bezier.

Option-drag the right Bezier handle to create a steep slope moving out of the keyframe while maintaining a flat entry.

Press F6 to close the Timing pane. Press Shift-Z to fit the Canvas to the window, and play the project.
The text now zips quickly out of the frame, as fast as a Ducati—maybe faster!
Note
If your ending keyframe is too close to the edge of the Canvas, you may see the text slow down as it exits the frame. In the Keyframe Editor, Shift-drag the last keyframe to the right to move it out in time without changing its value.
Keyframes are covered in greater detail in Lesson 10.
When you were working with the Text Sequence behavior earlier, you may have noticed a subfolder called Text-3D Move. All Motion layers can be animated in 3D space, and text is no exception. In this exercise, you’ll use one of the preset 3D text behaviors to animate text in the news teaser you worked on in Lesson 5.
With the Canvas selected, press Command-W to close the open project.
Press Command-O. Open Motion3_Book_Files > Lessons > Lesson_07 > 3D Text Start. Save the project to the Student Saves folder.
Start playback, and press F5 to open the Project pane.

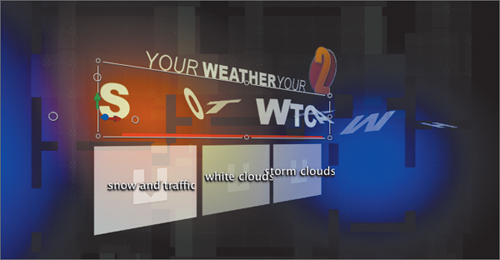
This project contains the middle set of the news animation from Lesson 5. The Mid Set group contains a group for the background elements, a group for the Channel 2 logo and drop zones, and an empty group for the text.
Stop playback and press Home. Select the Text group, and then choose the Text tool. Click in the Canvas and enter STORM WATCH. Press Esc.

In the HUD (F7), set the font to Arial Black, Regular, and set Size to 85pt.

The text is facing the camera, but you want it on the same plane as the logo and drop zones.
Press F1 to open the Properties tab of the Inspector. If necessary, click the disclosure triangle to display the Rotation parameters, and then set the Y value to 0.
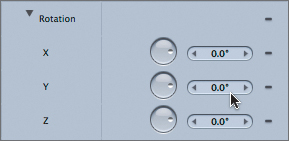
Motion had automatically set the Y value to -45 degrees to force the text to face the camera, so you reset the value.
Press Q to choose the Adjust 3D Transform tool; then, in the Canvas, drag the red, green, and blue 3D axis handles to position the text below the logo and above the red line.

At the top right of the Canvas, drag the camera’s Orbit tool to ensure that the text is in roughly the same plane as the logo.

Undo to return to the original camera view. Drag the blue Z-axis arrow if necessary, check again with the Orbit tool, and then undo the camera move again.
With the text created, formatted, and aligned with the other elements in 3D space, the actual animation is a snap.
In the Toolbar, click the Add Behavior icon and choose Text-3D Move > Space Tumble.

Two behaviors—a Sequence Text behavior and a Rate parameter behavior—appear below the text layer in the Layers tab.
In the Layers tab, click the Rate behavior to select it, and then Shift-click the Sequence Text behavior.

With both behaviors selected, you can trim them both at once.
Move the playhead to frame 35 and press O to trim the behaviors’ Out points. Play the project.
Note
If the current frame field shows timecode (with colons), click the current frame icon (the clock icon) to toggle to a frames display before moving to frame 35.
Instant 3D text animation! What will they think of next? To spice it up a bit, add a Sweep behavior to the camera.
In the Layers tab, select the Camera layer.
In the Toolbar, click the Add Behavior icon and select Camera > Sweep.

Stop playback, press Shift-End to move the playhead to the play-range Out point, press O to trim the behavior, and resume playback.
In the HUD, set the Sweep’s End value to 30 degrees. Press F5 to close the Project pane, Shift-Z to fit the Canvas to the window, and F8 to view full screen.
Note
On a large display, pressing Shift-Z can make your image more than 100% of its original size. Try pressing Option-Z to force the Canvas to exactly 100% size.
You could, of course, modify the animation by tweaking the parameters of the Sequence Text behavior, but this one works pretty darn well right out of the box.
You now have a new set of text-styling and text-animating tools under your belt, including behaviors, keyframes, text on a path, and 3D animation.