
Lesson Files | Motion3_Book_Files > Lessons > Lesson_11 |
Media | Motion3_Book_Files > Media > Paint |
Time | This lesson takes approximately 90 minutes to complete. |
Goals | Understand basic painting |
Use the Write On behavior | |
Create a custom brushstroke | |
Modify a stroke using a stylus and tablet | |
Apply behaviors | |
Activate stroke dynamics | |
Create a 3D effect with a stroke |
Motion now includes the ability to create dynamic, pressure-sensitive paint strokes and animate them over time, even in 3D space. The new Paint Stroke tool allows you to use a mouse, or a graphics tablet and stylus, to create a paint stroke naturally, instead of using point-to-point tools like Bezier curves or B-Splines. With a stylus and graphics tablet, you can use pen pressure and the angle to vary the stroke to mimic a natural look or to create special effects. Paint strokes also have their own unique behaviors, such as Write On and Sequence Paint, that allow you to easily animate strokes over time.
In addition to using the Paint Stroke tool, you can convert shapes created using the Bezier or B-Spline tool to paint strokes by applying a brush type to the shape’s outline. However, to get the most out of the Paint Stroke tool, a graphics tablet and stylus are highly recommended.

The easiest way to create a stroke with the Paint Stroke tool is to simply paint freehand using either a mouse or a stylus. You’ll explore both methods in this lesson. Using a tablet and stylus offers a greater degree of control than using a mouse because you can vary stylus pressure and angle to affect the stroke.
As you become familiar with the Paint Stroke tool in this lesson, you’ll use more complex settings to vary the stroke through time and space, and apply a variety of brush styles and behaviors. You’ll finish with a project that will take a simple stroke and turn it into a luminous, animated structure.
First, you’ll draw a simple solid stroke with the Write On behavior.
Press Command-Option-W to close any open projects. Press Command-O and open Motion3_Book_Files > Lessons > Lesson_11 > Paint_Stroke_01.
Choose Motion > Preferences > Project, and select Create Layers At: Start of project.

Click the Paint Stroke tool to choose it.

In the Paint Stroke Tool HUD, select the Write On checkbox.
In the HUD, set Brush Color to white, and Width to 10 pixels.
From the Shape Style pop-up menu choose Basic Solid.

Begin playback.
Starting in the upper left corner of the Canvas, draw a curvy line down and toward the lower right corner.
When finished, press the Esc (Escape) key or choose the Select/Transform tool to exit paint mode.

When you complete the stroke, the thin red line that was visible while you were drawing is replaced by the finished paint stroke. Since the Write On behavior was selected, the stroke automatically paints onto the Canvas over time, based on how fast the mouse or stylus moved while you drew the stroke. If you stop playback, you’ll need to move the playhead to the end of the Write On behavior to see the entire stroke.
Once a stroke is drawn, many controls are available to customize its appearance. You can change the stroke attributes in the HUD or in the Inspector. In addition, you can modify the Write On behavior to change the speed at which the stroke is drawn onto the Canvas.
Press F5 to open the Layers tab.
Select the Write On behavior.
Resume playback if stopped.
Drag the Out point of the Write On behavior until the tooltip indicates that the Out point is set at frame 90.

Moving the In or the Out point of the Write On behavior changes the point at which the stroke begins and ends. Shortening the behavior causes the stroke to appear more quickly; extending the behavior slows down the Write On effect.
Choose the Paint Stroke tool (P).
Draw a second stroke similar to the first one, quickly moving the mouse or stylus to complete the stroke.

Press F6 to open the Timeline tab.
The second Write On behavior has a shorter duration than the first. Motion adjusts the duration of the behavior to match how quickly you drew the stroke. As mentioned earlier, you can change the In and Out points to adjust the speed of the stroke after it’s completed.
In the Timeline, drag the Write On behavior to the right past the end of the Write On behavior for the first paint stroke. (Resume playback if necessary.)
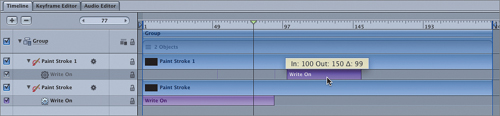
Two paint strokes should appear, one after the other. If you watch the paint strokes closely, you should see variations in each stroke that mimic how quickly you moved the stylus or mouse while you drew the stroke. This is because the behavior records the mouse or stylus movements.
The Write On behavior allows you to change whether the stroke is drawn on, erased, drawn and erased, or erased and then drawn on. You’ll perform the next exercise with playback resumed so that you can see the changes as you apply them.
Resume playback.
Select the Write On behavior for the first paint stroke.
Press F2 to open the Behaviors tab.
Set Shape Outline to Erase.

Select the Write On behavior for the second paint stroke.
Set Shape Outline to Erase and Draw.
Set Direction to Reverse.
In the Canvas, you’ll see you have changed the way the strokes are painted onto the Canvas. In the next steps, instead of using the recorded speed of the mouse or stylus, you’ll change the speed at which the shape is drawn onto the Canvas.
Using the recorded speed is similar to creating a variable speed change in Final Cut Pro. Using predefined speed curves is like setting keyframe interpolation in the Keyframe Editor.
Select the first paint stroke.
In the Behaviors tab, change Speed to Constant.

The Speed parameter defines the stroke’s draw-on velocity from the first to the last points in the stroke. There are nine options:
Constant—. The stroke is drawn at a steady speed from the first to the last point in the stroke.
Ease In—. The stroke starts drawing at a slow speed, and then accelerates and maintains a steady speed to the last point on the stroke.
Ease Out—. The stroke starts drawing at a steady speed, and then decelerates as it gradually slows to a stop at the last point of the stroke.
Ease Both—. The stroke drawing slowly accelerates from the first point, and then gradually decelerates to a stop at the last point.
Accelerate—. The stroke is drawn with increasing speed to the last point.
Decelerate—. The stroke is drawn with decreasing speed to the last point.
Natural—. The drawing speed of the stroke is determined by the shape of the path. For example, if the stroke is a U-shaped curve, the stroke is drawn on more quickly as it moves toward the low point of the U. and more slowly as it moves up the edges.
Recorded—. This option appears only if the stroke drawing was recorded over time. For shapes converted to a paint stroke, this parameter does not appear. If the paint stroke was created with the Paint Stroke tool in the Toolbar (using a stylus or mouse), this option does appear.
Custom—. The stroke is drawn along its path by setting keyframes for the stroke’s speed from 0% to 100%. In other words, you determine which portion of the stroke is drawn along its path in time.
Custom Speed—. This parameter becomes available when Speed is set to Custom.
You can modify the Custom Speed velocity curve in the Keyframe Editor. For example, you can keyframe custom values to draw a stroke forward to a specific percentage of its path, then backward, then forward, and so on before it reaches the end of the animation.
Experiment with the various Speed parameters using the existing strokes and observe how the animation is affected.
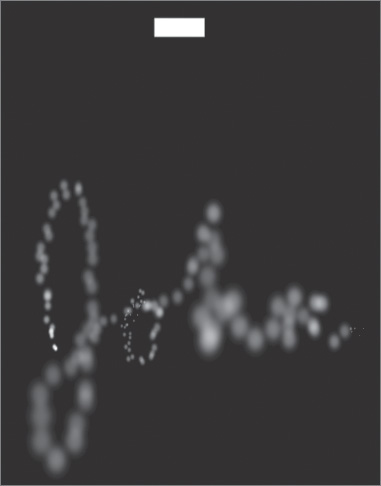
In this exercise, you’ll write your name on the Canvas with a basic paint stroke, using the mouse or a stylus. Then, you’ll change the Brush Type applied to the stroke.
Stop playback, if necessary.
Select and delete any strokes that you have created.
Go to frame 1.
Select the Paint Stroke tool (P).
Press F7 to display the HUD.
Deselect Write On and set Shape Style to Basic Airbrush. If you have a stylus, set Pen Pressure to Width, and Pen Speed to Opacity.
Position the Brush tool on the side of the Canvas.
As smoothly as possible, write your name or a short word using a mouse or stylus.
Don’t be surprised if it takes you several tries to get a good-looking graphic of your name or another word. For now, stick with just a short name or word in one continuous stroke. That may feel a bit unnatural, but it will work best for this exercise.

When you’re done writing, press Esc to select the stroke, and choose the Select/Transform tool.
The paint stroke may take a moment to display, depending on its complexity and the speed of your system.
Press F4 to display the Shape tab in the utility window.

A paint stroke does not have a fill associated with it, so the Fill is deselected. You’ll modify the brush Width and Spacing to see how they affect the way the stroke is drawn.
Set the Brush Profile Width parameter to 50.

The stroke is much wider, but it also looks more splotchy. Paint strokes are made up of dabs—similar to particles or replicator cells. However, a stroke has only one dab type. Just as you can modify a particle cell’s color, opacity, angle, scale, and so on, you can modify the paint dabs.
Set the Brush Profile Spacing parameter to 50%.

You now can clearly see the dabs that make up the paint stroke. Each dab shows up as a fuzzy dot.
Brush strokes have many options that can be modified for the entire stroke, or over the length or duration of the stroke. In addition to varying the stroke in response to stylus pressure, you can set keyframes in the Stroke pane of the Inspector.
In the Stroke pane, click the disclosure triangle next to Width Over Stroke.
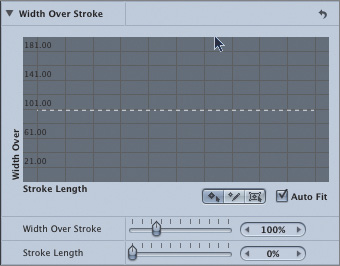
The Width Over Stroke mini-curve editor appears. You can create a curve that gradually changes the dab’s width over the length of the stroke. You can add and remove keyframes, use the Sketch tool to draw a curve, and change the interpolation type.
Click the dotted line to add a keyframe.

Move the pointer to the right, and drag the dotted line up to add a second keyframe and increase the dab width. You can see the new stroke width in the Width Over Stroke value field.
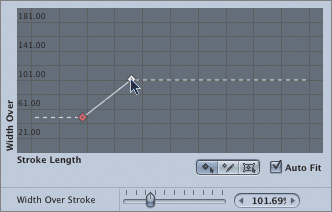
Dragging upward increases the stroke width. The dabs on the stroke grow larger as they approach the keyframe.
Move the pointer farther to the right, and drag the curve down to add a third keyframe and decrease the dab width.
Repeat the process to create a total of five keyframes, using the figure below as a guide.

The dab size will now change gradually over the length of the stroke. You can Control-click each keyframe to change its interpolation type.

Next to Width Over Stroke, click the disclosure triangle to collapse the mini-curve editor.

The curve is now represented as a scaled-down version of the actual curve.
You can also adjust the Width Over Stroke values directly in the Canvas. This allows you to dynamically adjust the stroke to achieve the desired look.
In the Canvas, Control-click the stroke and choose Stroke.
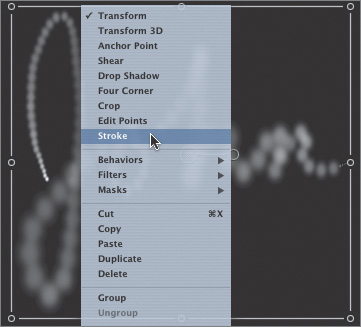
Small control points appear over the stroke at each keyframe. The red paint guideline also appears.
To adjust a keyframe, click a control point—which looks like a plus (+) sign—for that keyframe.
Control handles appear on either side of the control point.
To increase the width of the dabs, drag away from the point; to decrease the width of the dabs, drag toward the point.

To change the position of a width keyframe, drag the point along the length of the stroke. Keyframes can be dragged over one another.

The mini-curve editor is updated as you make onscreen adjustments.
Control-click the stroke and choose Transform when you are done experimenting.
When the Dynamics checkbox is selected in the Advanced pane of the Shape tab, a paint stroke acts much like an emitter—the dabs become particles. When the Local 3D checkbox is selected, the dabs are animated in 3D space. When the Local 3D checkbox is deselected, the particles are animated on X- and Y-axes only.
Stop playback, if necessary, and go to frame 1.
In the Inspector, click the Advanced button.
Select the Dynamics checkbox to activate it. Click the disclosure triangle to view the associated parameters.
Advance the playhead a few frames by pressing the Right Arrow key.

The dabs now act as particles emitted from the stroke. The initial speed is set a bit high, so let’s slow things down a bit.
Set Dynamics Speed to 10, and set Speed Randomness to 5.
Resume playback. The dabs now move away from the stroke much more slowly. You’ll establish a destination for the dabs by creating a shape and adding the Simulations Attractor behavior.
Choose the Rectangle tool, and draw a small rectangle above the stroke.
Choose the Select/Transform tool.
Making sure the rectangle is still selected, click the Add Behavior icon and choose Simulations > Attractor.
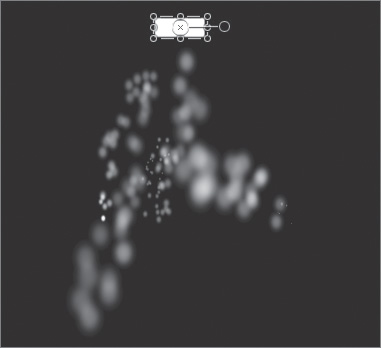
The dabs are now pulled toward the shape.
In the HUD, change Strength to 20 and set Drag to 1.00 to slow down the dabs.

Move the small rectangle off the top of the Canvas so that the dabs vanish offscreen.
The Local 3D checkbox allows you modify a paint stroke in 3D space. When the Dynamics checkbox is selected in the Advanced pane, dabs can be pulled out of their planes when certain Simulation behaviors are applied.
Select the paint stroke and resume playback, if necessary.
In the Stroke pane, select the Local 3D checkbox.

The Local 3D option allows the dabs to move in 3D space as they are pulled to the rectangle. If you select the Face Camera option in the Stroke pane, the dabs will rotate to face the camera as they move through 3D space.
In the Properties tab, click the Rotation disclosure triangle and set Y rotation to 60°.

In the Layers tab, select the Attractor behavior applied to the rectangle.
Before completing the next step, resume playback, if necessary, and watch the dabs as they animate off the Canvas. They move straight up from their original positions and remain separated in Z (depth) space.
In the HUD, in the Include options click Z.
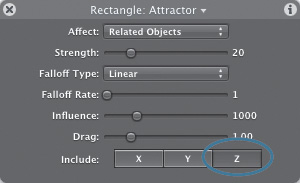
The dabs now collapse in Z space toward the shape.
For your final look at paint strokes, you’ll apply several behaviors to an existing stroke shape and save it as a project. Then you’ll import that project into a nearly completed opener.
Press Command-Option-W to close any open projects. Press Command-O and open Motion3_Book_Files > Lessons > Lesson_11 > Glowing_Stroke_Start.
Press F5 to view the Project pane.
Click Play.
Local 3D is activated for the stroke, and Y rotation keyframes have been applied to the Strokes group, which causes the stroke to rotate in 3D space. Let’s look at the stroke in 2D space.
Stop playback.
In the Glow Stroke layer, click the Isolate button.

Because a camera has been added to this project, it is normally viewed in 3D space. Strokes can be difficult to edit when they are viewed as 3D objects. Clicking the Isolate button places the stroke back into 2D space. This particular stroke started life as a B-Spline shape. To modify it, you need to see the control points of the B-Spline.
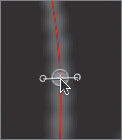
Control-click the stroke and choose Edit Points.

The thin red line is the path of the stroke. The dots are the control points of the B-Spline. You can reshape the path by dragging the control points and watching the path described by the thin red line.
Control-click the stroke, and choose Transform to hide the control points.
Click the Isolate button to return to a 3D view.
Rather than create the Write On behavior from scratch, you’ll use a stored favorite.
In the File Browser, navigate to Motion3_Book_Files > Lessons > Lesson_11.
From the File Browser stack (the lower portion), drag the Write_On_glow_stroke favorite onto the Glow Stroke layer.

Resume playback, if necessary. The paint stroke now paints on while it spins.
From the File Browser, drag the Color_Depth_Gold favorite onto the Glow Stroke layer.
Note
The Color_Depth_Gold favorite is built using the Sequence Paint behavior. Sequence Paint allows you to animate individual dabs of a paint stroke in sequence over time. This is the only way to animate the dabs individually. Keyframing the stroke parameters or applying other behaviors affects all dabs in the stroke uniformly. For more information, see “Sequence Paint” in the Motion manual.
To finish the Glowing Stroke project, you’ll duplicate the Glow Stroke layer and start it on frame 200.
Select the Glow Stroke layer, and press Command-D to duplicate it.
Drag the Glow Stroke copy in the mini-Timeline until its In point is at frame 200.

To emphasize the glowing effect, you’ll apply the Light Rays filter to the group of both layers. The filters have keyframes applied to intensify the effect over time.
From the File Browser stack (the lower portion), drag Light_Rays_filters onto the Strokes group.
The effect is subtle, but by adding the second copy of the stroke, you create a bright glow toward the end of the project.

To use the completed glowing paint stroke, you’ll export it as a QuickTime file with a transparent background. This will allow you to import it into the final project without the need to render it each time you play the project.
Go to frame 240. Choose Mark > Mark Play Range Out.
Save the file as Glowing_Stroke.
Choose File > Export.
Navigate to Motion3_Book_Files > Lessons > Lesson_11 > Student Saves folder.
Set Export to QuickTime Movie.
Set Use to Lossless + Alpha Movie.
Set Include to Video Only.
Select the “Use play range” checkbox.
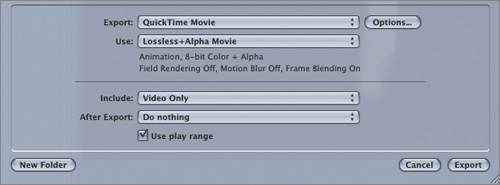
Click Export. The file will be saved as Glowing_Stroke.mov.
To finish the project, you’ll import the QuickTime file into a nearly completed DVD element.
Press Command-Option-W to close any open projects. Press Command-O and open Motion3_Book_Files > Lessons > Lesson_11 > Ducati_Attract_Title_Open_Start.
In the Layers tab, select the Camera layer.
In the File Browser stack (the lower portion), select Glowing_Stroke.mov. and in the Preview area at the top of the File Browser, click the Import button.
Note
The Glowing_Stroke.mov file in the Lesson_11 folder should match what you created using the steps in the previous section. If you’d like to use the movie you created, navigate to it and import it instead.
A new group is created at the top of the Layers tab. The Glowing_Stroke QuickTime movie will be a layer of that group.
Rename the newly created Group to Glowing Stroke Group.

Move to frame 171 and press I to set the In point of the group.
Go to frame 165 and choose Mark > Mark Play Range In.
Resume playback.

Note
When dealing with high-definition projects that have many layers with filters and behaviors, the preview playback rate may be extremely slow. A simple way to greatly speed up playback is to set the Canvas window to 25% scale and Resolution to Quarter. There may be a slight delay in playback after you switch resolutions. When you are done previewing, don’t forget to set Resolution back to Full.
Save the file in the Motion3_Book_Files > Lessons > Lesson_11 > Student Saves folder.
To return Motion to its default setting, choose Motion > Preferences > Project and select Create Layers At: Current frame.
You’re done! There are many paint options left to explore, especially the ability to use a Shape Style other than Basic or Airbrush. Experiment by creating a simple stroke and then applying a Shape Style from the Shape Style pane.