
Lesson Files | Motion3_Book_Files > Lessons > Lesson_06 |
Media | Motion3_Book_Files > Media > Ducati |
Time | This lesson takes approximately 90 minutes to complete. |
Goals | Round-trip a video clip between Final Cut Pro and Motion |
Work with Optical Flow, time remapping, and retiming behaviors | |
Send a Final Cut Pro sequence to Motion | |
Prepare a Motion project for DVD Studio Pro | |
Send an audio clip from Motion to Soundtrack Pro | |
Apply a Motion project as a menu in DVD Studio Pro |
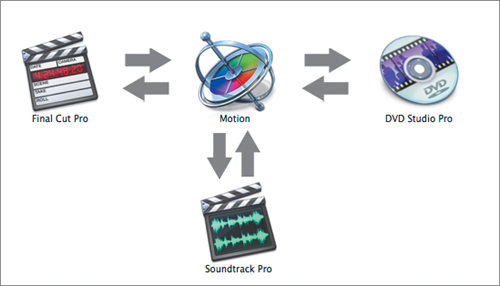
If you work in post-production, you’re likely to wear many hats: editor, effects artist, motion graphics designer, sound designer, DVD author, and probably chief coffee mug washer, as well.
While Final Cut Studio can’t help with those coffee mugs, it does include applications that cover the gamut of post-production tasks.
Although learning how to use Final Cut Pro, Soundtrack Pro, and DVD Studio Pro is outside the scope of this book, motion graphics projects aren’t created in a vacuum—they are often part of a larger project, be it a documentary editing in Final Cut Pro or a DVD menu authored in DVD Studio Pro. So in this lesson you’ll work with these other applications in the context of a motion graphics project and learn how to quickly move from one application to another.
Your journey will start in Final Cut Pro, where you will send a clip to Motion to create smooth slow motion using its Optical Flow feature. You’ll then work with Motion’s retiming behaviors, which provide a dynamic alternative to time remapping with keyframes.
While building a promotional DVD motion menu for Ducati motorcycles, you’ll send an edited sequence from Final Cut Pro to Motion for text and graphics animation, and send an audio clip from Motion to Soundtrack Pro for effects processing. Finally, you’ll use the completed Motion project to build a motion menu in DVD Studio Pro.
By the end of this lesson you’ll be able to move between the Final Cut Studio applications, leveraging each for what it does best.
Motion graphics projects often start out as editing projects: editing, trimming, and timing video clips to audio before adding effects, text, or other composited elements. Since Final Cut Pro is a powerful nonlinear editor, it’s the best choice for performing these editing functions. And although Final Cut Pro and Motion share a host of effects capabilities, sometimes one application is preferable to the other.
For example, you can make speed changes in both Final Cut Pro and Motion. Whether you’re speeding up a crowded street scene, slowing down a panning shot of bounding antelope, or ramping down the velocity of a passing car, speed changes are an essential part of the editorial process and a staple motion graphics effect. Since Final Cut Pro and Motion are capable of speed change, which should you use and when?
In this exercise, you’ll open a Final Cut Pro sequence that has had a speed change applied using time remapping. You’ll then send the clip to Motion to use Optical Flow to improve the slow-motion effect.
Open Motion3_Book_Files > Lessons > Lesson_06 > Lesson_06_Start.
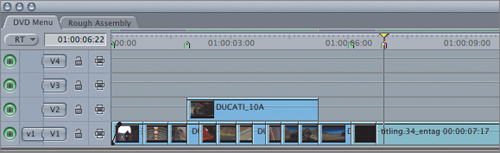
This is a Final Cut Pro 6 project file containing two sequences: Rough Assembly and DVD Menu.
Play the Rough Assembly sequence.

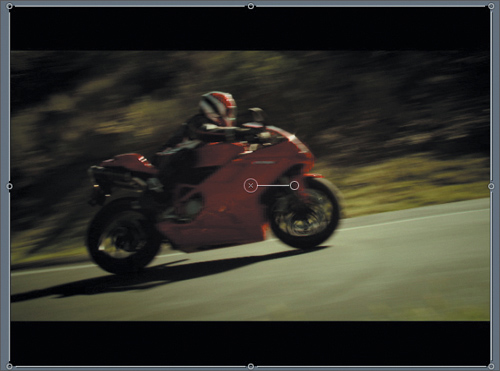
This sequence contains a few clips edited together to build a short opening for a DVD menu. Note that the last clip in the sequence has the word Variable at the end of the clip name to indicate that a variable speed adjustment, or time remapping, has been applied to the clip.
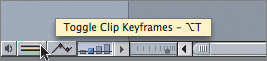
At the lower left of the Timeline click the Toggle Clip Keyframes button, or press Option-T.
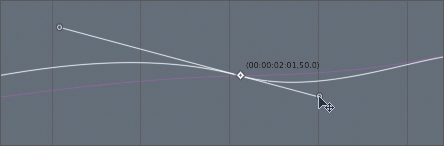
A horizontal blue bar appears below the clip, indicating that keyframes have been applied to at least one of the Motion properties (such as Scale, Position, Rotation, or Time Remap).
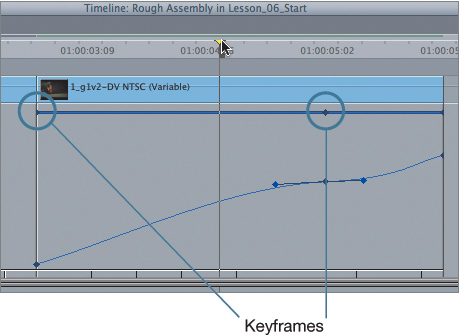
The blue diamonds on the horizontal blue bar represent the locations of the keyframes. Below the bar is the Time Graph.
Move the playhead anywhere over the last clip, and press X to mark the clip.
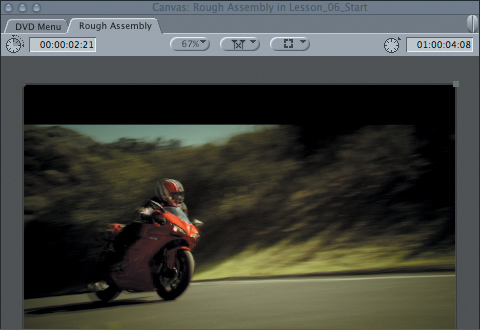
Note the duration of the clip at the top left of the Canvas: 2:21. You’ll later verify this length in Motion.
If looping playback isn’t already enabled, choose View > Loop Playback; then press Shift- (backslash) to play between the In and Out points of the clip.
The Timeline loops just the marked clip, making it easy to examine.
A keyframe is placed about two-thirds of the way through the clip where the slope of the curve flattens out, indicating that the clip speed decreases as the playhead passes through the keyframe. Notice that the motorcycle slows down at that point, but the slow-motion effect is a little jerky.
Stop playback, select the last clip, and choose Modify > Speed, or press Command-J.
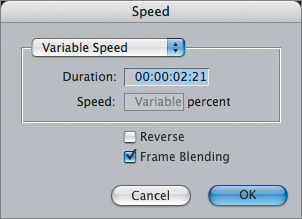
The Speed dialog opens with the Frame Blending checkbox selected. When Frame Blending is selected and a clip speed is below 100%, Final Cut will blend together existing frames to create new frames to smooth out the motion. Those frames do help, but using Optical Flow in Motion can help even more.
Press Cancel to exit the Speed dialog.
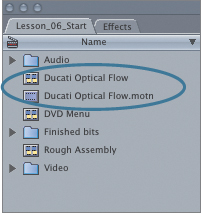
In the Timeline, Control-click the last clip and choose Send To > Motion Project.
The Export Selection to Motion Project dialog opens.
Enter Ducati Optical Flow in the Save As field.
Save the file to Motion3_Book_Files > Lessons > Lesson_06 > Student Saves.

Verify that the checkboxes are selected for Launch “Motion” and Embed “Motion” Content. Click Save.
You are saving a Motion project file that contains the selected clip. Because the Launch “Motion” checkbox was selected, Motion will open the project and become the active application. Because the Embed “Motion” Content checkbox was selected, this Motion project file will replace the selected clip in the Final Cut Pro sequence.
For the moment, press Command-Tab to return to Final Cut Pro.

Notice that Ducati Optical Flow.motn has replaced the original video clip. The .motn extension tells you that this clip is actually a Motion project file.
In the Browser, you can see both the Ducati Optical Flow.motn clip and a new sequence with the same name as the Motion project: Ducati Optical Flow.
Open the Ducati Optical Flow sequence.
This sequence contains the clip you sent to Motion. It’s a backup, just in case you want to return it to the main sequence or use it elsewhere.
Control-click the Ducati Optical Flow tab and choose Close Tab.
Press Command-Tab to return to Motion.
You’ll now work with this clip in Motion to improve the speed ramping effect.
Optical Flow is a technology taken from Shake, Apple’s visual effects compositing application. Essentially, it analyzes the motion in every frame of a clip to determine how the pixels in each frame are moving. When Optical Flow is applied to a clip and that clip is slowed with keyframes or behaviors, new frames are added to create the kind of smooth slow-motion effect that was once achievable only with high-speed film cameras.
Applying Optical Flow to a clip in Motion is a one-step process. But first you’ll examine this clip a bit. After all, it’s just been through a harrowing journey from Final Cut Pro to Motion, so you’d best make sure that it arrived intact.
Choose Mark > Reset Play Range to match the play range to the project duration, then press the Spacebar to play the clip.
The clip plays with the same speed ramping effect you saw in Final Cut Pro.
In the project duration field at the bottom right of the Canvas, make note of the clip’s length.
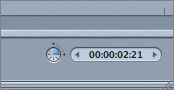
The duration is 2:21, the same as it was in Final Cut Pro.
Press F5 to open the Project pane, and in the Layers tab click the disclosure triangle to open Group 1.
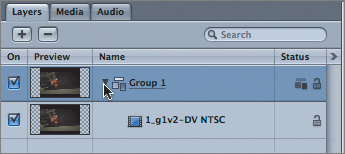
The source clip is tucked into Group 1 (the default layer name) with the same filename as it had in Final Cut Pro, 1_g1v2-DV NTSC.
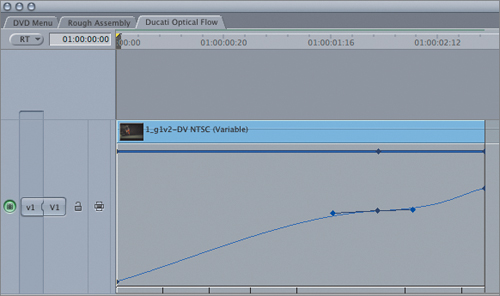
Select the 1_g1v2-DV NTSC layer, press F6 to open the Timing pane, and select the Keyframe Editor tab.
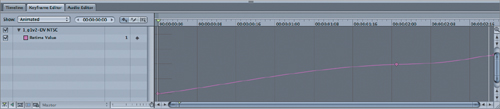
The graph you saw in Final Cut Pro appears in the Keyframe Editor, with keyframes in the same locations.
Press Shift-Z to fit the clip to the Canvas window.
Now that you’ve verified that the clip has made the trip from Final Cut Pro with the time remap changes intact, you can change its timing properties in Motion.
Press F1 to open the Properties tab of the Inspector.
At the bottom of the Properties tab is the Timing section.
Click the disclosure triangle to open the Timing section.

If the selected layer is anything other than a video clip, the Timing properties will include only the In point, the Out point, and the Duration, which are properties you could more easily adjust directly in the mini-Timeline. But if the selected layer is a video clip, as it is here, several additional parameters are available, including Frame Blending.
Click the Frame Blending pop-up menu.
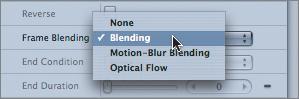
The current selection is Blending because the Frame Blending checkbox was selected in the Speed dialog of Final Cut Pro.
While the project is still playing, choose Motion-Blur Blending.
The new setting is applied immediately. The motion may look a little smoother overall, but the extreme slow motion at the middle keyframe still appears a bit jerky.
In the Frame Blending pop-up menu, choose Optical Flow.

The project continues to play, but nothing has changed. Notice the small animated icon to the left of the transport controls at the bottom of the Canvas. This is the analysis indicator, and it tells you that Optical Flow analysis is being performed in the background.
Double-click the analysis indicator.

The Background Task List dialog opens, showing a progress bar. Because the analysis is a background task, you can continue to work in Motion while it is under way.
When the analysis indicator disappears, the analysis is complete.
The results of the Optical Flow analysis can vary dramatically, depending upon the type of motion in the clip and the degree of slow motion applied. In this case, because the camera is panning the bike, the analysis sees the hillside moving and therefore warps the background as a result of the very slow speed setting.
In the Keyframe Editor, select the middle keyframe and drag the Bezier handles to adjust their length and angle while continuing to play back the project. Try moving the keyframe itself up, down, left, and right.
The clip immediately responds to changes made in the Keyframe Editor. Once the Optical Flow analysis has been performed, the clip does not need to be reanalyzed, even when making significant timing changes.
Note
The Optical Flow analysis creates a cache file on your hard drive, located in ~/Document/Motion Documents/Retiming Cache. The cache files can be quite large, so it’s a good idea to delete files you no longer need. You can delete cache files and change their location in Motion’s Preferences. Keyframes are covered in greater detail in Lesson 10.
Keyframes aren’t the only way to retime a clip in Motion. Often it’s faster and easier to use behaviors. Retiming behaviors, like all of Motion’s behaviors, allow you to create animation without keyframes. In this case, however, you aren’t animating position, scale, or opacity; you are animating time itself. A ramping effect similar to the one you created in Final Cut Pro using keyframes becomes quick work when using a Motion retiming behavior.
If necessary, select the 1_g1v2-DV NTSC clip, and play the project.
In the Properties tab of the Inspector, click the Time Remap pop-up menu and choose Constant Speed.
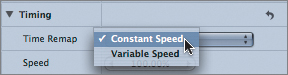
The clip now plays every frame at 100 percent of its original speed.
Press Command-2 to open the Library. Select the Behaviors folder, then the Retiming subfolder.
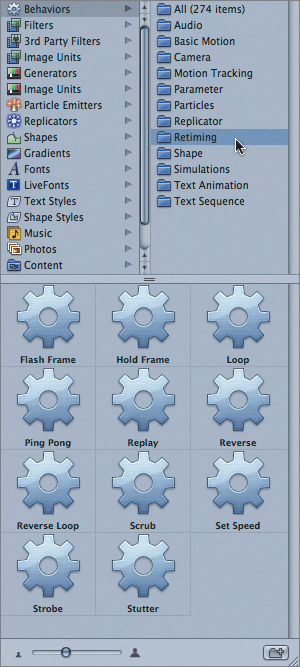
Select a few retiming behaviors and observe the results in the Preview area at the top of the Library tab.
You can probably figure out what each behavior does from its name, but the preview can be helpful. The Set Speed behavior is the one you’ll use in this exercise.
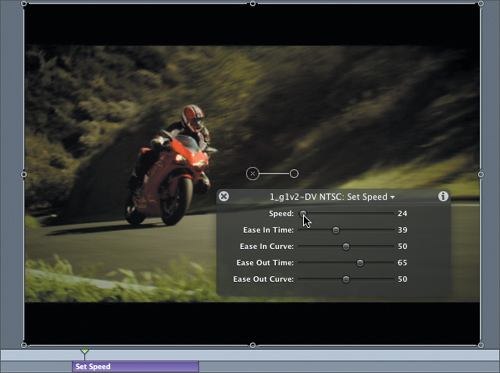
Drag the Set Speed behavior from the Library to the Canvas and release the mouse button. If the Heads Up Display (HUD) isn’t visible, press F7.
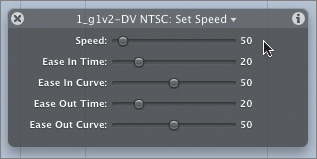
Like most behaviors, the Set Speed behavior is applied to the full duration of the clip by default. You can verify this because the effect bar fills the mini-Timeline. In the HUD, the default Speed value is 50%, so the entire clip is playing at 50 percent of its original speed. Since the project duration hasn’t changed, you now see only the first half of the clip.
For a ramping effect, you’ll trim and reposition the Set Speed behavior so that the clip will start and end at 100 percent speed but slow down in the middle.
Stop playback. Type 2. (two period) to move the playhead to 2 seconds, and press I to trim the behavior’s In point to the playhead.

Drag the behavior left to the middle of the project and resume playback.

The behavior now affects only the middle of the clip, while the rest of the clip plays at 100 percent speed.
But the speed doesn’t change instantaneously from 100 percent to 50 percent; that would be quite jarring. The other parameters for the Set Speed behavior—which are all available in the HUD—control how quickly and how smoothly the clip transitions in and out of the retimed section. You can think of these parameters in terms of controlling the length and angle of Bezier handles on “virtual keyframes” at the beginning and end of the behavior.
Note
Applying the Set Speed behavior will change the total duration of the source clip. For example, when the behavior is applied to the entire clip at its default value of 50%, the modified clip will be twice as long. This result is different from using keyframes with time remapping in Motion and Final Cut Pro. With keyframes and time remapping, a clip stays the same length, because when one section of a clip is slowed down, the other sections speed up to maintain the same clip length. When applying behaviors, the clip length changes because when one section of a clip is slowed down, the rest of the clip does not speed up to maintain the clip duration.
As the project plays, adjust each of the Set Speed parameters in the HUD to your liking. Also, try trimming and repositioning the behavior in the mini-Timeline.
Save your work and press Command-W to close the project (leaving Motion open).
By combining Optical Flow with retiming behaviors, you can quickly create ramping effects with standard-frame-rate video. We don’t need no stinkin’ high-speed film camera!
With the ramping effect completed, you can return to Final Cut Pro and observe the results of your Motion work in the context of your original sequence. But what if you need to make a few changes? The Open in Editor command allows you to pop back into Motion, while ensuring that Final Cut Pro will see your new work.
Return to Final Cut Pro.

As you have already seen, the Motion project file replaced the original clip in the sequence. The colored bar over the Timeline ruler indicates that the project needs to be rendered for full-quality, real-time playback.
Press Option-R to render the sequence; then play it.
All of the retiming changes you made in Motion are reflected in the clip.
Note
If you slowed down the clip, you will no longer see the same ending frame that previously was present in Final Cut Pro. If you want to see the full clip, return to Motion and increase the project duration to include the end of the clip. Then, in Final Cut Pro, you will be able to extend the clip to that ending frame.
If you feel you didn’t get it quite right, you can pop back into Motion and tweak it a bit more.
Control-click Ducati Optical Flow.motn and choose Open in Editor.
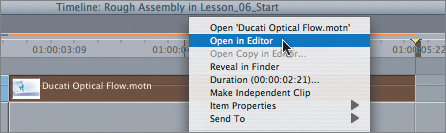
Since Motion is the editor for this project, the project opens in Motion.
In Motion, trim or reposition the Set Speed behavior in the mini-Timeline; then save and close the project.
Return to Final Cut Pro.
After a short Media Offline warning is displayed, the clip updates.
Note
While you could open the Motion project file without using the Open in Editor command, Final Cut Pro may not see your changes and could lose its link to the file. It’s safest to use the Open in Editor command to maintain the link between Final Cut Pro and Motion.
Of course, you don’t first need to keyframe the Time Remap parameter in Final Cut Pro to use Motion’s Optical Flow feature. If you know you’ll want to retime a clip, send it straight to Motion, and then retime it using keyframes or retiming behaviors. The advantage of using keyframes is that they don’t change the duration of the clip. If clip duration is not critical, retiming behaviors can be faster and more intuitive to use.
Sending a single clip or group of clips from Final Cut Pro to Motion is a great way to quickly apply effects or composite elements in Motion that are then reflected in Final Cut Pro.
You can also send an entire sequence to Motion, but sending a sequence is a one-way trip, so it’s most useful in situations when you don’t need to return to Final Cut Pro—for example, when exporting directly from Motion for the Web, or when building a DVD menu.
Whether you send a few clips or a full sequence to Motion, it’s important to understand which properties are retained so that you know what to build in Final Cut Pro, and what is best added in Motion.
In the Final Cut Pro Timeline, select the DVD Menu sequence tab and play the sequence.
This short sequence will form the basis for a DVD menu that you will create in Motion and apply in DVD Studio Pro. To understand which properties of a sequence are retained when it is sent to Motion, let’s poke around the sequence a bit.
Press Home to return to the first frame of the sequence.
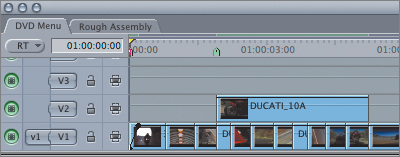
In the Canvas, the marker on the first frame is labeled opacity. The first clip’s opacity is keyframed, as indicated by the slope of the clip overlay.
Press Shift-M to move the playhead to the next marker.
The marker text, flop. appears in the Canvas.
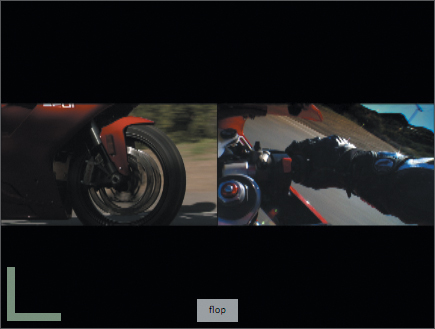
Double-click the clip on track V2 to load the clip into the Viewer, and then click the Filters tab.
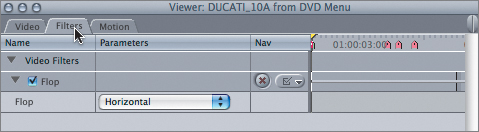
Sure enough, this clip has a Flop filter applied to it, so that the bike is facing in toward the center of the Canvas. The shot is a bit shaky, so you’ll smooth it using the SmoothCam filter.
Choose Effects > Video Filters > Video > SmoothCam.
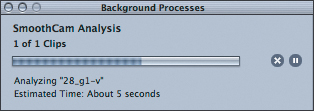
The Background Processes dialog appears, and Final Cut goes to work analyzing the clip.
When the analysis is complete, play the clip.

The clip seems to have grown much larger. The effect is actually pretty cool, but at this scale the clip is pixilated (and a mask would be required to hide the movement).
In the Filters tab, set both the Translation Smooth and Rotation Smooth values to 0.26, and then play the clip.

So much motion exists in this clip that Final Cut scaled up the clip to about 300% to fill the screen at all times. Reducing the two SmoothCam parameter values decreased the amount of smoothing, so the clip no longer needs to be rescaled, and the scale returns to 100%, as indicated in the Actual Scale field.
In the Viewer, select the Motion tab and note the settings.
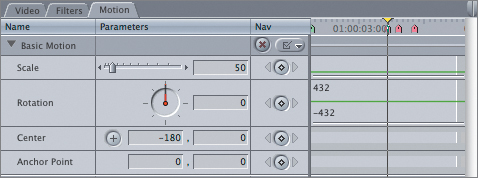
This clip is scaled down to 50% of its original size and is repositioned along the X-axis. In fact, all the clips underneath this one have been adjusted in the same way to create the split-screen effect.
In the Timeline, move the playhead to the third marker, slug.
This clip is a slug that was generated inside Final Cut Pro to create a pause between the end of the intro and the start of the DVD menu elements.
Move the playhead to the fourth and final marker, Menu text.
This is where the DVD menu text will appear when you add it in Motion.
The video clip at this marker is actually a freeze frame created from a video clip using Final Cut Pro’s Modify > Freeze Frame command. The clip’s name, titling.34_entag 00:00:07:17. includes the timecode of the freeze frame.
Double-click the titling.34_entag clip to load it in the Viewer, and click the Motion tab.
The keyframes for the center parameter cause the graphic to animate into position at the first beat of the menu_loop.aif music track. In the Canvas, you can see the motion path.
Play the sequence once more, noting the audio clips in the Timeline.

Tracks 1 and 2 contain the menu music, and tracks 3 and 4 contain sound effects. The first music track contains several markers that were used to cut the video to the beat of the music.
Now that you have become familiar with the sequence, it’s time to send it to Motion and see what elements come along for the ride. Because you want to send the entire sequence instead of individual clips, you’ll select it in the Browser.
In the Browser, Control-click the DVD Menu sequence and choose Send To > Motion Project.
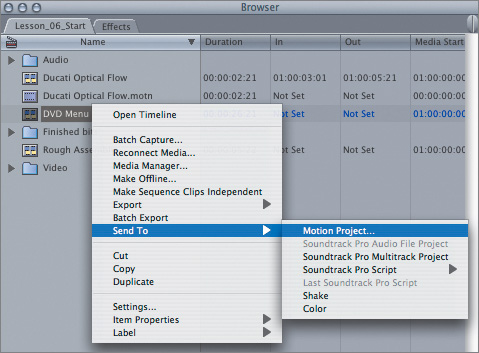
The Export Sequence to Motion Project dialog opens.
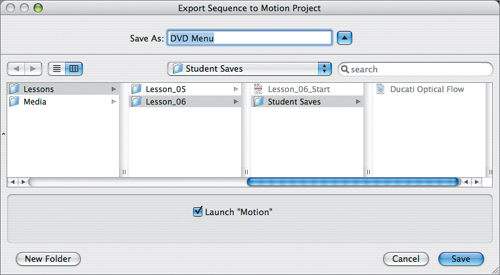
Accept the Save As default name DVD Menu. navigate to Motion3_Book_Files > Lessons > Lesson_06 > Student Saves, and click Save.
The project opens in Motion. Since sending a sequence to Motion is a one-way affair, you can close Final Cut Pro.
Return to Final Cut Pro. Save your project and quit the application. Return to Motion.
In Motion, play the project.
When you play the project, you can see the following:
The first clip fades in, so the opacity keyframes are retained.
The “split-screen” clips are there, so Motion remembers the scale and position changes made in Final Cut Pro.
The freeze frame of the graphic is present and animates into position.
The music and the sound effects can be heard.
Press Home.
Look at the effect bars in the mini-Timeline.

The Stabilize effect bar in the mini-Timeline is Motion’s translation of the SmoothCam effect in Final Cut Pro.
Press F5 to open the Project pane.
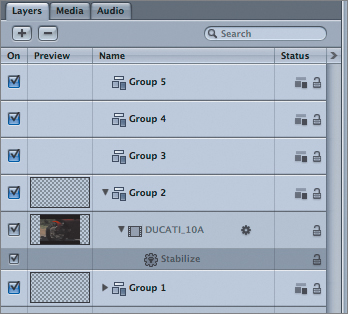
The Stabilize behavior is applied to the DUCATI_10A layer inside Group 2.
Press F6 to open the Timing pane.
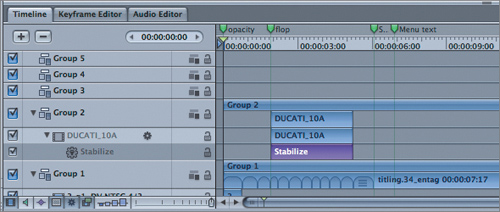
Note the four markers in the ruler area. All of them arrived intact from Final Cut Pro, including the marker names.
At the bottom left of the Timeline, click the Show/Hide Audio button.

The music and sound-effects tracks appear—one track for each channel of the stereo pair. The clip markers in the first music track are also present.
It looks like all the video and audio clips arrived with In and Out points intact; the opacity keyframes in the first clip remain; the SmoothCam filter was converted to the Stabilize behavior; the freeze frame was converted to the Hold Frame behavior; Final Cut Pro’s Motion tab parameters, such as Scale and Position, were respected in Motion; keyframes remain; and Timeline markers and audio clip markers are all there. Is there anything that didn’t make the trip?
Move the playhead to 1:22.

The motorcycle on the left is now facing off the Canvas. It looks like the Flop filter fell off the back of the truck. In fact, filters generally are not retained when sending clips and sequences from Final Cut Pro to Motion, with the SmoothCam filter being the sole exception. But Motion has its own Flop filter, so there’s a quick fix.
Choose Edit > Deselect All, or press Command-Shift-A.
In the Layers tab, select the DUCATI_10A clip in Group 2; then click the Add Filter icon at the top of the Canvas and select Distortion > Flop.
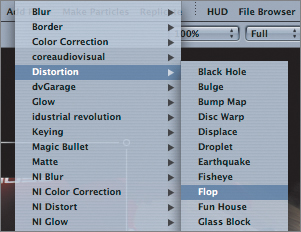
The clip now faces the correct direction.
Press Command–Option–Right Arrow to move the playhead to the third marker, slug. Scroll up and down in the Timeline.
Tip
You may find it easier to scroll in the Timeline if you temporarily hide the audio to make more room in the interface.
You won’t find the slug clip. That’s because generators don’t make the trip from Final Cut Pro to Motion.
Note
In general, all of Final Cut Pro’s Motion tab properties, including keyframes on those properties, also appear in Motion. Filters, generators, and transitions will not (with the exception of SmoothCam).
Since the background color for this project is set to the default black, you don’t really need the slug here, but you need to ensure that the background will be rendered with the project.
Choose Edit > Project Properties, or press Command-J.
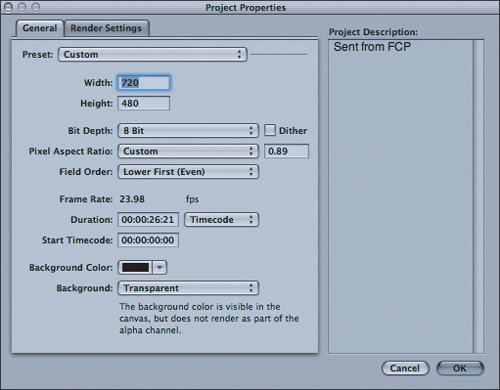
The Project Properties dialog opens. By default, Background is set to Transparent, which is appropriate if you want to composite the Motion project over a track in Final Cut Pro. But for the DVD menu, you want a solid black background.
Click the Background pop-up menu and choose Solid.

The Background Color is set to black by default.
Click OK to close Project Properties. In the Layers tab and in the Timeline, close all open groups.
The Motion project is now an exact copy of the original Final Cut Pro sequence and is ready for the additional DVD menu elements.
Motion allows you to perform many common editing operations, such as insert edits, overwrite edits, and superimpose edits. You’ll use these as you edit another Motion project file into this project that contains the DVD menu elements.
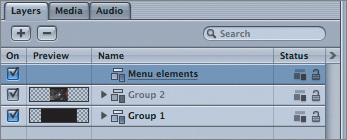
In the Layers tab, delete Group 4 and Group 5.
These are empty groups that are created when some items sent from Final Cut Pro to Motion don’t make the trip.
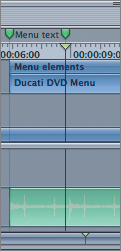
Rename Group 3 to Menu elements.
In the Timeline (F6), click the Show/Hide Audio button to hide the audio tracks (if you didn’t earlier).
It will be easier to work with the video if there is a little more display room.
Press Command–Option–Right Arrow as many times as necessary to jump to the Menu text marker.
With the Menu elements group visible in the Timeline, go to the File Browser, navigate to Motion3_Book_Files > Media > Ducati, and locate the Text Elements file.
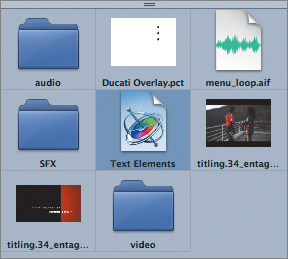
This file is a Motion project containing animated text that was created for this project.
Note
You will learn how to animate text in Lesson 7.
Drag the Text Elements file from the File Browser to the Timeline, holding down the mouse button and moving over the Menu elements group track at the playhead location.
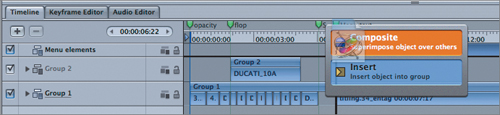
A thick black vertical line indicates that you have snapped to the playhead, and a drop menu appears with two editing options, Composite and Insert.
Select Composite.
Since you want to composite these animated text elements over the background image that is already in the Canvas, Composite is the right choice here. Composite is similar to performing a superimpose edit in Final Cut Pro.
Note
Choosing Insert would shift all layers to the right of the edit point to make room for the clip (and would split any layers to the right and left of the edit point). Another option that may appear is Overwrite, which trims any layers underneath the new file for the duration of the file. Both Insert and Overwrite work similarly to the same edits in Final Cut Pro.
Play the project.

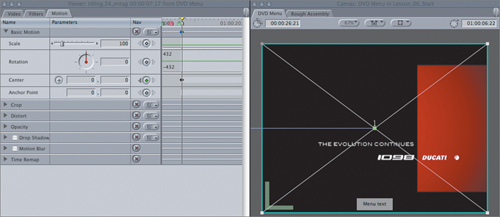
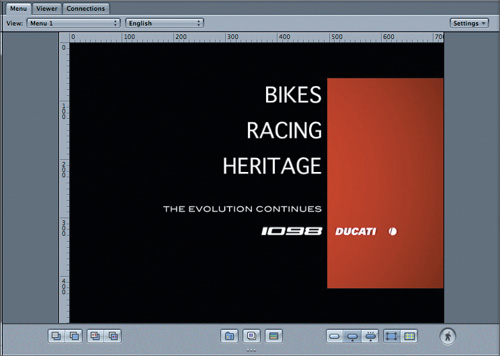
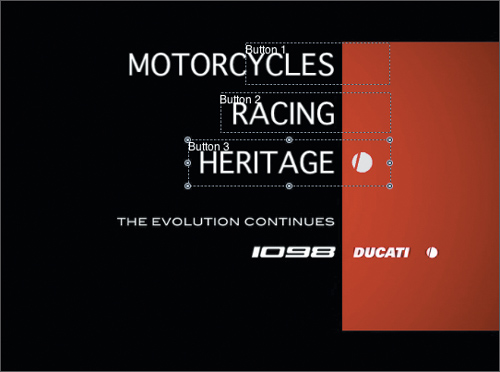
Three DVD menu text elements—BIKES. RACING. and HERITAGE—animate onto the screen over the Ducati background plate.
With the text in place, you can now add two behind-the-scenes elements that DVD Studio Pro will use.
Stop playback, and then press F6 to close the Timing pane and save your work.
Every DVD menu needs highlights. visual feedback that indicates whether a menu button is in a normal, selected, or activated state. One way to tell DVD Studio Pro where to place the highlights on a menu is to use an overlay file. An overlay file can be a simple black and white graphic: Areas that are black become highlights when you add buttons in DVD Studio Pro, and areas that are white are ignored.
You can create the overlay inside Motion and then export it as a still image for DVD Studio Pro. For this project, the overlay is already present but not activated. You’ll now activate it and export a frame as an image file.
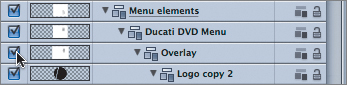
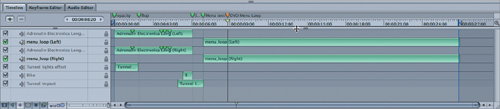
In the Layers tab, open the Menu elements group and all the groups inside it. Resize the groups so that you can see as many layers as possible.
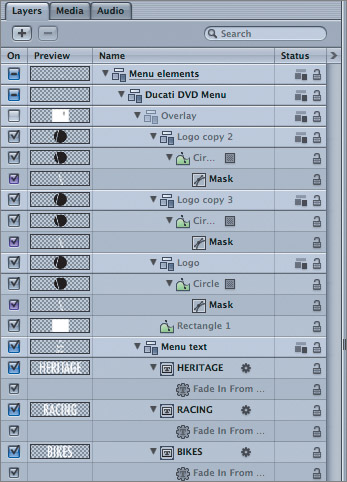
The Menu text group contains the three text elements, each animated with a behavior.
The Overlay group contains three subgroups—each one contains a copy of the Ducati logo made with a shape and a mask. You can see the shapes in the preview icons of the Layers tab, but you can’t see them in the Canvas because the Overlay group is inactive.
Select the activation checkbox for the Overlay group.

The three black Ducati logo symbols will become the highlight areas for each button in the menu when this image is applied as an overlay in DVD Studio Pro.
Deselect the activation checkbox for the Rectangle 1 layer to hide it.

Now you can see that the highlights are aligned with the menu text—this is where they will appear in DVD Studio Pro.
Select the activation checkbox for the Rectangle 1 layer to turn it back on.
You need the white background as part of the exported still image to tell DVD Studio Pro where not to draw highlights.
Choose File > Export.
The Export dialog opens.
In the Save As field, enter Ducati Overlay. and then navigate to Motion3_Book_Files > Lessons > Lesson_06 > Student Saves.
Click the Export pop-up menu and choose Current Frame.

All you need for DVD Studio Pro is a single still image.
Click the Use pop-up menu and choose PICT.
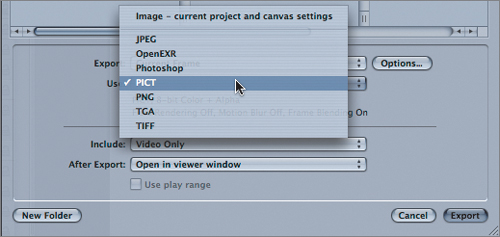
Click the After Export pop-up menu and choose “Do nothing”; then click Export.
Motion exports the PICT file.
Deselect the activation checkbox for the Overlay group to turn the group off, and close the Menu elements group.
You don’t want to see the overlay in the Motion project. You only needed it to create the overlay file for DVD Studio Pro.
Tip
You could use another graphics application, such as Adobe Photoshop, to create your overlay, but the benefit of creating it in Motion is that you can easily align the overlay elements with other elements in your composition, and move them if you change the menu layout.
With the overlay created, you can set a loop point. The loop point determines where the menu will restart after reaching the end of the project, and also sets the point where the highlights first appear. If that doesn’t yet make sense, it will be easier to understand when you later see it work in DVD Studio Pro. When a loop point marker is set in Motion, DVD Studio Pro sees it and sets the same loop point automatically.
Move the playhead to 8:20. If necessary, press F6 to open the Timing pane, click the Show/Hide Audio button to display the audio tracks, and drag between the track names to increase the size of the audio tracks and reveal the waveform overlay.

This frame is at a point in the project just after all the text has animated onscreen, and just before the next beat of the music track.
Press Shift-M to add a project marker.
A green marker appears in the Timeline.
Double-click the marker.
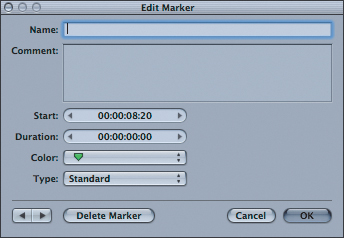
In the Edit Marker dialog, name the marker Menu Loop Point.
Click the Color pop-up menu and choose a color other than green.
It’s not required, but changing the marker’s color makes it easy to distinguish it from the green markers that came over from Final Cut Pro.
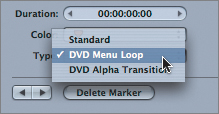
Click the Type pop-up menu and select DVD Menu Loop. Click OK.
This step is essential. It tells DVD Studio Pro to use this frame as the loop point.
The project is now ready to travel to DVD Studio Pro. But you’ll make one more stop before reaching your final destination.
You will likely perform most of your audio work in Final Cut Pro and Soundtrack Pro, perhaps moving back and forth between them. However, sometimes you’ll want to add a quick effect to an audio clip that you have already brought into Motion. You can round-trip the clip to Soundtrack Pro for processing, and it will be automatically updated inside Motion.
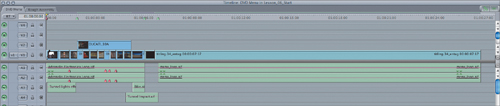
In the Timeline, drag up the divider bar between the audio and video tracks and decrease the track size so that you can see as many audio tracks as possible.
Play the first few seconds of the project, listening to the Tunnel lights effect clip.
It’s good, but a bit of echo could amplify the feel of being in a tunnel.
Control-click Tunnel lights effect and choose Send to Soundtrack Pro.

In the Save As dialog, accept the default name, navigate to Lesson_06 > Student Saves, and select Save as Soundtrack Pro Audio.

Soundtrack Pro launches an audio project, and the clip’s waveform appears in the main window.
Choose Process > Effects > Reverb > Space Designer.
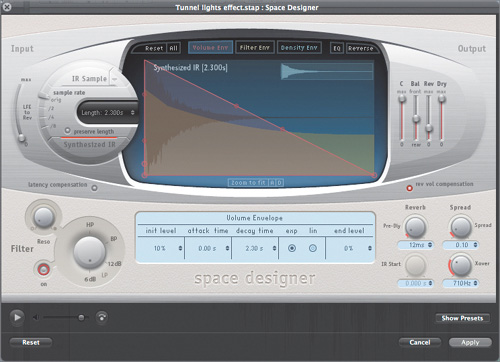
A large, intimidating interface appears. You’re going to bypass this whole interface and simply apply a preset.
At the bottom right of the Space Designer interface, click the Show Presets button.
In the Preset window that opens, choose User Presets > 01 Large Spaces > 06 Outdoor Spaces > 0.25s Medium Tunnel.
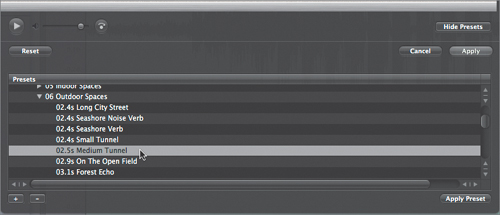
No need to work with all those sliders and dials when the perfect preset is ready and waiting for you.
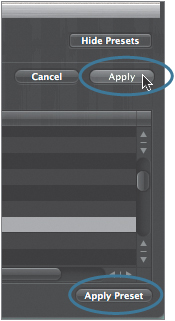
Click the Apply Preset button, and then click the Apply button above it.
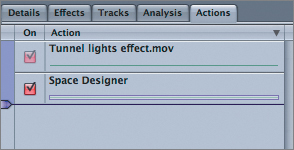
The Space Designer window closes, Soundtrack Pro applies the filter, and the filter appears in the Action list.
Press the Spacebar to listen to the result.
That sounds a bit more tunnel-like.
Press Command-S to save the change; then, in the Save Audio File Project Preference dialog that appears, click OK to include the source audio with the project file.
Quit Soundtrack Pro, return to Motion, and play the beginning of the project.
Fantastic. The DVD menu is complete and ready to be applied in DVD Studio Pro.
Press F6 to close the Timing pane; then save the project and quit Motion.
DVD Studio Pro happily accepts a Motion project file as a menu background, so there’s no need to export a movie from Motion. And if you want to change the menu, you can use the Open In Editor command to return to Motion and make the change, which will be automatically reflected in DVD Studio Pro.
In this exercise, you’ll focus on just those steps you need to apply the menu and overlay in DVD Studio Pro, make buttons, test the menu, and make a change to the menu in Motion.
Launch DVD Studio Pro.
Press F3 to view the Advanced configuration.
This layout lets you see all parts of the DVD Studio Pro interface.
In the Assets tab (at the bottom left of the interface), click the Import button.

In the Import Assets dialog, navigate to Motion3_Book_Files > Lessons > Lesson_06 > Student Saves.
Hold down the Command key and select Ducati Overlay.pct and DVD Menu. then click Import.
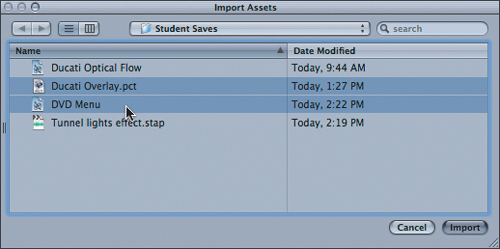
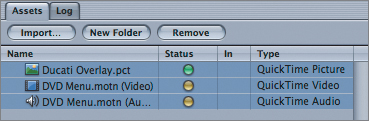
The files appear in the Assets tab of DVD Studio Pro. The Motion project file is split into two files: one for the video and one for the audio.
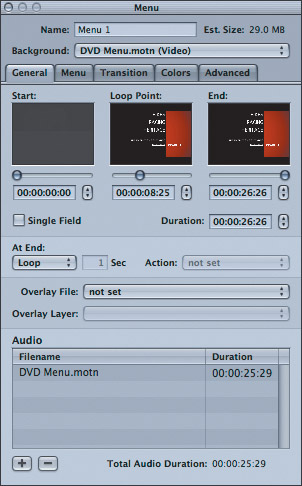
Click DVD Menu.motn (Video) once to deselect the other files. Drag DVD Menu.motn (Video) into the large Menu tab in the center of the screen, holding down the mouse button until the Drop Palette appears. Position the pointer over Set Background and release the mouse button.
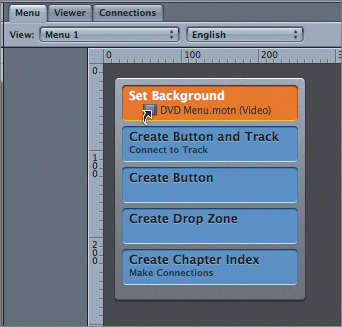
The Motion project appears in the menu, with all the text onscreen.
Notice that in the Inspector (the bottom right window), the loop point has automatically been set to 8:20. Also notice that the audio has been added to the menu automatically, because the audio file has the same filename as the video file.
From the Assets tab drag Ducati Overlay.pct to the Menu tab, wait for the Drop Palette, and release the file on Set Overlay.

Nothing seemed to happen, but in the Inspector the pop-up menu for Overlay File now shows the same filename, Ducati Overlay.pct.

To see the overlay in action, you need to draw the buttons.
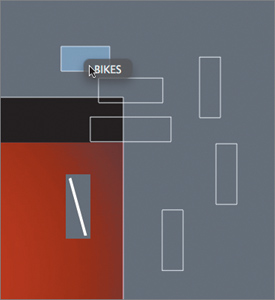
In the Menu tab, click near the top left of the word BIKES and draw a rectangular button around the word that extends far enough to the right to reveal the highlight.
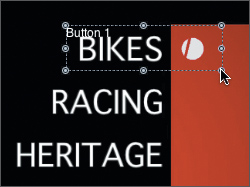
The highlight appears with its default white color displayed, directly over the invisible overlay file’s black pixels that are hiding beneath. If the DVD is played on a computer, the highlight will show when the pointer is placed anywhere over the button.
Draw buttons around the other two words, RACING and HERITAGE. each large enough to show the logo highlight, but making sure not to overlap them.

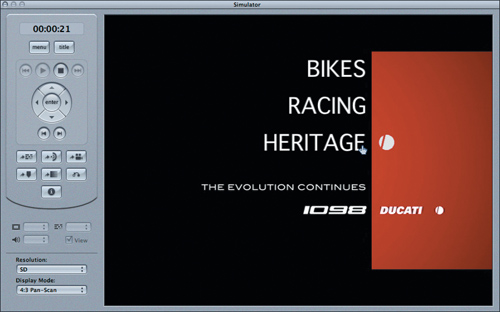
At the top of the window, click the Simulate icon.

The Simulator launches and plays the menu. After the menu text animates onto the screen, you can move the pointer over each word to see the highlight. Let the menu play to the end to observe the loop point in action. The menu should loop back to 8:25 so that the words and highlights remain static on the screen.
Note
As its name implies, the Simulator simulates what the menu will likely look like in the DVD. Because DVD Studio Pro is attempting to play material that has not yet been multiplexed (and is not even rendered to a single file but references multiple files), simulated playback may stutter. Also note that the Simulator will not play the audio of a Motion project; you’ll need to build the DVD to test the audio.
Let’s say that your client has changed his mind and wants the word BIKES changed to MOTORCYCLES. After rolling your eyes and sighing loudly (when you are off the phone, of course), you realize that it’s actually very simple to do.
In the Assets tab, Control-click DVD Menu.motn (Video) and choose Open In Editor.

Motion opens.
Move the playhead to a frame in which you can see the menu text, and press X to activate Motion’s expose feature.
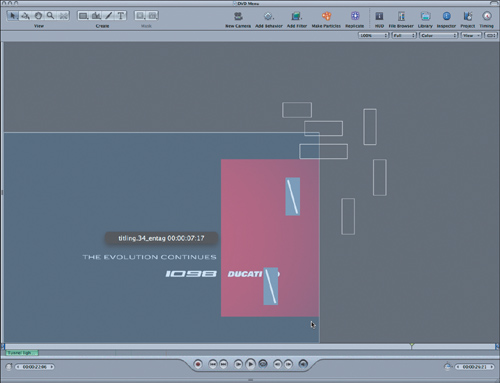
All the elements in the composition at the current frame spread out in the Canvas.
Position the pointer over each element until you locate the BIKES text layer; click to select it.
The composition returns to normal with the BIKES text selected.
Double-click the BIKES text (be sure to click directly on a letter) to highlight it and enter MOTORCYCLES. Adjust the text position, if necessary.

Press Esc (Escape) to exit text-entry mode. Save your work, quit Motion, and return to DVD Studio Pro.
The Asset Refresh dialog appears.

Click OK. If it appears again for the audio, click OK again.
The new text appears in the menu. The project is now ready for you to name buttons, add tracks, link the buttons to the tracks, and do all that other good DVD Studio Pro stuff.
Save the DVD Studio Pro project to the Motion3_Book_Files > Lessons > Lesson_06 > Student Saves folder with the filename Ducati DVD Menu.
Congratulations—you have completed quite a journey through Final Cut Studio! You started in Final Cut Pro by editing content for the menu, then took the sequence into Motion, where you added the DVD text elements and created the overlay for the highlights in DVD Studio Pro. From there, you took a side trip to Soundtrack Pro, where you added an effect to an audio clip in Motion. Finally, in DVD Studio Pro you applied the Motion project file as a menu. Along the way, you discovered the project properties that move between applications, as well as how to use the Open in Editor command to make changes that are automatically updated. You can now travel confidently and freely in the land of Final Cut Studio.