
Lesson Files | Motion3_Book_Files > Lessons > Lesson_08 |
Media | Motion3_Book_Files > Media > Particles |
Time | This lesson takes approximately 60 minutes to complete. |
Goals | Use generators to create background elements |
Export and replace a group | |
Build familiarity with emitter presets | |
Create a custom 3D particle emitter | |
Modify emitter and cell parameters |
Pity the writer with nothing but an empty page staring at him. As a motion graphics artist, you are often called upon to create something from nothing; but—unlike the writer—you have Motion’s Library, loaded with objects and content ready to inspire your project.
Motion’s generators are a good starting place for creating background shapes and patterns; and with Motion’s particle engine you can create all kinds of animated magic, from backgrounds for lower-thirds titles to natural phenomena like clouds, smoke, rain, and fire.
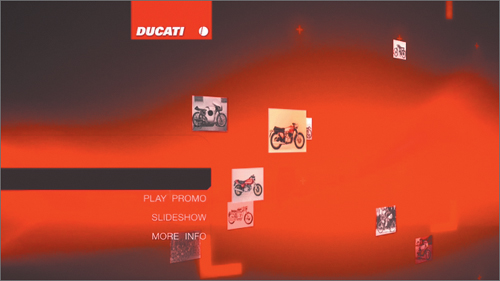
In this lesson, you will create a DVD menu for a Ducati motorcycles promo. You will focus your efforts on the animation that happens after the loop point—after the menu text has animated onscreen.
You’ll create background elements by applying generators in combination with filters and other graphics. Then you’ll use Motion’s particle engine to create the effect of photographs gently raining down in 3D space.
First, you should preview the finished project.
Open Motion3_Book_Files > Lessons > Lesson_08 > DVD_menu_finished.mov. Play the movie.
This is the looping section of the DVD menu. It will loop continuously until the viewer makes a menu selection. You will start your menu with an empty project, adding a few prebuilt elements and creating some elements of your own.
Open Motion3_Book_Files > Lessons > Lesson_08 > Lesson_08_Start. and then save it to the Student Saves folder.
Press F5 to open the Project pane.
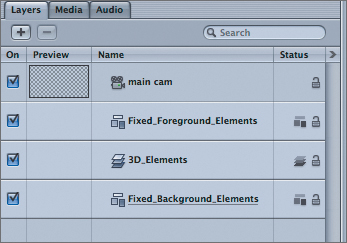
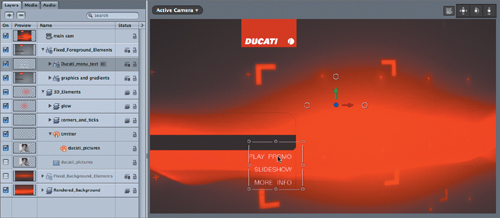
The project contains a camera and three empty groups:
The Fixed_Foreground_Elements group will contain the logo, menu text, and a few other stationary elements at the top of the composition.
The 3D_Elements group will contain particles and other elements moving in 3D space.
The Fixed_Background_Elements group is a 2D group that will contain the animated 2D background design that you will create using a combination of graphics, generators, and filters.
You’ll start from the bottom group and work up, first building the background elements.
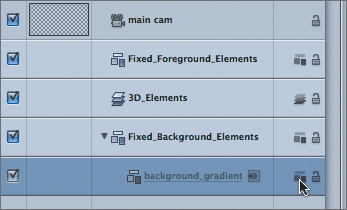
Press Command-Shift-N to create a new group, name it background_gradient, and drag it into the Fixed_Background_Elements group. Click the 2D/3D icon to switch the group to 2D.
The first element you’ll add to this group is a gradient image file.
In the File Browser, navigate to Motion3_Book_Files > Media > Particles, and drag horizon_grad.10_8m.psd into the background_gradient group.
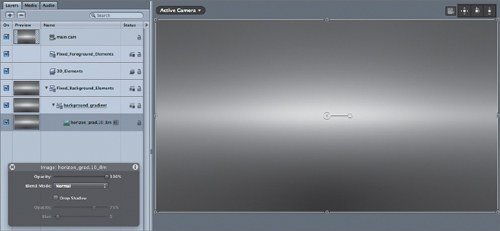
The file automatically is scaled down to fit the Canvas. But in this case, you want it at full size so that you can lower the brightest part of the gradient in the Canvas to serve as a horizon for the animated elements to come.
Press F1 to open the Properties tab of the Inspector, and change the Scale value to 100%.
In the Canvas, drag down the gradient image so that the bright horizontal bar is located about two-thirds of the way down in the Canvas.
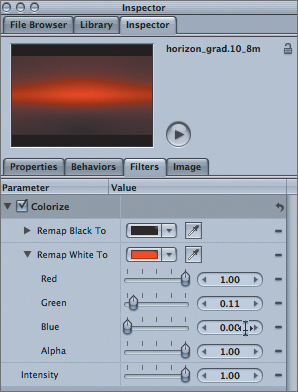
In the Toolbar, click the Add Filter icon and choose Color Correction > Colorize.
Rather than sample a color with the eyedropper, you’ll enter a specific value.
If the Filters tab isn’t already visible, press F3 to open it in the Inspector.
Click the disclosure triangle of the Remap White To parameter group; then set Red to 1.00, Green to 0.11, and Blue to 0.00.
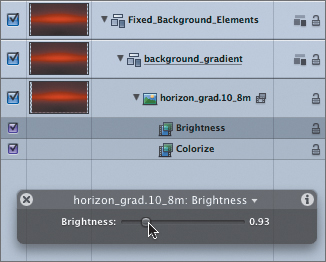
The color is good, but the overall background is a bit too bright. You don’t want it to compete with the elements you’ll be adding.
In the Toolbar, click the Add Filter icon and choose Color Correction > Brightness. In the HUD (press F7), set Brightness to 0.93.
Gradients are a great way to create soft, gradual changes in color and brightness, but they can break down when compressed, resulting in banding. Adding a little noise can help smooth out the gradient.
Press Command-1 to open the File Browser, and locate the background_noise file.
This file was created by dragging a group of elements from a Motion project into the File Browser.
Drag the background_noise file from the File Browser to the Fixed_Background_Elements group in the Layers tab.
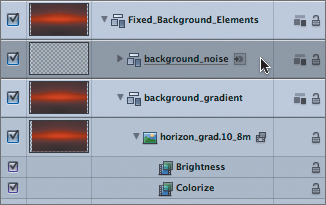
Motion places the file at the top of the Fixed_Background_Elements group, and it appears as a group named background_noise.
Start playback; then expand the background_noise group and open each of the elements inside the group.
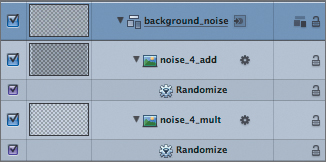
The group contains two graphics files with random noise, each animated with a parameter behavior so that they move randomly around the Canvas. If you select each layer and then look in the HUD, you’ll see that each has a very low opacity and a different blend mode applied to it. The upper graphic is set to Add, the lower to Multiply. Together they create an effect that is difficult to see but will conceal any banding artifacts in the gradient.
Note
You’ll work more with parameter behaviors in Lesson 10.
Stop playback and return the playhead to the first frame. Close the background_gradient and background_noise groups and save your work.
Generators are another category of objects in Motion’s Library. Like shapes and text, a generator becomes a layer when added to the Canvas, and it can be manipulated like any other layer. You can change a generator’s properties, such as position, rotation, and scale, and you can add behaviors, filters, and masks. But generators also have unique parameters that are found in the Generator tab.
Generators can be useful for creating static or animated shapes, including the animated part of your DVD menu background, and patterns of all kinds. By manipulating parameters and adding effects, you can turn a generator’s default appearance and animation into something completely different.
Select the background_noise group; then press Command-Shift-N to create a new group and name it generators.

Because you first selected the background_noise group, the new group is automatically placed above it, inside the Fixed_Background_Elements group. You want the generator animation to stay in the same location no matter where the camera moves, so you placed it in the same 2D group as the other background elements.
In the Library, select the Generators category. In the file stack at the bottom, select each generator and watch the preview.
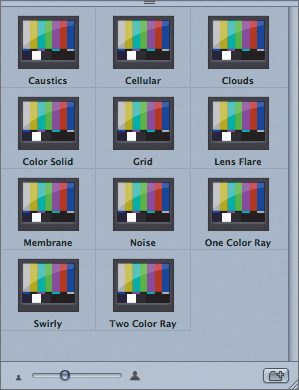
Motion comes with 11 generators. Five of those generators are animated by default, but all 11 can be animated using behaviors or keyframes. The thing to remember about generators is that you can make them look completely different from their default appearance—so don’t pass one up just because you think it doesn’t look very interesting.
In this exercise, you’ll use the Membrane generator and modify it with a few filters.
Select the Membrane generator. Be sure that in the Layers tab the generators group is selected. Click the Apply button at the top of the Library.

The generator is added to the generators group and automatically centered in the Canvas. You want it to animate over the brightest portion of the underlying gradient, so first you’ll change its scale and position.
In the Canvas, make some room by holding down Command-Spacebar and dragging left. Then, drag the bounding-box control handles to resize the generator so that it spreads over the bottom third of the Canvas.

Tip
If you hold down Option while dragging a center bounding-box control handle, the opposite side will move by the same amount in the opposite direction. This makes it easy to stretch a layer and keep it centered.
Now you can modify the generator’s color to better match the background, and also slow down the animation.
Press F4 to open the Generator tab of the Inspector.

The Generator tab contains the parameters unique to the generator.
Click the Color well and choose a bright red. Then, set Speed to 0.04 and Brightness to 13.
If one generator looks good, two will surely look better.
Press Command-D to duplicate the Membrane layer. In the Canvas, drag the handles of the Membrane copy to make the layer thinner and wider.
In the Generator tab or the HUD, drag several of the start and end sliders so that the Membrane copy has a different animating pattern. Set Speed to 0.08, Offset to 0.89, and Brightness to 22.

With the basic pattern in place, you can add a few filters to blend it into the composition. You’ll apply the filters to the group so that they affect both Membrane layers simultaneously.
In the Layers tab, select the generators group. Then, in the Toolbar, click Add Filter and choose Blur > Gaussian Blur. In the HUD, set the Amount value to 10, leave Horizontal set to 100, and set Vertical to 0.
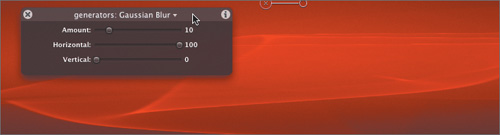
The horizontal-only blurring softens the pattern.
In the Toolbar, click the Add Filter icon and choose Distortion > Bulge.
In the Canvas, drag the crosshair to center it on the pattern. In the HUD, change the Amount parameter to 400 and Scale to 3.
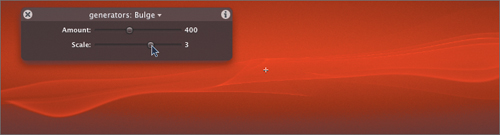
The change in the Scale value causes the pattern to get thinner in the middle and thicker toward the edges, flattening out the overall pattern and aligning it with the gradient. You’ll add one more filter to liven things up.
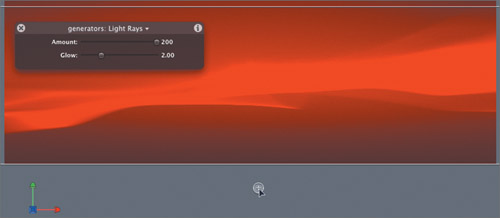
In the Toolbar, click the Add Filter icon and choose Glow > Light Rays.
In the Canvas, drag the crosshair straight down below the bottom of the visible part of the Canvas, so that the light rays shoot upward.
In the HUD, set the Glow value to 2.0. Save and play the project.
The combination of three filters applied to the two generators creates an undulating, ethereal look that should work well for this project.
The background composite that you created is fairly complex, containing multiple layers, filters, behaviors, generators, opacity levels, and blend modes. The background is complete, and you don’t expect to make any more changes. So, rather than requiring Motion to calculate all these elements every time you move the playhead, you can export the background as a self-contained movie and use that in place of the current elements. This process, sometimes called baking, renders all the elements into a single movie clip. Therefore, it takes much less processor power to play, but it cannot be altered. Your original elements are still in the project, however, so you can always return to them and make a change if necessary.
In the Layers tab, close the Fixed_Background_Elements group and then select it.
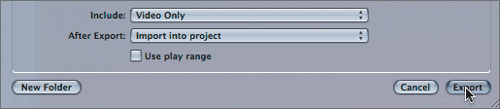
Choose File > Export Selection.
In the Export dialog, choose the Lesson_8 > Student Saves folder.

From the Export pop-up menu choose QuickTime Movie.
From the Use pop-up menu choose DVCPRO HD 720p30 Movie.
This choice matches the project’s Properties setting.

Note
For the highest quality and to retain an alpha channel, choose “Movie – current project and Canvas settings.” However, that setting can result in very large file sizes for a negligible quality increase. In this case you don’t need an alpha channel, so choosing the specific project settings will do just fine.
From the After Export pop-up menu choose “Import into project.” Make sure the “Use play range” checkbox is deselected, and click Export.
Motion will display an Export window as it exports a QuickTime movie of the selected group with all the current settings. It will then import the new QuickTime movie back into the project and place it in its own group, just below the exported group.
Deselect the activation checkbox for the Fixed_Background_Elements group.

With the QuickTime movie in place, you no longer need to display the original elements.
Rename the new group Rendered_Background, change it to a 2D group, and close it. Play the project.
You can now view real-time playback of the background.
Save your work.
With the background elements completed, you can turn your attention to the 3D elements. The primary element will be a 3D shower of Ducati photographs taken over the years. You’ll create a custom particle system to do this, but only after you explore Motion’s large collection of preset particle emitters.
For the Rendered_Background group, deselect the activation checkbox.

You don’t need to see the background while you are experimenting with preset emitters.
In the Library, select the Particle Emitters category.

Over 200 preset particle emitters in Motion are organized into eight folders. Let’s examine a few of them.
In the Abstract folder select Flow 01, and watch it in the Preview area at the top of the Library.
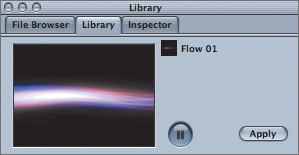
This emitter could make a good lower-third background. Many of the emitters in this category are excellent candidates for background elements.
With the project playing, drag the Flow 01 emitter to the 3D_Elements group in the Layers tab.
The emitter appears in the Canvas, starting at the beginning of the project, but doesn’t last the full length of the project. Many preset emitters have a default length of 10 seconds, although you can easily trim them in the mini-Timeline. This emitter also looks quite small in the Canvas because, like many emitters, it was designed for standard-definition projects and needs to be modified to fit high-definition projects.
By creating a custom particle emitter, you’ll learn how to modify preset emitters to suit your projects.
Press Command-Z to undo, thereby removing the emitter from the Canvas.
In the Library, select the Fauna folder, and then drag the Feather Ball emitter to the 3D_Elements group in the Layers tab.
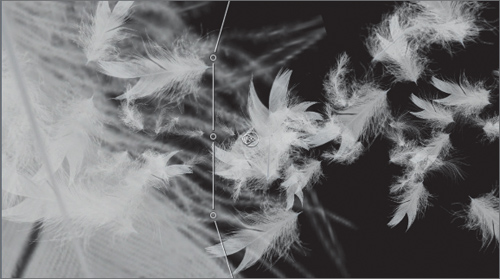
This is a 3D emitter whose particles move in 3D space.
Press Command-Z to undo, and then, in the Library, select the Nature folder. Drag the Water Fall emitter to the 3D_Elements group in the Layers tab.
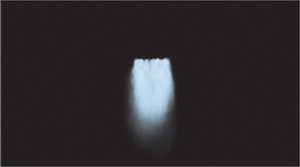
Particle emitters are well suited to imitating natural phenomena such as smoke, fog, fire, rain, and water.
Undo, and then, in the Library, select the Pyro folder. Drag the Corona emitter to the 3D_Elements group in the Layers tab.
You’ll make a few quick modifications to this emitter.
Stop playback. Press Shift-O to move the playhead to the Out point of the emitter; then press Command-Option-O to set a play-range Out point.

In the Canvas, Shift-Option-drag a corner control handle to increase the scale of this emitter to about 300 percent, scaling proportionally around the anchor point. Resume playback.
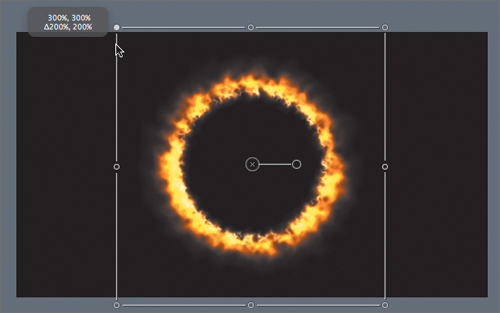
In the 3D controls at the top right of the Canvas, drag the center Orbit control until you can see the edge of the emitter.

This is a 2D emitter—a flat card in 3D space.
Press F4 to open the Emitter tab of the Inspector.
There are a lot of parameters here. For now, you care about only one.
Near the top of the Emitter tab, select the 3D checkbox.

The emitter now emits particles in 3D space.
Press F1 to open the Properties tab of the Inspector, and increase the Scale Z value to 300%.
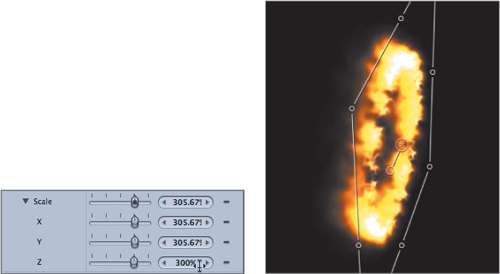
Now you can clearly see the particles moving in 3D space. Drag in the Orbit control to confirm.
In the Layers tab, delete the Corona and Wisp08 layers (the Wisp 08 layer is the source object for the emitter—more about that in the next exercise). Press Option-X to reset the play range. Select the Camera layer, and in the Properties tab of the Inspector, click the reset button (the hooked arrow).
Feel free to browse the other preset particle emitters and add them to the project—just make sure to undo when you are done.
Now that you have a sense of the possibilities that preset particle emitters offer, you will build your own.
Every particle emitter starts with a source object, and that object can be just about anything: an image, a movie, a shape, text, a generator, or a group.
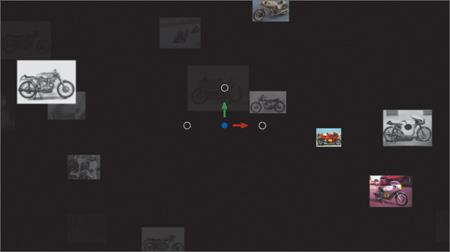
For this Ducati DVD menu, you will use a custom particle emitter to create particles that are spread out and falling in 3D space, with each particle being an image from Ducati’s archives. The source object for this emitter is a movie clip.
In the File Browser, select Motion3_Book_Files > Media > Particles > ducati_pictures.mov and watch the Preview area.
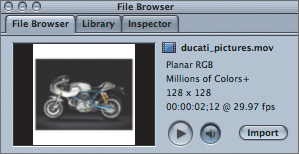
This movie contains 73 pictures, each 128 x 128 pixels in size, playing one picture per frame at 29.97 frames per second. The total duration of the movie is 2 seconds, 12 frames.
With the project still playing, drag ducati_pictures.mov from the File Browser to the 3D_Elements group in the Layers tab.
The clip appears in the Canvas for only a moment because it is so much shorter than the project, but that’s OK. The duration of the source object doesn’t affect the duration of the emitter.
In the Toolbar, click the Make Particles icon.

Immediately, dozens of copies of the movie clip appear to spread out and stream toward you in a massive clutter of images, each playing the movie clip from a different starting frame.
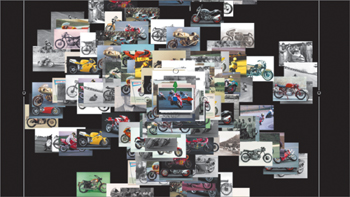
Stop playback before the cascade of images induces a permanent cross-eyed condition and look at the Layers tab.
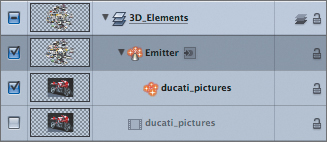
The original movie-clip layer, ducati_pictures, has been deactivated automatically. Above it, two new layers appear: Emitter, and, indented under it, ducati_pictures. The layer named Emitter is, surprisingly enough, the emitter—the object that spits out the particles. The layer below with the same name as the original source object’s, ducati_pictures, is called the cell—it represents all the particles flowing out of the emitter.
The HUD contains several controls for the Emitter.
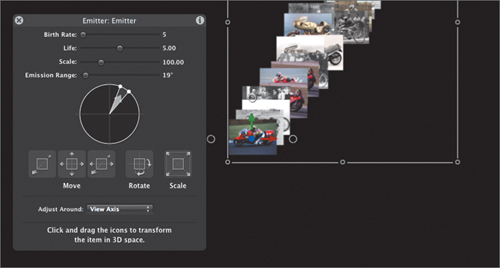
In the HUD, decrease the Birth Rate to about 5 and resume playback.
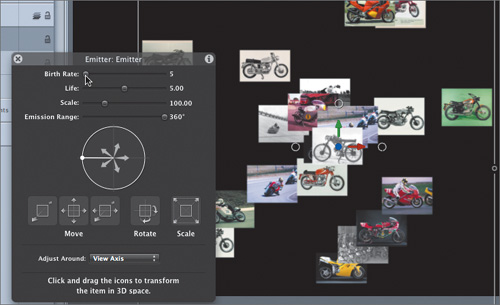
With just five particles being born every second, the result is a little easier on the eyes.
In the HUD, click the ball on the left edge of the circle and drag it around the circumference of the circle in either direction to change the Emission Range.
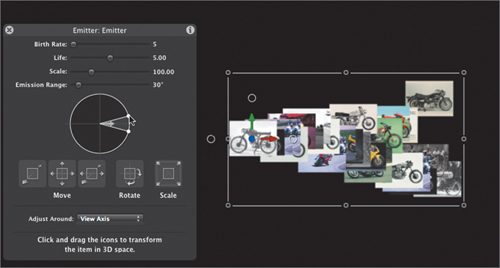
By default, the particles emit in every direction from a single point, but you can choose how wide the spray is.
Drag inside the “pie slice” to emit the particles at a different angle.
Drag the arrow to change the speed of the particles.
The HUD lets you make basic changes to the Emitter, but, as usual, you must go to the Inspector if you really want to dig in.
Press F4 to open the Emitter tab of the Inspector.
A long list of parameters—too long to fit on most screens—fills the tab. But don’t worry—it’s not as imposing as it looks.
The parameters in the Emitter tab include controls for both the Emitter and Cell layers. Changing these parameters allows you to tweak or completely change the look and feel of the Emitter layer. First, let’s deal with the rapidly changing pictures.
Near the bottom of the Emitter tab (you may need to scroll down), deselect the Play Frames checkbox.

That’s better. Now every particle shows just one frame. And since the Random Start Frame checkbox is selected, each particle chooses one of the 73 frames to show at random, and sticks with it.
Next, you’ll change the shape of the Emitter and make it 3D.
Near the middle of the Emitter tab, set the Speed parameter to 0.

With the particles stationary, it’s easier to discern the emitter shape.
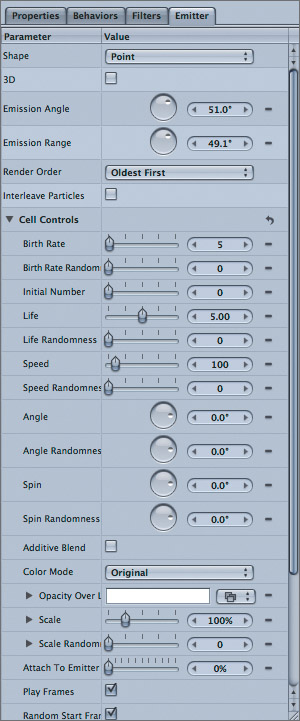
Near the top of the Emitter tab, select the 3D checkbox.

Nothing changes in the Canvas, because you first need to choose a 3D shape.
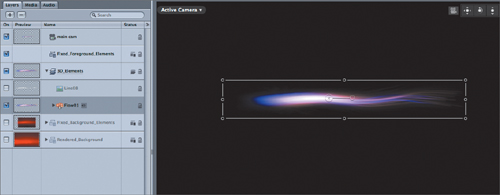
At the top of the Emitter tab, click the Shape pop-up menu and select Box.
From the Arrangement pop-up menu choose Random Fill, and then click the disclosure triangle to display the Size parameters.

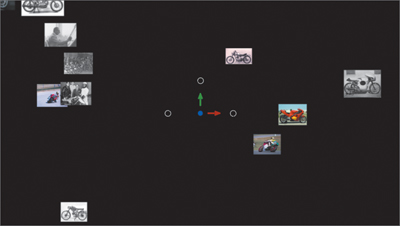
The particles now appear within a 3D box in the Canvas, arranged in a random pattern. The default size of this virtual box is 300 pixels wide, high, and deep. That’s not big enough for this project.
Set the Width, Height, and Depth values to about 1500 pixels by dragging in each value field, or click in the value field for Size and enter 1500. Save your work.
This emitter requires several additional adjustments to create a gentle shower of falling pictures, each fading in and out.
Set the Speed value to 50.

With the particles in motion, it will be easier to understand the Emission parameters.
Set Emission Latitude to 270, Emission Longitude to 0, and Emission Range to 0.
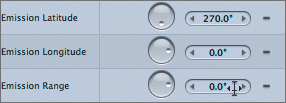
The particles now move straight down.
In the Cell Controls section of the Emitter tab, set Birth Rate to 4, Birth Rate Randomness to 2, Life to 6, and Life Randomness to 4.
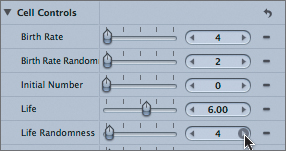
The randomness parameters lend a more organic feel to particle systems. With a Birth Rate of 4 particles per second and a Birth Rate Randomness of 2, two to six particles are born each second (4 – 2 to 4 + 2). With Life Randomness set to 4, each particle lives from 2 to 10 seconds (6 – 4 to 6 + 4).
You can also introduce randomness to the speed of the particles.
Set Speed Randomness to 50.

Particles now move at rates ranging from 0 pixels per second to 100 pixels per second.
The particle emitter now has random birth rates, life spans, and speeds, but all within specific boundaries. There is one more parameter you can randomize: Scale. The pictures in the Canvas currently appear to be different sizes, but they aren’t. They just appear that way on your 2D display because they’re located at different 3D distances from the camera.
Near the bottom of the Emitter tab, set the Scale Randomness parameter to 50.

The particles are now nicely randomized, but they just pop on and off the screen. A soft fade-in and fade-out would look better.
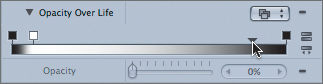
Click the Opacity Over Life disclosure triangle.

The white bar represents the opacity of each particle over its life span, starting from the left and moving to the right. Currently, the bar is completely white, indicating that each particle is fully opaque while it is “alive.” The white box above the bar is an opacity tag—it’s the reason why the bar is white. You’ll add a few more opacity tags.
Click inside the white bar, just to the right of the opacity tag, to create a new tag.
Click the original opacity tag to select it, and then drag the Opacity slider to 0.

The particles now start invisibly and quickly fade up to full opacity.
Add another opacity tag at the right end of the bar, and set its opacity to 0.
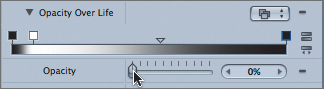
The particles fade out slowly over their life spans, but the fade-out starts a little too early.
Drag the spread control (the inverted triangle), located between the second and last opacity tags, toward the right to extend the duration of the white portion of the bar.
To finish, you’ll tilt the emitter at an angle and reposition it over the background elements in preparation for adding final foreground elements.
In the Emitter tab, deselect the Face Camera checkbox.

When this checkbox is selected, each particle turns to face the camera as the camera moves, so that you’re looking at every particle face-on. This property is what creates the 3D appearance of particles such as the Corona preset emitter you looked at previously. But in this case, you want the particles to tilt on the Y-axis.
In the Toolbar, select the Adjust 3D Transform tool (or press Q), and in the Canvas, move the pointer over the left circle. When the green Y-axis rotation indicator appears, drag to the right about 45 degrees, using the tooltip as your guide.
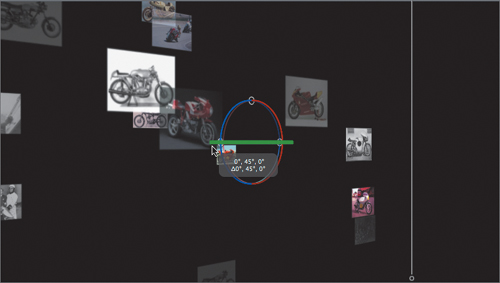
In the HUD, set the Adjust Around pop-up menu to View Axis, and drag in the Move XY (center) control to move the emitter to the right side of the Canvas.
In the Move Z (left-hand) control, drag right to move the emitter back in Z space.

In the Layers tab, select the activation checkbox to turn on the Rendered_Background group. Close the 3D_Elements group and save your work.

Well done. You created your own particle emitter from a movie clip, turned it into a 3D emitter, and modified its properties in the Inspector. You can use these new skills to quickly change the parameters of preset emitters as well.
There are a few more 3D elements and foreground elements to add to your menu. The 3D elements consist of simple floating graphical designs and a glow to brighten part of the screen. The foreground elements consist of the Ducati logo, the text for the DVD menu items, a graphic to contain the text, and a gradient.
Stop playback and press Home.
From the File Browser, drag the corners_and_ticks file to the 3D_Elements group in the Layers tab.
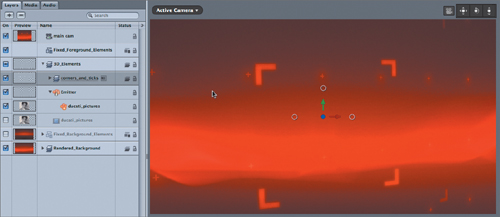
These elements will appear to move as the camera moves, giving the project more depth.
From the File Browser, drag the glow file to the 3D_Elements group. In the Canvas, drag the glow a bit to the right.

The glow spreads out and softens the Membrane animation behind the falling particles.
From the File Browser, drag the graphics_and_gradients file to the Fixed_Foreground_Elements group.
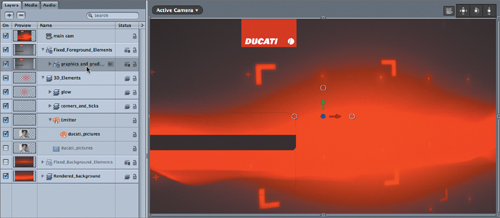
The gradient darkens the edges of the frame, creating a vignette effect.
From the File Browser, drag the ducati_menu_text file to the Fixed_Foreground_Elements group. If necessary, reposition the text in the Canvas to align it under the black bar.
You’ll animate the camera using two parameter behaviors saved as a preset so that it gently rocks up and down. Since the 3D_Elements group is the sole 3D group, the camera movement will affect only this group, leaving the Fixed_Foreground_Elements and the Rendered_Background groups unchanged.
From the File Browser, drag the Oscillate_camera behavior into the main cam layer in the Layers tab.
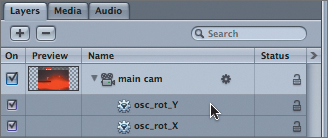
The behavior actually consists of two parameter behaviors, osc_rot_Y and osc_rot_X, each moving the camera back and forth on a different axis.
Play the project.
The graphical elements and the particle emitter in the 3D_Elements group appear to move slowly up and down, while the logo, text, and background elements remain fixed.
Note
Make sure you changed the Rendered Background group into a 2D group by clicking the 2D/3D icon in the Layers tab under the Status column.
Congratulations! You’ve built a 3D project using modified generators and a custom particle emitter—and gotten more familiar with Motion’s Library in the process.