Lesson Files | Motion3_Book_Files > Lessons > Lesson_10 |
Media | Motion3_Book_Files > Media > Rocket_Boy |
Time | This lesson takes approximately 90 minutes to complete. |
Goals | Understand the concept of keyframes in motion graphics |
Record animation during real-time previewing | |
Set keyframes manually | |
Learn about different types of keyframe interpolation | |
Use keyframes with filters | |
Understand the concept of parameter behaviors |
Keyframing is the process of creating “snapshots” of where you want an object onscreen—and how you want it to look—at specific moments in time. When you create several of these snapshots, Motion figures out where the object should be between these times.
The concept of keyframes comes from the world of traditional cartoon (cel) animation. In traditional animation, a senior animator draws stills of the primary or key poses that a cartoon character will assume during a given scene. Then, another artist or group of artists draw the in-between frames from one pose to the next, to create a final animated sequence. The poses drawn by the senior animator are the key frames of the animation.
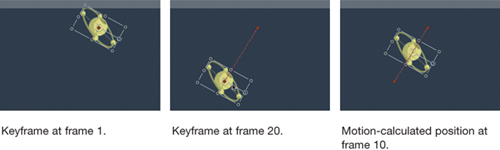
In Motion, you are the senior animator creating the key poses, while Motion draws the images and frames in between. You create keyframes at, say, frames 1 and 20, and Motion calculates the animation between those frames based on parameters that you define.
Animating with keyframes obviously saves a lot of time. Instead of positioning an object in different locations for every frame, you only have to modify frames at specific points in the Timeline. Keyframes can be used to change an object’s rotation, the intensity of a blur, or nearly any other parameter of a layer, group, particle generator, or filter.
You’re going to build a couple of elements of a motion menu for a DVD. Since it’s a complex animation, you’ll work on smaller portions that can be combined to finish the project. The first section is the background—you want to create the appearance of a camera speeding over an alien landscape and gradually slowing to a stop. You can open and play Lesson_10_Finished to see the completed project.
During the first part of this exercise, you’ll animate several background elements moving into position. You’ll use keyframes to move those elements.
Tip
This first section has only background elements, so observing the Safe Zone overlays isn’t as important. If they’re turned on and you’d like to deactivate them, you can do so from the View and Overlay Options menu in the upper right corner of the Canvas.
Press Command-Option-W to close any open projects. Press Command-O and open Motion3_Book_Files > Lessons > Lesson_10 > A.Background_Start.
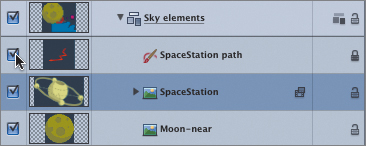
In the Layers tab, notice that all the layers have been grouped together into a single Background group.
Click the disclosure triangle to open the “Sky elements” group.
Most of the sky layers have already been animated. You’re going to finish by animating the Space Station zipping through the sky.
Click the SpaceStation layer to select it.
Drag the Space Station just above the visible portion of the Canvas.
Choose Mark > Recording Options.
In earlier lessons, you created keyframes by turning on Record Animation (by clicking the Record button at the bottom of the Canvas, or pressing A) and dragging sliders. Because Record Animation was turned on, a keyframe was set for the slider you adjusted.
When you did this, you made sure that playback was stopped. A keyframe was set for the specific frame at which the playhead was parked. But what would have happened if Motion had still been playing through the play range as you adjusted the sliders? One of four things, depending on what was selected in the Recording Options dialog.

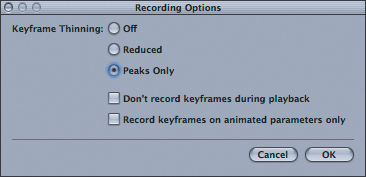
Keyframe Thinning decides how often Motion will set a keyframe. When Keyframe Thinning is set to Off, Motion creates a keyframe at every frame as you drag a slider or move an object. That’s usually undesirable, since it results in fairly shaky, start-stop motion. Most likely you’ll want to settle on one of the other options.
When Reduced is selected, Motion attempts to re-create the changes you make over time while using as few keyframes as possible. This usually results in smoother transitions from one value to the next.
When Peaks Only is selected, Motion will record keyframes only at the extremes of your actions. So, if you’re moving a slider back and forth, Motion will create keyframes only at the points where you change direction and move the slider in the opposite direction. This option generally works best, since it creates the fewest keyframes and produces the smoothest motion. The resulting keyframes are also the easiest to edit, since they represent only the extremes of your motion.
Finally, if you want to safeguard against accidentally creating a truckload of keyframes while you’re experimenting, you can select the “Don’t record keyframes during playback” checkbox. You’ll still be able to use Record Animation mode to set keyframes at specific frames (as we’ve done up till now); but if your Timeline is playing back, no keyframes will be set as you make adjustments.
Make sure that Keyframe Thinning is set to Off. Deselect “Don’t record keyframes during playback,” and then click OK.
Press Home to jump back to frame 1.
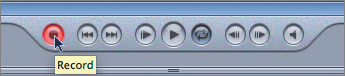
Click the Record button (or press A); then click the Loop Playback button, at the right of the Play button, to turn it off.
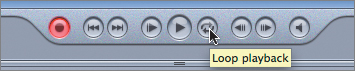
Up to this point, Motion has always looped playback of the play range. But you’re trying to record animation while the playhead is moving. If the playhead loops back to frame 1, you might mistakenly record over earlier keyframes. That’s why you turned off looping. The play range should already be set to end at frame 151. The animation will stop recording when you reach the end of the play range.
Now you’re going to animate the Space Station zipping through the sky. You’ll start the Space Station at the top of the screen and move it off the Canvas near the center of the left side.
Tip
To make this section easier to follow, a layer named SpaceStation path has been created that you can follow during keyframing. It’s currently locked and hidden. To make the layer visible, select the activation checkbox to the left of the SpaceStation path layer. Be sure to re-select the SpaceStation layer if necessary.
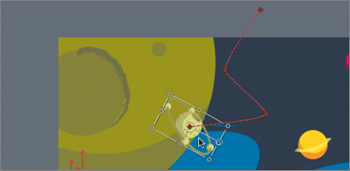
Hold down the mouse button with the pointer positioned over the Space Station in the Canvas.
Press the Spacebar to begin playback, and drag the Space Station along the desired path, all before the playhead reaches the end of the play range.
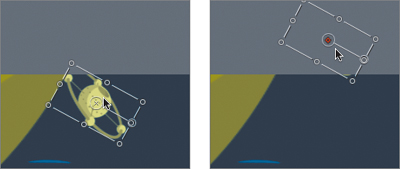
Chances are, things didn’t go so well. Even if you were extremely careful, you probably ended up with something that resembles the following figure:
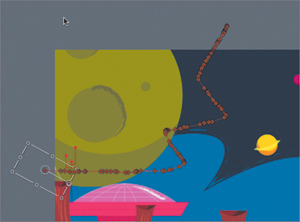
The hollow diamonds in the Canvas are an overlay of all the keyframes that Motion created as you dragged. It created a keyframe for nearly every frame in the Timeline.
Move the playhead back to frame 1 (or press Home) and resume playback.
Most likely you’re looking at very shaky, jerky movement as Motion plays the sequence. You’ll address that in the next exercise.
Press Command-Z to undo the creation of the keyframes. (If things went horribly wrong, you can revert the project.)
The previous method worked, but it created a fairly rough-looking animation. The jerky movement would be fine if it was supposed to represent an out-of-control Space Station, but you’re trying to achieve smooth, natural motion.
Choose Mark > Recording Options.
Tip
You can also open the Recording Options dialog by double-clicking the Record button below the Canvas. This toggles the state of the Record button. Always check the state of the Record button before modifying graphics.
Change the Keyframe Thinning setting to Peaks Only and click OK.
Make sure you’re at frame 1 and Record Animation is on then repeat steps 5, 10, and 11 of the previous exercise.
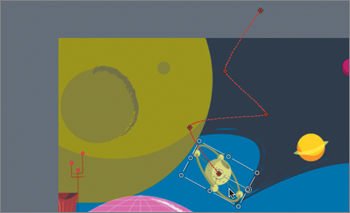
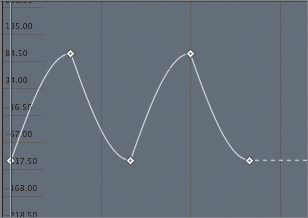
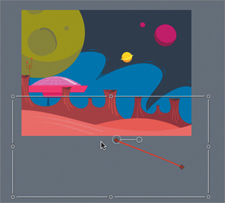
If you worked really hard at it, you may have ended up with a keyframe overlay something like the one in the following figure:

Notice that this path includes fewer keyframes than your previous attempt. The keyframes are the hollow diamonds; the little dots along the path are the positions that Motion calculated for the frames between keyframes.
If you play the sequence again, you should notice that the motion is smoother.
Smoother, but not perfect. Now that you’ve played with real-time recording, you should get more precise about the values.
Press Command-Z to undo the creation of the keyframes (or revert the project).
Choose Mark > Recording Options (or double-click the Record button), and change Keyframe Thinning to Off (the default value).
You’re about to explore the Keyframe Editor, but first you will set precise values for the Space Station’s movement by using Record Animation mode with playback stopped.
If the Loop Playback button is off, click it to reactivate it.
Move to frame 1, and make sure the Record button is on (press A if it isn’t).
Although the Space Station should already be in position, you need to jiggle the layer to force Motion to generate a keyframe. At frame 1, move the Space Station slightly to create a starting keyframe. Motion creates keyframes only for parameters that change at the current frame.
Move the playhead to frame 25; then drag the Space Station down and to the left, and stop at the first bend in its path.

Move the playhead to frame 50. Drag the Space Station down and to the right, and stop at the second bend in its path.
Move the playhead to frame 75. Drag the Space Station down and to the left, and stop at the third bend in its path.
Move the playhead to frame 100. Drag the Space Station down and to the right, and stop at the fourth bend in its path.
Finally, move the playhead to frame 151, and drag the Space Station off the left side of the Canvas.
Unlike real-time recording, which created many keyframes, this animation uses only six keyframes.

Turn off the Record button (or press A) to exit Record Animation mode.
Press Home to go back to frame 1, and then resume playback.
The direction of the animation seems OK, but the turns at the corners are too abrupt. To fix them, you’ll use the Keyframe Editor.
The Keyframe Editor is where you fine-tune the paths set up by your keyframes. Although you’ve set specific keyframes for your Space Station layer, Motion can calculate the position of the object between these frames in different ways. It’s the paths between the keyframes that interest you right now.
Tip
If you’ve fallen behind, open B_SpaceStation_Started to catch up. Make sure to select the SpaceStation layer.
Press F6 to reveal the Timeline, if necessary.
Click the Keyframe Editor tab (Command-8).

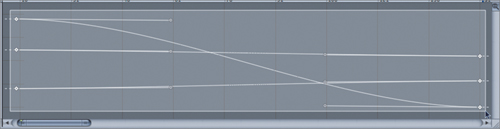
You’ll see three entries in the Keyframe Editor: Transform.Position.X, Transform.Position.Y, and Transform.Position.Z. The Transform.Position.X and Transform.Position.Y entries refer to the horizontal and vertical positions of the SpaceStation layer, while Transform.Position.Z refers to its Z depth, its distance from the camera or viewer.
Tip
If the graphs are not visible, from the Show pop-up menu choose Animated and verify SpaceStation is still selected.
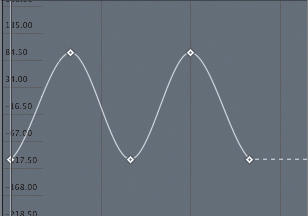
A lot of people get confused when they first encounter a keyframe graph. In the Keyframe Editor, everything is plotted in relation to time. The value of a keyframe is its vertical position in the graph; the frame at which the keyframe is placed is its horizontal position. So, when the Space Station object moves to the right of the Canvas, the graph of its X (horizontal) position in the Keyframe Editor moves upward. (Remember that X values increase as you move to the right, Y values increase as you move up, and Z values increase as you move closer to the camera.)
When an object is at the right side of the Canvas, the Position.X value is greater than if the object were on the left side, so the curve in the Keyframe Editor increases. It takes a little while to get your head around this, but once you do, it makes the Keyframe Editor much more useful. For example, the red curve in the graph above represents the horizontal location (X position) of the Space Station. As the graphic moves toward the right edge of the Canvas, the curve goes up. When it moves toward the left edge, the curve goes down.
Deselect the activation checkbox next to Transform.Position.Z.
Deselecting a checkbox to the left of a parameter name in the Keyframe Editor hides its curve, reducing clutter, and can help save you from mistakenly moving the wrong keyframe.
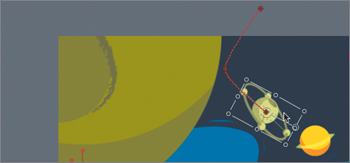
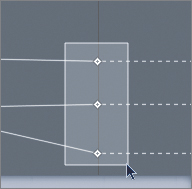
Click the second-to-the-last X keyframe to select it. The keyframe turns white to indicate that it’s selected. (Note that the X keyframes are associated with the reddish curve, and the Y keyframes with the green curve.)

Notice the Bezier handles to the left and right of the keyframe. These behave in exactly the same way as other Bezier shapes in Motion.
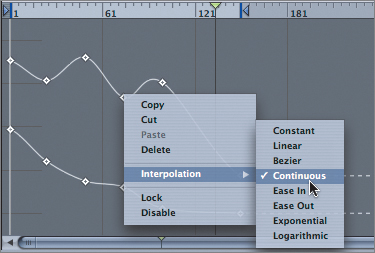
Control-click the selected keyframe, and position the pointer over Interpolation in the pop-up menu to open its submenu.
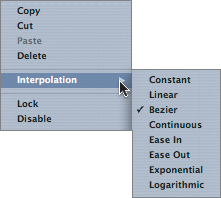
Interpolation refers to the way Motion calculates the curve between each keyframe. The curve is a visual indication of how quickly a parameter value is changing. A flat curve indicates a slow rate of change; a steep curve indicates a fast rate of change. These are the eight types of interpolation:
Constant—. Keyframes set to Constant retain the same value all the way to the next keyframe, where the value instantly changes. Think of a strobe light: Now it’s on, now it’s off. For Position, the layer jumps instantly from one location to the next.

Linear—. Keyframes set to Linear create a curve in a straight line from one keyframe to the next. Think of a robot walking with a fixed step size and speed. When the direction of the curve changes at a keyframe (as in the following figure), the change is instant—there is no deceleration or acceleration in the rate of change.

Bezier—. Keyframes set to Bezier allow you to control how the curve enters and leaves the keyframe, using Bezier handles. This is great for customizing Ease In– and Ease Out–style curves (see the figure below). Setting keyframes to Bezier and then adjusting the curves allows you create organic changes in speed.

Continuous—. Keyframes set to Continuous allow a smooth transition of the curve coming into and leaving the keyframe. Think of throwing a ball up in the air—it slows down as it approaches its highest point, and then accelerates as it falls. Continuous keyframes are useful for making smooth changes in the speed of a curve. You cannot adjust the speed changes as you can when using Bezier keyframes—you do not have access to the curve controls.
Ease In—. Keyframes set to Ease In cause the curve to flatten (the rate of change slows down) as it approaches the keyframe, and rise sharply (the rate of change speeds up) as it leaves. Think of a car coming to a smooth stop at a red light and then accelerating sharply as the light turns green.
Ease Out—. Keyframes set to Ease Out cause the curve to rise sharply as it approaches the keyframe, and flatten out as it leaves. Ease Out keyframes are the opposite of Ease In. Think of a car slamming on the brakes to stop at a red light and then accelerating gently as the light turns green.

Exponential—. Keyframes set to Exponential causes the rate of change to be very slow at first, and then reach maximum speed just before the next keyframe. Most of the changes in keyframe values occur over the last few frames. Exponential keyframes create a snaplike effect with rapid motion changes. When used with scale keyframes, Exponential creates a scale effect that mimics moving an object through Z depth.

Logarithmic—. Keyframes set to Logarithmic cause the rate of change be high at first, and then reach minimum speed just before the next keyframe. Most of the changes in value occur over the first few frames. Logarithmic can be considered the opposite of Exponential.

Every keyframe can have its own interpolation—one keyframe might be Bezier, while its neighbors might be set to Linear.
You want to create a smooth, graceful motion as the Space Station passes through the sky. To achieve this, you’ll set all the keyframes to Continuous.
Click away from the shortcut menu to cancel out of it.
Drag a marquee around all the keyframes of both parameters. All the keyframes should turn white to indicate that they’re selected.

Control-click one of the keyframes (it doesn’t matter which, since they’re all selected), and from the shortcut menu choose Interpolation > Continuous.
Both curves should now slope gently from point to point.
Close the Timing pane (F6).
The Space Station now moves and changes direction smoothly.
Note
Since the Space Station leaves the Canvas at frame 151, it’s a good practice to set an Out point for the layer at that frame. To do so, stop playback, press Shift-End to jump to the play-range Out point marker, and make sure the SpaceStation layer is still selected. Then, press O to mark an Out point for the layer.
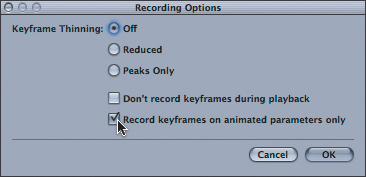
Motion has a new recording option that behaves similarly to more traditional keyframing software. It’s called “Record keyframes on animated parameters only,” and it allows you to leverage experience you may already have with other keyframe-animation software.
When “Record keyframes on animated parameters only” is chosen, you manually set your first keyframe for a parameter using the Properties tab. You then turn on the Record button. As you move the playback head to a new frame and modify your graphic, additional keyframes are added only to those Properties that already have at least one keyframe. This prevents you from adding keyframes to properties you do not intend to animate.
You’ll use this technique to finish up the background animation and animate the layers of the Land elements into place.
Click disclosure triangles as necessary to collapse the Sky elements group and expand the Land elements group. Press Option-Z to center the Canvas.
Double-click the Record button.
Select “Record keyframes on animated parameters only” and click OK.
Verify that the Record button is activated. (It should be red—if not, click it to activate it.)
Move to frame 15.
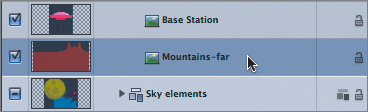
In the Layers tab, click the Mountains-far layer to select it.
To create the effect of the camera flying over the terrain, you’ll use a 3D trick. Rather than scaling the layer to make it appear larger, you’ll move the layer closer to the viewer. Just as in the real world, objects appear larger when they are closer to the viewer, and smaller as they move farther away. Moving an object closer or farther away involves modifying its Z position. You’ll also move it slightly as it zooms away to exaggerate the effect. The advantage of using the Z value to make the object appear larger or smaller is that you can accomplish your visual goal using just one parameter set—Position—instead of modifying both Position and Scale.
Press F1 to show the Properties tab.
Click the disclosure triangle next to Position.
Each Position Parameter—X, Y, and Z—has its own parameter value and Animation menu (shown by the icon of the small horizontal line at the far right). You’ll use this menu to add a keyframe to each of the Position parameters.
Click and hold down the Animation menu to the far right of the Position parameter.

The Animation menu lets you add and delete keyframes, move between keyframes in the Timeline, load keyframes into the Keyframe Editor, disable keyframed animation, and reset the parameter—which removes any keyframes or parameter behaviors that were applied.
Choose Add Keyframe.
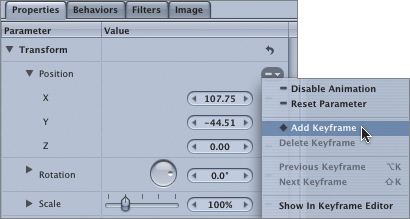
The icon is now a solid diamond. This indicates that the Position parameter has a keyframe applied to it at the current frame. The Position values are shaded red, indicating that keyframes will be added if you move the playhead to a new frame and modify the Position values.

You need to modify the X, Y, and Z positions of the Mountains-far layer to make it appear very large and below the Canvas.
Click in the Z value field and drag (or type in a new value) to change the Z value to approximately 400.

You’ve moved the layer closer to the viewer so that the Mountains-far layer is now much larger.
Drag the Mountains-far layer down and to the right so that the X position value is approximately 200 and the Y value is -50.
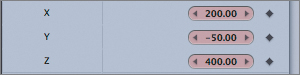
The visible portion of the Mountains-far layer is now very large and just below the Canvas. Keyframes have been set to hold these values at this frame.


Notice that the Position diamonds are hollow at this frame. This tells you that the parameter has keyframes applied but that there isn’t a keyframe at the current frame.
You want to apply another keyframe here, but clicking the Animation menu and choosing Add Keyframe is a little cumbersome. You’ll use the Record option that you set earlier to limit new keyframes to those parameters that already have at least one keyframe.
If the Record button is not active, click it to activate it.
In previous versions of Motion, modifying any parameter when the Record button was active would create a keyframe. Because you’ve selected the “Record keyframes on animated parameters only” option, Motion will add keyframes only for Position and for no other parameters.
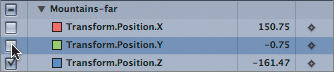
Motion indicates this situation by highlighting in red only those parameters to which keyframes will be added. Note that only the Position values are shaded in red, while all the others are in light gray.
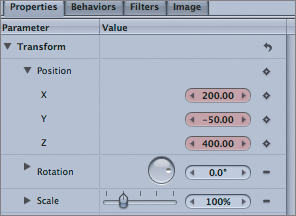
Adjust the Z value to -170, making the Mountains-far layer much smaller.

You’ll notice that the diamond to the right of the Z value is now solid, indicating that a keyframe has been added.
Drag the Mountains-far layer up and to the left so that the Canvas looks like the following figure (X = 160, Y = 0).
The Animation-menu diamonds for X, Y, and Z are now solid, indicating that you’ve set new keyframes.

Resume playback. The Mountains-far layer now zooms past the viewer and settles into the far horizon.
Stop playback and turn off the Record button.
To make the motion more dynamic, you want the mountains to move very quickly into the frame and slowly recede into the distance. Modifying the keyframe interpolation will allow you to achieve this effect.
Go to Frame 1.
Click the Animation menu for the X Position parameter and choose Show in Keyframe Editor.
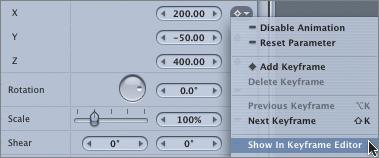
Motion opens the Keyframe Editor, and the selected parameter is automatically loaded with its keyframes, ready to be edited. This is a great feature, and it saves you a lot of time searching through dozens of parameters for the one parameter you want to edit.
Rather than repeat the process for the Y and Z parameters, you’ll have Motion display them automatically.
Just below the Keyframe Editor tab, click the Show pop-up menu.
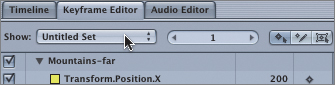
You’ll see a list of options. In Motion, you can customize sets of curves for quick access by dragging parameters from the Inspector into a curve set. For example, if you’re continually adjusting the blur and color of an object at the same time, you might want to create a curve set with just these two parameters modified. In this case, you’ll use a predefined curve set.
Choose Animated.

When Animated is chosen, only the parameters of the currently selected object that already have keyframes will appear.
Notice that the Keyframe Editor also has a keyframe diamond to the right of each parameter’s label. Clicking the diamond will open an Animation menu similar to the one found in the Inspector.
Tip
Several commonly used parameters and curve sets are listed and have single-letter shortcuts. For example, if the Keyframe Editor window is active and you press U, all of the animated properties of the selected layer(s) will be displayed. You can also create your own curve sets. For more information, see “Show Pop-Up Menu” in the Motion manual.
Click the Animation menu for Transform.Position.X.
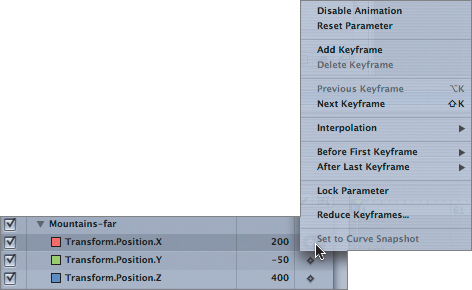
The Animation menu that appears is similar to the one found in the Inspector, but it has a few extra features. Here you can choose how Motion repeats the pattern laid out by your keyframes before the first keyframe in your curve (Before First Keyframe) and after the final keyframe (After Last Keyframe). You can also “thin” your keyframes using the Reduce Keyframes option. This resamples the number of keyframes to create a smoother curve.
Click outside the Animation menu to exit it.
After that brief detour, let’s get back to modifying the layer’s motion.
Click the Fit Curves button in the lower left corner of the Keyframe Editor.

Drag the zoom slider slightly toward the right to zoom out so that you can see the keyframes at frames 15 and 151.

Drag the scroll bar at the base of the Keyframe Editor to center the keyframes, if necessary.

Drag a marquee around all of the keyframes.
Control-click any one of the keyframes and choose Interpolation > Linear.
Resume playback.
The Mountains-far layer animates at a constant speed. This is OK for the start of the animation, but not for the ending. You’ll adjust that in the next exercise.
Stop playback.
Many times, you can use the keyframe-interpolation methods in Motion to get the animation characteristics you want. There are other times, however, when more granular control is needed. The Bezier keyframe-interpolation method allows precise control over animated parameter changes.
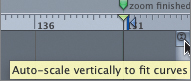
Drag a marquee around just the keyframes at frame 151. (A marker titled “zoom finished” can help identify that frame.)
Control-click one of the selected keyframes and choose Interpolation > Ease In.
Resume playback.
The Mountains-far layer now moves faster at the beginning of the animation and slows toward the end. Let’s exaggerate the speed of the Z motion by manually modifying the shape of the keyframe graph.
Deselect the checkboxes to the left of Transform.Position.X and Transform.Position.Y to hide their graphs.
The Keyframe Editor can get crowded when you’re looking at lots of parameters. Hiding the ones you’re not editing can help save you from mistakenly modifying the wrong keyframe.
Motion colors the curves to make it easier to associate each curve with its corresponding parameter.
Drag a marquee around both Z position keyframes.
Control-click one of the selected keyframes and choose Interpolation > Bezier.
Each keyframe now has Bezier handles attached. By dragging these handles, you can change the shape of the curve, which will change the speed at which the parameter changes.
Click the background of the Keyframe Editor to deselect the keyframes.
Click the first keyframe to select it.
Drag the handle for the first keyframe down and to the left.
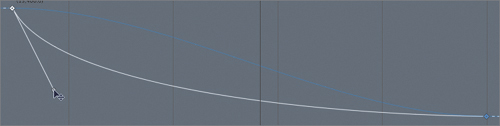
The original curve is displayed as a light blue line as a reference. When modifying a keyframe curve, keep in mind that a steep slope represents a fast rate of change, and a shallow slope represents a slow rate of change. Based on the curve you’ve drawn, the Z value will change quickly at the beginning of the animation, and slowly toward the end.
Note
You can also take a snapshot of a curve set to use as a before-and-after comparison. For more information, see “Curve Snapshots” in the Motion manual.
The Mountain-far layer now zooms past us quickly and then slowly recedes into the distance.
Rather than manually add more keyframes, you’ll now import and apply saved favorites to several more layers. This will allow you to quickly finish the background animation.
Move to frame 1. (Stop playback, if necessary.)
Press Command-1 to open the File Browser tab.
Navigate to the folder Motion3_Book_Files > Lessons > Lesson_10 > Rocket_Boy_Favorites.
The files listed in the folder are Favorites—in this case, saved keyframes that you can apply to the remaining layers so that they animate into position. You’ll drag them from the bottom pane of the File Browser onto the layer you want to animate.
Drag the Mountains-near Position curve onto the Mountains-near layer.
Drag the Dunes-far Position curve onto the Dunes-far layer.
Drag the Dunes-near Position curve onto the Dunes-near layer.
Drag the Base Station Position curve onto the Base Station layer.
Resume playback.

The rest of the layers now animate into position. However, the Mountains-near layer starts moving too early. It should start moving later than the Mountains-far layer to maintain the illusion that it is closer to the viewer.
In the Layers tab, select the Mountains-near layer.
In the Keyframe Editor, drag a marquee around all three Position keyframes at frame 1.

In the lower left corner of the Keyframe Editor, click the Snapping button to activate snapping.

Snapping in the Keyframe Editor is different from snapping in the Canvas, and it cannot be activated or deactivated using the N key.
Stop playback. In the Keyframe Editor, move the playhead to frame 30.
Position the pointer over one of the selected keyframes and hold down the mouse button. Then, hold down Shift to constrain the keyframes to horizontal movement. (You want to move their positions in time but not change their values.) Drag the keyframes to the right until they snap to the playhead at frame 30.

You might find this a little tricky to coordinate at first. That’s OK. There’s always that Undo command (Command-Z) if things go awry and you need to try again.
Resume playback.
Moving the keyframes delayed the start of the Mountains-near layer animation, heightening the illusion of moving through space.
To enhance the effect of moving through space, you’ll add filters to several layers and use keyframes to animate their values. Here on Earth, mountains in the far distance appear lighter and have less intense colors than nearby hills or mountains, due to haze. You’ll simulate this effect by applying the HSV color filter and animating it using keyframes.
In the Layers tab, select the Mountains-far layer.
Stop playback, if necessary, then go to frame 15.
Click the Record button to activate it.
Click the Add Filter icon at the top of the Canvas.
Choose Color Correction > HSV Adjust.
Press Command-3 to open the Filters tab.
Option-click the Saturation parameter’s Animation menu to set a keyframe.

Drag the Saturation slider to about .25 to increase the intensity of the Mountains-far layer color.
Move to frame 151.
Drag the Saturation slider to about -.25 to decrease the intensity of the Mountains-far layer color.
The saturation of the Mountains-far layer now decreases as the mountains move into the distance.
You still need to modify the animation curve of the Saturation parameter so that it more effectively matches the motion of the layer.
Click the Animation menu to the Saturation parameter and choose Show in Keyframe Editor.
In the lower left of the Keyframe Editor, click the Fit Curves button.
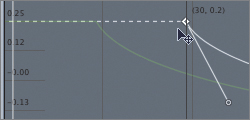
In the upper right of the Keyframe Editor, click the “Auto-scale vertically to fit curves” button.
Note
When the “Auto-scale vertically to fit curves” button is selected, the range of the graph changes dynamically to accommodate your entire curve. This can be somewhat confusing at first, since you can’t control the amount of scaling. Turning off auto scaling allows you to manipulate the zoom slider and scroll bar at the right side of the Keyframe Editor to adjust the display to your liking.
In the Show pop-up menu in the Keyframe Editor, choose Modified. Control-click the left keyframe and choose Interpolation > Bezier.
Drag the first keyframe handle down and to the left.

Now the speed of the Saturation change matches the speed of the motion for a more convincing effect. To save time, you can add the Saturation effect to the Mountains-near layer by copying and pasting the filter you just modified.
In the Layers tab, select the HSV Adjust filter. If it’s not visible, click the disclosure triangle next to the Mountains-far layer.
Choose Edit > Copy.
Select the Mountains-near layer.
Choose Edit > Paste.
A copy of the HSV Adjust filter is applied to the Mountains-near layer with the keyframes already set.
Resume playback.
One minor bit of cleanup remains. Since the Mountains-near layer does not start its animation until frame 30, you also need to move the first keyframe of the HSV Adjust filter to frame 30.
Stop playback.
Select the HSV Adjust filter under the Mountains-near layer in the Layers tab. If it’s not visible, click the disclosure triangle next to the Mountains-near layer.
In the Filters tab, click the Animation menu for the Saturation parameter and choose Show in Keyframe Editor.

You may see the HSV Adjust filter listed twice in the Keyframe Editor. The original filter is still listed, along with the copy. You want to apply the filter only to the currently selected layer.
Click the Show pop-up menu and choose Animated.

Move to frame 30.
With the pointer positioned over the first keyframe, click and hold the mouse button. Then, hold down Shift to constrain the keyframe to horizontal movement, and drag to the right until the keyframe snaps to the playhead at frame 30.
Save the project in your Student Saves folder as Background_finished.
You’re done animating the background. Keyframes are great when you want to precisely control the animation parameters of a layer. There are times, however, when you might want an animation that appears random, like the flight of a bumblebee. Or you might want a repetitive animation, like the movement of an oscillating fan. That’s when parameter behaviors come in.
Parameter behaviors can quickly assign value changes to any named parameter you see in the Inspector. If you want something to speed up or slow down, oscillate, wriggle, vary randomly, or behave in some other “mathematical” fashion, you can apply a parameter behavior. In Motion, you apply the behavior and the software conveniently calculates the math.
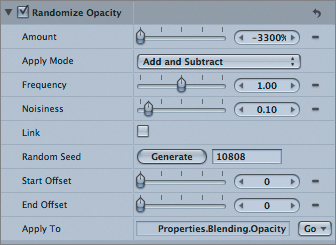
Parameter behaviors don’t apply only to movement; they can also apply to any named parameter. If you want a layer to flicker on and off, you can apply a Randomize parameter behavior to the layer’s opacity, and it will suddenly flicker. Of course, you can modify parameter behaviors to fit the specific needs of each animation.
You’ll start by getting Will (your Rocket Boy) to float around in space. Then you’ll animate the jets that keep him suspended.
Note
To see what the finished project will look like, play Motion3_Book_Files > Lessons > Lesson_10 > Rocket_Boy_finished.
Press Command-Option-W to close any open projects. Press Command-O and open Motion3_Book_Files > Lessons > Lesson_10 > E_Rocket_Boy_Start.
Click the disclosure triangle next to the Will group (and subsequent groups) to see how the layers are organized.
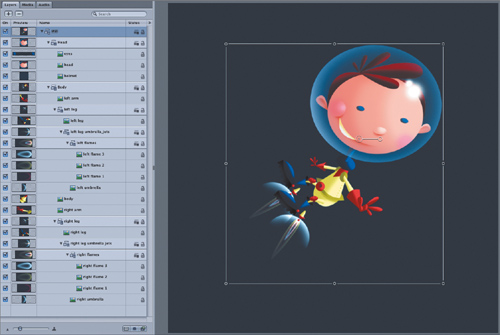
Click the disclosure triangle next to the Will group to collapse it. (Make sure the Will group is selected when you do so.)
Press F1 to open the Properties tab.
Control-click the Position parameter label to open the shortcut menu.
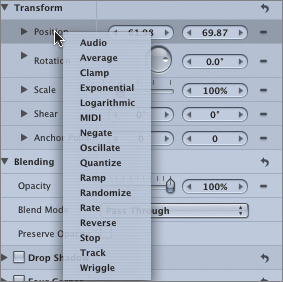
Choose Randomize.
Motion automatically jumps to the Behaviors tab of the Inspector, where you’ll find a new behavior called Randomize.
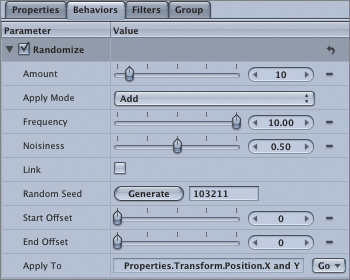
The name describes how this behavior randomly changes a parameter value over time. There are several parameters within the Randomize behavior that you can modify to get exactly the effect you desire. (You’ll explore other types of parameter behaviors later in this lesson.)
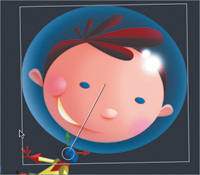
You’ll see that Will is now moving due to the parameter behavior—no keyframes have been set. The squiggly reddish lines over his face represent the path created by the parameter behavior.
His motion is a little frenetic. Let’s slow it down so that it looks as if he’s floating.
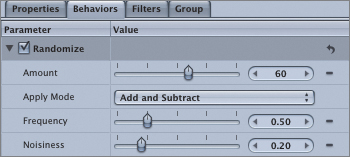
Set Amount to 60.
The random values generated by the behavior are applied to Will’s position. So in this case, Amount refers to pixels. If the behavior were applied to Rotation, it would indicate degrees; if applied to Opacity, a percentage; and so on. It will take several more steps to get Will under control.
Set Frequency to .5 (period five).
Frequency controls how often a new random value is generated and applied to the parameter. It is measured in 1-second increments, so entering .5 creates a new random value every half-second.
Set Apply Mode to Add and Subtract.
As the name implies, random values are added or subtracted from the current location, giving a wider range of motion than just adding or subtracting.
Tip
Depending on the parameter, you’ll want to choose an Apply Mode that best suits your needs. For example, if you start with Opacity set to 100 and apply the Randomize parameter behavior, you won’t see any effect if the Apply Mode is set to Add. An Opacity value of over 100 has no effect, so adding a random value to 100 does nothing. Change the Apply Mode to Subtract, and you’ll see your layer’s opacity start to flicker.
Set Noisiness to .2 (period two).
Finally, Will is floating nicely in space.
Think of Noisiness as an extra layer of randomness added to the random numbers. A small value will keep the random numbers closer together, creating smoother random motion. A larger Noisiness value places the random numbers farther apart.
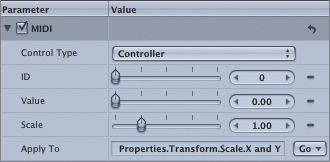
Click the Go pop-up menu at the right of the Apply To settings and choose Properties > Transform > Position > All.

As you can see from the Go pop-up menu, you can change which parameter is controlled by this behavior. Because you’ve applied this Randomize behavior to the X, Y, and Z position parameters, Will now moves in three dimensions, which enhances the illusion of floating in space.
To gently rock Will’s head back and forth as he floats in space, you’ll add an Oscillation behavior to the Rotation parameter of the Head group.
In the Layers tab, select the Head group.
Press F1 to open the Properties tab, if necessary. Also resume playback, if stopped.
Control-click the Rotation parameter label to open the shortcut menu.
Choose Oscillate.

Whoops. Will’s head has oscillated right off his body! You need to change the anchor point of the Head group so that his head rotates around his neck.
Stop playback and go to frame 1.
In the View tools above the Layers tab, click the far left tool (Select/Transform), and from the pop-up menu choose the Adjust Anchor Point tool.

By default, the anchor is set to the center of a graphic, layer, or group. Scale, Rotation, Shear, and other properties use the anchor point as their starting position. In the case of the Head group, you want the anchor point to be positioned at Will’s neck, so that the Rotation parameter behaves correctly.
Drag the anchor point down and to the left so that it is centered on the collar just below his neck.
Better, but not quite there. The Randomize parameter behavior needs a little adjusting to keep Will’s head from swinging too far from side to side.
Set the Amplitude of the Oscillate behavior to 20 degrees.
Much better. You’ll now use a set of saved parameter behaviors to finish the animation.
As with keyframes, parameter behaviors can be saved as favorites and reused. You’ll apply the favorites to Will, save the file, and finish the project by combining all the completed elements to create a final animation for a DVD motion menu.
Pause playback and go to frame 300.
Choose Mark > Mark Play Range Out.
Resume playback.
Press Command-1 to open the File Browser.
If necessary, navigate to Motion3_Book_Files > Lessons > Lesson_10 > Rocket_Boy_Favorites.
In the Layers tab, open the Head and Body groups if they are not already open.
Click the disclosure triangles next to the “left leg” group and the “right leg” group, and then open the enclosed groups within the leg groups.
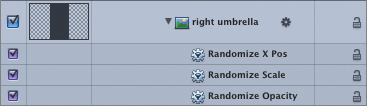
Drag the Umbrella parameter behaviors from the File Browser to the “right umbrella” layer.

Three parameter behaviors are applied to the right umbrella layer.
Drag the Umbrella parameter behaviors from the File Browser to the left umbrella layer.

Drag the Flames parameter behaviors from the File Browser to the “right flames” group (not layer). Repeat this step for the “left flames” group.

Drag the Right leg parameter behavior to the right leg group (not layer).

You want the entire leg to rotate, not just the jets. If you applied the parameter behavior to the leg layer, only the leg artwork would rotate. The jets would remain as they are.
Drag the Right arm parameter behavior to the right arm layer. Repeat the step for the left arm layer.
Drag the Eye Blink parameter behavior onto the eyes layer.
Whew. That was a lot of dragging. But you now have a fully animated Will. The last bit of cleanup is to vary the umbrella and flame animations so that they are slightly different from each other.
To change the umbrella and flame animations, you’ll use a random seed. No, a random seed isn’t a surprise vegetable in a packet of flower seeds. It’s a parameter that determines what kind of random numbers Motion generates.
Random numbers in Motion aren’t strictly random. That is, they don’t change every time you turn on your computer. Think of random seeds as being different lists of random numbers in a book. So, if you use a seed of 5, Motion will refer to page 5 of its random-number list when creating random values. If you choose a seed of 20, Motion will look at page 20 instead, and so on. The lists never change; page 20 will always show exactly the same list of random numbers.
Throughout Motion, you’ll find parameters that rely on random-number sequences. The parameter behaviors you’ve been using are a good example. Right now, the jets on Will’s feet have exactly the same animation because you applied the same favorite to both the flames and the umbrellas. To finish the animation, you’re going to change the random-seed value for several parameter behaviors to create a different animation for each leg.
If necessary, click the layer and group disclosure triangles to display the left umbrella layer.
If necessary, click the disclosure triangle for the left umbrella layer to display the three parameter behaviors applied to the layer.
Click the Randomize Opacity parameter behavior.
Press F2 to open the Behaviors tab.

You can see all three behaviors listed, although you may have to use the scroll bar to see the lower portion of the Randomize Opacity behavior.
Click the Random Seed Generate button for the Randomize Opacity parameter behavior.
A new random seed is generated. The Opacity value for the left umbrella is now different from that of the right umbrella. If you don’t like the results, you can click the Generate button repeatedly until you are happy with the way the opacity changes.
To keep the umbrella and flames in sync, you’ll use the same random-seed value for all parameter behaviors that control their animations.
Select the new Random Seed value for the Randomize Opacity parameter behavior and Choose Edit > Copy.
Select the existing Random Seed value for the Randomize Scale parameter behavior and choose Edit > Paste.
Select the existing Random Seed value for the Randomize X Pos parameter behavior and choose Edit > Paste.
In the Layers tab, select the Randomize Scale X parameter attached to the left flames layer.
Select the Random Seed value for the Randomize Scale X parameter behavior and choose Edit > Paste.
Select the Random Seed value for the Randomize Opacity parameter behavior and choose Edit > Paste.
The umbrella and flames for the left leg now animate differently than for the right leg. Because you have copied the same random seed to all five parameter behaviors for the left leg jets and umbrella, all five behaviors animate in unison. Notice that the Random Seed value is now the same.
To finish this lesson, the two pieces you’ve completed need to be combined with a number of other files to create a DVD motion background. The additional files are provided, along with a QuickTime movie of how the completed project might look. If you have the time, feel free to try your hand at integrating all the pieces to complete the animated background.
More Info
One of the parameter behaviors that can be applied to any named parameter is the MIDI control parameter behavior. This parameter behavior allows you to edit and animate object parameters using standard MIDI devices, such as a synthesizer. For more information, see “MIDI” in the Motion manual.