
Lesson Files | Motion3_Book_FIles > Lessons > Lesson_01 |
Media | Motion3_Book_FIles > Media > Intro |
Time | This lesson takes approximately 60 minutes to complete. |
Goals | Learn the basic interface elements |
Add movies to a project | |
Work with the play range | |
Add and modify filters and behaviors | |
Create a particle effect |
The easiest way to understand why Motion is so revolutionary is to play with it. Rather than making you plow through pages of information on windows, menus, and widgets, this chapter will plunge you straight into the thick of Motion’s magic.
Along the way, you’ll learn how to use the interface elements, but you’ll also get a handle on the Motion workflow—real-time previewing, behaviors, particles, and so on. By the end of the chapter, you’ll have a clear sense of what Motion is and an inkling of what you can create with it.
When Motion was introduced, it indicated a dramatic shift in the post-production world. For years, a great divide existed between the digital haves and have-nots. Only those artists prepared to mortgage their houses and endanger their marriages could purchase the million-dollar-plus online suites that enabled high-end results and attracted high-end clients.
In the nonlinear editing world, things were different. The appearance of Apple’s Final Cut Pro made it possible to build a complete high-end, high-definition editing station for under $25,000.
Unfortunately, in the realm of motion graphics, million-dollar machines still ruled the big time. The issue wasn’t a dearth of powerful software. The issue was workflow.
Imagine the following scenario: Advertising agency McSwank & Spendit wants some fancy title and logo work for a TV commercial that will launch a prestigious European manufacturer’s entry into the American SUV market. The ad agency wants lots of motion and lots of frenetic, edgy graphics. They’ve narrowed down the candidates to two post houses: PixelPuffVoodoo and JuxtaFish.
The owners of PixelPuffVoodoo decided to be smart and kind to their significant others, so when they opened their facilities, they invested in several modest desktop computers instead of mortgaging their houses to purchase one of those million-dollar machines that go obsolete overnight. They’ve hired talented up-and-coming digital artists, and when they win the McSwank & Spendit contract, they feel their ship has finally rendered.
When the creative director from McSwank & Spendit arrives at the PixelPuffVoodoo office, he’s a little disturbed to find that there’s no cool-looking gray-carpeted suite to hang out in, and he mumbles something about “no cocktails.”
One of the owners proudly takes him to the workstation where the final composite of the commercial has been assembled, and orders the artist to crank up the speakers and play the clip.
“Hmmm, I like where it’s going,” the client remarks. ”But let’s make the sky a little darker and add some blur to the parrot.”
The PixelPuffVoodoo founder smiles and suggests that they go get a cappuccino while the artist re-renders the clip with the changes. When the McSwank & Spendit creative director discovers that this will take a half-hour, he mumbles something else and storms out of the building, never to return.
Then he calls up JuxtaFish, agrees to pay the extra $20,000 they were asking, and heads over to their office. The design work isn’t as creative, but as soon as the executive enters, they put a piña colada in his hand and lead him to a suite with wall-to-wall carpeting and a lava lamp. As he lies back and watches a preview, he casually asks the artist at the workstation to blur the parrot, and then smiles as he sees the bird instantly smear into the background. The artist can do this because the owners of JuxtaFish, who are in debt up to their eyeballs, have a million-dollar motion graphics suite with real-time capabilities.
Enter Motion. Motion democratized motion graphics the way Final Cut Pro democratized nonlinear editing. It provided the ability to make real-time, interactive changes to animated graphic elements in a manner comparable to and sometimes exceeding the capabilities of million-dollar hardware behemoths. And it did all of that on a standard Macintosh workstation.
The initial version of Motion indicated what was possible but did not include a feature set that would get everything done in one place. With subsequent versions, Apple has rounded out that feature set to produce a comprehensive design space that keeps up with real-time needs even when a project has more layers than an ogre.
Now, let’s open Motion.
In the Dock, click the Motion icon.
When you first open Motion, you’ll be greeted by the Welcome screen. This enables you to choose from a list of options, including tutorials and templates. Since you’ll be working with custom projects for your lessons, you can ignore this screen.
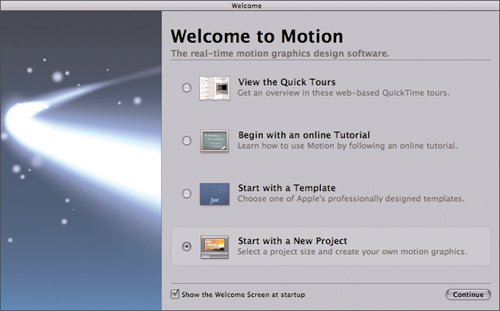
Click Continue.
Configuring Startup Preferences
If you later want the Welcome screen to appear when you launch Motion, open the Preferences window by choosing Motion > Preferences. In the General tab, set the At Startup pop-up menu to Show Welcome Screen.

Alternatively, set At Startup to Open Last Project(s) so that every time you launch Motion, the previous project will open for you to continue working on it.
When the Select Project Preset dialog appears, from the Preset pop-up menu choose NTSC Broadcast SD. Click OK.

Normally, you would choose a preset that matches the final output of your composite. In this case, you’re just here to experiment, so you’ll use standard-definition NTSC settings, even if you normally work in PAL (since you’re not exporting this session to tape).
Before you start experimenting, take a tour of the workspace elements. When the Motion interface opens, you see two of four main sections. You will open up the remaining two by using their keyboard shortcuts.
Press F5. This will toggle open the Project pane on the left side of the Canvas window.
Press F6. Now you will see the Timing pane at the bottom of the Canvas.
These two keys toggle showing/hiding of their respective panes to allow you to focus on the visual composition when you don’t need to see the details.
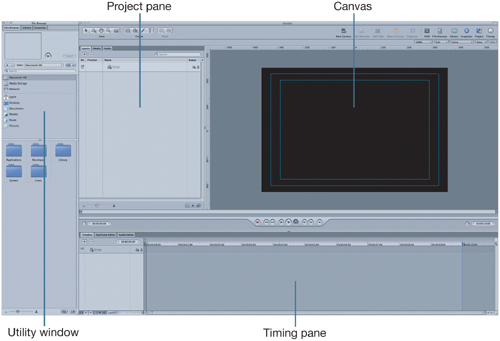
The Canvas is well named: It’s where you’ll “paint” your composite. This is the part of the workspace where you’ll preview your work and make changes to such things as the location and rotation of elements on the screen. Think of the Canvas as the stage, and the elements of your composite as the actors and props. They are yours to move around as you see fit.
The utility window is a very busy place. It’s where you import footage (in the File Browser tab), browse for filters and effects (in the Library tab), and change the parameters of your scene and its layers (in the Inspector tab). Parameters are the values for an object’s properties, such as scale, onscreen position, and opacity.
The Project pane is all about organizing your elements, making sure they are layered on each other in the right order. It also helps you to single out and change specific parts of your composite.
The Timing pane is where you decide what happens and when. It’s also where you can be more precise about how things speed up, slow down, or stop, using the Keyframe Editor.
I know, we’re supposed to be diving into playtime, but we need to make a quick stop to learn some keyboard shortcuts. Anyone who’s spent time using a professional software application like Motion knows that keyboard shortcuts—single keys or key combinations that quickly perform common tasks—are essential to working efficiently. Motion has a lot of keyboard shortcuts; you’ll be learning the ones that matter most.
Because of the density of windows and views in Motion, it’s important to learn the shortcut keys that will quickly open or close the sections of the interface you need most often. See the following figure for details.
Note
If you spend most of your time using another application, such as Final Cut Pro or Adobe After Effects, you can use the Command Editor to set up the keyboard shortcuts that work best for you. See the next section, “Creating Custom Keyboard Maps,” for more information.
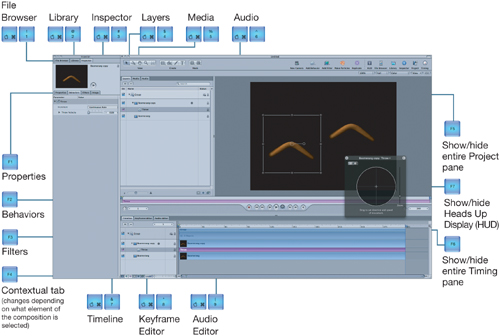
Here are the most important keyboard shortcuts to learn:
Command-1—File Browser
F1—Properties tab of the Inspector
F2—Behaviors tab of the Inspector
F3—Filters tab of the Inspector
F4—Contextual tab of the Inspector (a tab that will change titles depending upon the type of object selected)
F5—show and hide the Project pane (which will usually be set to its Layers tab)
F6—show and hide the Timing pane
F7—show and hide the HUD
Don’t panic—you’ll be reminded of these shortcuts throughout the book, but they really are worth learning by heart. If you forget the shortcuts for opening and closing windows, you can open and close windows from the Window menu or use the icons in the Toolbar at the top of the Canvas.
If you’re integrating Motion pieces into a larger video project or the rest of the Final Cut Studio 2 workflow, chances are you’ll find yourself constantly switching between Motion and Final Cut Pro. One of the greatest challenges in moving between programs is adjusting to sudden keyboard-shortcut changes. In one application, the D key might mean “Make my video [d]ance,” and in another application it might mean “[D]elete everything on my hard drive, starting with the projects that are needed for client review within the hour.”
Motion’s Command Editor is the solution. It allows you to remap Motion’s key commands to match those used in other applications. This will solve such dilemmas as the fact that in Final Cut Pro the A key innocently reverts to the standard select tool, while in Motion it activates auto-keyframing, which can wreak all kinds of havoc if you fail to notice that you activated it.
The good news is that you might not need to do any heavy lifting. Motion ships with a keyboard layout preset corresponding to Final Cut Pro’s keyboard shortcuts.
To open the Final Cut Pro keyboard preset map, go to Motion > Commands > Final Cut Pro Set, and then select the appropriate language.
To map your own custom command set, choose Motion > Commands > Customize. Here you can choose which Motion commands are triggered using various key combinations. In the Motion manual, see “Using the Command Editor” for more information.
Most graphic artists find the mouse limiting as an input device. Drawing shapes and lines with a mouse leaves something to be desired. While you are trying to ever-so-smoothly move the mouse when painting, you inevitably have to leave the Canvas to click a menu item or release the mouse button to access the keyboard shortcut.
Of course, you can streamline drawing by using a graphics tablet and pen (also known as a stylus). However, Motion also helps streamline the process by allowing you to perform some basic functions by drawing special symbols, called gestures. Rather than reach for the keyboard, you can draw a gesture to perform a particular action. For example, you can draw a stroke from left to right (like a minus sign) to advance the playhead one frame. Your hand continues to hold the pen and keeps your workflow moving.
A well-trained artist can execute these gestures smoothly and in swift succession, allowing for a speed that’s hard to match using only mouse clicks and keyboard shortcuts. You can find out more about setting up your Mac for gestural input in Appendix D of the Motion 3 User Manual.
Enough with the details. Let’s start experimenting.
Press Command-1 to open the File Browser.
The File Browser is more than the Browser of Final Cut Pro or the assets tab of DVD Studio Pro. It is, in essence, a constant Finder window allowing you to search for your assets and drag a desired file directly into the Canvas.

In the middle section of the File Browser (called the sidebar), click the Macintosh HD icon.
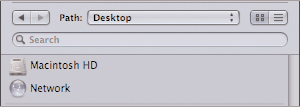
In the bottom section of the File Browser (called the stack), double-click the Motion3_ Book_Files folder.
Double-click the Media folder, and then double-click the Intro folder.
You should find a single clip called Boomerang.mov.

Hold down the mouse button over the Boomerang icon in the stack, at the bottom of the File Browser—not the thumbnail icon in the Preview area at the top of the Browser—and drag the icon to the center of the Canvas.
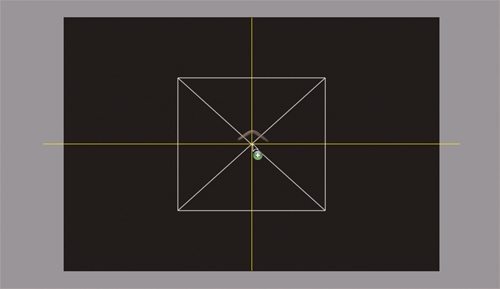
As you drag the icon over the center of the Canvas, you’ll notice that yellow lines appear onscreen. The image will snap to these lines. These are called Dynamic Guides. and they help center your composite’s elements. They can also help align several objects alongside each other. If the Dynamic Guides do not appear, press N to toggle on snapping.
Release the mouse button when horizontal and vertical yellow lines form a cross at the center of the screen. This ensures that your clip is perfectly centered.
Tip
If you have trouble executing a step and end up with something that looks markedly different from what you see in a figure, press Command-Z to undo the last step, or undo multiple steps by pressing Command-Z a few times. This will return your project to the state it was in before things went awry.
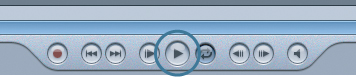
To play the clip, press the Spacebar or click the Play button at the center of the transport controls below the Canvas window.
You should now see the boomerang spinning happily in place.
OK, so you haven’t done anything revolutionary just yet; you could have done the same thing by opening the movie in QuickTime Player. Before you get more adventurous, though, you need to set up a play range in preparation for real-time previewing.
Press the Spacebar to halt playback.
The Spacebar toggles between play and stop.
Press F5 and then F6 to hide the Project and Timing panes.
You’re not using these panes right now, so there is no need to have them onscreen.
If you look at the very bottom of the Canvas, just above the Play button, you’ll see a blue bar with the name Boomerang.
Note
If you don’t see the blue bar, you’ve probably deselected the Boomerang object. Click the boomerang image in the Canvas to reselect the clip.

This bar is part of the mini-Timeline that shows where a selected object starts and finishes. When projects get complicated by lots of objects and effects, it’s much easier to change an object’s In and Out points in the mini-Timeline than in the main Timeline tab.
The upper section of the mini-Timeline is a long strip similar to the scrubber bars of Final Cut Pro’s Viewer and Canvas windows. This area displays the playhead, the play-range In point, and the play-range Out point. You may have noticed the playhead moving from left to right while you were playing the boomerang animation.
Your final composite could last anywhere from a couple of seconds to a couple of minutes or longer. Because Motion loads all the objects into the system RAM—a process known as caching—at some point you’ll run out of RAM, which will cause playback problems. To enable your computer to efficiently play a portion of the sequence without glitches, you’re going to set a play range. That way, Motion will need to cache only a portion of your project.
Tip
Want more RAM for your real-time Motion previews? Aside from running to the local Apple Store for more RAM, the easiest way is to make sure that you have no other applications running in the background. Running Adobe Photoshop with an iLoad of open images is going to siphon off a lot of your precious system RAM. You can specify the percentage of your RAM that is available to Motion for previewing in the Cache section of Motion Preferences.
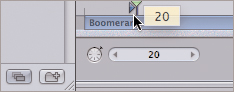
Drag the play-range In point marker to the right. As you do so, a yellow tooltip will appear, indicating the frame where your In point marker is positioned. When the tooltip reads 20, release the mouse button. You’ve set a new In point for the play range.
Note
Although you’ve set the play-range In point to frame 20, the project still starts at frame 1. This means that you’ll be able to preview only frames 20 and beyond of your composite. The final render of your project will still include frames 1 through 19, as well as any frames existing beyond the play-range Out point.
Hold down the mouse button in the current frame field just below the left side of the mini-Timeline. Drag left and right to change the frame value. Notice how the playhead moves as you adjust the value.

You’re using a hot scrub numeric entry field. All of Motion’s parameter fields can be modified this way. You can also enter a specific number by clicking once inside the field, entering a number, and pressing Return.
When the current frame reads 120, release the mouse button.
You’re now going to set the play-range Out point, but instead of dragging the marker, you’ll use another keyboard shortcut.
Press Command-Option-O. Instantly the play-range Out point marker jumps to the playhead’s current position, in this case frame 120 (since you just placed the playhead there).
The play range is now set from frame 20 to frame 120. So when you press the Spacebar to begin playback, Motion will play only the 101 frames contained within the play range.
Note
On systems with less than 512 MB of RAM, you may need to create a shorter play range to fully cache the Timeline. Conversely, if you have 2 GB or more RAM in your system, feel free to extend your play-range Out point to 200 or farther in this exercise. You should still be able to maintain real-time playback.
The keyboard shortcut to set the play-range Out point is a good one to learn—it saves you the trouble of constantly dragging markers and provides a way to select specific frames. The keyboard shortcut to set the play-range In point is Command-Option-I.
At times you’ll want to scrutinize fine details of your composite; at other times you’ll want to make the Canvas small enough to see what’s going on with several menus and windows open. Zooming the Canvas in and out satisfies both situations. Let’s take a look at the ways you can zoom the Motion Canvas.
At the upper right corner of the Canvas, change the Zoom Level pop-up menu from 100% to 50%.

The Zoom Level menu offers preset zoom levels of 12%, 25%, 50%, 100%, 200%, 400%, 800%, and 1600%.
Press Command-+ (plus) and Command-– (minus) on the main keyboard (that is, don’t use the numeric keypad’s plus and minus keys), and watch the zoom level in the upper right corner of the Canvas.
Pressing Command-+ and Command-– zooms the Canvas in and out by the specific preset intervals listed in the Zoom Level menu, providing an easy way to jump to a suitable zoom level.
Hold down Command-Spacebar, and then drag the mouse left and right.
This allows you to do free-form zooming. which allows you to zoom to any arbitrary size. Note that you can do this even while a sequence is playing.
As you experiment with zooming, you’ll see that Motion zooms in on the part of the image that was under the pointer when you began the zoom. So, if your pointer was over one of the tips of the boomerang when you began the zoom, that’s where you’ll zoom to.

Hold down the Spacebar and drag the mouse in the Canvas.
Holding down the Spacebar allows you to pan the image around the Canvas. This is great when you’re zoomed in all the way and need to see a part of the image that’s offscreen.
Press Option-Z.
Pressing Option-Z automatically returns you to 100% scale.
Press Shift-Z, and then press F5 a few times to open and close the Project pane.
By pressing Shift-Z, you activated the Fit in Window zoom mode. In this mode, Motion zooms the image in the Canvas so that the entire composite is visible at all times. As you open and close the Project pane, notice that the image resized so that the entire image fit the available Canvas space. (By opening the Project pane, you’re reducing the size of the Canvas space and forcing the image to scale down to fit.)
Press Option-Z to return the Canvas to its default 100% scale.
Now let’s add more objects to your scene.
Press the Spacebar to resume playback. Because you’ve set a play range, Motion loops from frame 20 to 120.
One boomerang gets kind of boring the 20th time around, so let’s add another one.
Note
Unless you’re specifically told to stop playback and move to a particular frame, make sure the preview continues to loop as you add clips to the Canvas. Clips that you add to the Canvas while previewing in real time are automatically added to the Timeline and frame 1. Clips added to the Canvas while playback is paused are placed in the Timeline at the current playhead position. (That is, if the playhead is paused at frame 39, a clip added to the Canvas will start at frame 39 in the master Timeline.)
If you accidentally add an object at a frame other than frame 1, you can press the Home key to jump to frame 1, and then press Shift-[ (left bracket) to automatically shift the object so that it begins at that frame.
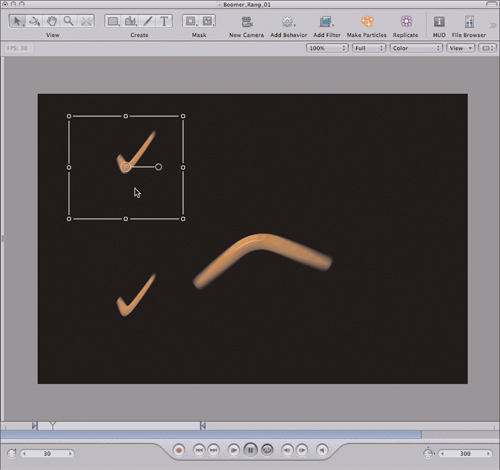
Hold down the Option key, and then drag the boomerang to create a duplicate.

You now have two boomerangs swooshing around the screen. The problem is, they’re identical. You want to create the impression that these are two distinct boomerangs.
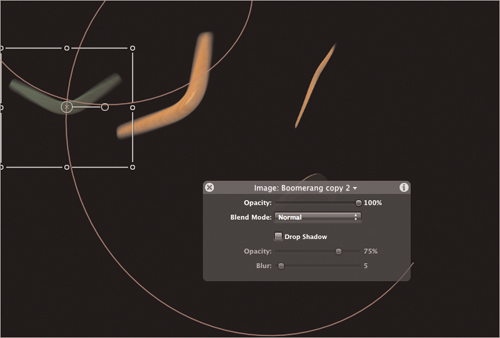
In the Canvas, drag in one of the corner circles of the new boomerang’s bounding box toward the center of the boomerang. As you do so, the boomerang will scale down.

Notice that the boomerang is scaling in and out of the corner opposite the one you’re dragging. If you hold down Option as you drag, the boomerang will scale from the center. In addition, holding down the Shift key while scaling will cause the element to scale horizontally and vertically, preserving the boomerang’s original aspect ratio.
Hold down Shift-Option as you drag to lock the horizontal and vertical scales and to scale the element from the center.
Scale the boomerang to about two-thirds of its original size. Drag the center of the boomerang to reposition it, if necessary.
Both boomerangs should still be playing back in real time, even as you were adjusting the scale of the new one. But you’re just getting started.
The second boomerang is swooshing in perfect time with the first. If these really were two different boomerangs, the swooshes would be out of sync.
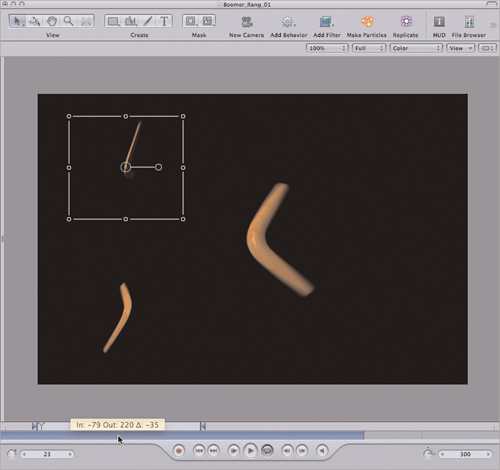
In the mini-Timeline, drag the blue bar to the left, but do not release the mouse button. The blue bar should be labeled Boomerang copy. (You won’t be able to see the label after you’ve dragged it to the left—the label will be hidden before frame 1 in the Timeline.)

As you drag the bar, another tooltip appears, displaying new In and Out points for the selected object (in this case, Boomerang copy). It also shows how far you’ve moved the clip from its original position—that’s the number after the triangle, called the delta value.
Release the mouse button when the delta value reads -45.
You’ve now offset the timing of the second boomerang so that it’s playing 45 frames ahead of the original boomerang. This helps the illusion that these are two distinct boomerangs.
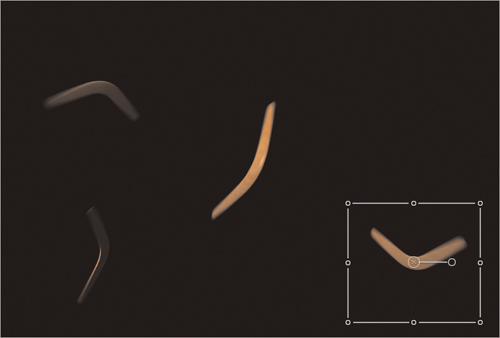
Hold down the Option key and drag the boomerang that you’ve just scaled (in the lower left) to the top left corner of the Canvas.
Click the Media tab to reveal its contents.

The Media tab lists all of the media files that are referred to by objects in your project. Notice that there is only one listing for Boomerang.mov. the QuickTime clip you dragged in from the File Browser. Because you Option-dragged the boomerang to create the second and third copies, you’re still using only one source clip from the computer’s hard drive. All three instances of the boomerang that you see in the Canvas are referencing the same source file.
Press F5 again to hide the Project pane.
Drag in the mini-Timeline for the new boomerang until the delta value in the tooltip reads -35.
Option-drag to create a fourth boomerang to be positioned in the lower right corner of the Canvas. Use a delta value of -45.
Click the original center boomerang to select it.
Notice that the mini-Timeline displays the position in time of whichever object is selected in the Canvas. Now that the original boomerang is selected, the blue bar is once again labeled Boomerang.
So far in Motion, you’ve been able to play four separate clips in real time and resize them on the fly. That may not be revolutionary, but it’s nice, nonetheless. Let’s examine another fundamental feature of Motion: behaviors.
Traditionally, in motion graphics work, movements and actions onscreen are specified by keyframes, which tell the computer how an object should look at specific moments in time. The process of creating motion graphics keyframes is very similar to traditional cartoon animation, in which a senior artist blocks out key poses at particular moments in an animation, and then another artist is given the task of tweening—filling the frames that connect the two key poses of the character.
In conventional computer keyframe animation, the user blocks out the keyframes in the animation, and the computer’s job is to do the tweening.
Behaviors in Motion animate via a completely different method. Using behaviors, you give some basic information to the computer, and it figures out the rest. To continue the cartoon animation analogy, using behaviors is like telling the cartoon character to be flattened by a rock, and then he’s flattened. There’s no need to even draw the keyframes; the computer does that for you.
That’s not to say Motion doesn’t “do” keyframes; it does. And even if you start with behaviors, it’s possible to turn behaviors into keyframes for further tweaking in Motion’s Keyframe Editor. The good news, though, is that behaviors can do things that are not possible using keyframes, and require a lot less work.
To understand behaviors, let’s apply a behavior called Vortex.
Make sure the center boomerang is still selected (the blue bar of the mini-Timeline should be labeled Boomerang).
>With the Timeline still playing, click the Add Behavior icon at the top of the Canvas.
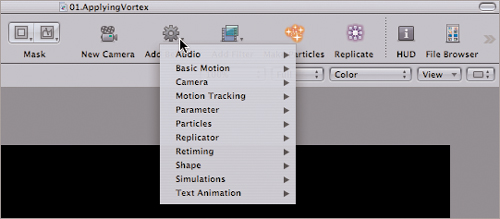
Choose Simulations > Vortex.

As soon as you choose Vortex, the other three boomerangs begin to fly around the center boomerang. That’s because when the Vortex behavior is applied to an object, other objects in the scene rotate around that object.
You may have noticed a semitransparent window appear during the course of earlier steps. If you don’t see it, do the following:
Press F7 to show the Heads Up Display, or HUD.

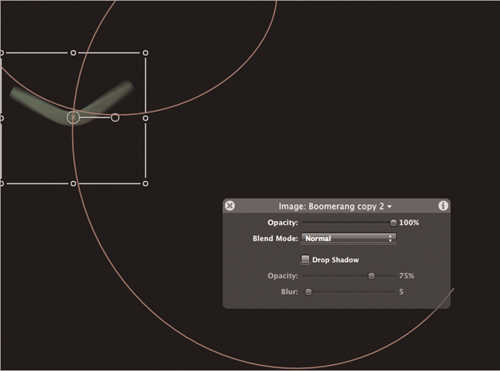
The HUD is a very cool little window that provides quick access to the most common object features, filters, and effects. If the title of the HUD doesn’t say Boomerang: Vortex. you may have deselected it. That’s OK. You can easily switch between the components of an object in the HUD.
Make sure the center boomerang is still selected. If not, click it.
Click the downward-facing arrow to the right of the HUD title, Boomerang: Vortex.

You’ll see a menu of the object and all the filters and behaviors applied to it. In this case, you have only one behavior, Vortex.
From the pop-up menu, choose Vortex.
In the HUD, drag the Strength slider to 0.
The boomerangs are no longer affected by the Vortex.
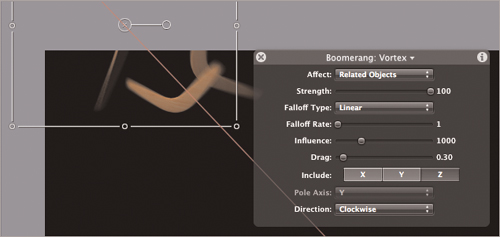
Return the Strength value to 20, and then set Drag to around 0.30.

The boomerangs are now drawn toward the center boomerang over time. Notice how Motion instantly adjusts the preview to reflect the new parameters.
Tip
You’ll sometimes find that you can’t get the exact value you want when dragging the sliders in the HUD. If this happens, hold down the Option key and click to the right or left of the slider knob to increment or decrement the slider value by one unit. Occasionally, this won’t be suitable, either, in which case you’ll need to visit the Inspector, but more on that later.
The whole thing looks a little static right now; let’s give these boomerangs a little direction.
Make sure the center boomerang, Boomerang, is still selected.
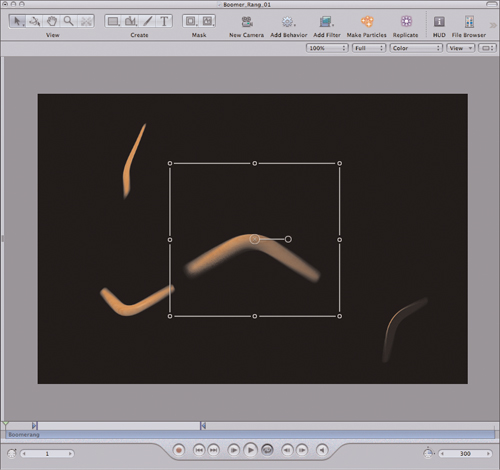
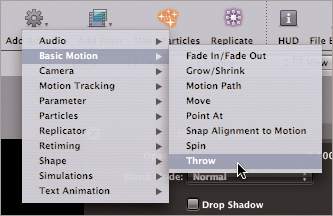
Click the Add Behavior icon at the top of the Canvas and choose Basic Motion > Throw.
Your HUD now shows parameters for the Throw behavior. This behavior’s job, believe it or not, is to throw things around the screen.
Drag the pointer from the center of the circle in the HUD to the upper left corner.
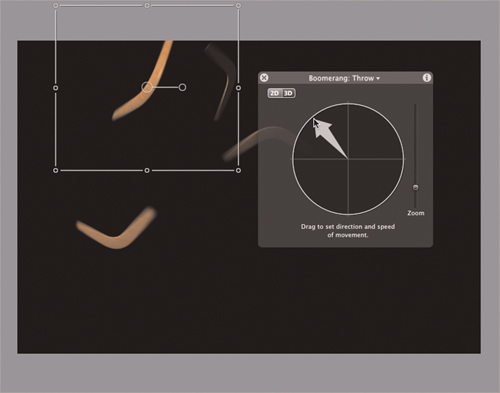
The boomerang is now “thrown” up and to the left of the screen. Notice that the other boomerangs are having a hard time keeping up with your lead boomerang. Instead of neatly rotating around it, they’re lagging behind somewhat. That’s because they’re influenced by the Vortex behavior you applied to the lead boomerang, and its strength of influence isn’t quite strong enough to make them follow obediently.
It’s actually a pretty cool effect, but let’s assume your storyboard calls for the boomerangs to stay in close formation.
Press the D key a few times and watch the HUD.
Pressing D cycles through the HUD controls for all the filters and behaviors attached to a selected object. Pressing Shift-D cycles in the opposite direction. These shortcut keys make it unnecessary to select the controls via the pop-up menu as you’ve done previously.
Press D again until you return to the controls for the Vortex behavior.
Set Strength all the way to 100.
The peripheral boomerangs now keep up with the lead boomerang.
Let’s start to stylize your boomerangs by using a color-correction filter to add a splash of color to the three orbiting boomerangs.
Click one of the orbiting boomerangs to select it.
If you find it hard to “catch” one, press the Spacebar to temporarily pause playback. Once you’ve selected a boomerang, press the Spacebar again to resume playing.
Click the Add Filter icon at the top of the Canvas and choose Color Correction > Colorize.
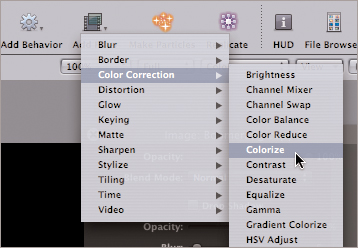
The color of the boomerang should change instantly, although the initial change will be subtle. You can now start tweaking the color.
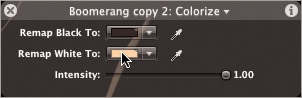
In the HUD, click the color well (the colored square) to the right of Remap White To.
Remember, if you can’t see the HUD, press F7 to reveal it.
Note
Be sure to click the color well only once. If you double-click it, you’ll be opening the Mac OS X color picker with the first click and deactivating the Remap White To color well with the second click. If that happens, click the Remap White To color well again to reactivate it and make it ready for editing in the Mac OS X Colors window.
Drag your pointer around the color wheel in the Mac OS X Colors window that appears, and watch as the selected boomerang changes color in real time. Pick a color you like and close the Colors window.

Let’s go a little out on the edge now by adding a glow filter.
Select the original, lead boomerang by clicking it.
Click the Add Filter icon and choose Glow > Dazzle.
In the HUD, set Threshold to 65.
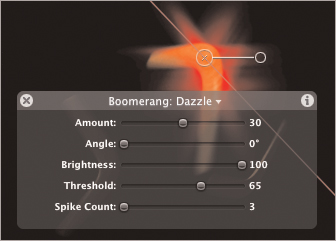
That’s better. The boomerang’s highlights are now triggering the effect of the Dazzle filter without going overboard.
Depending on your hardware, you may have noticed a slowdown after applying the Dazzle filter. Dazzle is a render-intensive filter and may slow your playback rate below the desired 30 frames per second (fps). You can see just how fast Motion is currently playing your sequence by looking at the FPS reading at the top left of the Canvas.

If your computer is still happily zipping along at 30 fps, pile on a few more filters and then read on when your system starts to chug.
Regardless of whether Dazzle puts on the brakes for your system, at some point you’ll be working with enough objects and filters that Motion will be unable to preview them all in real time. Motion has a couple of ways to take care of this problem.
Soloing a layer temporarily hides all other layers so that you can concentrate on tweaking a single layer in real time.
Select the boomerang to which you applied the Colorize filter.
Press Control-S.
All other objects disappear from the screen. You should regain real-time performance. You can apply this to any object in your project, which is great for tweaking parameters for specific objects in real time when projects become extremely complex.
Press Control-S again to unsolo the other objects.
A RAM Preview in Motion renders out a final version of your composite and then stores it in RAM so that you can easily play it in real time. RAM Previews restore real-time playback, but at the expense of interactivity. As soon as you make a change to one of the properties in your project, however, the preview is unrendered, and real-time performance is again lost until another RAM Preview is initiated.
Tip
RAM Previews are a common way of working in other motion graphics applications. However, due to Motion’s leveraging of the graphics card, RAM Previews in Motion are usually several times faster than in other software.
Choose Mark > RAM Preview > Play Range, or press Command-R.

Motion begins to render a RAM Preview. Notice how the play range in the mini-Timeline begins to turn green as frames are cached into RAM. It’s actually possible to stop the RAM Preview rendering and restart it later. As long as you haven’t modified your project, the section of the Timeline that already has been rendered (the part that’s green) will be retained, and the RAM Preview render will pick up where it left off.
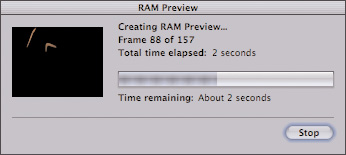
When the RAM Preview is complete, resume playback by pressing the Spacebar or clicking the Play button at the base of the Canvas.
Your playback rate (as indicated in the top left of the Canvas) should now be 30 FPS. Try changing one of the sliders in the HUD—you’ll find that the RAM Preview was immediately removed from the cache (as indicated by the removal of green in the mini-Timeline).
A typical motion graphics project can quickly build to dozens if not hundreds of layers. Even using four quad-core processors, quad SLI graphics, and everything cooled to -273 degrees Celsius and overclocked, you’ll lose real-time performance at some point. The good news is that your system doesn’t actually need to play all your layers in real time.
Think about it: Most of the time, you’re only working with the top five or six layers. Other layers in your composite were modified minutes, hours, even days ago and require little additional tweaking. If you were to render those other layers into a single QuickTime movie, Motion could play that single movie in real time instead of all its individual elements.
The procedure for rendering layers to a QuickTime file is fairly straightforward.
Press F5 to open the Project pane.
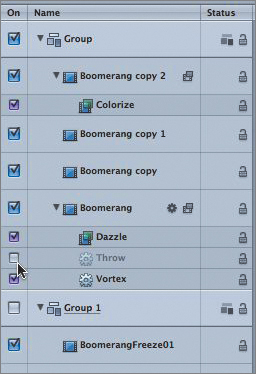
All of your boomerangs are contained in one group. A group is simply a container for organizing layers and objects. Your projects can have many groups, and groups inside groups.
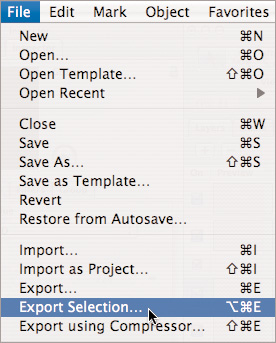
In the Layers tab, select the group containing your boomerangs, and then choose File > Export Selection.
In the dialog that opens, enter an appropriate name for the rendered file, and select a destination for export such as Motion3_Book_Files > Lessons > Lesson_01 > Student Saves.
It’s a good idea to include a version number to avoid confusion if you later make changes and refreeze the layers.
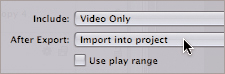
Unless you need to render with float precision (in which case, use OpenEXR export), from the Use pop-up menu choose Lossless+Alpha Movie.
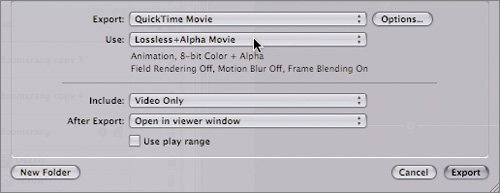
From the After Export pop-up menu choose “Import into project,” and in the dialog that opens; click Export.
Because you’ve chosen to import the clip into the project after export, a “frozen” movie of the group is automatically added to the Layers tab inside a new group.
In the Layers tab, deactivate the group that contains the original boomerang movies (and copies) that you used to create the animation.

You now have a single video stream that includes all the layers, behaviors, and filters in the group you just froze.
If you need to make changes to something within the frozen group, delete the rendered movie from your project and reactivate the group. After your changes have been made, you can repeat the process to render out a new frozen version of the group.
Be careful when freezing layers involved in interactive behaviors like Vortex. The rendered movie will no longer be affected by behaviors in the same way, and has no behaviors of its own by which to influence other layers. (However, behaviors included in the original group will still have influence over other layers, even though the group has been deactivated.)
And if this last paragraph is confusing to you, just forget you read it and go and enjoy a cappuccino.
No doubt you’ve already started to throw on other filters and behaviors in a frenzy of experimentation. Go ahead, give them all a whirl. Just one thing: After you’ve thrown 20 behaviors on an object, here’s how to turn some of them off.
Press F5 to open the Project pane.
In the Layers tab, deactivate the group containing your rendered movie, and then deactivate the Throw behavior.
The center boomerang is no longer thrown offscreen. All filters and behaviors can be deactivated by deselecting their respective checkboxes in the Layers tab.
In the Layers tab, click the Throw filter to select it.
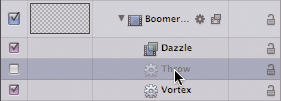
The Throw behavior is now completely removed from the layer.
Press Command-Z to undo.
Your command to delete Throw is undone, and the behavior returns to the Layers tab.
Particles are amazing little gifts to the motion graphics artist. Particles can create explosions of flames, profusions of flowers, or a flurry of sparks. They can make text rain down, vapors shimmer, and clouds form. Many tasks that involve multiple “things” can benefit from particles, and using them often removes a lot of the pixel grease from the effort.
Motion comes with a great collection of preset particle simulations, but it’s easy to create your own. If you’ve tried to use other particle systems and failed, fear not. Motion’s real-time feedback and simple controls make the design process extremely intuitive. (You’ll look at designing custom particle systems later in the book.)
What you may not immediately realize is that anything in Motion can become a particle simulation: still images, movies, even text. In the next exercise, you’ll take your humble boomerang and turn it into a hailstorm of carved wood.
The first part of creating a particle simulation in Motion involves applying an emitter. which you’ll do now.
Press Command-Option-W to close any currently open projects. If you’ve created a masterpiece that you’d like to revisit later, save it when prompted. Otherwise, click Don’t Save to continue.
Press Command-O to open an existing project.
Choose Motion3_Book_Files > Lessons > Lesson_01 > 04.Particles.
Here you have your humble boomerang looking a little lonely.
Make sure that playback is stopped. If not, press the Spacebar to stop playback, and move the playhead to frame 1 by pressing the Home key.
In the Canvas, click the boomerang to select it, and then click the Make Particles icon at the top of the Canvas.

Before you play this, know that the default Birth Rate value of 30 is much too high for what you’re doing here. Because you have a relatively large animated sequence, Motion has to do a lot of work to calculate all of the particles in real time.
In the HUD (press F7), drag the Birth Rate slider to around 5.
Now press the Spacebar to begin playback.

The boomerangs explode outward. Notice how each one starts at a different frame of the boomerang’s motion, creating the illusion that these are all different boomerangs.
Tip
If you’re having problems getting real-time playback on your system, try reducing the Birth Rate value even further for a more modest number of boomerangs. Alternatively, you could try reducing the play range by moving the play-range Out point marker to the left. Another solution would be to run out to the local Apple Store and buy more RAM and a better graphics card, or even a shiny new Mac Pro.
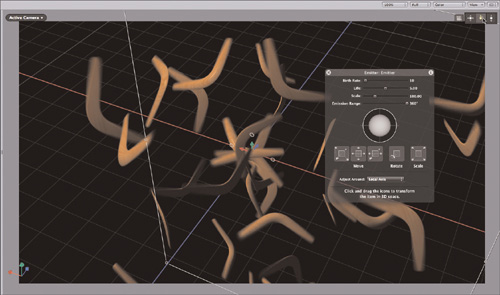
Drag the main radial line—the line with no arrows connected to the outside of the circle by a small round dot—and watch the result. The radial line will divide into two separate lines.

Moving the radial lines in this fashion allows you to set how broad a spread of directions the boomerangs will move in once they’re born.
Drag the gray arrows in the circle, watching the result.

Dragging the arrows toward the outside of the circle increases the boomerangs’ speeds, while rotating around the circle changes their directions.
In the HUD, set the arrow controls so that they’re about halfway between the center and the outside of the circle, thus setting the speeds of the boomerangs to a medium level.
Drag one of the radial lines to close up the circle again, causing the boomerangs to shoot out in all directions.

It’s a little disconcerting how the boomerangs just pop out of nowhere. Let’s apply another behavior to change that.
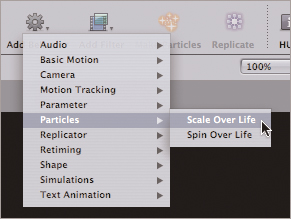
Motion ships with two particle behaviors, the most useful of which is Scale Over Life.
Press F5 to open the Project pane.
Click the Layers tab if it’s not currently visible.
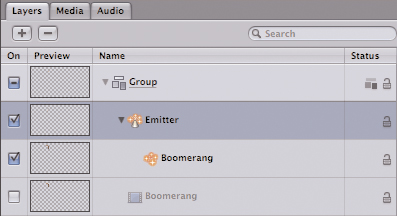
Notice that there are four rows in the Layers tab. The row labeled Group contains the particle object (you’ll take a closer look at the role of Groups later). Next is the emitter, Emitter. It’s the layer spitting out the boomerangs. Third, you have a particle called Boomerang. It’s what Emitter spits out. Finally, you’ll notice a dimmed row called Boomerang. This is the original reference footage used by the Boomerang particle. It’s turned off because it’s being used only as a reference for the particle system; it’s not being drawn to the Canvas, itself. If it were, you’d see the original boomerang that was on the screen before you clicked Make Particles, in addition to the boomerangs fired out of the emitter.
Don’t worry if all this sounds confusing; you’ll later spend a lot of time going through the basics of particle systems.
Click the Boomerang cell layer to select it.

Click the Add Behavior icon and choose Particles > Scale Over Life.
Press F5 to close the Project pane. If you stopped playback, press the Spacebar to resume.
In the HUD, from the Increment Type pop-up menu choose Birth and Death Values.

Set Scale At Birth to around 20 and Scale At Death to around 300.
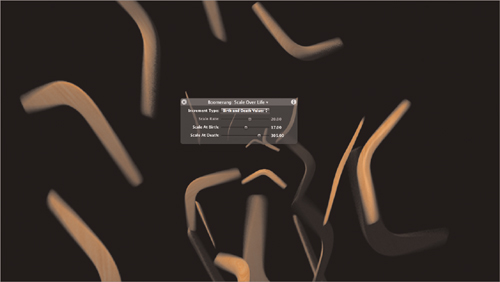
The boomerangs now start their lives at a fairly humble size and grow bigger and bigger with age.
Let’s face it: 2D motion graphics are a little last century. These days, every sports show opener, shampoo commercial, and trade-show kiosk has graphic elements zooming through virtual 3D space. Motion is designed throughout for 3D imagery. In this lesson, you’ll do a little 3D experimentation as a warm-up. In Lesson 4, you’ll dive headlong into 3D motion graphics.
If you’ve made a mess of your onscreen display, press Command-Option-W to close all open projects.
Open Motion3_Book_Files > Lessons > Lesson_01 > 05.GoingDeep and press the Spacebar to start playback.
In this project, you’ll find the same old two-dimensional scene you were just working with. First, to create a 3D effect, you’ll need to add a 3D camera to look through.
At the top of the Canvas, click the New Camera icon. When prompted, click Switch to 3D.

In Motion, you can choose whether each group should interact in 3D space or remain a direct-to-screen 2D element. This simple dialog allows you to switch all existing groups to 3D when you introduce your first 3D camera to the project. You can later toggle groups between 2D and 3D, if necessary.
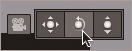
In the upper right corner of the Canvas, position your pointer over the Orbit tool in the 3D View tools that appeared when you created the camera. Then click and hold down the mouse button while you drag the tool in several directions.
The camera rotates in 3D space. The boomerangs, however, look anything but 3D. They actually look like a 2D display (a plane, in geometric terms) viewed from the side. That’s because the particle system is still working in two dimensions; a single click will fix things.
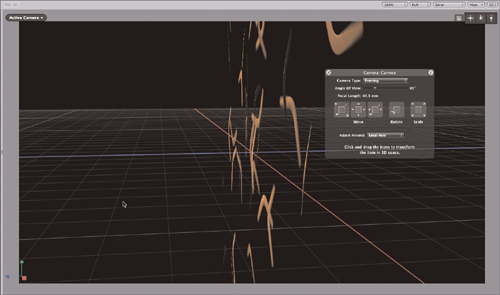
Press F5 to open the Project pane (if it’s not already open). In the Layers tab, click the Emitter to select it.
Press F4 to open the Emitter tab in the Inspector, and then select the 3D checkbox to activate 3D.
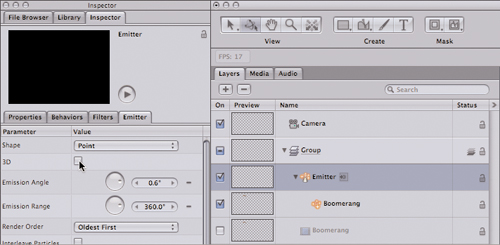
The boomerangs immediately move out in three dimensions.
To view the boomerang particles from different angles, drag the Orbit tool again.
More Info
The astute among you may be wondering how we created three-dimensional objects out of a 2D QuickTime movie. The answer is, we didn’t. The boomerangs are still 2D, but because the original boomerang clip rotates to show all sides of the boomerang, they appear to be in 3D. This is also helped by the Face Camera parameter in the Emitters tab. Try deactivating that parameter to see the difference.
Just when everything seems perfect, all of a sudden nothing is. That’s what happens when you’re nearing completion of a project and the power goes out, or Motion unexpectedly quits (although you probably shouldn’t have been doing those 13 simultaneous renders in the background). Fortunately, Motion includes an autosave function to rescue your work should you suddenly be staring at the Desktop instead of the Motion workspace.
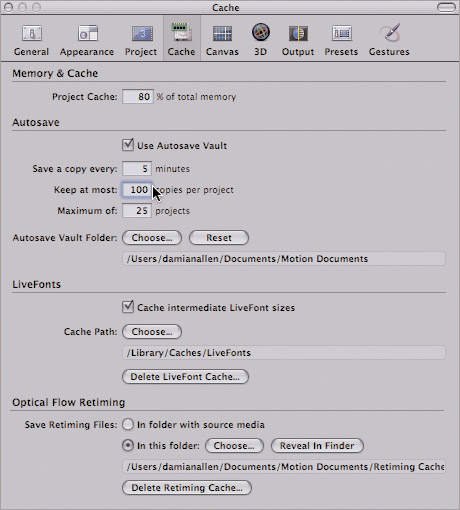
You can find the Autosave settings in the Cache section of Motion > Preferences. By default, Motion is set to save every 15 minutes. That’s a lot of time when you’re working on deadline. An autosave every 5 minutes is more sensible. Autosaving at any shorter interval may affect design performance as you continually experience background disk activity due to the saving process.
Project files are tiny, so why not have as many back-ups as you can? Motion allows you to have as many as 100 copies of each project cached and as many as 100 projects in the cache.

One last thing: Don’t exclusively rely on the autosave function. It makes sense to manually increment the project version number by using the Save As command. Do this at strategic development phases of your project. That way, if you accidentally screw something up, you can travel back to an earlier version of your project and rescue that screwed-up something by retrieving an earlier version.
Table . Keyboard Shortcuts
File Commands | |
Command-O | opens a project |
Windowing Keys | |
Command-1 | opens and closes the File Browser |
Command-2 | opens and closes the Library |
Command-4 | opens and closes the Layers tab |
F1 | opens the Properties tab of the Inspector |
F2 | opens the Behaviors tab of the Inspector |
F3 | opens the Filters tab of the Inspector |
F4 | opens the Contextual tab of the Inspector (this tab changes titles depending on the selected objects) |
F5 | shows and hides the Project pane (which usually opens to its Layers tab) |
F6 | shows and hides the Timing pane |
F7 | shows and hides the HUD (see below) |
Navigation | |
Command-+ (plus) (main keyboard) | zooms in by a discrete amount |
Command-– (minus) (main keyboard) | zooms out by a discrete amount |
Shift-Z | zooms Canvas to 100 percent |
Option-Z | sets Canvas to Fit in Window zoom mode |
Spacebar-drag | pans the Canvas |
Play-Range Commands | |
Spacebar | begins and halts playback |
Command-Option-I | sets the play-range In point to the current time |
Command-Option-O | sets the play-range Out point to the current time |
Home | locates the playhead to frame 1 |
Shift-[ (left bracket) | moves the beginning of the selected object to the current playhead position |
HUD (Heads Up Display) | |
F7 | shows/hides the HUD |
D | cycles through the filters and behaviors attached to the current object |
Shift-D | cycles through the filters and behaviors attached to the current object in the opposite direction to the D keyboard shortcut |
Miscellaneous | |
Command-R | renders a RAM Preview |
Control-S | solos a selected object |
Command-Z | undo the last action |