
Lesson Files | Motion3_Book_Files > Lessons > Lesson12 |
Time | This lesson takes approximately 60 minutes to complete. |
Goals | Generate a key in Motion |
Refine a key with the parameters in Primatte RT | |
Apply a Matte Magic filter | |
Create garbage mattes using masking tools | |
Rotoscope using the B-Spline tool | |
Create a luma key in Motion |
Keying lies at the heart of smooth, integrated composites. A seamless marriage of all elements should hide the technical complexity of its creation from the viewer. Whether you’re creating an imitation of reality or an imaginative combination of disparate and often computer-generated elements, the whole should always appear greater than the sum of its parts.
In this lesson, you will explore how to pull a key using various filters and masks and how to clean up the mattes of those keys to cohesively blend layers. Your goal is to create an element to use in the opening of a planetarium show.
So far in your composites, you’ve been layering objects on top of each other with a great amount of ease. That’s because, for the most part, the objects you’ve been compositing have had alpha channels that told Motion which parts of the object should look opaque and which parts should be transparent. Or you have used blend modes to composite the entire image. A problem arises when you want to composite an image without an alpha channel. In such situations you need to create one. One way to do this is by pulling a key.
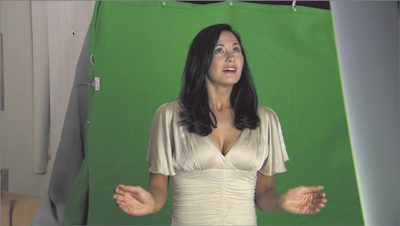
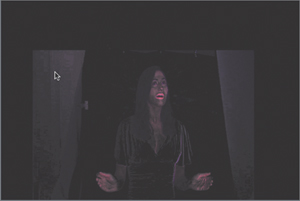
Look at the following figure. You want to composite the woman over another background. So how does Motion know which parts of the image to keep and which parts to throw away? Using a matte, also known as a key, you can tell Motion what to use and what to discard.
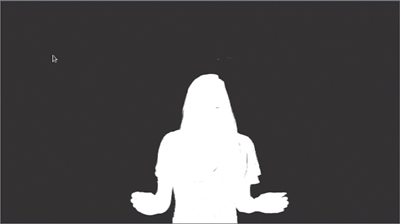
Creating a key is like cutting holes in a piece of cardboard and then laying it over the top of a photograph. The only parts of the photograph that you’ll see are the ones showing through the holes. The following figure is a key for the previous figure: The white area corresponds to the part of the image you want to keep, and the black area corresponds to the part you want Motion to remove, so that you can replace it with a different background.
Pulling a good key entails a trade-off: You want a solid contrast between the foreground white and the background black while preserving a nice feathered edge on the foreground so that it blends smoothly with the background that’s replacing the green or blue you’re removing. For this exercise, you’ll use Primatte RT, a plug-in that is bundled with Motion.
Note
When talking about mattes, keys, and alphas, there is often confusion about each term. The term matte developed in the film world, while the term key initially referred to a video process. Both words effectively mean the same thing. An alpha is simply a matte that’s been attached to an image or movie file. It’s given a special channel, the alpha channel. It sits alongside the red, green, and blue channels, which contain the color data of the image.
Before you start keying, you need to make sure the project is set up appropriately for the current footage.
Press Command-Option-W to close any open projects.
Press Command-N to create a new project.
The footage you’ll use comes from a combination of primarily standard-definition materials with an anamorphic aspect ratio.
From the Preset pop-up menu choose Custom. The Project Properties dialog opens. In the General tab, do the following:
Set Width to 720 and Height to 480.
Make sure that Pixel Aspect Ratio is set to NTSC D1/DV Anamorphic.
Set Field Order to Lower.
Set Frame Rate to 30.00 fps.
Set Duration to 450 Frames.

Note
If the Select Project Preset dialog fails to appear, close the project that was created automatically and press Command-Option-N. At some point in the past, you may have selected the “Create new documents using the default preset” checkbox in the Select Project Preset dialog. Pressing Command-Option-N opens the dialog so that you can choose a different preset.
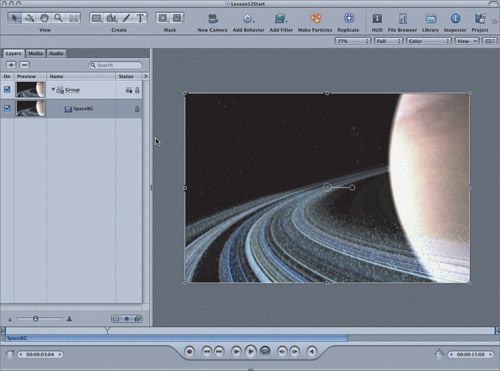
In the File Browser, navigate to Motion3_Book_Files > Media > Space. Drag SpaceBG.mov into the Layers tab, or drag it into the Canvas and snap it to the center guides. (In the filename, BG stands for background.)
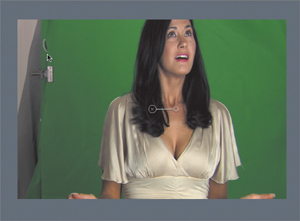
In the View and Overlay Options menu at the top right of the Canvas, make sure that Correct for Aspect Ratio is selected. From the File Browser, drag STACY.mov into the Canvas, and release the mouse button when the file snaps to the center guides.
Tip
To make it easier to read the names of files, you may want to click the List View button at the top of the File Browser.
In the upper right corner of the Canvas, change the Zoom Level menu selection to Fit in Window.
In the Properties tab of the Inspector, set the Scale value of Stacy.mov to 50%. This shot was captured from DVCProHD, and you need to scale it down for use in your SD sequence.
In the Canvas, position the bottom of the Stacy.mov clip at the bottom of the frame.

Begin playback.
When the Timeline has played through once, the two pieces of footage should be cached, and you’ll be able to watch the composite in real time. However, at the moment, you’ll be able to see only the green screen over a portion of the screen—the background will be partially obscured.
Primatte RT is a surprisingly capable keyer, given the simplicity of its interface. It provides three sliders to adjust when you’re pulling a key. Primatte RT also automatically analyzes the background to determine the color you’re trying to key out. You know the shot you’re looking at is a green screen, but Primatte RT needs to determine that it’s a green screen and not, say, a blue screen.
Make sure that Stacy is selected in the Layers tab; then click the Add Filter icon at the top of the Canvas and choose Keying > Primatte RT.
Congratulations, you’ve pulled a key! Stacy looks as if she’s contracted an alien flesh-eating virus, but at least the green background is gone.
When you applied the Primatte RT filter, it analyzed the frame and determined that green needed to be keyed out. However, at frame 1, only a small portion of the screen is green—the rest is filled with our talent and the studio background. To help Primatte RT generate the most accurate key, you should find a frame with more green to analyze.
Drag the playhead to the end of the Stacy.mov clip, and press Command-Option-O to mark the Play Range Out point.
For the moment, you only want to watch and apply the key for the Stacy clip. You will be adding material later after this shot.
Press the Spacebar to play the sequence and examine the key result.
Stop playback and set the playhead to frame 10.
Frame 10 allows you to see Stacy’s hands and may help you to set a better green for the keyer.
In the HUD (press F7 to display it if it’s hidden), click the Green Auto Sample button.
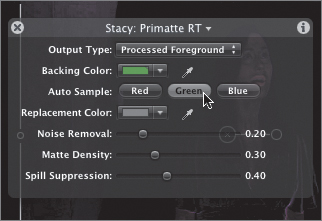
Now, about that alien flesh-eating disease our talent has contracted: It’s the cumulative result of parts of the image being keyed out by mistake, and overzealous spill suppression. We’ll fix both of these problems in turn.
Resume playback.
Primatte RT is a real-time keyer, and you can take advantage of that fact. Now that you’re viewing the full playback, you can see all kinds of problems. It looks like that virus has spread to her teeth. You can start adjusting the three sliders—Noise Removal, Matte Density, and Spill Suppression—but there’s a better way to see what you’re doing.
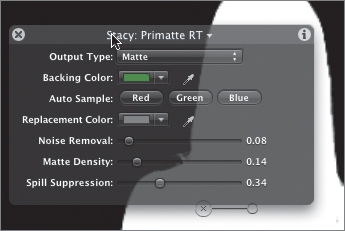
In the HUD, set Output Type to Matte.

The Matte Output Type lets you see the black-and-white matte (that is, the key) that Primatte RT has generated. For the composite to work correctly, the foreground should appear pure white (unless it includes something semitransparent, such as a clear plastic raincoat, in which case you’d expect some gray values in the matte). The background should appear opaque black. The Matte Output Type is a useful diagnostic tool, because problems with the matte can sometimes hide in the background that you’re adding to the shot.
In the current example, your foreground matte is looking anything but opaque. Wherever you see gray, the background will partially show through, and that’s the source of the flesh-eating disease.
Drag the Noise Removal slider all the way to 0.
It appears you’ve made things worse. Now the background is no longer an opaque black. If we leave this as is, some of the original green screen will be added to the final composite, which is not good. You’ll fix that in a moment, but first you’ll fix the gray in Stacy’s face.
Drag the Matte Density slider to the left until the foreground becomes opaque white (a value of around 0.14).
The Matte Density setting increases the contrast of the matte, making the whites whiter and the blacks blacker.
Drag the Noise Removal slider to the right until most of the noise around the foreground has dropped to black (a value of around 0.08).
The Noise Removal slider removes pixels from the matte that are close to the original backing color.
Change Output Type to Processed Foreground.
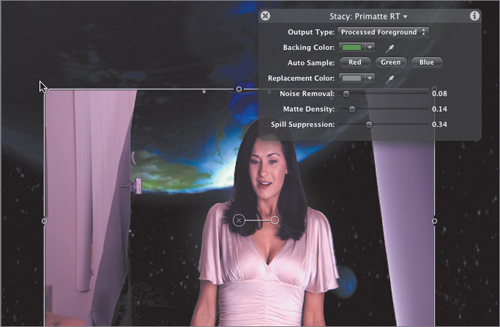
OK, so no flesh-eating disease is present, but the magenta’s a touch strong. What’s happened here is that Primatte RT has been a little too eager to remove the green spill and has pushed the colors in the opposite direction.
Whenever you shoot bluescreen or greenscreen images, some of the blue or green lighting inevitably spills over onto the subject you’re trying to key. As part of the keying process, it’s essential to remove this excess color from the image. In this case, it’s green spill, and Primatte RT has automatically removed it, albeit to an extreme degree.
In the HUD, drag the Spill Suppression slider to the left until the color of the foreground looks appropriate (a value of around 0.14).
The spill suppression now looks much more natural. You may notice, however, that the contrast of our talent is much flatter than the contrast of the background. That’s because the gamma of the greenscreen footage doesn’t match the gamma of the background. (Different film and video formats have different response curves to compensate for variations in output devices—at least that’s the short story.)
At the top of the Canvas, click the Add Filter icon and choose Color Correction > Gamma.
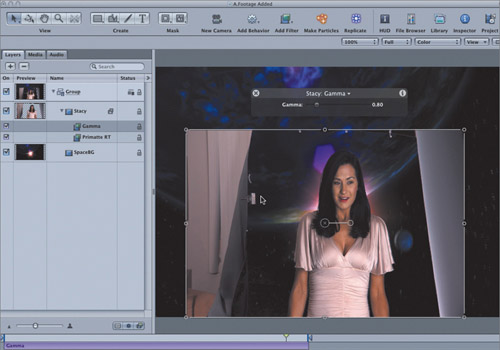
In the HUD, set the Gamma to about 0.8.
Stacy now blends much more naturally into her background.
One of the biggest problems when pulling a key is to have the edges convincingly blend with the background. Motion has a few tricks you can employ to clean up the edges.
One advantage in the current example is that the composite is surreal. You’re not trying to suspend disbelief and convince your audience that this woman is standing in the middle of a real street. The background is obviously fantastic, so an audience might forgive a composite that would look disconcerting in, say, a gritty cop show.
If you examine the right side of Stacy, you’ll see a faint ring of noise around her hair. This is the result of a color shift in the greenscreen background close to the edges of the subject. A common solution to this problem is to choke the matte. Choking is the process of trimming away unwanted pixels around the edges of an image.

Note
Choking a matte necessarily destroys some edge detail, especially in cases like this, when fine, loose strands of hair are present. More sophisticated keying techniques (using multiple keys) can remedy many edge problems without the need to choke the matte, but such techniques are beyond the scope of this lesson.
In the Layers tab, select Stacy.

At the top of the Canvas, click the Add Filter icon and choose Matte > Matte Magic.
As soon as you apply the Matte Magic filter, you should see a change in your image. The Matte Magic filter smoothes the edges of the matte into the background, feathering away the border pixels of the foreground image.
In the HUD move the Shrink slider all the way to the right.
As you drag the slider to the right, you’re shrinking the matte, or choking more of the pixels at the edge of the matte. The result is far too extreme and also creates internal holes.
Press Command-Z to undo the change to the Shrink, returning its value to 1.00.
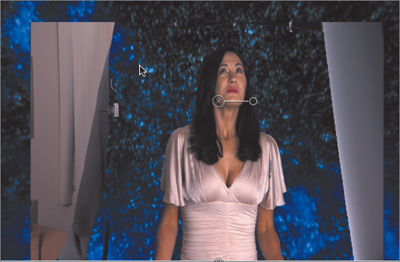
The Matte Magic filter helps “sell” your problematic edge, but take a look at Stacy’s hair on the left side of the image. As you play back the sequence, you’ll notice that the edges of her hair have been unnaturally darkened. If you look at her mouth and elsewhere in her dress, you may even see speckling where the Matte Choker has caused holes to emerge in the matte.
In the HUD, move the Shrink slider to 0.8 and the Feather slider to 0.5.

In the Layers tab, toggle the Matte Magic filter on and off to view the affected and unaffected versions of the composite.
In this case, the cure seems worse than the ailment; you fix the edges of your composite at the expense of the inside. There’s always a solution, of course, and you’ll get to it shortly.
In the Layers tab, toggle the Matte Magic filter back on.
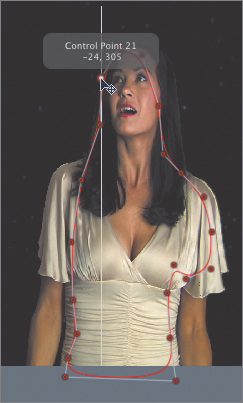
You’ve probably noticed that objects in the studio where the shoot took place are visible in this clip. Obviously, the studio isn’t supposed to be in the shot, so you need to remove it, leaving just Stacy and the starscape behind her. To remove the studio from the composite, you’ll create a garbage matte. Garbage mattes are used to cut away the unwanted elements in a shot.
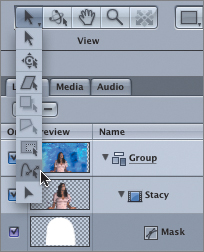
In Motion, garbage mattes can be created using layer masks. There are five types of layer masks: rectangular, elliptical, freehand, Bezier, and B-Spline. (The first two are simple preset shapes made from Bezier points, but let’s not worry about those right now.)
Layer masks are mattes that tell Motion which parts of an object to keep and which parts to throw away. Now that you’ve carefully pulled your key, you can use a layer mask to quickly cut away the garbage around it.
In the Layers tab, select Stacy.
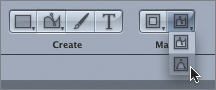
In the top left corner of the Canvas, click the Rectangle Mask tool.

Stop playback, and in the Timeline position the playhead at frame 20.
In the Canvas, drag a marquee from the lower left of Stacy’s left hand to the upper right above her head and to the right of her right hand.

The room around Stacy should disappear, revealing the SpaceBG behind it. You’ve basically told Motion, “Keep the stuff inside this box. Anything outside the box is garbage.” Because you applied the layer mask to your Stacy object, only the foreground was affected. The SpaceBG clip is still intact.
The rectangle would work fine for this shot, but for the sake of demonstrating workflow, let’s use the free-form shape tools to finish the job.
In the Layers tab, select Rectangle Mask.
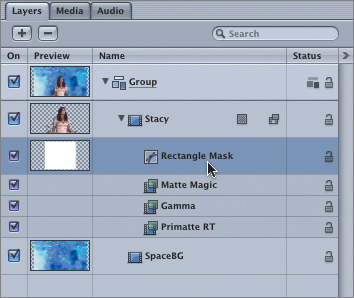
Notice that the mask has been added as an extra element underneath Stacy. It’s just like a filter or behavior; it belongs to the Stacy object.
Press Delete to remove the Rectangle Mask from the object.
Reselect Stacy, and then click the Bezier Mask tool to select it.

Bezier shapes are made by creating a bunch of points and then joining them to make a closed shape. Don’t worry—you’ll see how in just a moment.
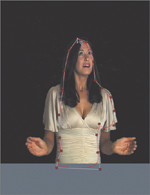
Click in the gray space below and to the left of Stacy to create a point.
Click just above and to the left of her shoulder to create another point.

It would be nice to create a single point above her head, but if you draw a straight line to that point, it might cut off part of her head. Instead, you’ll create a Bezier point. To create a Bezier point, drag the pointer instead of clicking.
Position the pointer just above Stacy’s head; then click and drag outward to the right to create a curve to the new point.
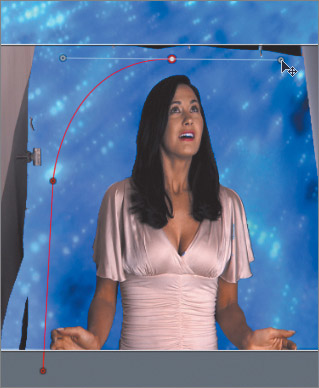
Click to create another point just above and to the right of her other shoulder.
Click to create another point just below and to the right of Stacy in the gray space outside the Canvas.
To close the curve and create the shape, click your starting point.
Tip
When creating shapes, you may find the snapping lines to be more of a hindrance than a help. Pressing N will deactivate snapping; pressing it again will reactivate snapping when you’ve finished adjusting your shape. You can also turn snapping on and off in the View menu. A checkmark appears next to the command to indicate when snapping is on.
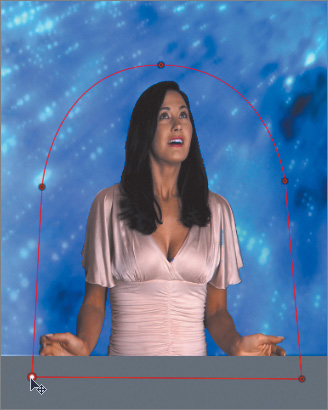
Using a Bezier shape, you’re able to create a closer fit to the contours of your talent. You could have added more points to make the shape fit even closer. In that case, however, you would risk cutting off some of her hair or her hands, so you’re better off using a looser shape.
Let’s look at a few other features of Bezier shapes.
Create a folder called Motion3_Book_Files > Lessons > Lesson12 > Student Saves and save the file to that folder with the name A.GarbageMatteCreated.
Click the Bezier point above Stacy’s head.
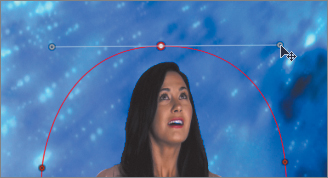
The lines emerging from either side of the point are called tangent handles. They enable you to adjust the slope of the curve going into and out of the point.
Drag around the hollow circle at the end of one of the Bezier handles.
The handle pulls in and out, adjusting the slope of the curve. As it moves up or down, it adjusts the angle of the curve by changing the angle of the other handle, but not the length of the opposite handle.
Option-drag the end of one of the handles.
This unlocks them, allowing you to move one handle by itself.
Option-drag the end of the same handle again.
The handles are relinked.
Command-Option-drag the handle again.
The two handles are scaled simultaneously.
Option-click a part of the shape outline where there is no point.
A new point is created.
With the new point still selected, press Delete.
The new point is deleted. You can Shift-click or drag a marquee around several points to select them, and then press Delete to remove them from the shape.
Control-click one of the straight points at the side of the shape, and from the shortcut menu choose Smooth.

The straight, or linear, point is converted into a smooth point—that is, a point with tangent handles. Alternatively, you can use this menu to convert smooth points to linear points.
OK, now that you’ve made a mess, it’s time to create the garbage matte for real.
Press Command-Option-W to close the project. When prompted, choose Don’t Save.
Open the project you saved to the Student Saves folder in step 14, A.GarbageMatteCreated.
Note
If you did not create the file, open Motion3_Book_Files > Lessons > Lesson12 > D.GarbageMatteCreated, or delete the mask in the Layers tab and repeat steps 7 through 13.
Notice that after you’ve reloaded the project, the shape has the standard scale handles around the edges. If you tried, you’d be unable to edit individual points on the curve. That’s because when Motion opens a project, it defaults to the Select/Transform tool, the tool you commonly use in Motion to select objects and move them around the Canvas. If you want to edit the points on your shape, you’ll need to use another tool, the Adjust Control Points tool.
At the top left of the Canvas, click and hold the Select/Transform tool, and from the pop-up menu choose the second tool from the bottom—the Adjust Control Points tool.
The individual points of the curve are available again for editing.
Resume playback.
You have a major problem with your key. It’s showing holes through Stacy’s clothing and mouth. You need a garbage matte to hold in parts of the original footage and reflect the slight changes in shape as she moves. You can do this by keyframing.
In Lesson 10, you explored the concept of keyframes in great detail. You will need to use them here to allow your mask to change over time. You’ll create snapshots of the points and size of the mask at different frames, and let Motion interpolate the mask between those snapshots. The snapshots will be created using Record Animation mode.
For your mask, you will use B-Splines instead of Bezier curves to speed your work. B-Splines are manipulated using points only—there are no tangent handles. The points themselves do not lie on the surface of the shape. Instead, each B-Spline control point is offset from the shape’s surface, pulling that section of the shape toward itself as if it were a magnet to create a curve. B-Splines are extremely smooth—by default, there are no sharp angles in B-Spline shapes, although you can create sharper curves, if necessary.
In the Layers tab, make sure that Stacy is selected.
Duplicate the Stacy layer and rename it Stacy Hold-In.
In the Stacy Hold-In group, delete the Mask, Matte Magic, and Primatte RT filters.
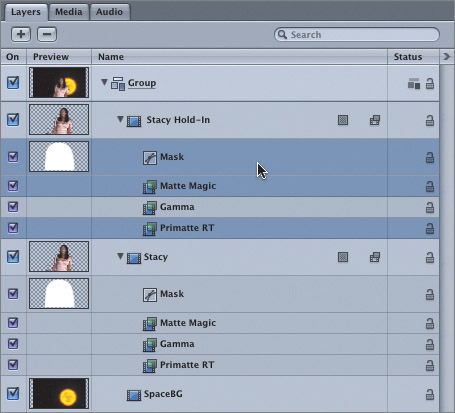
You need to preserve the Gamma filter to match the look of the Stacy group.
In the Canvas toolbar, click the B-Spline Mask tool.
Make sure the playhead is on frame 1, and click a number of points within Stacy’s shape to hold out the errant key holes. Click the first point to close the shape.
Press the Spacebar to play the sequence.
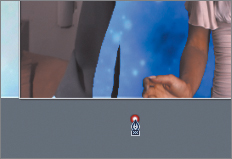
Around frame 100, the green screen is reappearing, as your B-Spline shape has not yet altered to accommodate Stacy’s movement.
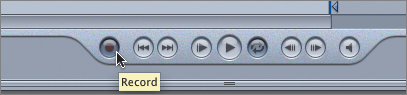
At the bottom of the Canvas, click the Record button to activate it.
When Record Animation mode is activated, any changes to the properties of an object, filter, mask, or behavior will create a keyframe (that is, a “snapshot”) at that position in time. This is a quick way to create keyframes as you work.
Note
The shortcut key for turning Record Animation mode on and off is A. Unfortunately, this is also the shortcut key for choosing the Select tool in Final Cut Pro. If you’re a Final Cut Pro user, be careful that you don’t turn on Record Animation and set keyframes when you really mean to switch to the Select/Transform tool (press Shift-S).
You could scale the whole mask inward if you used the Select/Transform tool (by pressing Shift-S and dragging the matte inward), but instead you will rotoscope or move particular points as Stacy changes position.
Move to frame 105.
Drag inward the B-Spline points that are now revealing the green screen until the green screen is hidden again.
Move to frame 160.
To the left of Stacy, drag inward the B-Spline points that are now revealing the green screen until the green screen is hidden again. On the right, pull out the B-Spline points to cover the holes in her shoulder.
Progress through the rest of Stacy Hold-In and adjust B-Spline points wherever necessary. Only a few points should require tweaking now, as Motion has already interpolated changes between the keyframes that you set by recording the animation.
When finished, turn off Record Animation.
Occasionally, as with this footage from a DV source, you may need to slightly blur the matte for a cleaner outside edge. By applying a Gaussian blur at a very low setting, you can achieve a smoother edge for your mask.
In the Layers tab, select the original Stacy group, and in the Canvas, choose Add Filter > Blur > Gaussian Blur.
In the HUD, set Amount to 1.

Stacy’s face is still clear, because the Hold-In mask on the layer above has preserved her from the Gaussian blur.
You now have a clean key with a nice, soft edge and a gamma setting that integrates Stacy into the background. Your second mask on the layer above Stacy’s original layer has held out all speckles. It will often take a combination of masks or mattes like this to help you achieve the best results in your own work.
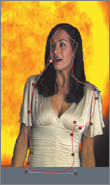
To add a little more interest and motion to your composite, you will now add a luma-keyed element. A luma key uses the black and white information inherent to an image or clip to designate how the foreground relates to the background. In this exercise, you will key out the black in a clip of flames to place the fireball over your previous layers of footage.
In the File Browser, navigate to Motion3_Book_Files > Media > Space. Drag Flame Tunnel into the Canvas and snap it to the center guides.
At the top of the Canvas, click the Add Filter icon and choose Keying > Luma Key.
In the HUD, set Key Mode to Key Out Darker and Tolerance to 0.42.
The Key Mode setting will reveal the flame from the jet engine, and the Tolerance setting adjusts the range of blacks and grays to be utilized in the key’s calculations.

Luma keys work best when you have media with high contrast levels. In your own work, you should consider applying a contrast filter, if necessary, prior to using a luma key.
Play the sequence.
You may find that the sequence is stuttering and playback is anything but smooth. Keys and Gaussian blurs require a lot of muscle from your Mac.
To get a better idea of how things are looking, create a RAM Preview by choosing Mark > RAM Preview > Play Range (press Command-R).
Select the Flame Tunnel layer, and in the Canvas turn on Record Animation. Scrub through the Timeline and pull the flames off Stacy’s face where necessary by repositioning the layer.
In the Layers tab, select the top Group layer, and in the Canvas, choose Add Filter > Blur > Zoom Blur.
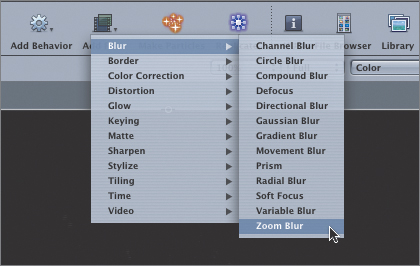
This effect is applied to the entire Canvas, so you don’t want Motion pulling black from outside the frame for the blur. You’ll fix this in Zoom Blur’s properties.
Press F3 to open the Filters tab of the Inspector. Select the Crop checkbox.
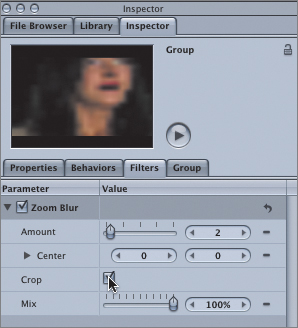
Move to frame 20. Press O to end the Zoom Blur at this point.
In the HUD, drag the Amount slider to 0. At the head of the sequence, drag the Amount slider to 30.
Turn off Record Animation when you’re done.
To finish your composition, you want to zoom all the elements together to augment the sense of motion right from the start.
Select the Group layer in the Layers tab and choose Add Behavior > Basic Motion > Fade In/Fade Out.
In the HUD, drag the Fade In slider left to 10 frames.

Press Command-R to render the sequence to RAM.
That’s a wrap. You now have an element ready for your client to use in the opening of her show for a planetarium.