
Lesson Files | Motion3_Book_Files > Lessons > Lesson_05 |
Media | Motion3_Book_Files > Media > Templates |
Motion3_Book_Files > Media > News_Teaser | |
Time | This lesson takes approximately 30 minutes to complete. |
Goals | Open and modify a Motion template |
Access Library content | |
Build and save a custom template with drop zones |
In the post-production industry, you’ll find that there are two kinds of jobs: the ones that pay well and the ones that don’t. (There are also jobs fueled by your life’s passion, but they usually lead to mortgaging your house, driving your marriage to the breaking point, and assorted neuroses, so let’s ignore them.)
On the jobs that don’t pay well, it’s a struggle to find the time or energy to build a motion graphics composite with style and sophistication. On the other hand, your work has your name on it and acts as a calling card for potential clients. What’s an impoverished designer to do?
The answer is templates. Templates allow you to quickly assemble a polished design by dragging and dropping custom footage into a prebuilt composite. Change a couple of titles and voilà!—an instant masterpiece. You can create your own templates or use those that ship with Motion. Templates include drop zones, which make it easy to replace content directly in the Canvas. Plus, Motion templates can be applied and modified in Final Cut Pro, so you can hand over your masterpiece to a Final Cut Pro editor who can easily replace graphics, video, and text that you set as replaceable, all without changing the overall look of the template.
Any way you use them, templates help you to generate a stylish product for the thrifty client or for the rushed Final Cut Pro editor, all without breaking a sweat, leaving you more time to spend on those multimillion-dollar contracts you’ve been meaning to get to.

You’ll start by using the templates that ship with Motion. Imagine the following scenario: You’ve been asked to come up with a promotion for a local child-care center. The center is really just a group of local parents, who need some design help. Your heart goes out to them, but you’ve just landed some paying work that needs to be done in the same time frame. Rather than turn away these parents, you use a trusty template and save the day (and earn yourself a sizable helping of free babysitting).
Press Command-Option-W to close any open projects.
Choose File > Open Template.
The Template Browser window opens, allowing you to choose from several collections of templates, called themes.
From the scrolling Theme list on the left of the Template Browser, select Curves.

There are eight templates in the Curves theme, including both NTSC and PAL versions.
Click the Show pop-up menu and choose NTSC.

By filtering the template collection, you can focus on just those templates that are available in the format you will use. For this exercise, you’ll work with the NTSC template.
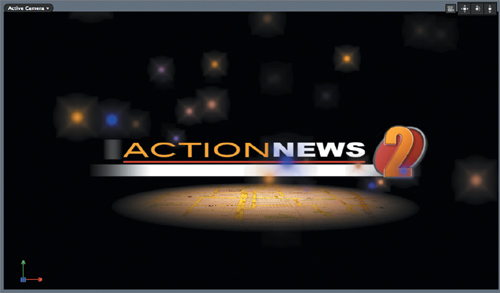
In the center Template pane, click the Curves Steel-Open template.

The preview area in the top right corner of the Template Browser shows how the template animates. When choosing a template, you can browse through the themes and click the template icons to quickly preview them.
Click Open Template to open the template.
The template opens as a new project. The text Drop Zone 1 appears in the Canvas—more on that in a moment.
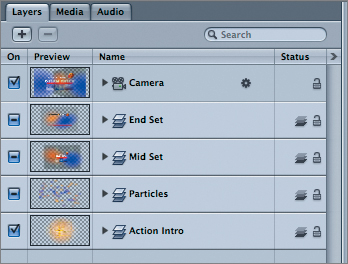
Press F5 to open the Project pane, and if necessary, select the Layers tab.

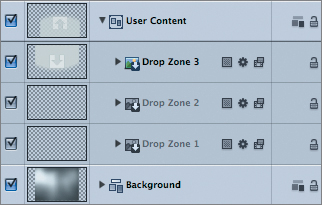
The template is organized into four groups. The ones you care about are the Text Elements and User Content groups.
Click the disclosure triangles to the left of the Text Elements and User Content group names to display their contents.
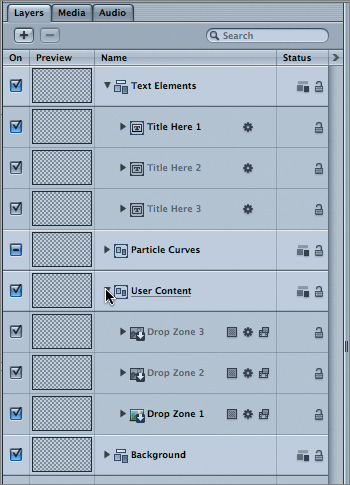
This template animates through three sections, each with its own title. You’ll customize the elements in each section of your project.
You’ll start customizing this template by changing the text, entering the three core principles of the child-care center, one principle for each shot in the sequence.
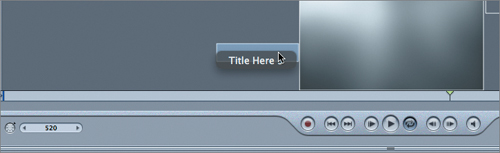
Move the playhead to frame 80. In the Layers tab, select the Title Here 1 layer.
It’s much easier to change text when you can see it clearly, so you’ve moved to a frame where the full Title Here 1 text appears onscreen.

In the Canvas, double-click in the text Title Here 1 to select it. The letters should all change to white on black to indicate that they’re selected.

Enter Discovery, and then press the Esc (Escape) key to exit text-entry mode.

In the Layers tab, select the Title Here 2 layer. Move the playhead to frame 300. This is where you can clearly see the text, Title Here 2.
Select the text Title Here 2 and change it to Understanding. Press Esc to exit text-entry mode.
Move the playhead to frame 520. Rather than first selecting the Title Here 3 layer in the Layers tab, press X to activate Motion’s expose feature.

Pressing X separates all the active layers in the Canvas to make them simultaneously visible. As you move your pointer over the Canvas, each layer’s name appears.
Locate the Title Here 3 text layer and select it.
Change the Title Here 3 text to Purity. Once again, press Esc.
Now that you’ve modified the text, all you need to do is add custom images.
The parents at the child-care center want to emphasize individual care, so they’ve chosen one child to appear in the commercial. Unfortunately, the three shots they’ve given you (two stills and a movie clip) look completely different from each other.
Open the File Browser (Command-1) and navigate to Motion3_Book_Files > Media > Templates.
Double-click MSA01.tif to open it in the viewer window.

This is a nice stylized image with warm orange tones.
Close the viewer, and then double-click MSA02.tif.

This shot is a more neutral-colored digital photograph that lacks the visual stylization of the first image.
Close the viewer window, and then double-click MSA03Matted.mov.
Press the Spacebar to play the clip in the viewer window.

This clip has a 8 mm film–style look, again notably different from the other two shots.
Close the viewer window.
The great news about this template is that it color-corrects all the footage to the same color scheme, so you don’t need to worry about the different styles of the shots.
In addition, the drop zone layers make it easy to add media directly to the Canvas.
In the Layers tab (press F5 to open the Project pane), make sure the User Content group is expanded.
Move the playhead to frame 50.
At this frame, you can see Drop Zone 1 in the Canvas.
Drag MSA01.tif from the File Browser to Drop Zone 1 in the Canvas, and don’t release the mouse button until you see the yellow highlight box around Drop Zone 1.

The highlight box indicates that you are replacing the default drop zone graphic with new content.
Tip
Alternatively, you could drag the media file to the Drop Zone 1 layer in the Layers tab, wait for the reset button (a hooked-arrow icon) to appear, and then release the mouse button. This method of replacing media will work whether the target layer is a drop zone or a media file. One advantage to using the drop zone is that it allows you to drag and drop in the Canvas.
You should now see MSA01.tif in the Canvas. Note that in the Layers tab the layer name is still Drop Zone 1.
Move the playhead to frame 250, and then drag MSA02.tif onto the Drop Zone 2 layer in the Canvas to replace the footage.
Move the playhead to frame 450, and then drag MSA03Matted.mov onto the Drop Zone 3 layer in the Canvas.
Play the project.
You should find that the two stills and the movie clip all integrate visually with the style of the template, even though the originals looked quite different. If you like, in the File Browser, double-click FinalTemplateMovie.mov to open a rendered movie of the final version.
Although you modified only the drop zones and the text layers in this exercise, note that the template is a regular Motion project, which means you can add, modify, or delete any layer, group, or effect.

Even if you turn up your nose at prebaked design templates, you can still take advantage of elements used in the templates. Motion includes some very nice fire, water, satin, and light clips that blend well into all kinds of projects. Take a look at how you can get your hands on them.
Open the Library (Command-2), and then click the Content folder.

The Content folder contains over 1,400 elements, including graphics, video clips, and Motion project files. Every element used in Motion’s templates is available, as well as hundreds of additional elements that you can use to build your own custom templates, or just use in your projects.
Select the Template Media subfolder.
This folder contains all the elements used in the templates that ship with Motion.
Double-click the Fire subfolder; then, from the list of clips in the file stack (the bottom pane), select Fire Crawl.mov.
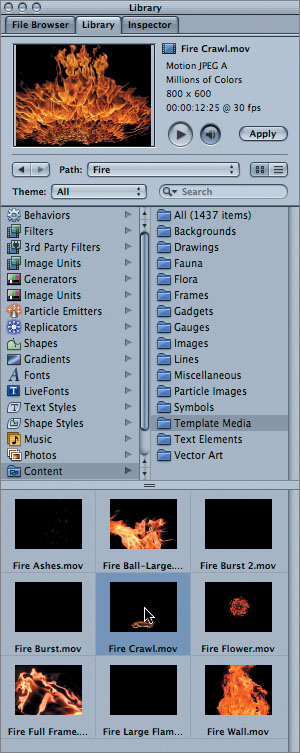
You’re instantly treated to a preview of a QuickTime movie of crawling fire. Click through the categories to examine the available clips. They provide great background and matte elements, regardless of whether you’ll use the templates.
Motion’s templates are great, but they don’t always fit the bill. Sometimes you may want to create your own custom template from scratch.
Let’s say you’ve designed a new 3D weather teaser for a local news station. But the Final Cut Pro editor who will be using the teaser is constantly on deadline and doesn’t have the time to learn Motion. What if you could turn your teaser project into a template that the Final Cut Pro editor could access and change inside Final Cut Pro? Well, you can. Here’s how to do it.
Close any open projects (Command-Option-W).
In the File Browser, open Motion3_Book_Files > Lessons > Lesson_05 > Storm_Watch_Teaser.
Play the project.
This is a 3D project featuring an animated camera that moves through three sets.
Stop playback and move the playhead to frame 33.
This frame shows the first set, consisting of a map, the TV news station’s logo, and some 3D particles.
Move the playhead to frame 70.

This frame includes the second set, containing the logo, the STORM WATCH teaser text, and three video clips. You’ll later replace these clips with drop zones.
Move the playhead to frame 175.

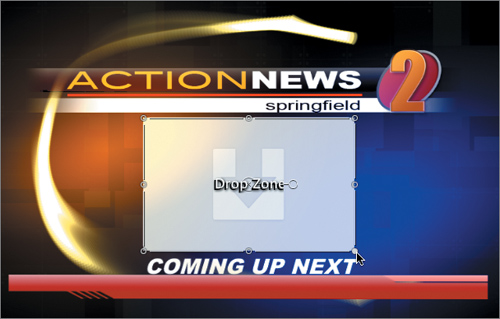
In this frame, you’ll see the third and final set, containing the logo, some graphic elements, and a big empty space into which you’ll add a drop zone for the money shot: dramatic storm footage intended to rivet viewers into their seats.
Return the playhead to frame 70.
Drop zones allow you to replace content using drag and drop in the Canvas, but they have another extraordinarily useful feature. When a drop zone is saved as part of a Motion template, that template can be added to a Final Cut Pro sequence, and those drop zones can be replaced with media using the same drag-and-drop technique right inside Final Cut Pro. In fact, any text in a Motion template can also be edited in Final Cut Pro.
You add a drop zone to a Motion project by converting an existing media layer into a drop zone, or by creating a new drop zone layer. You’ll do both in this exercise.
Press F5 to open the Project pane.
In the Layers tab, there are four 3D groups and a camera at the top level.
Open the Mid Set group and the Logo and Clips group.

This group contains three video-clip layers: storm clouds, white clouds, and snow and traffic. You’ll convert each layer into a drop zone.
Select the snow and traffic layer, and press F1 to open the Properties tab of the Inspector.
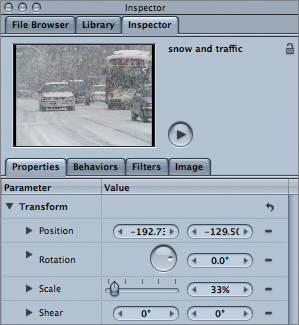
Note that the Scale of this layer is 33%.
Click the Image tab of the Inspector, and select the Drop Zone checkbox.

In the Layers tab, the icon for the layer changes to include a downward-facing arrow to indicate that the layer is now a drop zone.
In the Canvas, the layer has shrunk. This is because the drop zone inherits the properties applied to the original media.
Click the Properties tab, and change Scale to 100%.
The layer returns to the proper size in the Canvas.

In the Layers tab, select the white clouds layer.
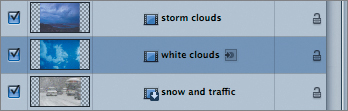
In the Image tab of the Inspector, select the Drop Zone checkbox. In the Properties tab, set Scale to 100%.
Repeat step 7 for the storm clouds layer.
With the three layers converted to drop zones, you can examine the ways that drop zones work with media.
With the storm clouds layer still selected, go to the Image tab of the Inspector and choose each of the Fit options to observe their effects.

Fit scales the media so that the largest dimension, either horizontal or vertical, fits within the drop zone.
Center leaves the media at full size and centers it in the drop zone.
Stretch changes the scale and proportions of the media to force it to fill the drop zone.
Since the drop zones were created from media clips, they have the same aspect ratio, so Fit will work best here.
When you’re finished experimenting with the Fit settings, choose Fit.
Next, you will create the generic drop zone containers, like the ones used in the Curves template.
In the Image tab, click the Clear button. Select each of the other drop zones in the Layers tab; then, in the Image tab, click the Clear button for each of them.

By replacing the video clips with the default drop zone icon, you make it obvious to other users what media need to be replaced.
Now you are ready to add a drop zone to the final set.
In the Layers tab, click the disclosure triangle to close the Mid Set. Then select the End Set and open it.

Move the playhead to frame 175 so that you can see the End Set group in the Canvas.
You’ll add a new drop zone to the center of this set.
Choose Object > New Drop Zone or press Command-Shift-D.

A drop zone appears in the Canvas, but it’s a bit on the large side.
In the Canvas, use the control handles to resize the drop zone so that it’s about as wide as the COMING UP NEXT text and sits between the lines of text with a little extra breathing room. Scale it to a roughly 4:3 aspect ratio.
Tip
Because the drop zone was created inside the End Set group, Motion automatically positioned it in 3D space to match the other elements. You can check this by dragging the camera’s Orbit tool at the top right of the Canvas—just make sure to choose Undo when you’re done experimenting.
As a final step, you’ll trim the drop zone so that it doesn’t start until the set is almost visible.
Move the playhead to frame 95, and then press I to trim the drop zone.

In the Layers tab, rename the drop zone main teaser clip.

With the drop zones prepared, it’s time to save the template.
Saving a project as a template adds it to the Template Browser, which is available in both Motion and Final Cut Pro.
Close any open groups and press F5 to close the Project pane.
Choose File > Save as Template.
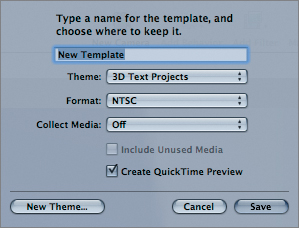
The Save Template dialog opens.
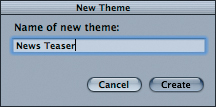
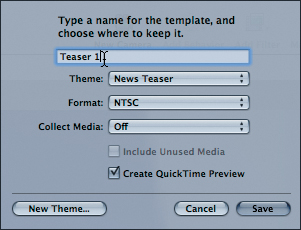
Rather than save this template into one of the existing themes, you’ll create your own theme.
Click the New Theme button. Enter News Teaser into the New Theme dialog, and then click Create.
Name your template Teaser 1. Leave the Collect Media pop-up menu set to Off and click Save.
Note
If you are creating a template for use on another Mac, from the Collect Media pop-up menu choose Copy into Folder. All media used in the project will be duplicated into a location that you specify, which makes it easy to move the project and all its assets to another system.
The Export dialog opens, telling you that Motion is rendering the preview movie of your template from the Template Browser.

When the render is finished, press Command-Option-W to close all open projects.
Choose File > Open Template.
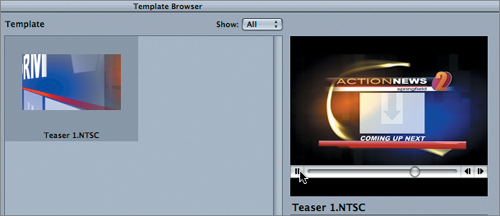
The Template Browser appears; scroll through the Theme list at the left to locate your new theme.

Select the News Teaser theme, select the Teaser 1.NTSC template, and observe the preview.
The template is complete and ready to go—and it can be applied in either Motion or Final Cut Pro. In Final Cut Pro, you can replace the drop zones by dragging clips from the Browser to the Viewer, and text layers can be edited in the Viewer.