
9
Integrating Different Components with Logic Apps
Azure Logic Apps is a main enterprise-level integration service and lets us automate processes as workflows across the organization. It allows for the simple connection of different services and applications with multiple connectors. Furthermore, by leveraging a serverless model, it reduces costs and shortens the time needed for developing a working solution.
The following topics will be covered in this chapter:
- What Azure Logic Apps is and how it works
- Connectors for logic apps
- Creating a logic app and integrating it with other services
- Business-to-Business (B2B) integration and how it works
- Virtual network integration
Technical requirements
To perform exercises from this chapter, you will need the following:
- Visual Studio Code
- A Visual Studio Code extension for Azure Logic Apps
What is Azure Logic Apps?
Sometimes, you need to integrate multiple services and automate tasks such as sending an email, creating a file, or generating a report based on some input data (maybe a database table or a social media feed). If you work with a specific cloud vendor (in this case, Microsoft Azure), it can be crucial to be able to rapidly develop workflows that can be versioned and are natively integrated with multiple cloud services, using a tool that does not require learning many different concepts to get started. Such a service is Azure Logic Apps, which you will learn about in this chapter.
Azure logic apps – how they work
In Chapter 7, Serverless and Azure Functions and Chapter 8, Durable Functions, you learned about Azure Functions, which required a trigger to be executed. The situation is similar with Azure Logic Apps – you need to define specific criteria that tell the runtime when a logic app instance should be executed. During the execution, even more actions are performed:
- Input data is converted so that it meets the initial requirements.
- All conditional flows are executed so one specific execution flow is evaluated.
- Temporary variables are assigned values.
The following shows an example of a flow that is executed daily and sets a variable that is used to remove outdated blobs:

Figure 9.1 – The Azure Logic Apps flow for setting a variable and then listing available files
As you can see, it contains three different blocks, which are the initial part of the flow (in fact, the whole workflow is much bigger, as it contains a loop and different conditions and actions – we will cover all of these later):
- The first one defines how often an instance of a logic app should be executed.
- The second one defines a variable, which is used in the next steps – it specifies the maximum age of a file in Azure Blob storage.
- The third one feeds the next step (a for each loop) with a list of available blobs within a specific storage account and container.
You probably noticed one more thing – the workflow is built using graphical blocks, which can be connected by defining multiple relations. While such a solution is a real handful when creating and modifying logic apps, it can be problematic when versioning and developing within a team. Fortunately, each flow is also defined in JSON:

Figure 9.2 – JSON representation of the Azure Logic Apps flow
Thanks to such a representation, you can add your logic apps to any version control system (for example, Git or Subversion (SVN)) and modify them when you wish. Additionally, you can automate the creation of different logic apps by generating code files on the fly.
Azure Logic Apps – advantages
You may wonder what the real use case for Azure Logic Apps is when you have other possibilities available (Azure Functions and custom workflows). If you take a closer look at its features, you will notice the following:
- You do not have to be a cloud developer to develop workflows – even less advanced users (for example, IT professionals, IT admins, and data scientists) can create the one they need without learning much about this service.
- You do not need to worry about scaling – as Azure logic apps are also a part of serverless services available in Azure, you can focus on delivering business value rather than server configuration and capabilities.
- In general, you do not have to write code – however, you are not limited to a "codeless" environment, as it is possible to host it within Azure Functions and just execute it on demand.
- You can implement B2B integration, which leverages enterprise standards relating to exchanging messages and communication, such as Applicability Statement 2 (AS2) or EDIFACT.
The following shows the current pricing for Azure Logic Apps:
- Each action costs $0.000025 per execution.
- Each connector costs $0.000125 per execution.
Important Note
In Azure Logic Apps, the first 4,000 executions are free if you are using the Consumption plan.
The preceding prices refer to the Consumption plan, which works in a similar way as the Consumption plan for Azure Function – you are paying for your usage. However, there is also a way to use the Standard plan, which is structured almost identically to the Premium plan of Azure Functions:
- You pay $0.1972 for each hour of vCPU.
- You pay $0.0141 for each hour of memory.
However, to fully understand the Consumption plan, we have to describe these two terms:
- Action: This is each step executed after a trigger (for example, listing files, calling an API, or setting a variable).
- Connector: This is a binding to multiple external services (for example, Azure Service Bus, SFTP, or Twitter) that you will use in your workflows.
Note that Azure Logic Apps can be quite expensive when performing complicated workflows very often. In such scenarios, consider using other services (such as Azure Functions), which, of course, require much more time spent on developing but, on the other hand, offer better pricing.
Connectors for logic apps
The main concept of Azure Logic Apps is connectors. Connectors are both actions and triggers that you can use in your workflows to fetch data, transform it, and extend the current capabilities of your applications. Currently, Azure logic apps have 200 different connectors available, which allow you to integrate with multiple Azure services (such as Azure API Management or Azure Functions), other systems (OneDrive and Salesforce), and even on-premises systems.
Connector types
In Azure Logic Apps, connectors are divided into two categories:
- Built-in connectors: These are designed to work with Azure services and create workflows, and are organized around handling application logic and working with data.
- Managed connectors: These connectors ease integration with other systems and services.
Managed connectors are divided into even more detailed groups:
- Managed API connectors
- On-premises connectors
- Integration account connectors
- Enterprise connectors
In this section, we will go through multiple examples of different types of connectors so that you will be able to understand their use cases and functionality.
Built-in connectors
The following shows examples of built-in connectors that you can use in your Azure logic apps:
- Schedule: For running logic apps on a specific schedule or pausing their executions
- HTTP: For communicating with endpoints over the HTTP protocol
- Request: For making a logic app callable from other services or sending responses
- Batch: For processing messages in batches
- Azure Functions: For running custom code snippets
- Azure API Management: For integrating triggers and actions defined by other services
- Azure App Service: For calling API apps and web apps
- Azure Logic Apps: For calling other logic apps
As you can see, we have here more generic connectors (schedule, HTTP, and request) and those specific to a service (such as Azure Functions and Azure App Service). In general, these connectors are the foundation of most Azure logic apps – when it comes to creating workflows, we very often are required to call an API or perform various other HTTP requests.
Note that each connector has detailed documentation available, describing its use cases and how you can develop workflows with it. You can find a link to it in the Further reading section in this chapter.
Managed API connectors
When using managed API connectors, you will be able to integrate with services and systems that require configuring a connection; these can be used when executing an instance of a logic app. The following shows an example of a logic app in a resource group with an additional resource defined as the API connection:

In the documentation, plenty of different API connectors are described – including the following:
- Azure Service Bus
- SQL Server
- Office 365 Outlook
- Azure Blob storage
- Secure File Transfer Protocol (SFTP)
- SharePoint Online
As you can see, with these connectors, we have access to a variety of different Azure services and other systems (here, Office 365 and SharePoint), which can be leveraged in your workflows to extend your application's logic.
On-premises connectors
As I described previously, with Azure Logic Apps, you can also integrate with on-premises services such as different database systems (Oracle, MySQL, and SQL Server), business analytics systems (Teradata), or filesystems.
To access on-premises data, you will have to create a resource called an on-premises data gateway. Instructions about how to do so can be found here: https://docs.microsoft.com/en-us/azure/logic-apps/logic-apps-gateway-connection.
Integration account connectors and enterprise connectors
Azure Logic Apps also lets you build so-called B2B solutions using integration accounts and leveraging a variety of advanced connectors, such as XML Transforms and X12 encoding/decoding, or even accessing enterprise systems, such as the Systems Applications and Products in Data Processing (SAP). While, for most users, these capabilities are not that useful (as these are rather advanced topics that most people are not familiar with), being able to build logic apps that allow for seamless communication between partners is an interesting functionality. We will cover more about B2B integration within Azure Logic Apps at the end of this chapter.
Creating logic apps and integrating services
As Azure Logic Apps is also targeted at non-developers, the process of creating instances and working with them is quite straightforward. In this section of this chapter, we will learn how to work with them in the Azure portal and Visual Studio, and how to integrate multiple services and use actions to control a workflow.
Creating logic apps in the Azure portal
To create an instance of a logic app, follow these steps:
- Click on + Create a resource and search for Logic App. When you click on the Create button, you will see a simple form that allows you to create a new instance of a logic app:

Figure 9.3 – The creation of an Azure logic app in the portal
- In fact, the only extra thing you can configure here is enabling Azure Log Analytics. Since this service will not be covered in this book, I will skip it in this chapter. When you click on the Review + create button to confirm your choice, Azure will start the creation of a new logic app.
- When the creation is finished, you can go to the service to check what it initially looks like:

Figure 9.4 – The created Azure logic app
- Now, you can click on the Logic app designer button on the left to access a new blade that enables you to create a brand-new workflow. Initially, you will see plenty of different templates available – it is a great start if you are already familiar with this service, as it displays many different possibilities and configurations that you can achieve using Azure logic apps. To get started, in the Templates section, select the Schedule option in the Category drop-down menu and choose Scheduler - Add message to queue:

Figure 9.5 – Templates for Azure Logic Apps
- When you click on the template and then the Use this template button, you will see a designer window where you will be able to finish configuring the workflow. However, before we can start developing the individual steps of our app, we need to connect to a storage account (see Chapter 12, Using Azure Storage – Tables, Queues, Files, and Blobs, for detailed instructions on working with Azure Storage). In this case, you will need to use the Sign in option and enter the connection details for the storage of your choice:
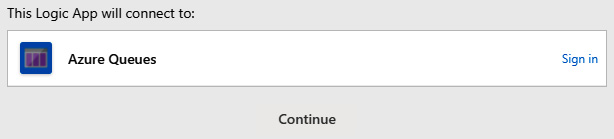
Figure 9.6 – Connecting to Azure Storage
- With the Azure Storage account connected, we can then proceed to the workflow configuration. As you can see in the following screenshot, we can enter parameters such as the frequency of our process, the exact queue configuration, and the setup for a poison queue. All the fields decorated with an asterisk are required for the flow to work:

Figure 9.7 – The configuration of the scheduler flow
Note that this connector does not create a queue if it does not exist. Make sure that you have one before starting a logic app instance. If you do not know how to do so, refer to Chapter 11, Reactive Architecture with Event Grid, where we will discuss Azure Storage features and queues.
With the workflow configured, click on the Save button and then select Run Trigger. You will be able to see how the full flow was executed:

Figure 9.8 – The executed flow
This flow was executed correctly, but what if there is an error? Well, fortunately, Azure Logic Apps offers an option to debug each step and display all the errors that were the cause of a failed flow. When you go to the Overview blade in your logic app, you can click on the flow that was not successful:

Figure 9.9 – The Overview blade with a failed flow
When you click on it, you will see a new screen containing all the steps executed with their status and errors (if any):

Figure 9.10 – The failed flow with an error stating that there was no blob found
Congratulations! You have created your first Azure logic app! In the next section, we will see how we can work with it in Visual Studio.
Working with Azure logic apps in Visual Studio Code
While it is perfectly fine to work with your logic apps using the Azure portal, you do not always want to log in and use its User Interface (UI). As it is possible to install an extension to Visual Studio Code, which enables you to work with Azure logic apps, we will try this to see how it works:
- To start working with your logic apps in Visual Studio Code, you need the Azure Logic Apps extension installed. If you do not have it by now, no worries – you can open the Extensions: MARKETPLACE tab window and install it in seconds:

Figure 9.11 – The Azure Logic Apps extension
This will add a new section for your Azure tab, showing all the logic apps available for the account that you are currently signed in with.
- In the AZURE tab, select LOGIC APPS (CONSUMPTION) for a full view of the resources available:

Figure 9.12 – The logic apps available in Visual Studio Code
Remember that the availability of the logic apps depends on the account you used to sign in to Azure in Visual Studio Code. If you are missing some resources, make sure that they are available for your account.
- When you right-click on a logic app, you will see a menu with additional options to work with this resource. Select Open in Designer to see how the Azure logic apps designer looks in Visual Studio Code:
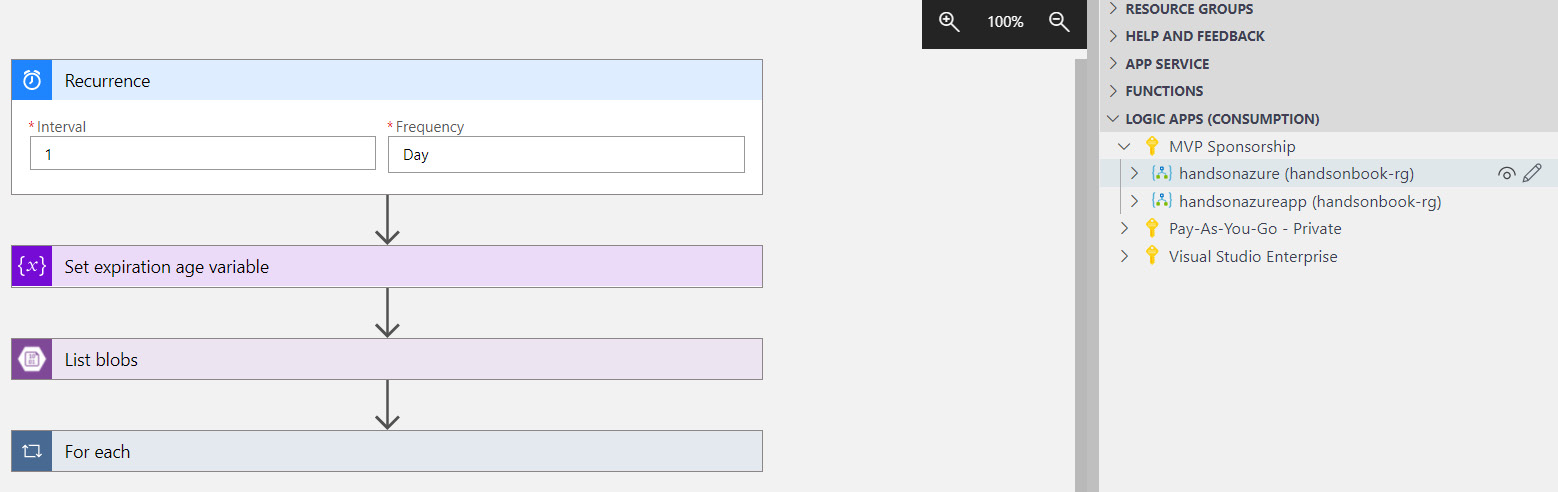
Figure 9.13 – Azure logic apps designed in Visual Studio Code
You can work with your logic app in Visual Studio Code in the same manner as you would work in the Azure portal. Additionally, you can look at its history and disable and delete it. To do so, extend the item in the view presenting your resource:

Figure 9.14 – Accessing logic app history
When you double-click on an item in the run history, you will see a JSON representation of your run, where you can debug a particular invocation. This is very helpful, as you can quickly develop and test your logic apps and work on other parts of your application without leaving your IDE.
I strongly encourage you to play a little bit with Azure Logic Apps by yourself in Visual Studio Code, as this is a great addition to the whole service and has the same feeling as the portal.
B2B integration
To a slight extent, we have already covered B2B integration of Azure Logic Apps in this chapter, but I wanted to give you some more information regarding this topic, as this service is not always recognized as an enterprise integration tool. Surprisingly, Azure Logic Apps has many interesting features to offer when it comes to exchanging messages and data between partners, and you'll find the relevant details in this section.
Starting B2B integration in Azure Logic Apps
To get started with B2B integration, you will need an integration account – this is a special container for integration artifacts that you will work with. In general, it allows you to store a variety of different items (such as certificates, schemas, and agreements) in one place so that you can work with them in Azure Logic Apps.
To create such an account, click on + Create a resource and search for Integration Account:
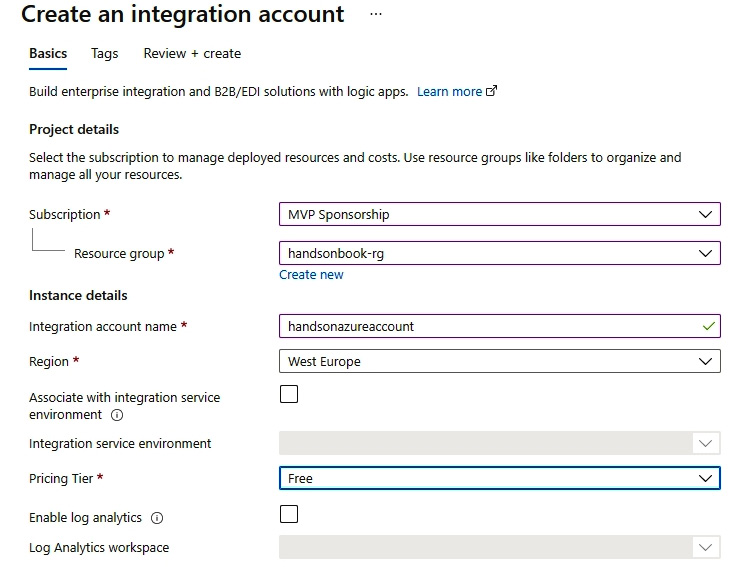
Figure 9.15 – Creating an integration account
As you can see, it offers a simple form where, in fact, the only thing you need to do is select the proper pricing tier. There is also an option to associate it with an Integration Service Environment (ISE). We will cover ISE in the next section of this chapter.
The selected tier changes the maximum number of stored artifacts. You can, of course, change it later.
Once you have an integration account instance, you will need to link it with your logic app. To do so, go to the Workflow settings blade in your instance of Azure Logic Apps and search for the Integration account section. Once the integration account is selected, click Save to complete the setup:

Figure 9.16 – Configuring an integration account
Now, you should be able to use connectors, which require an integration account to work.
Normally, if your logic app has no integration account linked, when you add a step requiring such functionality, you will have to provide a custom name. Once such a connection is available, you will not be asked for additional information again.
In the Further reading section of this chapter, you will find additional links that can help you gather more information regarding B2B integration in Azure Logic Apps.
Integrating with virtual networks
As Azure logic apps often work in enterprise environments, establishing secure connectivity is a must. Whether you want to connect to other Azure resources inside virtual networks or use hybrid connectivity to connect to your on-premises services, you need a way to integrate individual components of your system and allow them to talk to each other. The overall setup will depend on the plan used to host your logic apps:
- For the Consumption plan, you will need additional ISE runtime.
- For the Standard plan, you can leverage private endpoints/Virtual Network (VNet) integration.
When choosing a model that works for you, you need to consider several details. Use of ISE is not free of charge – there are two pricing tiers, which are charged as follows:
- Developer – $1.18 per hour
- Premium – $7.21 per hour
Important Note
Take into consideration that the Developer tier does not offer an SLA for the service.
As you can see, those charges are high, and when ISE is deployed, it will cost you a considerable amount of money. There are, however, many benefits of that setup:
- In ISE, your logic apps run in a dedicated environment that is isolated from other logic apps.
- Data is always stored in the same region as an ISE, so you will have more confidence in not violating your legal requirements.
- You do not need to deploy and configure additional services for cross-resource connectivity.
- You will have your own static IP address.
You must consider all the pros and cons and decide whether the high price of an ISE is worth it. The alternative of using the Standard plan may be tempting, but remember that it does not come without downsides:
- You lose the pay-per-execution model.
- You must configure private endpoints for inbound and VNet integration for outbound connectivity.
- You will lose the ability to use a Request/Webhook trigger publicly, as that networking model renders your logic app completely private as opposed to using an ISE.
For more information, refer to the Further reading section. It contains additional details about networking in Azure Logic Apps and private endpoints.
Summary
In this chapter, you have learned about Azure Logic Apps, a simple yet useful service whose use isn't restricted to Azure ninjas. You read about different connectors and multiple ways of working with your logic apps, using both the Azure portal (both with templates and the code editor) and Visual Studio Code. Additionally, you now know a little about B2B integration in that service and how to start it.
In Chapter 10, Swiss Army Knife – Azure Cosmos DB, we cover Azure CosmosDB – a serverless database that enables you to use different data models in the same service.
Questions
As we conclude, here is a list of questions for you to test your knowledge regarding this chapter's material. You will find the answers in the Assessments section of the Appendix:
- What is the pricing model for Azure Logic Apps?
- Can we use a loop in a logic app workflow?
- What is needed to open a logic app in Visual Studio Code?
- How can we debug a particular logic app execution?
- Can a logic app push a message directly to a queue, such as Azure Service Bus or Azure Storage Queue?
- How can we version multiple logic apps?
Further reading
For more information, you can refer to the following links:
- Azure Logic Apps overview:
https://docs.microsoft.com/en-us/azure/logic-apps/logic-apps-overview
- Exchanging AS2 messages:
https://docs.microsoft.com/en-us/azure/logic-apps/logic-apps-enterprise-integration-as2
- Integrating Azure Logic Apps with enterprise solutions: https://docs.microsoft.com/en-us/azure/logic-apps/logic-apps-enterprise-integration-overview
- Azure Logic Apps connectors:
https://docs.microsoft.com/en-us/connectors/
- Private endpoints:
https://docs.microsoft.com/en-us/azure/private-link/private-endpoint-overview
- Networking in Azure Logic Apps: