
12
Using Azure Storage – Tables, Queues, Files, and Blobs
Azure Storage is one of the fundamental services that are used across various Azure-based architectures. It is a universal solution that covers various aspects of application development—file hosting, messaging, and data storage.
The following topics will be covered in this chapter:
- Using Azure Storage in a solution
- Storing structured data with Azure Storage tables
- Implementing fully managed file shares with Azure Files
- Using queues with Azure Queue Storage
- Using Azure Storage blobs for object storage
Technical requirements
To perform the exercises in this chapter, you will need the following:
- An Azure subscription
- The Azure command-line interface (Azure CLI)
- Visual Studio Code (VS Code)
- Azure Storage Explorer, available at https://azure.microsoft.com/en-us/features/storage-explorer/
- Azurite if using the latest technology stack—see https://github.com/azure/azurite
Using Azure Storage in a solution
Most applications cannot work without a storage solution. This can be any kind of database—relational, document, file, or graph. Most of them require some skills to be able to configure and start working with them. For now, we have covered one storage solution available in Azure—namely, Azure Cosmos DB, which is a serverless database, where the only thing needed was to set a correct throughput value. Of course, Azure offers much more in the way of storage services, of which the most common is Azure Storage. It is a platform-as-a-service (PaaS) cloud component (though some define it as serverless, mostly because of a lack of servers) that can be used in four different ways. In this chapter, we will cover all of them so that you become familiar with their capabilities and features.
Different Azure Storage services
Azure Storage consists of the following four different services:
- Table storage
- Queue Storage
- Blob Storage
- Azure Files
They all serve different purposes and offer different capabilities and limits. While their names are self-explanatory, you will see that each is a completely different service, and though they can be used in connection with each other, they require a different set of skills to be able to do this efficiently, and you need to use best practices.
Azure Storage offers an additional service called Disk Storage, which is a feature used by virtual machines (VMs). Because of that, it will not be covered in this book. Nonetheless, you can find a link to its documentation in the Further reading section.
Different types of storage accounts
Some time ago, Azure Storage offered different types of accounts that could be used for different purposes. You could create a general-purpose account for generic work or use a blob account for working with files only. That changed recently, and now, when creating a new instance of the service, the only thing to decide is the performance tier. The question, for now, is: what is the difference between the Standard and Premium tiers—besides pricing, of course? You can define them like so:
- Standard: The most common choice with reasonable performance and support for all types of data. These accounts use magnetic disks for storage.
- Premium: Accounts with better performance, thanks to the use of solid-state drive (SSD) disks—recommended for VMs and when you require quick access to data stored on them (or you just have low-latency requirements).
The choice between the Standard and Premium tiers will impact the overall behavior of your storage account and its capabilities. The most important thing here is the fact that the Premium tier enables you to decide what kind of blob tier will be available for you, as outlined here:
- Block blob—For heavily utilized applications constantly communicating with a storage solution
- File share—Especially useful when you need to share data across the company
- Page blob—Used for VM disks
Note
You cannot change the account tier (kind) after it is created.
In general, if you are searching for predictable performance that is easily adjustable, you should go for the Premium tier as it allows for a granular selection of throughput and input/output operations per second (IOPS). Here is a simple comparison of different page blob types with their parameters:
- P10: 500 IOPS, throughput 100 megabytes per second (MB/sec), 128 gigabytes (GB), United States dollars (USD) $21.68 per month
- P30: 7,500 IOPS, throughput 250 MB/sec, 1 terabyte (TB), $148.68 per month
- P60: 7,500 IOPS, throughput 250 MB/sec, 8 TB, $1040.64 per month
As you can see, pricing varies greatly, depending on the parameters of the selected page blob type.
Securing Azure Storage
In general, there are two ways of securing access to your storage accounts, as noted here:
- Azure Active Directory (Azure AD) with role-based access control (RBAC)
- Shared access signature (SAS) tokens
Additionally, blobs can be accessed publicly (of course, only if you decide to do so). Depending on your needs, one option or another may cover your requirements—this, of course, depends on the characteristics of your application. Here is the difference between those two methods of securing Azure Storage:
- RBAC: This method is used to secure management operations on your accounts. You can restrict access to specific features of a service to only a specific group defined in Azure AD. However, you are unable to use this method to secure a blob or a table (although you can do this indirectly by securing access to a SAS token). This method also includes the use of managed identities, which use an Azure AD token for authentication and authorization based on roles assigned to service principals (SPs).
- SAS tokens: These are long strings that store different parameters describing access to a resource. They specify a service type, permissions, and the lifetime of a token, or restrict access to an Internet Protocol (IP) address.
Here is an example of a SAS token:
https://myaccount.blob.core.windows.net/securecontainer/blob.txt?sv=2015-04-05&st=2015-04-29T22%3A18%3A26Z&se=2015-04-30T02%3A23%3A26Z&sr=b&sp=rw&sip=168.1.5.60-168.1.5.70&spr=https&sig=Z%2FRHIX5Xcg0Mq2rqI3OlWTjEg2tYkboXr1P9ZUXDtkk%3D
As you can see, it restricts access to a blob.txt file stored as a blob in the securecontainer container. It defines parameters, such as service version (sv), expiry time (se), or the actual signature of a token (sig). In general, with SAS tokens, you can restrict access to either an account or a service (and thanks to that, also—for example—to a range of entities in Table storage).
Replication
When using a cloud, you must expect that any service can be down at any time. Although Azure Storage is considered one of the most durable services (because many services in Azure rely on it), it is possible that it will face an outage. To mitigate problems related to such failures, it offers four different kinds of replication, as outlined here:
- Locally redundant storage (LRS): Three copies of your data within the same data center
- Zone-redundant storage (ZRS): Three copies of your data within the same region
- Geo-redundant storage (GRS): Three copies of your data within the same data center plus three copies in another region
- Read-access GRS (RA-GRS): Three copies of your data within the same data center plus three copies in another region, with the ability to read from that region
In addition, the ZRS replication model is extended to the following additional two models:
- Geo-zone-redundant storage (GZRS)—Works as a combination of ZRS and GRS. The result is six copies—three in the primary region and three in the secondary region. All the copies are stored across availability zones (AZs).
- Read-access GZRS (RA-GZRS)—The same as GZRS but additionally gives you read access in the secondary region.
Note
It is impossible to change the replication model to/from ZRS/GZRS/RA-GZRS after a storage account is created.
When architecting an application using Azure Storage, you must carefully design its availability requirements. Depending on your expectations, a different model may suit you better.
Tip
When using a model that replicates data to another data center (basically, GRS and RA-GRS), take into account the cost of transferring data between different regions.
You may wonder how durable LRS is compared to other replication models. To define that, you must understand how data is stored within a single data center. In fact, disks for Azure Storage are installed within racks that are part of a bigger concept known as a stamp. Stamps are configured in such a way that they use different power lines and networks, and thanks to such a setup, it is possible to store copies of your data in different fault domains, ensuring that if one fails, the other two will still work. Microsoft states that LRS is designed to provide at least 99.999999999% durability. If that is not enough, you may consider other models.
Tip
When using RA-GRS, do not take for granted the ability to easily write to the secondary region if an outage occurs. While it is possible to initiate a failover manually (in a similar manner as in the case of Azure Cosmos DB), it is still an opt-in decision. In general, the recovery time objective (RTO) for Azure Storage consists of both time for Microsoft to decide whether to perform a failover or not and time to change Domain Name System (DNS) entries to point to another region.
After this short introduction, let’s learn more about various Azure Storage services, starting with Table storage.
Storing structured data with Azure Storage tables
We will start our journey with Azure Storage capabilities by learning something about Table storage. If you want to store unstructured data with almost limitless capacity and with high demands regarding availability and durability, this service is for you. In this section, you will learn how to start developing applications using Table storage and the best practices for storing data and achieving the best performance for both writing and reading it. You will also see how to efficiently query it, and what is important when designing services using this Azure Storage capability.
Creating an Azure Storage service
To get started, we must create an instance of Azure Storage. To do so, please follow these steps:
- Go to the Azure portal and click on + Create a resource. Search for storage account and click on the Create button.
- You will see a multi-step form, where you must configure a new instance of a service. Here is an example of what I chose for the Basics tab:
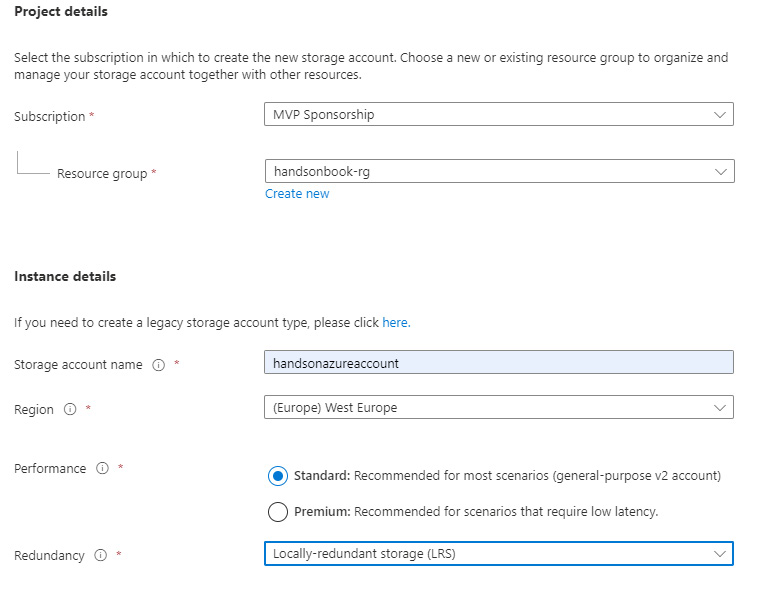
Figure 12.1 – Initial screen of Azure Storage creation wizard
Now, I would like to describe some of the more mystical options available here, as follows:
- Performance: It is possible to select either the Standard or Premium performance tier. As mentioned previously, this impacts the hardware used to provision your service with common magnetic disks for the Standard tier and SSDs for the Premium tier.
- Redundancy: Implies which replication model is used for your account. Remember that ability to select any zone-related model is connected to the availability of AZs in the selected region.
While it is possible to configure much more options related to the different capabilities of Azure Storage, we will skip them for now. All the default options should allow for account creation, so let’s click on the Review + create button and then on the Create button and wait a moment—your account will be created, and soon you will be able to start working with it.
Managing Table storage
When you go to the Overview blade, you will see a dashboard with basic information available regarding your account, as illustrated in the following screenshot:
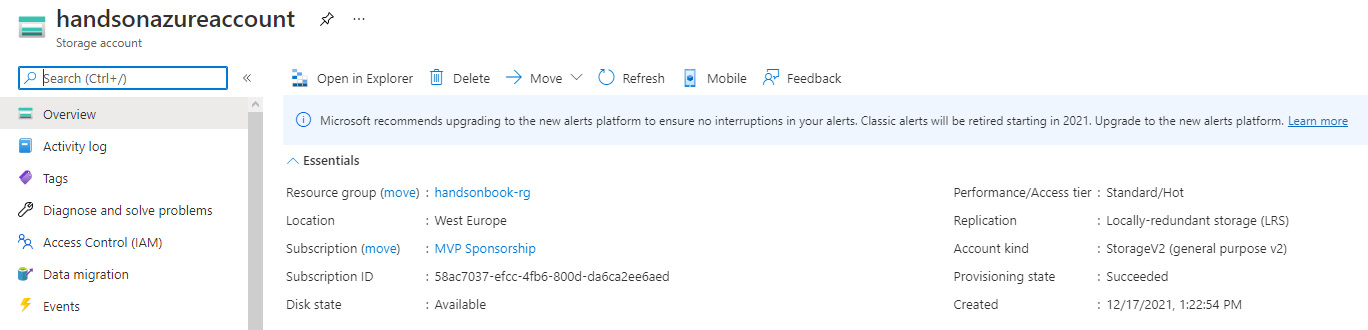
Figure 12.2 – Overview blade for Azure Storage
As you can see, it displays the information you defined while creating it, such as location, performance tier, or replication type. Additionally, when you scroll down, you will see the Properties section, where you can see all the basic parameters of the service. Additionally, you can select another tab to get further information, as illustrated here:

Figure 12.3 – Various Azure Storage properties available for the Overview blade
In this section, we are covering Table Storage, so find the Tables blade on the left and click on it. Initially, you should see no tables at all, as illustrated in the following screenshot. Of course, this is something we expected, as this instance of the service has been just provisioned. Nonetheless, this is one of the methods to check what is stored within an account:

Figure 12.4 – View of the Tables blade
To create a new table, simply click on the + Table button—you will be asked to provide a table name, which is all that is needed to get started. As you probably remember, I described Table storage as a capability for storing unstructured data. While the term table may imply that this feature works in a similar way to relational databases (which also contain tables), it is instead a key-value storage. Here is the same view after a table is created:

Figure 12.5 – List of tables inside Azure Storage
The preceding screenshot shows an handson table and its Uniform Resource Locator (URL)—you may be wondering what this URL is all about. As there are multiple ways to manage and use Azure services, Azure Storage allows you to use its capabilities using different methods, such as REpresentational State Transfer (REST), PowerShell, the Azure CLI, or the Azure portal. When using software development kits (SDKs) and reading their source code, you could find that they are just wrappers around simple a REST application programming interface (API). This makes this service superbly easy to get started working with on a daily basis. We have talked a little bit about tables’ basics—now, it is time to describe their schema.
Storing data in Table storage
Each record in Table storage has a row structure with multiple columns. Each row has the following base columns:
- PartitionKey: Identifier (ID) of a partition of a row.
- RowKey: The row’s ID.
- Timestamp: This column tells you when a row was recently modified.
- ETag: Table storage implements the optimistic concurrency model and uses entity tags (ETags) to control whether an entity should be modified or not.
Of course, you are not limited to the columns listed here—you can create any additional columns you want and give each a specified type. However, before we go any further, you must fully understand the implications of such a design. Here, you can find an example of entities stored within a single table:

Figure 12.6 – Data stored inside Table storage
In the preceding example, data is stored within multiple partitions, and though a single table is used, multiple schemas still can work, so there is no need to use additional tables.
PartitionKey
Table storage uses partitions to distribute, load, and handle requests. The number of partition keys within a table impacts the ability to balance them. It is possible to use a single partition per table, but in most cases, this is an invalid approach that will lower the performance of your storage account. Partition keys are limited to 1 kilobyte (KB) in size and must be unique within a table (so, once an entity is assigned a partition key, all others that use the same value will be stored in the same storage). They also must be strings.
RowKey
Each row key is a unique ID (UID) of a row within a partition (so, you can have rows using the same RowKey column value, as long they have a different PartitionKey value). More importantly, each table is sorted in ascending order using values of row keys. This requires a smart design when you need, for example, to read only a selection of top rows and do not want to provide their row keys (we will cover that later in this chapter). As with PartitionKey, RowKey is also limited to 1 KB and must be a string.
Timestamp
This column is maintained server-side and is a DateTime value that is changed each time an entity is modified. It is also internally used to provide optimistic concurrency and cannot be modified. Even if you set it, the value will be ignored.
General rules for entities
Table storage has some hard limitations when it comes to storing data, as outlined here:
- The maximum number of columns is 255.
- The maximum size of an entity is 1 MB.
- By default, each entity column is created as a type string—this can be overridden when it is created.
- It is not possible to store null as a value—if you do not provide a column value, an entity will be considered as if it does not have it at all.
Querying data in Table storage
To get started with querying data, we need to create a table. You can do this in the Azure portal and can also use the Azure CLI for that, as illustrated in the following code snippet:
az storage table create --name [--account-key] [--account-name]
Note
Remember to use the az login command if you are starting a new session in your terminal.
We now need to get a connection string, so depending on the storage account you would like to use, you must do one of the following:
- Go to the Azure portal, find your storage account, and copy a connection string from the Access keys blade.
- Use the UseDevelopmentStorage=true value for connecting with Storage Emulator if you have an instance running locally.
- As Storage Emulator is starting to be considered deprecated, you can use Azurite to emulate a storage account locally. If so, your connection string will look like this:
DefaultEndpointsProtocol=http;AccountName=account1;AccountKey=key1;BlobEndpoint=http://account1.blob.localhost:10000;QueueEndpoint=http://account1.queue.
ocalhost:10001;TableEndpoint=http://account1.table.localhost:10002;
When you execute an application, a table should be created without a problem. Now, when we have a table, we would like to insert something into it. To do so, you will need the following code:
az storage entity insert [--account-key] [--account-name] --entity PartitionKey=AAA RowKey=BBB Content=ASDF2 --if-exists fail [--table-name]
The preceding command will insert a new entity passed with the --entity parameter. Note that all the data here is passed using a key=value notation and can be different for each record. Additionally, we are using the --if-exists fail parameter, so the whole command will fail if we try to insert a duplicate record.
The last thing to do is to query a table. Performing such an operation in the Azure CLI is very simple, as we can see here:
az storage entity query --table-name MyTable [--account-key] [--account-name]
We just executed a basic query that will return all rows from a table. While it works now, it is not the best idea to query all data within a table using such a query—in most cases, you will use a more sophisticated approach that may include additional parameters available for that command, as illustrated here:
az storage entity query --table-name
                        [--accept {full, minimal, none}]
                        [--account-key]
                        [--account-name]
                        [--connection-string]
                        [--filter]
                        [--marker]
                        [--num-results]
                        [--sas-token]
                        [--select]
                        [--subscription]
                        [--timeout]
Note
Remember that to achieve the best performance, your queries should include both PartitionKey and RowKey. Using PartitionKey only leads to worse results but is still acceptable. Using only RowKey will result in reading the whole partition anyway. Not using those columns will result in reading the whole table.
You can also check what is stored in a table using Azure Storage Explorer, as illustrated in the following screenshot:

Figure 12.7 – Using Azure Storage Explorer for data exploration
In general, browsing data with that tool can help you quickly check data stored inside a table or add a record without additional tools. For more advanced scenarios (that require smart filtering of data or reporting), a coded approach will be more helpful.
Table API in Azure Cosmos DB
It is possible to leverage the premium offering for Table storage using Azure Cosmos DB. Using that option has the following advantages:
- Automatic and manual failovers
- Secondary indexes (the ability to index against all properties inside a row)
- Independent scaling across multiple regions
- Different consistency levels
- Dedicated throughput per table
While failover is currently available for Azure Storage, the rest of the presented features are available only for Azure Cosmos DB and can be a great solution if you like the simplicity of this service and still want to challenge it against more complicated scenarios. However, leveraging the Table API for Azure Cosmos DB is beyond the scope of this book. To help you explore the topic further, I added some links related to that feature in the Further reading section.
Implementing fully managed file shares with Azure Files
When in need of creating a file share that can be accessed by different people, you often must either buy some hardware that will be set up and configured for such functionality or use third-party solutions, which can be hard to customize, or expensive. With Azure Storage, you can quickly develop a solution that is almost limitless in terms of capacity, offers industry-standard protocols, and can be quickly provisioned and ready to use.
Azure Files concepts
Azure Files has some basic concepts that create a whole picture of a service. In fact, it is designed to replace current on-premises file servers in terms of functionality and performance. The main difference between Azure Files and the “old” solution is accessibility (as you can set the access token and make the URL private). What is more, it is operating system (OS)-agnostic, allowing you to use the very same file share mounted on different machines using Linux, Windows, or macOS. It—of course—shares other Azure Storage concepts, so you can use it with the same reliability and durability assurance. The main feature of Azure Files is support for the Server Message Block (SMB) protocol. This is a very common protocol (and a mature one, as it was designed in the mid-1980s) for sharing computer resources, and is also used for printers and other network devices. We could summarize Azure Files as follows:
- Fully managed: This is a full cloud service, where you do not have to worry about the OS or its configuration.
- Durability and resiliency: With Azure Files, you do not have to worry about not having access to data stored and securing your resources against power failures and other outages.
- Common development (dev) tools: Accessing Azure Files is easy, thanks to the system I/O APIs, appropriate SDKs, or even REST APIs.
Let’s now see how we can work with that service.
Working with Azure Files
When you go to the Azure portal and open your Azure Storage instance, you will find the File shares blade. This displays a list of available file shares, as seen in the following screenshot:

Figure 12.8 – Available file shares in the Azure portal
From this screen, you can create a new file share by clicking on the + File share button. The important thing here is the value of the Quota field—this determines the maximum capacity of a file share.
Note
The maximum size of a file share is 100 tebibytes (TiB). This requires an Enable large file shares option to be enabled on your storage account and limits replication models to LRS and ZRS.
To get information about how to connect to a file share, you can click on the file share and then on the Connect button, as illustrated here:
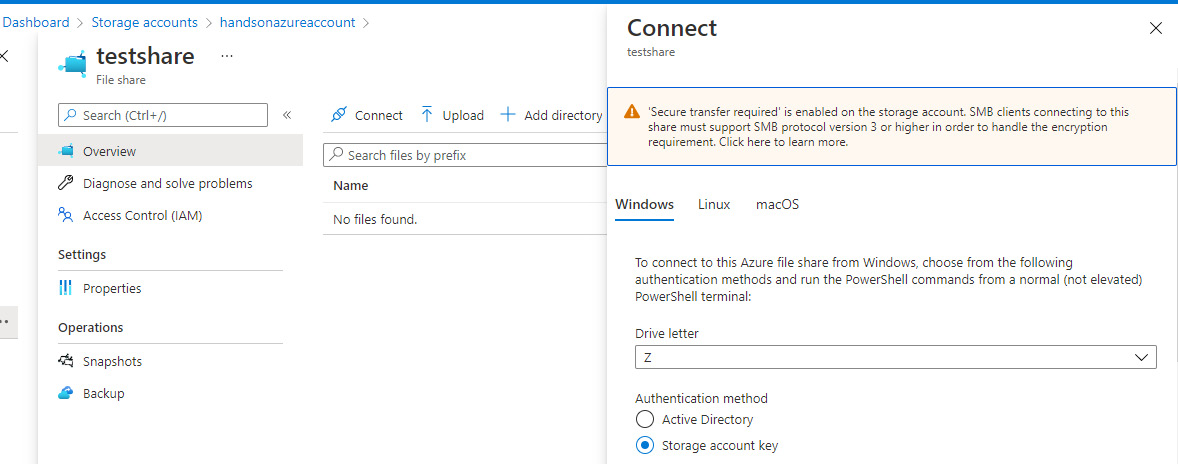
Figure 12.9 – Connection instruction for file share
This will display some short instructions about how it is possible to quickly connect from your computer to a specific file share. Here, you can find an example of a command for Windows written in PowerShell:
$connectTestResult = Test-NetConnection -ComputerName handsonazureaccount.file.core.windows.net -Port 445
if ($connectTestResult.TcpTestSucceeded) {
# Save the password so the drive will persist on reboot
cmd.exe /C “cmdkey /add:`”handsonazureaccount.file.core.windows.net`” /user:`”localhosthandsonazureaccount`” /pass:`”zAY8PABBFs8L2sbNX++ckztZerSEIpa0RgSqm3WvufQd8kjen 5btJxF2yDJ+MCIF0Qm5tXhof7B4rkpJpt4oww==`””
# Mount the drive
New-PSDrive -Name Z -PSProvider FileSystem -Root “\handsonazureaccount.file.core.windows.net estshare” -Persist
} else {
Write-Error -Message “Unable to reach the Azure storage account via port 445. Check to make sure your organization or ISP is not blocking port 445, or use Azure P2S VPN, Azure S2S VPN, or Express Route to tunnel SMB traffic over a different port.”
}
You can specify the letter of a drive using the -Name parameter (in the preceding example, it is Z).
Note
Mapping a drive is an operation that may require additional permissions—make sure you are running all these commands as an administrator.
The whole setup takes only a few minutes—this is the strength of this service, as normally I would need many hours to set everything up and achieve the same level of portability and reliability. It also gives you unlimited storage capacity—nothing blocks you from attaching multiple file shares and storing all your files on them.
Blob storage versus Azure Files
In fact, both Azure Blob storage and Azure Files have a similar purpose—you create them to store and share files. There are, however, some fundamental differences between them when it comes to use cases. Let’s have a look at some examples of how you would use the services here:
- If you want to create a common file share space for your company, you will use Azure Files.
- If you want to have a space for files uploaded by your users via—for example— your website, you will use Blob storage.
- If you want to have your files completely private, you will use Azure Files.
- If you want to configure security on a blob or a container level, you will use Blob storage.
Both services also have different pricing models (for example, Azure Files is much more expensive when it comes to paying for each GB of data).
Using queues with Azure Queue Storage
Azure Storage—besides being a service for storing many kinds of data—can be used also as a queue. Queue Storage is another capability that allows you to quickly develop a solution that requires a simple queue solution and additionally can store in a queue millions of messages without affecting performance. In this section, you will see how to develop applications using Queue Storage and what is important when using this feature. Additionally, I assume that you already have a storage account. If not, look at the Storing structured data with Azure Storage tables section, where I described the process of creating an account.
Queue Storage features
In general, Queue Storage has the following two use cases:
- Processing messages asynchronously
- Exchanging communications between different services (Azure Functions, legacy web roles/worker roles)
It is a very simple queue solution that can store and process messages in any format, limited to 64 KB. The retention time of a message is 7 days—after that, it is lost. The capacity of a queue is basically equal to the capacity of your storage account. In general, you should not worry that you will run out of available space. Queue Storage shares many additional features—such as virtual networks (VNets), SAS tokens, and much more—with other Azure Storage capabilities. Therefore, we will not reintroduce them in this section.
Developing an application using Queue Storage
To present Queue Storage, I created the following two applications:
- Producer
- Consumer
Producer will create and push messages, which will then be consumed by Consumer. Here, you can find the code for the Producer app:
using Azure.Storage;
using Azure.Storage.Queues;
using Azure.Storage.Queues.Models;
namespace QueueStorage.Producer
{
    internal class Program
    {
        private static async Task Main()
        {
            var queue = new QueueClient(“<your-connection-string>”, “<queue-name>”);
            await queue.CreateAsync();
            await queue.SendMessageAsync(“Hello!”);
        }
    }
}
And of course, we’ll also look at the code for the Consumer app, as follows:
using Azure.Storage;
using Azure.Storage.Queues;
using Azure.Storage.Queues.Models;
namespace QueueStorage.Consumer
{
    internal class Program
    {
        private static void Main()
        {
            var queue = new QueueClient(connectionString, queueName);
            foreach (var message in (await queue.ReceiveMessagesAsync(maxMessages: 10)).Value)
            {
                Console.WriteLine($”Message: {message.Body}”);
                await queue.DeleteMessageAsync(message.MessageId, message.PopReceipt);
            }
        }
    }
}
When you publish a message to a queue, you can retrieve it at any time—as mentioned previously, you have 7 days to fetch it from a queue. Here, you can see what a message looks like when stored in a queue:

Figure 12.10 – Available messages in Azure Storage Explorer
Remember that you can read a message multiple times—in many scenarios, once read, a message is dequeued and is not available for other consumers. However, it is possible to read multiple streams, though in general, Azure Storage is not the best solution for that. The reason is quite simple—in Azure Storage, when a message is read by a single consumer, it is invisible to others if a lease is in place. This leads to sequential reads—Consumer B can only read a message if Consumer A is done with it. For parallel processing, Azure Event Hubs is a better choice.
Using Azure Storage blobs for object storage
The last capability of Azure Storage is Blob Storage. In the previous sections, we were using this service to store unstructured data using Table storage, push messages to a queue with Queue Storage, and create file shares, thanks to Files. In the last section of this chapter, we will focus on developing solutions that store so-called blobs. You may wonder what exactly a blob is—well, there is no single definition for that. In general, blobs are files of different types, such as text files, images, or audio. Here, you will see how to use them in your applications, how to secure them, and how you can achieve maximum performance.
Blob storage concepts
Before we go deeper into the service, you should understand the basic concepts of Blob Storage. Here, you can find a diagram that clearly defines the three main concepts:
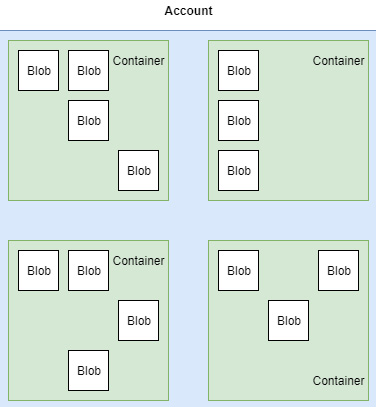
Figure 12.11 – Blob storage concepts
As you can see, we have three different concepts, as follows:
- Account: This is basically your storage account and stores all data within Blob Storage. Note that you can only have 250 accounts per region per subscription.
- Container: This is a logical entity holding an unlimited number of blobs inside it. An account can have an unlimited number of containers.
- Blob: A file stored within a container.
Additionally, there are three different types of blobs:
- Block blob: Text or binary data with a maximum size of 4.7 TB. Such a blob is made up of smaller blocks.
- Append blobs: A more specific type of blob, which is best for scenarios such as logging data or storing events or transactional logs. They are optimized for append operations.
- Page blobs: Designed for storing virtual hard disk (VHD) files used by VMs.
With the newest version of Storage Accounts (v2), it is possible to use the latest features of this service. One of the most interesting additions is access tiers. Now, it is possible to select whether you would like to use a Hot or Cool tier. The choice depends on the frequency of accessing your data—if you would like to read it often, Hot will be the best choice; otherwise, it is better to use the Cool tier or a general-purpose account.
Note
The tiers are available when modifying the properties of a file uploaded as a blob to the storage account. You cannot select a tier when creating a service.
There is also one more tier: Archive, designed for storing blobs that are rarely accessed, although it is available only on the blob level. You’re probably wondering about the differences between these tiers. Here, you can find a table that defines their pricing:

Figure 12.12 – Azure Blob Storage pricing
In terms of storage, you can see that the Hot tier is the most expensive and the rest are much cheaper, especially Archive. Now, let’s check the price for 10,000 read operations. This is what they would cost under the different tiers:
- Hot: $0.006
- Cool: $0.013
- Archive: $7.8
Ouch—the difference is huge here! Therefore, selecting the correct tier is so important—you may end up with a solution that costs many, many dollars, only because you misused the blob tier.
Inserting data into Blob Storage
Now, we will try to add something to our blob storage. Here, you can find a piece of code that allows you to upload a single file to a container:
using Azure.Storage;
using Azure.Storage.Blobs;
using Azure.Storage.Blobs.Models;
namespace BlobStorage
{
    internal class Program
    {
        private static void Main()
        {
            var container = new BlobContainerClient(connectionString, “sample”);
            await container.CreateAsync();
            try
            {
                var blob = container.GetBlobClient(“sample”);
                await blob.UploadAsync(“path_to_a_local_file”);
            }
            finally
            {
                // If you want to delete a container, simply                     // uncomment the below line
                // await container.DeleteAsync();
            }
        }
    }
}
As in the previous examples, this one looks pretty similar. You will need to follow these steps:
- Firstly, you have to create an instance of BlobContainerClient.
- Then, you need to obtain a reference to a container and create one if none exists.
- Finally, you must get a reference to a blob, and upload some content.
If I open Azure Storage Explorer, I can see that a new blob was uploaded to a container, as illustrated here:
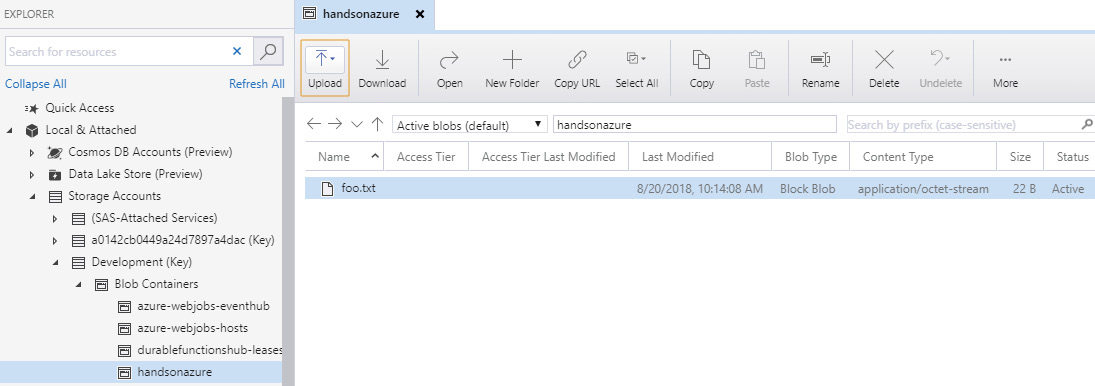
Figure 12.13 – Uploaded blob visible in Azure Storage Explorer
Of course, if I open the file, I will see that it contains the text that I uploaded, as illustrated here:

Figure 12.14 – Content of the uploaded blob
With development activities covered, let’s now switch our focus to design-related topics of Blob storage.
Containers and permissions
It is possible to select a proper access level when it comes to accessing a container stored within Blob storage. If you go to the Azure portal and open your Azure Storage service, you will find the Blobs blade. Inside it, you can click on the + Container button, which will open a small window, as illustrated here:
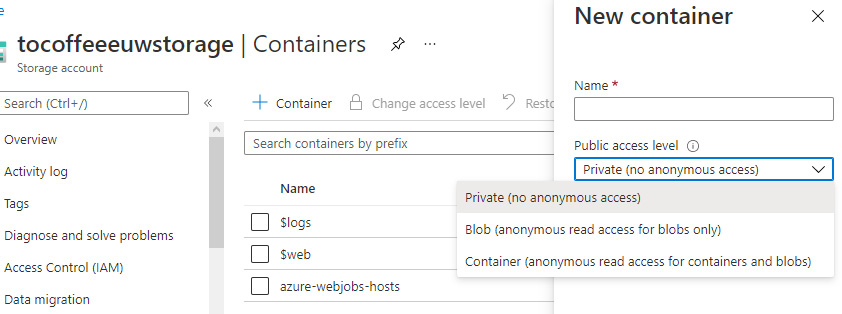
Figure 12.15 – Setting container permissions level
As you can see, besides providing a name for a container, you can select the Public access level option for selecting an access model for it. Currently, you have three different options available, as follows:
- Private: For no anonymous access
- Blob: Anonymous access on a blob level
- Container: Anonymous access on a container level to the container itself and blobs within it
You can click on a container you created to see another screen, where you can manage it. I will use it to upload a file to see which other options become available. Here, you can see what it will look like in the portal when a file is uploaded and I click on it:

Figure 12.16 – Blob properties
Now, I can see additional metadata regarding a file, managing or acquiring leases, or generating a SAS token.
Note
If you want to make a file read-only, click on the Acquire lease button—while it will still be possible to change it, such an action will require you to provide a lease ID.
What is more, there is a URL property available that can be used to access a blob directly—for example, using a browser. Here, you can see what it looks like in my case:
https://handsonazurestore.blob.core.windows.net/blob/11047_01_01.PNG
Now, you may be wondering what the difference is between Blob and Container access. To find out, we will use the following code:
using Azure.Storage.Blobs;
using Azure.Storage.Blobs.Models;
var blobAccessClient = new BlobContainerClient(new Uri(“https://xxx.blob.core.windows.net/blobaccess”));
var containerAccessClient = new BlobContainerClient(new Uri(“https://xxx.blob.core.windows.net/containeraccess”));
var listOfFiles = new List<string>();
try
{
    await foreach (BlobItem blobItem in blobAccessClient.GetBlobsAsync())
    {
        listOfFiles.Add(blobItem.Name);
    }
}
catch (Exception)
{
    Console.WriteLine(“Failed to read blob dues to access”);
}
try
{
    await foreach (BlobItem blobItem in containerAccessClient.GetBlobsAsync())
    {
        listOfFiles.Add(blobItem.Name);
    }
}
catch (Exception e)
{
    Console.WriteLine(e.Message);
}
I already created two different containers—one with Blob access, and the other with Container access. If I execute the preceding code for a container with full public access, here is what I will see:

Figure 12.17 – Failed access due to permissions level allowing us to access individual files only
Now, let’s run it for a container that has public access. This is what I will see:
Figure 12.18 – Error when accessing non-public container without proper permissions or credentials
As you can see, container-level operations are unavailable when the access level is blob or private. Of course, if you authorize using—for instance—an access key, you will be able to list all blobs within a container, even if it is private.
Blob storage – additional features
One of the coolest capabilities of Blob storage is the Soft delete feature, which allows you to perform an operation called a soft delete. What does this mean? In some cases, you may want to delete a file but have the option to easily revert the deletion within a fixed time. In Blob storage, that option is available via the Data protection blade, as illustrated in the following screenshot:

Figure 12.19 – Data protection blade
If you turn it on, any deleted blob will still be available within storage (but not for retrieval or modification) for a set number of days. Blob storage also has plenty of additional features that can be used in various scenarios, such as the following:
- Azure CDN: A content delivery network (CDN) service for serving static content to your customers—we will cover this later in the book.
- Azure Search: As already discussed, here, you can easily set your blob storage as a data source for a search engine.
- Static website: Instead of provisioning a VM or using Azure App Service, you can leverage Azure Storage as your web-hosting server.
- Data lake: Azure Storage can be used as a data lake service with hierarchical namespaces. You can migrate to such a solution at any time (by enabling Large file shares in the Configuration tab) or create a new account with the feature already enabled.
As you can see, this is a very flexible and useful Azure Storage capability that can be used for file storage, as an Azure Search document store, a logs database, and much, much more.
Summary
In this chapter, you have learned some basics regarding one of the most important services in Azure—Azure Storage. We developed a few solutions for tables, queues, files, and blobs—each enabling you to do different things, from asynchronous message processing to creating file shares. You also read about different redundancy models and how reliable and durable this particular service is. In the Further reading section, you will find plenty of additional resources that will allow you to build even more skills for working with this Azure service, such as Table storage patterns, performance targets, and a REST API reference. In the following chapters, you will learn something about data processing services, such as Azure Event Hubs and Azure Stream Analytics.
Questions
Here are some questions to test your knowledge of the important topics in this chapter:
- Which tiers are available during account creation when selecting Blob as an account type?
- What must you include in a query against Table storage to achieve maximum performance?
- What are the available redundancy models for storage accounts?
- What is the difference between blob and file storage?
- Can you store binary files using Blob storage?
- How long does a message in Queue Storage live before it is removed?
- What is the maximum size of a message in Queue Storage?
- What is the maximum size of the PartitionKey column value?
- Which concurrency model is implemented in Table storage?
- What is the difference between Azure Files storage and an on-premises filesystem?
Further reading
For more information, refer to the following sources:
- Disk storage: https://docs.microsoft.com/en-us/azure/virtual-machines/windows/about-disks-and-vhds
- SAS token reference: https://docs.microsoft.com/en-us/azure/storage/common/storage-dotnet-shared-access-signature-part-1
- Azure Resource Manager (ARM) versus classic deployment: https://docs.microsoft.com/en-us/azure/azure-resource-manager/resource-manager-deployment-model
- Table service data model: https://docs.microsoft.com/en-us/rest/api/storageservices/Understanding-the-Table-Service-Data-Model
- Blob storage pricing: https://azure.microsoft.com/en-us/pricing/details/storage/blobs/
- File storage performance targets: https://docs.microsoft.com/en-us/azure/storage/files/storage-files-scale-targets
- Guidelines for Table storage: https://docs.microsoft.com/en-us/azure/storage/tables/table-storage-design-guidelines