
4
Using Azure Container Instances for Ad Hoc Application Hosting
Let's assume your application is containerized. You are looking for hosting options and see that in Microsoft Azure you can use a managed Kubernetes cluster, an App Service plan, or a virtual machine (VM). All these options will serve your needs; still, they may be too complicated for your case. What if you need a simple service that would take your container, run it, and charge you only for the time it was used? Fortunately, we have Azure Container Instances – a simple solution for hosting and running containers only if you need them.
In this chapter, you will learn about the following:
- Provisioning and configuring a service
- Container groups as the main unit of work
- Security baseline and considerations
Technical requirements
To perform the exercises in this chapter, you will need the following:
- Access to an Azure subscription
- Visual Studio Code installed (available at https://code.visualstudio.com/)
- Azure CLI (https://docs.microsoft.com/en-us/cli/azure/)
- Docker (https://www.docker.com/get-started)
Provisioning and configuring a service
As you saw in the previous chapters, provisioning a service in Azure is a matter of choosing the right method. The easiest path is using the Azure portal, which has a graphical interface and various guidelines. You could also use a command-line interface (CLI) (the Azure CLI and Azure PowerShell are good choices) or deploy via an Infrastructure-as-Code (IaC) solution – it depends on your experience and current need. To deploy Azure Container Instances, we will initially use the Azure portal and, in further exercises, switch to the Azure CLI.
In the Azure portal, locate the + Create a resource button, click on it to access the marketplace, and search for container instances:

Figure 4.1 – Searching for Azure Container Instances in Azure Marketplace
Select the displayed position (Container Instances) and then click on Create. You will see a wizard for service creation in which you will be able to enter all the details. You should already be familiar with the Project details section; therefore, we will not cover it here (if you want the details, see Chapter 1, Web Applications in Azure – Azure App Service). As of now, we are interested in the Container details section. We will have to provide the following information:
- Container name: The name of our Azure Container Instance
- Region: Where the service will be deployed
- Image source: Where our image is stored (you may find that option just like hosting a container using Azure App Service)
- Image: The image that will be used in our container instance
- Size: The compute resources our container is expected to consume
In the following screenshot, you can see the values I used for this exercise:
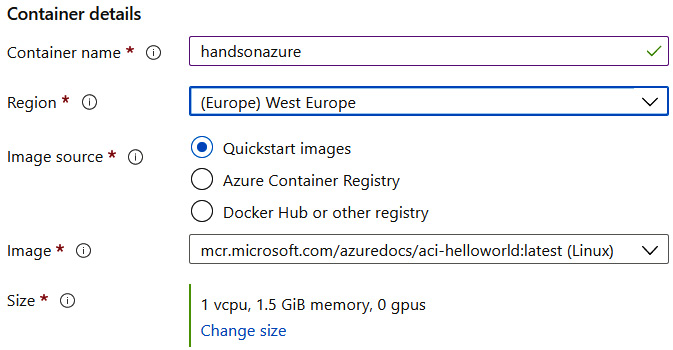
Figure 4.2 – Example container details
As you can see, my example uses a Quickstart image (currently, you have three different images to choose from). However, switching to other source options will render new fields in the creator. For example, if you use Azure Container Registry, you will have the option to select a registry to fetch an image from:

Figure 4.3 – Different creator view when Azure Container Registry is selected
If your image has additional tags, you will also be able to select the appropriate image. The same situation happens if the Docker Hub option is selected:

Figure 4.4 – The options when Docker Hub (or another registry) is selected
Depending on the Image type option selected, you may need to enter additional details required for authentication. Once you have filled in all the details, click the Review + create button at the bottom of the page. After confirming all the details, you can go to your service.
Let's describe the Overview blade of the Container instances instance. As you can see, it gives you information about things such as the operating system used for your container, the public IP address, the number of containers, and its Fully Qualified Domain Name (FQDN). If you have running containers, you will also see updated metrics telling you the current CPU and memory usage.

Figure 4.5 – Overview blade of Container Instances
However, service usage may be empty as our container is just starting. To check if everything is up and running, go to the Containers blade:
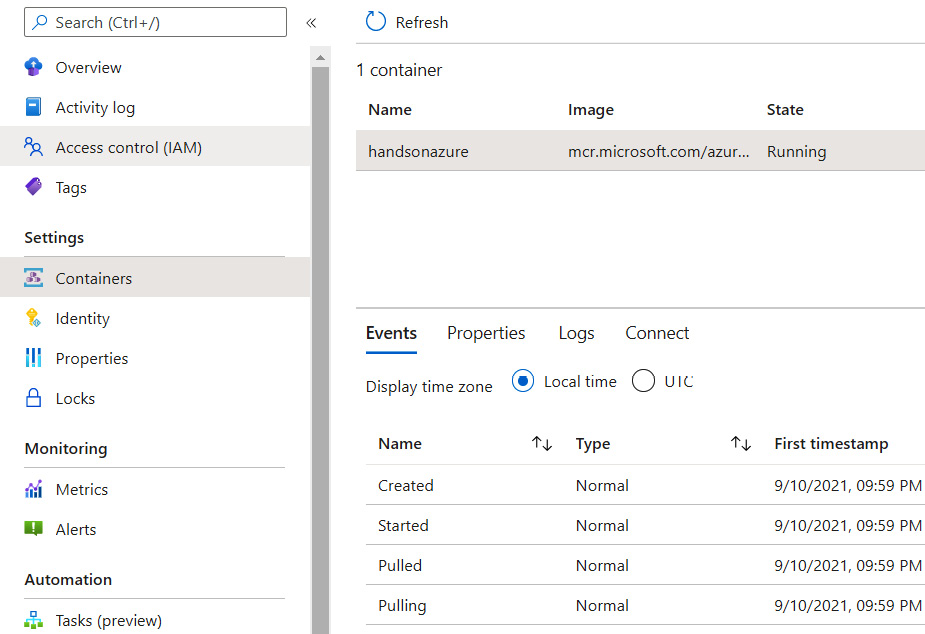
Figure 4.6 – Containers blade
As you can see, the Azure portal displays the full lifetime of our container. Container Instances automatically pull an image and then attempt to start it.
Note
Figure 4.6 shows you events that occurred while running a Quickstart image. You might have noticed that the Started event happened before the Created event. It is a small bug in the Azure portal, which sorts events by timestamp and then by name. If the timestamp is the same, then the order of events may be wrong.
It is worth mentioning that once you have configured Container Instances to run a container from a selected image, you will not be able to change it. Any changes required to the container image force you to recreate the whole instance and start from the beginning. This is a downside of running containers using this service – it is a one-way ticket and if you make a mistake (for example, provision Container Instances to run an outdated image tag), you must start from the beginning. However, remember that this setup is made by design – Container Instances cover fire-and-forget scenarios where you just want to execute a container, gather results (if any), and then destroy the provisioned infrastructure. As everything happens behind the scenes, you can focus on more important tasks and let Azure do the work.
Let's now learn something about container groups, which are the main unit of work in Container Instances.
Container groups as the main unit of work
When running containers in Container Instances, you always have two options:
- Run a single container for one job.
- Deploy a group of containers, which are specialized in more complex tasks and allow you to partition your work.
The group of containers in Container Instances is called a container group. You may think about it as a single unit of work – all the containers in a group share CPU, memory, network, and storage. They work as a single unit and are destroyed in the same moment as each other. There are two ways to deploy a container group:
- Deploy your IaC (using, for example, Azure Resource Manager templates or Bicep files) and include a container group there.
- Use a YAML file that contains the definition of your container group.
In this chapter, we will focus on using YAML as this is a more concise and native way of deploying containers (which, in fact, is very similar to Kubernetes deployments). Deploying a container group is extremely simple – you just need a single Azure CLI command, which takes the YAML file as the parameter:
> az container create --resource-group <resource-group> --file <yaml-file>
Note
Remember that at any time, you can create a resource group either in the portal or by using the az group create –n <resource-group> -l <region> command.
Still, before we deploy the file, we need to create it. The following snippet is an example of such a file with all the parameters, and its features are described in the following section:
 apiVersion: 2019-12-01
location: eastus
name: handsonazuregroup
properties:
  containers:
  - name: helloworld
    properties:
      image: mcr.microsoft.com/azuredocs/aci-helloworld:latest
      resources:
        requests:
          cpu: 1
          memoryInGb: 1.5
      ports:
      - port: 80
      - port: 8080
  - name: sidecar
    properties:
      image: mcr.microsoft.com/azuredocs/aci-tutorial-sidecar
      resources:
        requests:
          cpu: 1
          memoryInGb: 1.5
  osType: Linux
  ipAddress:
    type: Public
    ports:
    - protocol: tcp
      port: 80
    - protocol: tcp
      port: 8080
tags: {exampleTag: handsonazure}
type: Microsoft.ContainerInstance/containerGroups
The first thing is the definition of the container group. We need to enter the location of deployment and its name. Remember that in almost all Azure cases, you want all components that are integrated and communicate with each other to be in the same region. Then we have the properties of our container group – we must define each container that is part of the whole group.
As you can see, we define the following parameters:
- image, which will be used as the base of our containers
- resources utilized by this container
- ports used by it
There are also some additional settings that you may find helpful:
- The operating system used to run containers
- The IP address configuration, which states whether the whole group is accessible from the internet or stays private
You may also enter tags, which will decorate the whole group. As we have the whole configuration, we can start the deployment:

Figure 4.7 – Starting the deployment
If the process of provisioning of your group is successfully completed, you will get a long JSON response containing the containers' metadata. The whole group will be also available in the Azure portal and via Azure CLI commands, allowing you to query resources, as shown in the following screenshot:

Figure 4.8 – Container group deployed and visible in the Azure portal
If you go to the Containers blade, you will see that we have now two containers running on a single Container Instances instance:

Figure 4.9 – Two containers running on the single instance of Azure Container Instances
The last thing we need to check is access to the running container. Let's go back to the Overview blade and search for the IP address parameter. If you copy it and paste it in your browser, you should be able to access a web page running inside your service:

Figure 4.10 – A running web page inside Azure Container Instances
As you can see, deploying multiple containers is still amazingly simple when using Container Instances. All you need is to write your YAML file and deploy it using, for example, the Azure CLI. All the work (infrastructure provisioning, pulling images, and creating containers) is the responsibility of Azure.
In the next section, we will talk about security basics for Container Instances.
Security baseline and considerations
All cloud resources should consider security to be their priority. That said, you should always ensure that your service uses all the security features that are required for your business case. In Container Instances, you have access to the following security areas:
- Networking
- Monitoring and logging
- Access control
There are, of course, even more areas to consider here:
- Web access security
- Data protection
- Incident management
- Pen testing
When creating a Container Instance service, you can configure network access and ports that are open in your instance of the service, as shown in the screenshot:

Figure 4.11 – Networking configuration
As you can see, there are three different types of networking available:
- Public, which allows connections from everywhere
- Private, which can integrate Container Instances with a network of your choice
- None, which completely seals your containers but still allows you to browse logs via the CLI
The rule of thumb is that you should only deploy Container Instances to a virtual network and select Public access if you really need it. Connection via a virtual network will require a more advanced setup (you must use a VM deployed to Azure or set up integration between an Azure network and your computer), but it is always the best choice if you design your application with security in mind.
Selecting None as your networking type may look like an interesting choice, but it has limited usage. That option is useful only if your container is supposed to perform operations that have no artifacts and does not have to connect to external services. As you mostly run containers for a specific purpose (such as generating output from an operation), the lack of any integration renders that option useless in many real-world scenarios.
Each instance of Container Instances allows you to browse logs and metrics. Logs are available via the Containers blade and will give you insights into what is really happening inside a container:

Figure 4.12 – The logs of a helloworld container from a container group
Always make sure you are not logging anything important from the security point of view when your container is running. Examples of such data include the following:
- Connection string
- Authorization keys
- Authorization tokens
- Passwords and logins
- SSH keys
It is a common practice for developers to put some of that data into code when developing as it helps them understand the current behavior of an application. Always perform a detailed review of the application's code and the image definition to avoid surprises.
Access control in Container Instances is performed using the same component as in other Azure services. There is an Access control (IAM) blade available, where you can configure who has access to the service and with what permissions:

Figure 4.13 – Access control in Azure
It is always a good practice to avoid assigning roles granting full access to a service and following the Least Privilege principle.
Container Instances also allow you to set up a Managed Identity using the Identity blade. It is the very same feature as available in, for example, Azure App Service – you can decide whether you are assigning a unique identity for a particular instance of Container Instances (so it is available only for a single service) or using a user assigned identity, which can be shared by multiple services, allowing centralized access management.
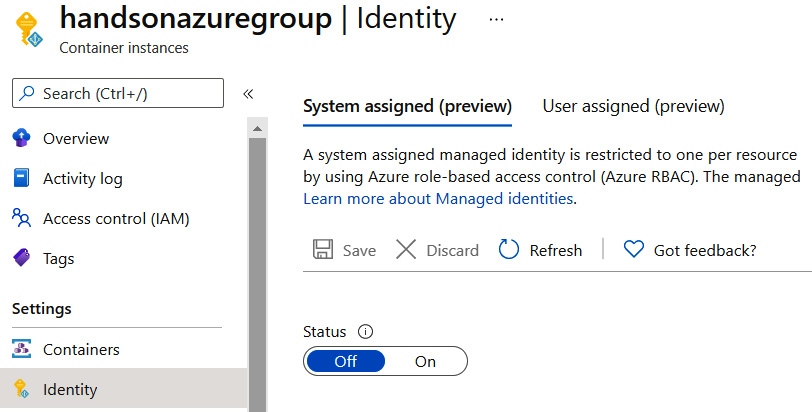
Figure 4.14 – Identity configuration in Container Instances
Using Managed Identity is also one of the security baselines – you can avoid putting secrets into your containers as they can use the identity assigned to Container Instances. Using this feature also allows us to control access to other services using the Access control (IAM) capability – a service with Managed Identity assigned is considered a principal in the whole Azure ecosystem, allowing for proper access management.
Summary
Container Instances is a simple yet robust solution for running your containers in a managed environment. It simplifies things such as infrastructure provisioning, authentication to registries, and hosting multiple containers in a single place. Of course, there is a cost of such simplicity – you cannot control the operating system's features and the environment in which a container runs. Still, if your goal is to run a container quickly, get the job done, and move ahead with the process, this looks like the service for you. In the next chapter, we will change the topic a little bit, as we will switch our focus to search engines and build a custom one using Azure Cognitive Search.
Questions
Following are some key questions to summarize the chapter:
- Can Container Instances integrate with virtual networks in Azure?
- What are the ways to deploy container groups?
- Can you select a virtual machine used for running containers in Container Instances?
- What are the networking types in Container Instances?
- Can Container Instances leverage Managed Identity?
Further reading
For more information, refer to the following resources:
- Azure Container Instances documentation: https://docs.microsoft.com/en-us/azure/container-instances/container-instances-overview
- Azure Container Instances security baseline: https://docs.microsoft.com/en-us/security/benchmark/azure/baselines/container-instances-security-baseline