
24
Distributing Load with Azure Traffic Manager
Sometimes we want to distribute our load depending on the performance of our backends, or maybe route users to different servers while some are under maintenance. This is not an easy task if we don’t have a service that will do this seamlessly and quickly. Thanks to Azure Traffic Manager we can improve the availability of our critical applications, distribute traffic when performing large, complex deployments, or perform maintenance without downtime.
The following topics will be covered in this chapter:
- Using Azure Traffic Manager
- Endpoint monitoring
Technical requirements
To perform exercises from this chapter, you will need the following:
- Access to an Azure subscription
Using Azure Traffic Manager
Imagine the following situation—you have an application that must be served globally. To guarantee the best performance for all your customers worldwide, you provision different instances of your service in different regions (one for North America, one for Europe, and one for Africa). There is one problem - you must explicitly tell your customer to access a specific instance of the application, the one that is closest to their location.
While this is, of course, possible (just give the customer the right URL), the solution is not ideal. For example, what if your client goes for a holiday and spends the following two weeks in Europe instead of in Africa? To overcome such problems, in Azure, you can leverage a service named Azure Traffic Manager, which takes care of the proper routing of incoming requests and allows you to implement high availability in your application.
Functions of Azure Traffic Manager
You can think of Azure Traffic Manager as a load balancer that works on the DNS level. To understand the concept, please look at the following example. By default, if there is no service such as Azure Traffic Manager, your customer uses an endpoint URL to send requests from a client application to a server application:

Figure 24.1 – Direct access to an application without a load balancer
If you want to load-balance incoming requests, you must introduce another element of an architecture that will take care of routing them to the proper backend (and possibly ensure that they are healthy):
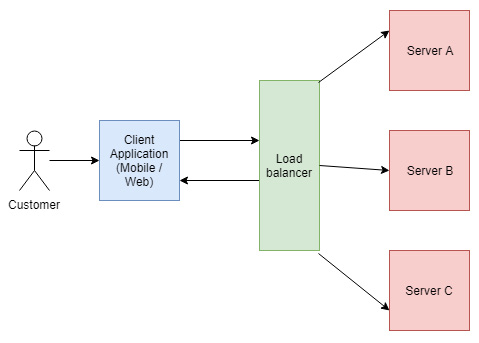
Figure 24.2 – Access to multiple instances of an application using a load balancer
The downside of such a setup is that latency can be introduced. What is more, in that scenario, your client connects via a load balancer directly, which does not resolve the problem of globally distributing the entry point.
Note
The preceding example is a common solution when using a reverse proxy, which acts as a gateway to your system.
The described scenario defines a solution, where load balancing is based on distributing traffic based on TCP/UDP, so it is a significantly lower level than DNS. When using Azure Traffic Manager, the flow of a request is completely different:

Figure 24.3 – Accessing multiple instances of an application with Azure Traffic Manager
The flow can be described as follows:
- Send a DNS query to a DNS service to obtain the address of a server.
- The DNS service is configured in such a way that it points to Azure Traffic Manager, instead of pointing to a service directly.
- Azure Traffic Manager chooses the right endpoint based on the query characteristics and returns a DNS response containing the address of the proper server.
- The client receives a DNS response and uses it to connect to the right server.
In fact, the client must perform two requests:
- Obtain the URL of a server
- Send the actual request
While it may seem like a bit of an overhead, the impact is imperceptible.
Note
The advantage of such a solution is the ability to send requests directly to a server. There is no intermediary service that participates in the communication.
Let us now check how quickly we can create Azure Traffic Manager using the Azure portal.
Creating Azure Traffic Manager in the Azure portal
To get started with Azure Traffic Manager in the portal, you must click on the + Create a resource button and search for traffic manager. Then, from the search results, select Traffic Manager profile. You will see a form, where you must enter all required fields to be able to create a service:
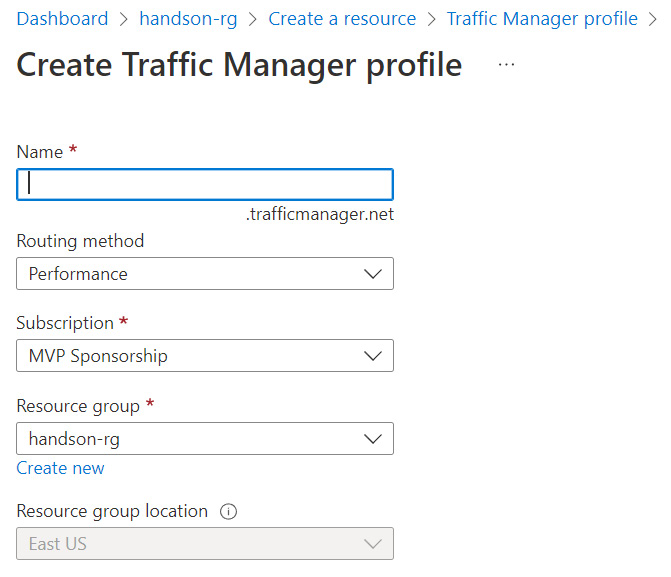
Figure 24.4 – Creating Azure Traffic Manager in the Azure portal
While most of them should be self-explanatory, there is one dropdown that will require our focus, Routing method. Here you have six different methods available:
- Performance
- Weighted
- Priority
- Geographic
- MultiValue
- Subnet
Before we describe each one, you have to understand what Routing method is exactly. Previously, I mentioned that Azure Traffic Manager decides to which endpoint a user should be routed. This routing operation may give a different result depending on the selected method. Let’s consider the following scenarios:
- Instances of your application are distributed globally, and you want to route a user to the closest one.
- Instances of your application offer different performances, and you want to route a user to the one that offers the best user experience.
- You have a primary region that handles all the traffic, and you want to route a user to secondary ones in case of an outage or temporary issues.
- You want to distribute traffic evenly, or according to set weights.
- You want to map user IP addresses to a specific instance.
Depending on the chosen scenario, a different routing method should be chosen. Now I will describe them in detail.
Routing method – performance
When using the performance routing method, a user will be routed to the endpoint that is the closest one. It is important to remember here, that the closest endpoint may not be the one that is the closest geographically, as this method takes into consideration performance, not distance. Let us assume that, internally, Azure Traffic Manager stores the following information regarding configured endpoints:

Figure 24.5 – Example performance of two separate endpoints
In the preceding scenario, the endpoint that performs better is Server A. When the performance routing method is selected, the user will be routed to that server.
Note
It is important to remember that with the performance method, Azure Traffic Manager checks the latency of a response, taking into consideration the IP address of the DNS server that sent the request. It is not an IP address of a client.
As performance is not always the best routing method, we can check how to attach weights by using the weighted method of load balancing.
Routing method – weighted
When you want to distribute traffic evenly or based on predefined weights, the weighted routing method is what you are looking for. Using that method, you define weights, which are then taken into consideration when deciding where a request should be routed. Let’s take into consideration the following table:
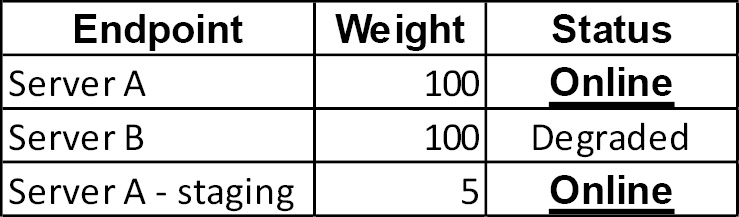
Figure 24.6 – Example status of the configured endpoints
In the preceding example, we have three endpoints, one of which has reporting issues. Although both Server A and Server B have the same weights, as Server B’s status is reported as Degraded, it will not be considered as a healthy endpoint, and as a result, a user will not be routed to it. There are two servers left that have different weights. In that situation, Azure Traffic Manager will randomly assign a user to an endpoint with the probability determined by the endpoint’s weight. If we imagine that there are 105 requests, 100 of them will be routed to Server A, and the rest to the Server A – staging.
Note
The weighted routing method is a great option for A/B testing, where you randomly route users to the new instance of your application containing new features. If they like them, you can change the weight and route the rest of the traffic to that instance.
As you can see, with the weighted load balancing method you can easily distribute traffic according to your current requirements. However, if you want a simpler method, you could try using the priority routing method.
Routing method – priority
The priority routing method is the most straightforward as it covers a simple scenario where you have a primary region that hosts your application, and you want to ensure that you can easily fail over to the secondary ones in case something is wrong. Let’s consider the following scenario:
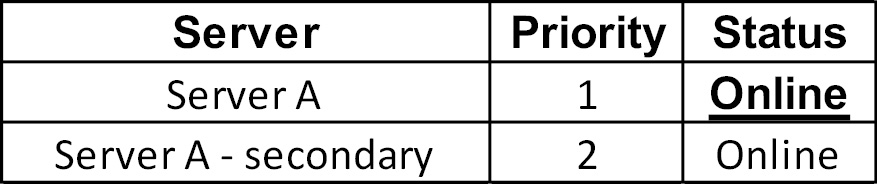
Figure 24.7 – Example priorities of endpoints
In the preceding example, all traffic will be routed to Server A for the following reasons:
- Its priority is set to 1
- Its status is considered online
Now something has happened, and the primary replica went down:

Figure 24.8 – Example of changing status of endpoints with priority configured
Because Server A is considered unhealthy, all traffic will be routed to the secondary instance until the primary one works again.
Note
Remember that clients may cache DNS responses, which will extend the period that your endpoint appears unavailable to them.
Priorities allow you to quickly decide which instance should go first when serving requests to your customers. However, they cannot guarantee that they will access the closest region physically. To do that, we need to use the geographic routing method.
Routing method – geographic
Sometimes you need to route a user to a specific region, taking into consideration its location. There are multiple reasons to do so, for example:
- Legal requirements
- Content localization
- Serving an application from a server that is the closest one taking distance into consideration
Note
Do remember that the region that is closest to a user may not be the best one regarding network latency. Do not overuse this routing method to achieve the best user experience.
When using the geographic routing method, you assign regions to configured endpoints:

Figure 24.9 – Example relations of servers and regions
Now to route a user to the proper server, Azure Traffic Manager tries to determine its location by reading the IP address of the source DNS server. It starts from state/province (or country/region if the former is not supported) and ends on the World value.
Note
When using the geographic routing method, Azure Traffic Manager will return an endpoint whether it is healthy or not. It is important to leverage nested profiles, to extend routing methods further, and achieve high availability.
As you can see, there are some serious considerations when using that method of routing. Make sure you have a plan to mitigate all the potential issues to get the best from it.
Routing method – MultiValue
The MultiValue routing method works a little bit differently from other routing methods, as it allows the return of multiple healthy endpoints, and lets the client choose which one should be used. This scenario covers a situation when on the service side, you do not know where to route a user, and simultaneously you want to ensure that a user will be routed to a healthy endpoint.
Note
To make sure that an endpoint can be returned to a user for this routing method, it must be set as External and have an IPv4 or IPv6 address assigned.
To complete the list, let us now quickly check how routing can be done based on subnets.
Routing method – subnet
The last routing method is the most sophisticated, as it allows you to map specific IP addresses (or a range of IP addresses) to a specific endpoint.
The use cases for that method may vary if, for example:
- You want to block users using a specific ISP
- You want to route users from a corporate network to an internal instance of an application
- You have branded your application and want to route users from different corporate networks to a particular branded instance
Note
When using the subnet routing method, make sure you have covered all possible IP addresses, as failing to do so will result in a NODATA response being returned, resulting in an error being sent to a client.
Once you are satisfied with your choice of a routing method, you can click on the Create button to provision a resource in Azure. We will now check how Azure Traffic Manager is configured and managed via the Azure portal.
Working with Azure Traffic Manager in the Azure portal
When you access your instance of Azure Traffic Manager, you will see a default screen containing the overview of the service:

Figure 24.10 – Working instance of Azure Traffic Manager
As there is currently no endpoint attached to this profile, the list of endpoints displayed is empty. Before we add a new one, let’s focus a little bit on other service features.
Configuration
When you access the Configuration blade, you will see the full configuration of your instance of Azure Traffic Manager:
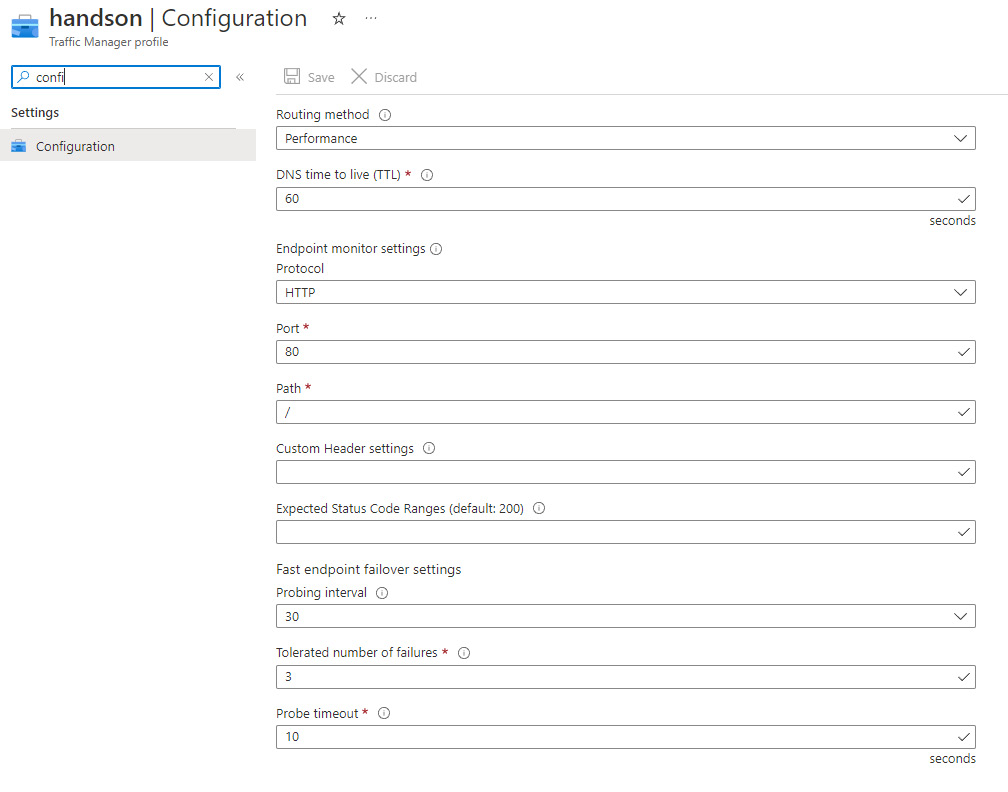
Figure 24.11 – Azure Traffic Manager configuration
It contains things such as Routing method (by default it displays the one you chose during service creation), Endpoint monitor settings, and Fast endpoint failover settings. From this screen, you basically control how Azure Traffic Manager will behave. For instance, let’s assume that each of your endpoints has a custom /status endpoint that is designed to work with the service. By default, Azure Traffic Manager checks the default endpoint URL (set here as /), so you will have to change the Path field as follows:

Figure 24.12 – Setting the Pathfield
The same goes for expected status codes. If your endpoints can return a range of HTTP status codes, and each of them should be considered as a success, you are able to enter the range in the Expected Status Code Ranges field:

Figure 24.13 – Setting expected status code ranges
You can experiment here with different settings, so they reflect the real scenario you must cover. Once the configuration is complete, we can see how to gather user measurements.
Real user measurements
When using the performance routing method, Azure Traffic Manager checks where DNS requests originate from, and translates the result to an internal table that reflects different network latencies for different end user networks. While this option is perfectly fine for most use cases, sometimes you want to be able to tell Azure Traffic Manager about real latency. With Real user measurements features, you can inject JavaScript code into your client endpoints, to send delays to your endpoints directly to this Azure service.
To do so, go to the Real user measurements blade and click on the Generate key button:

Figure 24.14 – Default view of Real user measurements
Once the key is generated, you will see a slightly different view:

Figure 24.15 – Measurements with a generated key
As you can see, there are two fields:
- Key: Stores the generated key
- Measurement JavaScript: Holds the script that should be injected into the client application
Once you use the generated script, it will start sending additional information to your instance of Azure Traffic Manager regarding latencies and the client network, which will improve the accuracy of decisions made by the service.
Note
The accuracy improvement is not instant—Azure Traffic Manager must gather lots of data from different networks to improve the performance.
While real user measurements are helpful, they are not the core functionality of Azure Traffic Manager. To be able to load balance traffic, we will need to learn how to configure endpoints.
Endpoints
The main functionality of Azure Traffic Manager is the ability to configure the endpoints it handles. You can access it through the Endpoints blade. To add an endpoint, you must click on the + Add button and enter the following values:
- Type: You can choose between Azure endpoint, External endpoint, and Nested endpoint. The difference impacts the whole form—with Azure endpoint you can choose an Azure service, External endpoint requires providing a fully qualified domain name or IP, and when you select Nested endpoint you can point to another Traffic Manager profile.
- Name: Unique name of an endpoint.
- Target resource type/FQDN or IP/Target resource: Depending on the Type value, you will have to select different values to configure an endpoint.
- Priority: Because my routing method is Priority, I must enter the correct value for this endpoint. If you select another method, you may find other fields here.

Figure 24.16 – Configuring an endpoint
In the following example, I selected an Azure endpoint and pointed the configuration to one of my Azure App Services. I performed the operation twice and added two different endpoints to two instances of my application:

Figure 24.17 – Two separate endpoints added
Note
Remember that you cannot add to a single Azure Traffic Manager profile service domains that point to the same region.
As you can see, right after adding endpoints, their status is displayed as Checking endpoint. This means that Azure Traffic Manager tries to gather information regarding their health. If something is wrong, you will see the Degraded status. Otherwise, the status should be marked as Online:

Figure 24.18 – Endpoints with one endpoint already online
If you have some problems with Azure Traffic Manager not being able to mark an endpoint as Online, make sure you set a correct protocol, path, and port in the configuration. Most errors are caused by invalid configuration of the service.
With the Azure Traffic Manager configuration described, let us now check how we can implement basic monitoring of the service.
Endpoint monitoring
Besides routing traffic to a different endpoint, Azure Traffic Manager offers some additional functionalities when it comes to monitoring. Besides the traditional Metrics blade, there is an extra feature available called Traffic view, which enables you to monitor traffic. What is more, you can use many different built-in mechanisms (such as nslookup in Windows OS), to check the current configuration of the service.
nslookup
To use nslookup, you must run the command line in Windows using your administrator account. Once it is loaded, enter the following command:
nslookup <Traffic-Manager-DNS-name>
After a moment, it should return a result showing the command resolution:
C:Userskamil>nslookup handson.trafficmanager.net
Server: UnKnown
Address: 2001:730:3ed2::53
Non-authoritative answer:
Name: hosts.butter-prod-euw-functionapp.azurewebsites.net
Address: 20.50.2.9
Aliases: handson.trafficmanager.net
butter-prod-euw-functionapp.azurewebsites.net
In my case it presented only a single alias, while it was supposed to display two (as I configured two separate endpoints for that instance). The reason for that is the degraded status of the second endpoint – once it came back online, it become available during DNS resolution:
C:Userskamil>nslookup handson.trafficmanager.net
Server: UnKnown
Address: 2001:730:3ed2::53
Non-authoritative answer:
Name: waws-prod-am2-161.cloudapp.net
Address: 52.178.75.200
Aliases: handson.trafficmanager.net
tocoffee-functionapp.azurewebsites.net
waws-prod-am2-161.sip.azurewebsites.windows.net
Once everything is up and running, you can incorporate Azure Traffic Manager into your architecture and make sure it is connected to your DNS server. To do that, you will need to simply put a CNAM DNS record into your server:
www.yourdomain.com IN CNAME <Traffic-Manager-DNS-name>
Once DNS propagation is complete, you will be able to access your website via your instance.
Note
Remember that you must wait a fixed amount of time before all DNS changes will be propagated. The value can be configured in the Configuration blade by changing the DNS time to live field.
To finish the topic of Azure Traffic Manager, let us check the Traffic view feature.
Traffic view
Traffic view is an additional monitoring feature that enables you to check how the selected routing method works exactly at the DNS level. It gives you extra helpful information such as the following:
- Real latency level
- Volume of traffic
- Users’ location
Note
Remember that this feature takes up to 24 hours to propagate and gather all necessary information.
By default, the screen for this functionality looks like the following:

Figure 24.19 – Default view of Traffic view
If you want, you can enable it, but you must remember that, once enabled, it takes up to 24 hours to fully propagate all the information:

Figure 24.20 – Error status that data for Traffic view has not been fetched yet
Once all the information is downloaded (it requires Azure Traffic Manager to be actively used), you will see a heat map containing how the traffic is distributed.
Summary
In this chapter, we have learned the fundamental concepts of traffic distribution and different routing methods that cover many real use cases that you may well face in your daily work. Now you should understand how this Azure service works and what can be achieved by the proper usage of its features, such as configuration, real user measurements, and monitoring.
In the next (and, unfortunately, the last) chapter, I will show you some useful tips and tricks for working with the Azure portal and different cloud components to improve your skills even further.
Questions
- What are the supported routing methods in Azure Traffic Manager?
- How can you use the Real user measurements feature?
- Can you link different Azure Traffic Manager profiles?
- Is it possible to use an external endpoint?
- Does a client connect directly to an endpoint returned by Azure Traffic Manager?
- What is the main difference between a gateway and Azure Traffic Manager?
- Can Azure Traffic Manager be used to achieve high availability? If so, how?
Further reading
- Disaster recovery with Azure DNS and Traffic Manager: https://docs.microsoft.com/en-us/azure/networking/disaster-recovery-dns-traffic-manager
- How it works: https://docs.microsoft.com/en-us/azure/traffic-manager/traffic-manager-how-it-works