
6
Mobile Notifications with Notification Hubs
Push notifications are one of the main features of mobile phones and desktop applications. They facilitate informing a user about new messages, features, or even a temporary discount that is available only for a few minutes within an application. While each vendor has its own service for such notifications, it's always nice to configure such a feature in one place so that we don't have to worry about changes in the underlying application programming interface (API) or the parameters required. Azure Notification Hubs simplifies things greatly by providing a single service that acts as a single endpoint for our mobile applications, easing both development and testing.
The following topics will be covered in this chapter:
- Reasons to use Notification Hubs
- Push notification architecture
- Registering a device within Notification Hubs
- Sending notifications to multiple vendors
- Sending a rich content notification through Notification Hubs
Technical requirements
To perform the exercises in this chapter, you will need the following:
- An active Azure subscription
- Visual Studio with the Azure software development kit (SDK) installed
Reasons to use Notification Hubs
If you have ever had a chance to develop an application that was integrated with any notification system, you probably know the challenges that are faced when creating such a product. In this chapter, I will try to introduce you to some basic concepts such as platform notification services (PNSes), push notifications, and device registrations. This will ensure that we can easily start developing applications leveraging Notification Hubs features and focus on learning details and hidden functionalities.
The exercises from this chapter are prepared using the .NET platform, but the core concepts, methods, and design are the same as others such as Java or Node.js.
Challenges for application design
Let's assume you have the following architecture:
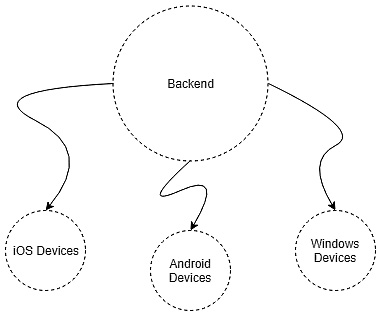
Figure 6.1 – Simple application multiplatform ecosystem
Here, we have a backend that sends some messages to the following three different platforms:
- iOS
- Android
- Windows
Now, if these messages are push notifications, our backend will have to communicate with the following three different services:
- Apple Push Notification Service (APNS)
- Firebase Cloud Messaging (FCM)
- Windows Notification Service (WNS)
Each of these services is called a PNS. Their responsibility is to accept a request to send a notification and send it to the appropriate device. They also handle the registration of the devices that want to accept notifications (for instance, by tokens in APNS). The downside of such a solution is that none of these services has a common interface—we cannot introduce a simple wrapper in our backend to handle each request in the same fashion. The solution for that kind of trouble would be to alter our architecture a little bit so that it contains a service that aggregates the logic for each PNS and is able to communicate with them, as illustrated in the following diagram:

Figure 6.2 – High-level design for PNSes
Notification Hubs is such a service; it's an abstraction over different PNSes and can handle different device registration. We can consider two more problems—scaling and routing. It is important to know that, according to the PNSes' guide, the device token must be refreshed with each app launch. Now, if it is your backend responsibility, you may end up with a solution that tries to handle refresh requests instead of focusing on your business logic.
Additionally, if you want to send a notification to a particular device, you must store its identifier (ID) somewhere so that you are able to route a message to it. All these responsibilities can be moved to a notification service, so this whole overhead can be taken from the backend.
After briefly covering the main reasons for using Azure Notification Hubs, let's move on to a more technical explanation by describing the overall solution architecture.
Push notification architecture
Creating a whole system that relies on push notifications is not a trivial task. Besides ensuring that you are not focusing on handling each PNS logic individually and providing reliable device registration and routing systems, you must introduce a pipeline for passing messages from one part of your system to the end device. In this section, we will focus on incorporating Notification Hubs into a few reference architectures, which will help you understand its role and the connections between different cloud services.
Direct connection
The simplest architecture we could think of would be a direct connection between a backend and notification service, as illustrated in the following diagram:

Figure 6.3 – Architecture for handling multiplatform push notifications
In such a scenario, each sent notification request is handled by notification services, which communicate with different PNSes. Each PNS individually handles a request and sends a notification to a registered device. Device registration is handled by the notification service—each device must register in it to be able to receive a notification. Note that, even in that simple scenario, the notification service (in our case, Notification Hubs) takes responsibility for two important things, as outlined here:
- Providing a common interface for different PNSes
- Handling device registration and routing
Devices never communicate directly with the PNS itself—they only receive push notifications because of sending a request to the notification service.
Queued communication
Sometimes, exposing a notification service to the backend is not the way to go—it could become unresponsive, have some performance issues, or just be overloaded. In such a situation, it is always good to have something that can cache messages and store them until all issues are resolved. Let's modify the previous architecture with one more service, as illustrated here:
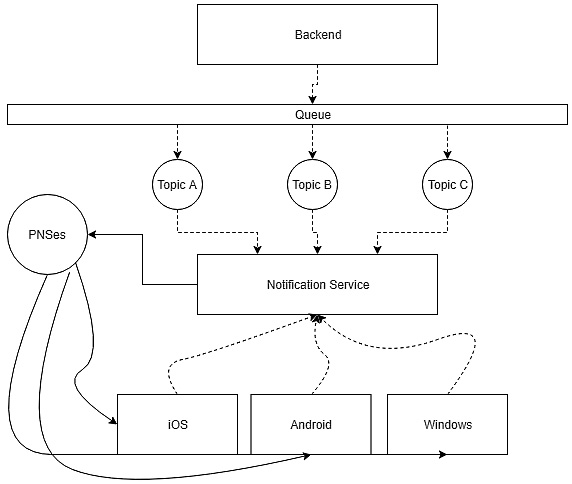
Figure 6.4 – Push notification for multiplatform service with queue
By introducing a queue with readers, you can absolve the backend from handling communication with the notification service and move the responsibility for delivering a message to it (the queue). Now, the backend does not have to know how to handle undelivered messages and will not be aware of a storage solution for storing them. This solution can be also scaled much more easily than the previous one, as you do not have to worry about losing a message—a queue should be able to cache messages if needed.
Make sure that your caching mechanism makes sense in the business domain you are working with. Caching a notification request for a day, for example, and sending a notification after that time may not make any sense in scenarios such as geolocalization, a specific time, or a short-lived discount.
Triggered communication
Sometimes, you might wish to send a notification based on some specific set of parameters or by raising an event. Let's assume you would like to send it whenever a photo is uploaded to storage, as illustrated in the following diagram:
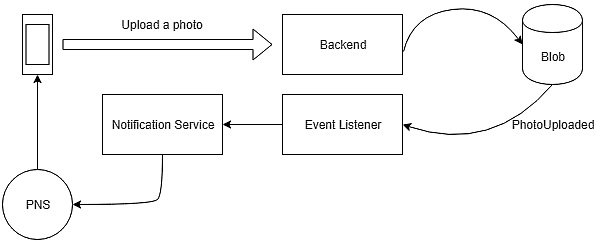
Figure 6.5 – Triggered communication for push notifications
In this asynchronous scenario, you have an event listener that listens to an event publication and performs an action based on the passed metadata. It sends a request to a notification service, which communicates with PNS to send a notification with the appropriate content (probable information regarding an upload status). Once more, we see the advantages of having a service acting as a proxy to PNSes—the whole communication can be made asynchronous, and each component has its own responsibility.
Let's now see how you can register a device in Azure Notification Hubs and start working with the service.
Registering a device within Notification Hubs
To be able to send a notification, you have to register a device in the PNS. Without using a service such as Notification Hubs, you would have to know the individual logic of each PNS and store device data somewhere. Such a challenge would be problematic in most cases, as you usually do not want to handle external dependencies by yourself; rather, your aim is to simplify the overall system logic. In this section, you will learn how device registration is handled in Notification Hubs and how to monitor it.
Notification Hubs device registration
When you register a device in Notification Hubs, you are associating it with a template of a notification and tag. To create such a link, you need a PNS handle, which can be understood as an ID of a specific vendor (such as a token or a Google Cloud Messaging (GCM) registration ID). In fact, there are two ways to register a device, as outlined here:
- Use registration: Where you pass an ID, tag, and template
- Use installation: An enhanced registration with an additional set of push-related properties
Note
Please note that currently, if you want to use installation, there is no possibility to use the .NET SDK—you are limited to using the REpresentational State Transfer (REST) API of a service.
We must also describe what tags and templates are to fully understand the process. Here's an overview of this:
- Tag: This is a way to route a notification to a particular set of (or all) registered devices. It allows you to segment users so that you can easily decide who is an addressee of a message; you can use, for example, version_Beta to send a notification to a limited group of devices using a preview version of your application.
- Template: This is a particular schema of data designed to be sent to a client application. It differs depending on the PNS used and varies from JavaScript Object Notation (JSON) data to Extensible Markup Language (XML) documents. By using Notification Hubs, you can create a platform-agnostic template that can be reused between different platforms.
Now, we will try registering a device using both methods and understand the differences between them.
Creating a notification hub
Before we start sending notifications, we must have a notification service provisioned and working. To create a notification hub instance, go to the portal and click on the + Create a resource button. Search for Notification Hub and click Create. Here, you can see a completed configuration:

Figure 6.6 – Creation of Azure notification hub
As you can see, the process of provisioning an Azure notification hub is really simple—the only things that need clarification are Namespace Details and Select pricing tier, which we will explain in more detail here:
- Namespace Details: You can have multiple Notification Hubs inside the same namespace. A namespace is a logical container for your hubs and holds the limit of available pushes for them.
- Select pricing tier: Depending on the selected tier (Free, Basic, or Standard), you will have different features available and a different number of available pushes for your hubs. Additionally, it defines the price of extra pushes and the number of active devices. What's more, the Standard tier comes with handy enterprise features such as multi-tenancy or scheduled pushes.
For this exercise, the Free tier will be more than enough. Once you are satisfied with your configuration, click on the Create button and wait for a second for service creation. When the service is created, you can go to its page where you will see an Overview blade, as illustrated in the following screenshot:

Figure 6.7 – Overview blade in Azure Notification Hub
There, you can click on the hub you created to see its features. We will cover them later in this chapter.
Creating a registration
In this section, I will show you which methods from the SDK you should use to be able to perform registration. As mentioned at the beginning of this chapter, examples will be performed with the use of the .NET SDK, but I will also point you to appropriate places in other platforms' SDKs.
Note
All the SDKs can be found at the following link:
https://docs.microsoft.com/en-us/azure/notification-hubs/notification-hubs-sdks
Each operation performed at a Notification Hubs level needs a Notification Hubs client in your code. To create it, you can use the following method:
// using Microsoft.Azure.NotificationHubs
NotificationHubClient hub = NotificationHubClient.CreateClientFromConnectionString(connectionString, hubName);
As you can see, there are two parameters required here, as follows:
- connectionString—A connection string to your namespace containing credentials to your notification hub
- hubName—The actual name of the hub you are connecting to
A connection string can be obtained for using the Azure portal, for example—when you access the Access Policies blade, you will see the default policies that define permissions and generate full credentials for your connection, as illustrated in the following screenshot:
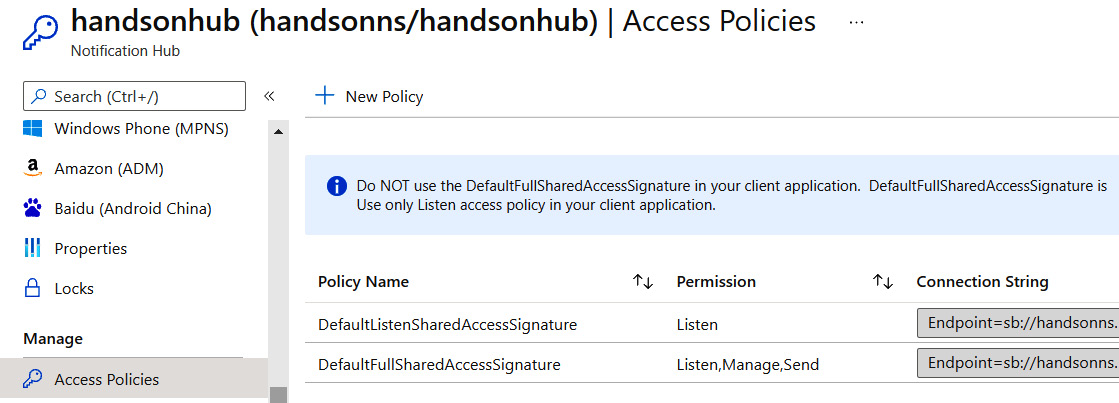
Figure 6.8 – Access Policies blade with two policies generated
If you want, you can generate a new policy that will grant a different set of permissions (for instance, you need a policy that will be passed to clients with a send-only permission). For our purpose, we will use the listen-only policy.
Tip
Using a common, full-access policy in production environments is generally discouraged and considered a bad practice. You not only expose yourself to a greater risk of breaking your security and increasing the blast radius but also make it difficult to manage different clients independently.
The name of your hub is available on the Overview blade (see Figure 6.7). Once you have two required parameters prepared, we can try to create a registration description. Such an object is a direct definition of a registration, which contains various data such as this:
- Platform
- Notification channel Uniform Resource Identifier (URI)
- Device token
- Platform-oriented metadata
In code, all registrations share a common interface—what is different is their interface. Therefore, you can create multiple registrations, as shown in the following code snippet, and use the same method to process them:
var winReg = new WindowsRegistrationDescription(channelUri, tags);
var appleReg = new AppleRegistrationDescription(deviceToken, tags)
await hub.CreateRegistrationAsync(winReg);
await hub.CreateRegistrationAsync(appleReg);
Note
When using Android notifications, you will need slightly different method to create a registration—hub.CreateFcmNativeRegistrationAsync (fcmRegistrationId).
This short code block is everything you need to register a device in Azure Notification Hubs. It performs several additional tasks under the hood to make sure connectivity is maintained and registration is completed. As you can see, it greatly simplifies the development of an application—you can focus on your business logic while keeping external dependencies easy to maintain and understand.
Checking available registrations
There are cases where you may want to check whether a particular registration is available in Notification Hubs. Of course, you will get an error if you try to access a non-existing one, but the rule of thumb tells us that you should always be prepared for errors and handle them if possible. For that purpose, the following method is available in the SDKs:
// .NET
GetAllRegistrationsAsync(string continuationToken, int top, CancellationToken cancellationToken)
// Java
getRegistrations() throws NotificationHubsException;
// All above methods are part of NotificationHubClient
If you do not want to check all the existing registrations, you can always search for a single one, as shown in the following code snippet:
var registration = await hub.GetRegistrationAsync<RegistrationDescription>("<registration-id>");This is a better method if you know the registration ID you are looking for and do not want to browse all the registrations available.
Using installations
Installations is a newer feature that allows you to handle each device registration using slightly different syntax and tools. It has a few important advantages over registrations, as follows:
- While it is possible to duplicate registrations (by registering the same device twice), installations are idempotent. This means that sending the same installation multiple times will not result in the creation of more than one registration record.
- By using HTTP PATCH, you can update a specific parameter in an installation.
- It is easier to perform individual pushes since each installation is automatically tagged using an installation ID. In registrations, you would have to create such a tag yourself and maintain it somehow to get the same functionality.
As I said in a previous part of this book, it is not currently possible to use installations with the .NET SDK on the client side—to check this functionality, we will have to use the Notification Hubs RESTful API or use the SDK for the backend. Here, you can find an example request for calling an API method:
PUT /{hub}/installations/{id}?api-version=2015-01 HTTP/1.1
Host: <namespace>.servicebus.windows.net
Authorization: <authorization token>
Content-Type: application/json
Cache-Control: no-cache
{
    "installationId": "{id}",
    "platform": "wns",
    "pushChannel": "{push channel}",
    "templates": {
        "myTemplate" : {
            "body" : '<toast><visual lang="en-US"><binding template="ToastTest01"><text id="1">$myTextProp1</text></binding></visual></toast>',
            "headers": { "X-WNS-Type": "wns/toast" },
            "tags": ["foo", "bar"]
            }
        }
}
To generate an authorization token, you will need to generate a shared access signature (SAS) token. You can find a guide on how to generate one here: https://msdn.microsoft.com/library/azure/dn495627.aspx.
Let's now see what you must do to send a notification using Azure Notification Hubs.
Sending notifications to multiple vendors
The main functionality of Notification Hubs is to send a notification to a set of registered devices. You will see that, using its SDK and portal, you can easily start using this feature without knowing the internal logic of different PNSes. After this section, you should be able to use Notification Hubs without problems and incorporate it into your applications.
Sending a test notification
While developing your application, you always need a way to test it. When using Notification Hubs, you have two options when it comes to sending a test notification—either use the portal or its SDK. Both possibilities allow for similar results; however, using the SDK is a bit more flexible as it is easier to find all the devices to which you would like to send a notification or add any kind of logic.
Test notifications in the Azure portal
When you go to the hub you created, you will see that, at the top of the page, there is a Test Send button, as illustrated in the following screenshot:

Figure 6.9 – Test Send button on the Overview blade
When you click on it, you will see a screen for the Test Send functionality. There are a few fields available, and they all depend on the platform selected. In the following screenshot, you can find a sample request for the Windows platform:
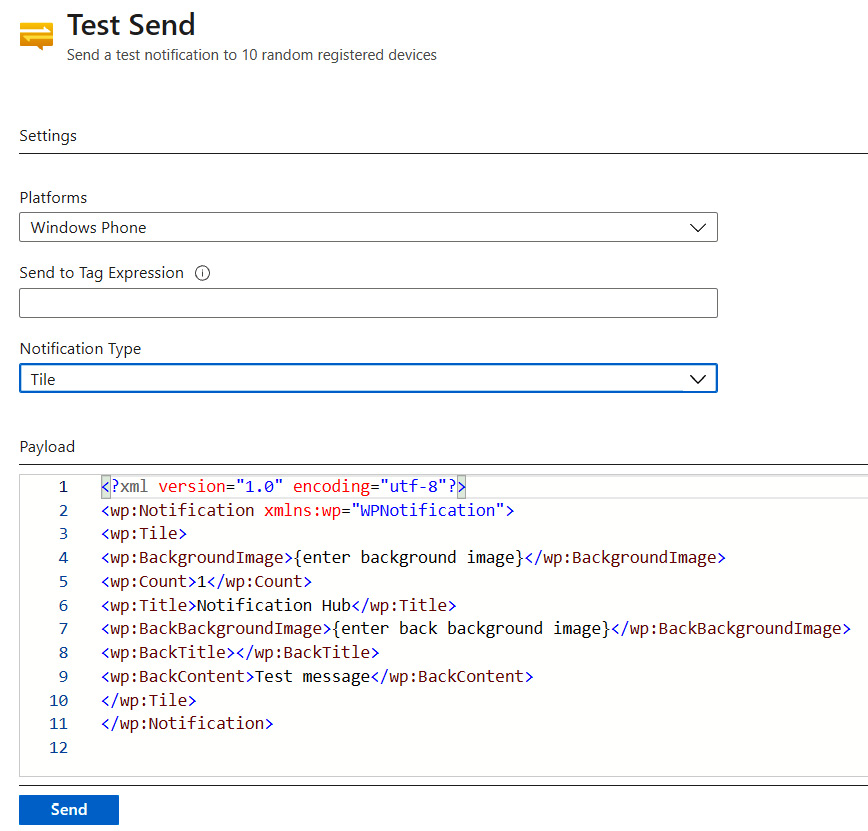
Figure 6.10 – Test Send interface
Now, if you click the Send button, Notification Hubs will select 10 different registered devices that will receive a notification. If you want, you can change both the type and the payload sent. What's more, you can send a message to a specific set of devices by specifying the Send to Tag Expression option.
Test notifications in the SDK
It is also possible to send a test notification using the Notification Hubs SDK. Consider the following example:
var hub = NotificationHubClient.CreateClientFromConnectionString(
                "{connection string}",
                "{hub}", true);
The last parameter enables sending a test notification. That means that each time you send a notification using the SDK, it will be sent to a maximum of 10 registered devices. Additionally, you will get the outcome of each operation (whether it succeeded or failed).
Remember that when test mode is enabled, each request to Notification Hubs is throttled. That means that you will not be able to overload your communication channel, as send operations will be queued and executed in a controlled manner.
You can check whether Test Send is enabled by checking a property on the NotificationHubClient object, as follows:
var hub = NotificationHubClient.CreateClientFromConnectionString(
                "{connection string}",
                "{hub}", true);
if (hub.EnableTestSend)
{
    // Do something....
}
This simple conditional statement is everything you need to implement an alternative route in your code and use it—for example, in your tests. To learn more about sending a notification in general, let's continue this topic in the next section.
Using the SDK to send a notification
The Notification Hubs SDK brings with it many different methods for sending notifications, depending on the configuration and expected output. Here, you can find all the methods available in the SDK:
hub.SendAdmNativeNotificationAsync();
hub.SendAppleNativeNotificationAsync();
hub.SendBaiduNativeNotificationAsync();
hub.SendDirectNotificationAsync();
hub.SendNotificationAsync();
hub.SendTemplateNotificationAsync();
hub.SendGcmNativeNotificationAsync();
hub.SendWindowsNativeNotificationAsync();
As you can see, we have two different categories, as follows:
- Native notifications: Methods for sending a notification to a specific platform only
- Generic notifications: A set of methods for sending a notification to a specific tag
I strongly encourage you to experiment and test different possibilities, as each method is a bit different. Here, you can find the result of calling SendAppleNativeNotificationAsync() and serializing the output:
var hub = NotificationHubClient.CreateClientFromConnectionString(
                "<connection string>",
                "<hub>", true);
await hub.SendAppleNativeNotificationAsync("{"aps":{"alert":"Notification Hub test notification"}}");
The result will look like this in my case:
{
  "Result": {
    "Success": 8,
    "Failure": 0,
    "Results": [{
      "ApplicationPlatform": "apple",
      "PnsHandle": "<pns handle>",
      "RegistrationId": "1013412858828458675-3388525925469165319-3",
      "Outcome": "The Notification was successfully sent to the Push Notification System"
    },
    ...]
  },
  "Id": 9,
  "Exception": null,
  "Status": 5,
  "IsCanceled": false,
  "IsCompleted": true,
  "CreationOptions": 0,
  "AsyncState": null,
  "IsFaulted": false
}
As you can see, we get the complete result of sending a notification to a set of registered devices. You can leverage that output to work with your application and, for instance, display the appropriate status or report.
The last topic of this chapter covers an advanced concept called rich content notifications. If you are searching for a solution that will allow you to send messages with a customized appearance, this subject is for you.
Sending a rich content notification through Notification Hubs
In the last section of this chapter, we will talk a bit about another type of notification that is called a rich content notification. Sometimes, you may wish to send something more than plain text. In Notification Hubs, it is possible to send—for example—an image to enhance the look and feel of an application.
Please note that receiving rich content notifications requires making changes on the client side. We will not cover that in this chapter but, at the end of it, you will find a link where such an operation is described in detail.
Creating and sending a rich content notification
To create and send a rich content notification, you will need the following two things:
- A model of a notification
- The notification payload and content
The idea is to send it in a way that will enable a client application to fetch rich content and handle it on its side. In fact, the simplest way to do so would be to have an API that provides two operations, as follows:
- Sends a notification
- Fetches notification data
In the following snippet, you can find example code for both actions:
[ApiController]
public class HubController :  ControllerBase
{
  public static Lazy<NotificationHubClient> Hub = new Lazy<NotificationHubClient>(() =>
NotificationHubClient.CreateClientFromConnectionString("<connection string>", "<hub>"));
  [HttpPost]
  public async Task<IActionResult> Send()
  {
    var notification = new Notification("Hey, check this out!");
    var fullNotification = "{"aps": {"content-available": 1, "sound":""}, "richId": "" + notification.Id +
            "", "richMessage": "" + notification.Message + "", "richType": "" +
            notification.RichType + ""}";
    await Hub.Value.SendAppleNativeNotificationAsync(fullNotification, "<tag>");
    return Ok();
  }
  public IActionResultGet(string id)
  {
    var image = Notification.ReadImage(id);
    var result = new HttpResponseMessage(HttpStatusCode.OK) {Content = new StreamContent(image)};
    result.Content.Headers.ContentType = new System.Net.Http.Headers.MediaTypeHeaderValue("image/{png}");
    return Ok(result);
  }
}
As you can see, the only thing we must do is to keep the correct schema for sending a notification to a particular PNS. In the previous example, I used APNS but, of course, it is possible to use other vendors (if their software supports receiving images or audio through push notifications). You can find an example in the source code for this chapter.
Summary
In this chapter, you have learned what Notification Hubs is and how you can use it to incorporate push notifications into your applications. We covered some reference architectures and possible scenarios that should help you understand what the purpose of this service is and how it solves problems when sending notifications to multiple PNSes and devices.
This chapter ends the first part of this book. In the next one, we will focus on serverless components and architectures.
Questions
Here are some questions to test your knowledge of the important topics in this chapter:
- What is a PNS?
- Do multiple platforms (iOS, Android, and Windows) have different PNSes?
- What is the difference between registration and installation?
- Can you register the same number of devices in the Free and Basic tiers?
- What is the easiest way to check registered devices in Notification Hubs?
- How can you send a test notification?
- What are rich content notifications?
Further reading
For more information refer to the following sources:
- Azure Notification Hubs documentation: https://docs.microsoft.com/en-us/azure/notification-hubs/
- Universal Windows Platform (UWP) apps notifications: https://docs.microsoft.com/azure/notification-hubs/notification-hubs-windows-store-dotnet-get-started-wns-push-notification
- iOS push notifications: https://docs.microsoft.com/en-us/azure/notification-hubs/notification-hubs-aspnet-backend-ios-apple-push-notification-service-apns-rich
- Registration management in Azure Notification Hubs: https://docs.microsoft.com/en-us/azure/notification-hubs/notification-hubs-push-notification-registration-management