
18
Big Data Storage – Azure Data Lake
Sometimes, we must store unlimited amounts of data. That scenario covers most big data platforms, where having even a soft limit for the maximum capacity could cause problems with the active development and maintenance of our application. Thanks to Azure Data Lake, we have limitless possibilities when it comes to storing both structured and unstructured data, all with an efficient security model and great performance. Thanks to this chapter, you will learn the technical basics of building your very own data lake, including things such as the overall capabilities of the service, its security features, and its similarity to Azure Storage.
The following topics will be covered in this chapter:
- Understanding Azure Data Lake Storage (ADLS)
- Storing data in ADLS Gen2
- Security features of ADLS Gen2
- Best practices for working with ADLS
Technical requirements
To perform the exercises in this chapter, you will need the following:
- Access to an Azure subscription
Understanding ADLS
When considering your storage solution, you must consider the amount of data you want to store. Depending on your answer, you may choose a different option from the services available in Azure – Azure Storage, Azure SQL, or Azure Cosmos DB. There is also a variety of databases available as images for virtual machines (VMs) (such as Cassandra or MongoDB); the ecosystem is quite rich, so everyone can find what they are looking for. A problem arises when you do not have an upper limit for data stored or, considering the characteristics of today’s applications, that amount grows so rapidly that there is no possibility to declare a safe limit, which we will never hit. For those kinds of scenarios, there is a separate kind of storage named data lakes. These allow you to store data in its natural format, so it does not imply any kind of structure over information stored. In Azure, a solution for that kind of problem is named ADLS; in this chapter, you will learn the basics of this service, which allows you to dive deeper into the service and adjust it to your needs.
ADLS fundamentals
ADLS is called a hyperscale repository for data for a reason—there is no limit when it comes to storing files. It can have any format, be any size, and store information structured differently. This is also a great model for big data analytics as you can store files in a way that is best for your processing services (some prefer a small number of big files; some prefer many small files—choose what suits you the most). This is not possible for other storage solutions such as relational, NoSQL, or graph databases, as they always have some restrictions when it comes to saving unstructured data.
Important Note
Azure currently offers two versions of ADLS – Gen1 and Gen2. As Gen1 will be retired in 2024, this chapter covers only Gen2, which is conceptually quite different compared to Gen1.
Fundamentally, ADLS leverages all the concepts of Azure Storage. This implies things such as redundancy—while Gen1 supported only the locally redundant storage (LRS) model of replication, with Gen2 you can use all the replication models supported by the base service. In fact, the main feature—which changes when Azure Data Lake is enabled for Azure Storage—is its use of hierarchical namespaces.
Hierarchical namespaces are designed to guarantee appropriate performance and scalability. They connect the flexibility of Azure Storage with filesystem semantics, which is useful when building big data systems and analysis.
There are two key features of hierarchical namespaces, as follows:
- Atomic directory manipulation: As Azure Storage does not offer a capability of physical directories (it operates on virtual folders, which are created based on embedding slashes in your filename), performing an analysis of filtered files is not easy as you need to browse all files uploaded to your account. Hierarchical namespaces allow you to operate only on a parent-directory level, improving the overall performance.
- Filesystem look and feel: Hierarchical namespaces act as a typical filesystem. This means all tools, developers, and users can interact with them as with any other filesystem interface.
However, always consider whether you really need hierarchical namespaces at all. Azure Storage (mainly Blob Storage) can work just fine without them if you are not working on actual data lake implementation. This includes common file storage implementation, backups, and so on.
Important Note
Once enabled, hierarchical namespaces cannot be disabled.
Above all the things mentioned before, remember that ADLS Gen2 is compatible on the Hadoop Distributed File System (HDFS)—this allows for seamless integration with many open source software (OSS) tools, such as the following:
- Apache Hive
- Apache Storm
- Apache Spark
- MapReduce
- Apache Pig
And many more...!
This gives you a much better ecosystem tool-wise and can be a dealbreaker when compared to other services acting as data lakes.
When it comes to accessing files stored inside an instance of ADLS, it leverages the Portable Operating System Interface (POSIX)-style permissions model; you basically operate on three different permissions, which can be applied to a file or a folder, as follows:
- Read (R): For reading data
- Write (W): For writing data
- Execute (E): Applicable to a folder, used to give read/write permissions in a folder context (such as creating children or listing files)
We will cover more security concepts in the Security section. For now, let’s see how we can create a new instance of the ADLS service using the Azure portal.
Creating an ADLS instance
To create an ADLS instance, you will need to search for Azure Storage in the portal, fill in the basics, and then check the Enable hierarchical namespace feature checkbox on the Advanced tab, as illustrated in the following screenshot:
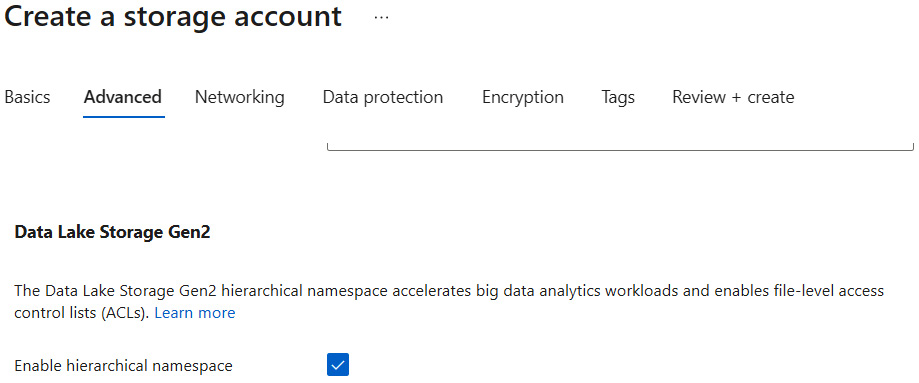
Figure 18.1 – Enabling hierarchical namespaces
If you have an existing Azure Storage instance, you can try to upgrade it to ADLS Gen2 using the ADLS Gen2 upgrade feature, as illustrated in the following screenshot:

Figure 18.2 – Upgrading Azure Storage to ADLS Gen2
Remember that such an operation will affect operations on your Storage Account instance, so it should be performed with care.
Note
ADLS Gen2 is compatible with general-purpose version 2 (v2) accounts and premium block blobs.
When you click on the Create button, your service will be provisioned—you can access it to see an overview, as follows:
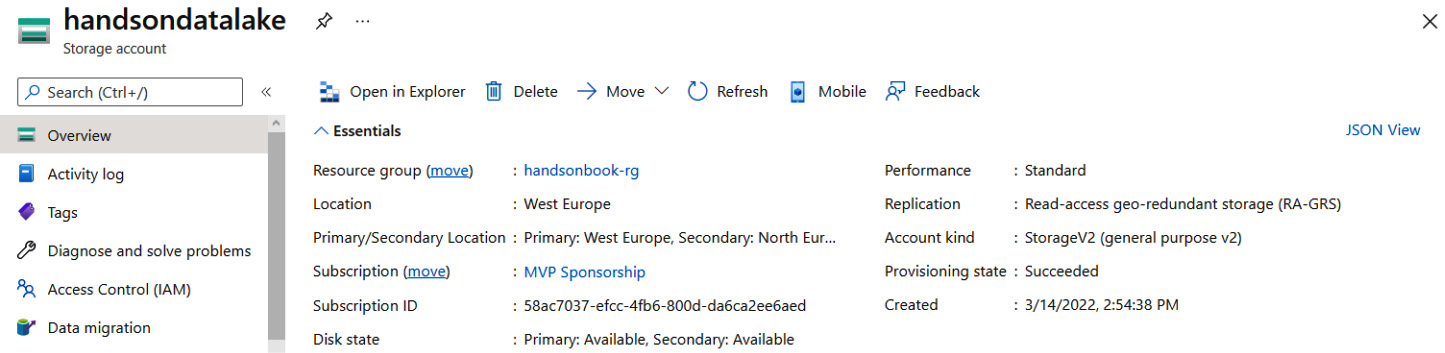
Figure 18.3 – Overview of ADLS Gen2
As you can see, it offers the same view as a standard Storage Account. You still have access to most of the basic features of that account—the only change is in the Properties tab, where you have a Data Lake Storage section now instead of Blob Storage, as illustrated in the following screenshot:

Figure 18.4 – Data Lake Storage properties
Besides that, all the other features are in place, and you can configure them as in Azure Storage. After that brief introduction, let’s see how ADLS can store our data and what needs to be done to communicate with it.
Storing data in ADLS Gen2
Because ADLS Gen2 is all about storing data, in this section of the chapter, you will see how you can store different files, use permissions to restrict access to them, and organize your instance. The important thing to remember here is the fact that you are not limited to using big data tools to store or access data stored within a service—if you manage to communicate with the ADLS protocol, you can easily operate on files using C#, JavaScript, or any other kind of programming language.
The first thing to cover will be using the Azure portal to navigate through our files.
Using the Azure portal for navigation
To get started with working with files in the Azure portal, you will have to click on the Storage browser button, as illustrated in the following screenshot:
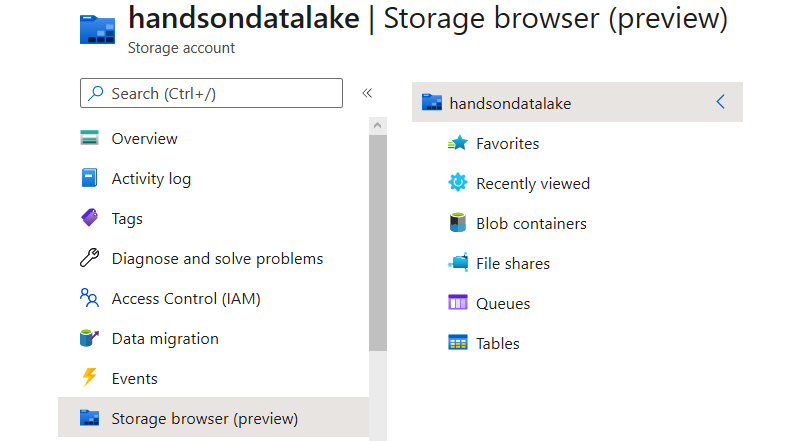
Figure 18.5 – Using Storage browser
Once you click on it, you will see a new screen where you are given many different options for creating a folder, uploading files, or changing access properties. While this tool is not the best way to manage thousands of files, it gives you some insight into what is stored and how. To be able to manage data in ADLS Gen2, simply click on Blob containers, as illustrated in the following screenshot:

Figure 18.6 – Blob containers
Tip
The downside of the user interface (UI) available in the portal is the fact that it tends to hang, especially if you have hundreds of files. Some options (such as deleting a folder) also tend to fail if you have stored gigabytes (GB) of data. In that scenario, it is better to use a software development kit (SDK).
If you take a closer look, you can see that the overall UI and user experience (UX) are the same as in Azure Storage—uploading files and managing containers work the same as in the base version of the service. If you want to learn about this in more detail, look at Chapter 12, Using Azure Storage – Tables, Queues, Files, and Blobs, where we discuss different features of Azure Storage. More differences can be found when we go to the Containers tab, as shown in the following screenshot:
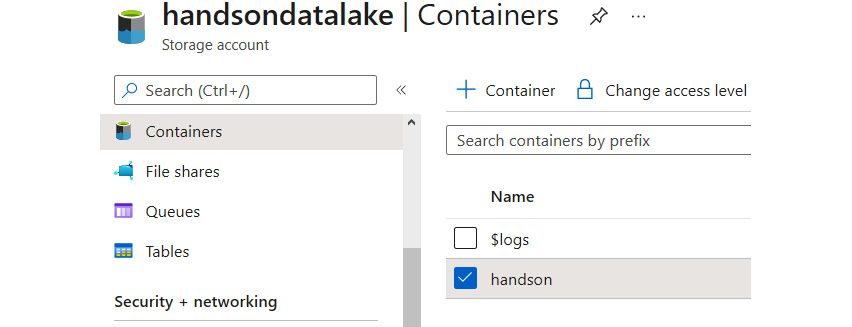
Figure 18.7 – The Containers tab
At the beginning of this chapter, I mentioned that ADLS Gen2 uses a slightly different model for giving access to files, which is based on the POSIX model. You can access this by going to the Manage ACL view, as illustrated in the following screenshot:

Figure 18.8 – The Manage ACL menu option
This view allows you to easily understand who can read or write something to a directory, as indicated in the following screenshot:
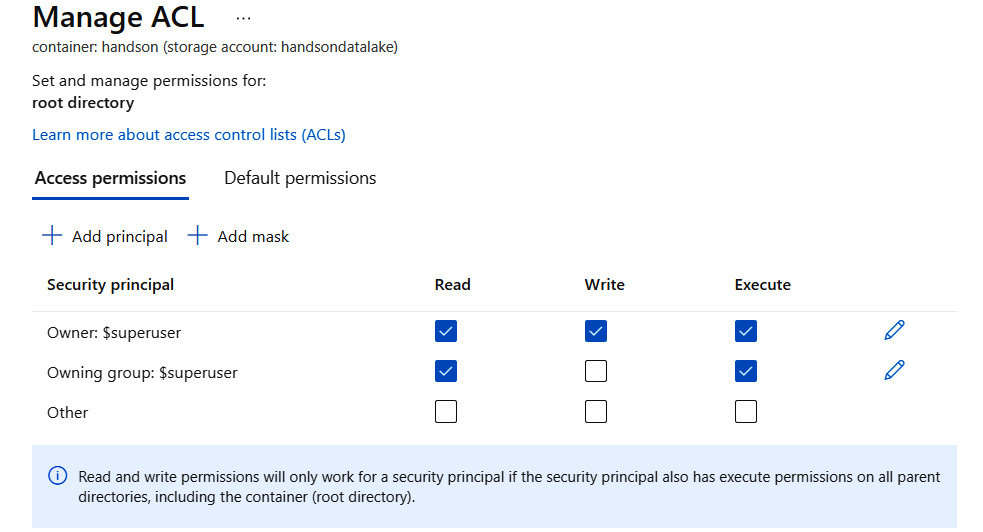
Figure 18.9 – Configuring access to a directory
The same view is available when you find an individual file and decide to overwrite permissions, which are given on a directory level, as shown in the following screenshot:
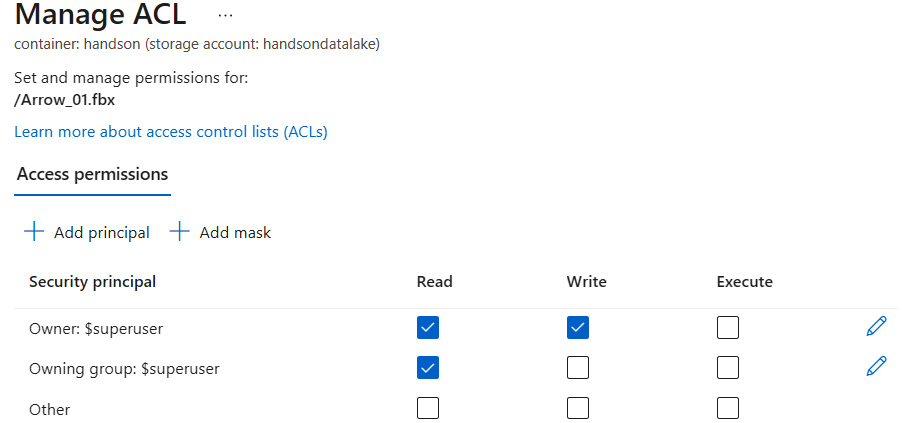
Figure 18.10 – Configuring access to a file
By default, only you can access a file or a folder. To add a new user or a group, you can click on the + Add principal button. As you can see, managing permissions via the portal is really simple and does not require additional operations. With that topic covered, we can go to the next part and see how an SDK can help achieve the same as the Azure portal.
Using SDKs
The most flexible (and the most advanced) option to manage files and your ADLS instance is using an SDK for a language you are using. Currently, there are three different languages officially supported, as follows:
- .NET
- Java
- Python
For .NET, you need to install the Azure.Storage.Files.DataLake package—for example—using the following command:
dotnet add package Azure.Storage.Files.DataLake -v 12.6.0 -s https://pkgs.dev.azure.com/azure-sdk/public/_packaging/azure-sdk-for-net/nuget/v3/index.json
For Python, you can leverage pip, like so:
pip install azure-storage-file-datalake
Finally, Java can use different package managers. Here is an example for Maven:
<dependency>
<groupId>com.azure</groupId>
<artifactId>azure-storage-file-datalake</artifactId>
<version>12.8.0</version>
</dependency>
There is also the possibility of using a REpresentational State Transfer (REST) application programming interface (API), so basically, you can connect to it using any language you want.
To connect to a service, you need a client—the actual code depends on the authentication method. Currently, there are two ways of authenticating:
- Using the account key
- Using Azure Active Directory (Azure AD)
Here, you can see how an ADLS client is obtained for .NET:
// Azure AD
// Install Azure.Identity NuGet package to get access to ClientSecretCredential() object
public static DataLakeServiceClient GetDataLakeServiceClient(
String accountName, String clientID, string clientSecret, string tenantID)
{
var credential = new ClientSecretCredential(
tenantID, clientID, clientSecret, new TokenCredentialOptions());
var dfsUri = "https://" + accountName + ".dfs.core.windows.net";
return new DataLakeServiceClient(new Uri(dfsUri), credential);
}
// Account key
public static DataLakeServiceClient GetDataLakeServiceClient(
string accountName, string accountKey)
{
var sharedKeyCredential =
new StorageSharedKeyCredential(accountName, accountKey);
var dfsUri = "https://" + accountName + ".dfs.core.windows.net";
return new DataLakeServiceClient
(new Uri(dfsUri), sharedKeyCredential);
}
Here, you can find an example of two methods written in .NET, which create a directory and upload a file to it:
public async Task<DataLakeDirectoryClient> CreateDirectory
(DataLakeServiceClient serviceClient, string fileSystemName)
{
var fileSystemClient =
serviceClient.GetFileSystemClient(fileSystemName);
var directoryClient =
await fileSystemClient.CreateDirectoryAsync("my-directory");
return await directoryClient.Value.CreateSubDirectoryAsync("my-subdirectory");
}
public async Task UploadFile(DataLakeFileSystemClient fileSystemClient)
{
var directoryClient =
fileSystemClient.GetDirectoryClient("my-directory");
var fileClient = await directoryClient.CreateFileAsync("uploaded-file.txt");
var fileStream =File.OpenRead("<path-to-local-file>");
var fileSize = fileStream.Length;
await fileClient.Value.AppendAsync(fileStream, offset: 0);
await fileClient.Value.FlushAsync(position: fileSize);
}
You can find more examples and code snippets in the Further reading section.
Tip
The important thing about using SDKs is the ability to abstract many operations and automate them—you can easily delete files recursively or dynamically create them. Such operations are unavailable when using UIs, and most serious project developers would rather code stuff than rely on manual file management.
Let’s now revisit the security features available for ADLS Gen2.
Security features of ADLS Gen2
ADLS Gen2 offers almost the same security model as Azure Storage. In fact, the only difference is the access control list (ACL) feature, which can be used to define access to directories and files. In this section, we will cover the security features available and describe them in detail so that you can use them right away.
Authentication and authorization
To authenticate who or what can access data stored, ADLS Gen2 uses Azure AD to know what the current entity accessing data is. To authorize it, it leverages both role-based access control (RBAC) to secure the resource itself, and a POSIX ACL to secure data.
It is important to understand the distinction between these two terms, so let’s have a closer look here:
- Authentication: This determines who or what tries to access a particular resource.
- Authorization: This secures a resource by limiting access to it to those who have been assigned a particular set of permissions.
Note
It is important to remember that if you have multiple subscriptions hosting different resources that would like to access ADLS, you have to assign the same Azure AD instance to all of them—if you fail to do so, some will not be able to access data, as only users and services defined within a directory assigned to ADLS can be authenticated and given access to it.
Let’s check the difference between the RBAC and POSIX models.
RBAC
RBAC controls who can access an Azure resource. It is a separate set of roles and permissions that has nothing to do with the data stored. To check out this feature, click on the Access Control (IAM) blade, as illustrated in the following screenshot:

Figure 18.11 – RBAC configuration for a container
In the preceding screenshot, you can see the configuration of RBAC set up on a container level. The same can be done when configuring your instance of a service. When considering RBAC, you have two levels of configuration for ADLS Gen2, as follows:
- Resource level, which defines who (or what) can configure an instance of the service
- Container level, used for limiting access to containers storing your data
When securing your resource, you can use different roles available for your account, as illustrated in the following screenshot:

Figure 18.12 – Subset of roles available for RBAC configuration
Using the Access Control (IAM) blade, you can easily control who can access your instance of ADLS and how—use it any time you want to change permissions or the set of users/services accessing it.
Tip
A good idea is to manage groups rather than individual entities—this allows you to add/remove a user or an entity in one place (Azure AD) instead of browsing resources and their RBAC.
While RBAC can be useful for limiting access to resources (in other words, the management plane), they serve little purpose when implementing business logic connected to data.
POSIX ACL
As described previously, you can manage access to data stored within your instance of ADLS by providing a set of permissions defined as R, W, and E. They are part of the POSIX ACL model that is a feature of HDFS, which is part of the engine of this Azure service. If you have used—for example—File Transfer Protocol (FTP) servers, you probably have worked with filesystem permissions; they were described as numbers or strings containing the letters r, w, x, and the character -. Here is an example:
- -rwx------ is equal to 0700 and declares read, write, and execute permissions only for the owner.
- -rwxrwxrwx is equal to 0777 and declares read, write, and execute permissions for everyone.
- -rw-rw-rw- is equal to 0666 and declares read and write permissions for everyone.
ACL can be configured on a directory or file level. You can find more about the POSIX ACL model in the Further reading section.
Let’s now check network isolation features, which are crucial in all enterprise and secure environments.
Network isolation
In ADLS Gen2, network isolation is configured in the same way as traditional Azure Storage, as illustrated here:
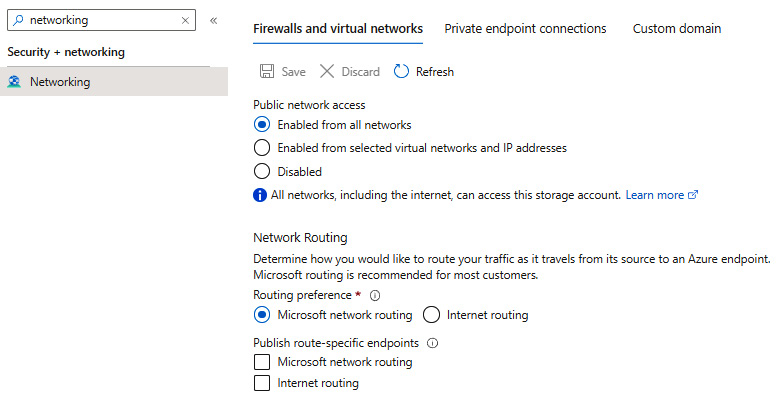
Figure 18.13 – Configuring networking for ADLS
The important thing here is the ability to block other Azure services from accessing your data—this can be helpful if you have requirements that force you to disallow anyone from reading any information stored in ADLS.
We have now completed most of the technical stuff related to ADLS. The last topic for this chapter will be covering some good practices and gotchas that can be helpful for working with the service.
Best practices for working with ADLS
ADLS is a bit different when it comes to accessing data stored and performing read and writes. As this service is designed for storing petabytes (PB) of data, it is important to know the best practices for doing so, to avoid problems such as the need to reorganize all files or slow reads/writes. This also includes security features (as discussed earlier), as this is an important part of the whole solution. In this section, we will focus on multiple pieces of advice regarding ADLS to help you use it consciously and leverage the best practices.
Performance
One important feature of many storage solutions is their performance. In general, we expect that our databases will work without a problem whether the load is low or high and a single record is big or small. When it comes to ADLS, you must consider the following factors:
- Using the Premium tier: As opposed to general-purpose accounts, the Premium tier in Azure Storage uses solid-state drive (SSD) disks for better performance and lower latency. If your application requires access to data with higher performance targets, this is the way to go.
- Data ingestion optimization: Always make sure that your infrastructure supports working on high volumes of data. In practice, this means that you should ensure the network will not be a bottleneck, your VMs use SSD disks for lower latency regarding input/output (I/O), and so on. Microsoft recommends that when Azure VMs are considered, you should go for Azure D14 VMs or better.
- Network connection: To make sure that everything is optimized both performance- and cost-wise, deploy your infrastructure and application to the same region so that most of the traffic stays within the same data center.
- Parallel processing: Try to perform as many reads and writes as possible to ADLS Gen2 in the same timeframe. This ensures that you are using all the throughput you are given.
- Use an appropriate file format: Instead of storing data as JavaScript Object Notation (JSON) or comma-separated values (CSV) files, try to use formats such as Avro, Parquet, or Optimized Row Columnar (ORC). They have a compressed, embedded schema in each file and are machine-readable.
Security
We discussed this topic a little previously, but here, we summarize it. When using ADLS and considering its security features (such as authentication, authorization, and access to files), it is important to remember the following things:
- Prefer groups over users/services: While, initially, it is easier to assign an individual user to a resource or a folder, you will quickly face problems when the number of people interested in data starts to grow rapidly. Therefore, it is better to use Azure AD groups to both determine RBAC access to the resource itself and a POSIX ACL for files and folders. It also improves the performance of the solution, as it is quicker to check whether an entity belongs to a group than to traverse through a long list of users.
- A minimum set of permissions: As in other services, always start with a minimum set of permissions required by someone who accesses your instance of ADLS. Do not assign a write permission to somebody who only reads data or execute to a service that reads only a single file in a folder.
- Enable the firewall: In general, you do not want to allow anyone to access data stored inside ADLS. To secure your solution so that only a subset of IP addresses can access information, enable the firewall so that anyone outside the list will be rejected.
Resiliency
It is crucial to ensure that your data is stored in a safe manner and will not be lost in the case of any issue inside the data center. As mentioned at the beginning of this chapter, ADLS Gen2 can leverage standard replication options for Azure Storage. This is a great improvement over Gen1, though you should still consider cost when going for geo-replication. When lots of data is replicated, you should always include outbound traffic in your calculations.
Data structure
You will choose a different data structure for different use scenarios—for Internet of Things (IoT) data, it will be very granular, as shown here:
{Vector1}/{Vector2}/{Vector3}/{YYYY}/{MM}/{DD}/{HH}/{mm}On the other hand, for storing user data, the structure may be completely different, as we can see here:
{AppName}/{UserId}/{YYYY}/{MM}/{DD}It all depends on your current requirements. The data structure is extremely important when you plan to perform an analysis on the files stored—it directly affects the size of files and their number, which can further affect the possible toolset for your activities.
Tip
Another important thing here is the legal requirements—if you use any kind of sensitive data as a folder or a filename, you will have to be able to perform a cleanup efficiently if a user tells you that they want to be forgotten or asks for an account to be removed.
Summary
In this chapter, you have learned a bit about ADLS, an Azure service designed to store an almost unlimited amount of data without affecting its structure. We have covered things such as data structure, security features, and best practices, so you should be able to get started on your own and build your very first solution based on this Azure component. Bear in mind that what can easily replace Blob Storage—for example—all depends on your requirements and expectations. If you’re looking for a more flexible security model, better performance, and better limits, ADLS is for you. This ends this part of the book, which included services for storing data, monitoring services, and performing communication between them.
In the next chapter, you will learn more about scaling, performance, and maintainability in Azure.
Questions
Here are some questions to test your knowledge of the important topics in this chapter:
- Which security model is better—managing security groups or individual entities, and why?
- What is the difference between RBAC and a POSIX ACL?
- Which data structure is better—a single folder containing thousands of files or a hierarchy of folders containing several files each?
- Can ADLS be used with any programming language?
- What is the difference between ADLS Gen2 and Azure Storage?
- How do you ensure that your solution based on ADLS is geo-redundant?
Further reading
For more information, refer to the following sources:
- Blob Storage features supported by ADLS Gen2: https://docs.microsoft.com/en-us/azure/storage/blobs/storage-feature-support-in-storage-accounts
- ACLs: https://docs.microsoft.com/en-us/azure/storage/blobs/data-lake-storage-access-control
- Best practices: https://docs.microsoft.com/en-us/azure/storage/blobs/data-lake-storage-best-practices
- Java reference: https://docs.microsoft.com/en-us/java/api/overview/azure/storage-file-datalake-readme?view=azure-java-stable
- Python reference: https://azuresdkdocs.blob.core.windows.net/$web/python/azure-storage-file-datalake/12.0.0b5/index.html
- .NET reference: https://docs.microsoft.com/en-us/dotnet/api/azure.storage.files.datalake?view=azure-dotnet
- Query acceleration reference: https://docs.microsoft.com/en-us/azure/storage/blobs/data-lake-storage-query-acceleration