
21
Managing APIs with Azure API Management
The more applications you have, the more important it becomes to understand their interfaces. Multiple public endpoints managed in various places make administration and development tricky and error-prone. To address application programming interface (API)-heavy architecture issues, Microsoft Azure offers Azure API Management—a modern and flexible API gateway.
Understanding how to manage multiple APIs on an Azure level becomes more and more important for all systems that were recently created or are undergoing a design phase. This is caused by both an increasing number of working services and a more complex architecture that requires a service to centralize API management.
The following topics will be covered in this chapter:
- The main concepts of Azure API Management
- Guidelines for designing APIs
- The basics of Azure API Management policies with examples
- Automated management of the service
Technical requirements
To perform the exercises in this chapter, you will need the following:
- An Azure subscription
The main concepts of Azure API Management
Before we get started with Azure API Management as a service, let’s briefly discuss the purpose of this service. In many information technology (IT) systems, there are various APIs that are often built by different teams using different technologies. Each of these APIs must authenticate requests, track them, and possibly implement a sophisticated way to handle retries, caching, or thresholding. While doing all these independently may not seem like a bad idea, in most scenarios, it will be considered a bad practice.
The reason for avoiding doing such operations individually in each service is simple–we want to avoid duplication. It is not only relevant for the code base—where architecture is designed, the overall aim is to reuse available components if possible. If there is a way to centralize mentioned features, we should always leverage it.
This is where services such as Azure API Management come into play—they act as a centralized service for managing various APIs across multiple environments. You can treat them as a way of solving more general problems, such as the following:
- API discovery
- Centralized security
- Centralized API management
- Single point of entry (SPOE) for a company’s APIs
Azure API Management has three main concepts that we need to understand before going forward, as outlined here:
- API gateway, which is a proxy passing requests further to all the backends
- Management plane used for configuration of the service, setting up policies, and managing users
- Developer portal
All combined make Azure API Management.
API gateway
Most of the logic of the Azure API Management service is done within an API gateway. This is quite a busy component as it is responsible for multiple things, including the following:
- When you configure your API to have a quota or rate limit, the API gateway is responsible for enforcing it.
- It validates credentials (such as JavaScript Object Notation (JSON) Web Token (JWT) tokens and API keys).
- It caches request data if caching is configured for your API.
- As all the logging and tracing is done within the API gateway, it is also the main component for reporting and troubleshooting.
As you can see, the API gateway will be one of the most important components for us as many features available for Azure API Management are implemented inside it.
Note
An API gateway has two modes of deployment—managed and self-hosted. When a self-hosted mode is used, you can deploy it directly into the same network as your other services. This enables you to improve traffic and be compliant with any legal requirements.
While in most cases we will not interact with the API gateway directly, it will still be a crucial component of the whole ecosystem.
Management plane
To configure Azure API Management, we will use the management plane. Simply put, this is a layer of the service that handles requests coming from administrators to set up various settings. This component allows us to not only manage Azure API Management itself but also to import APIs using specifications (such as OpenAPI) and set up policies. We cannot perform management tasks without connecting with that layer.
Developer portal
A developer portal is a website that is automatically generated and can be easily customized. Its main purpose is to host things such as documentation of your APIs and interact with them using an interactive console. Using the portal is optional—you can connect to APIs proxied with Azure API Management with traditional tools (including command-line interface (CLI) tools, custom code, or even browsers). On the other hand, it simplifies the distribution of APIs to end users.
With some fundaments explained, let’s learn more about designing APIs and onboarding them to the cloud with Azure API Management.
Guidelines for designing APIs
When designing an API, you need to consider the following aspects:
- Who is the consumer (is this an internal/external API)?
- Which protocol will be used for connection and information exchange?
- How will authentication be performed (if any)?
- What are the performance goals of the API?
- Do you need additional features such as throttling/caching/conditional access (CA)?
- Are you planning to monetize your API?
Depending on your answer, the use of Azure API Management may or may not be justified. A general rule of introducing such a service depends on your business capabilities and requirements. That said, we always need to challenge our choice against requirements and overall goals.
As it is now possible to host Azure API Management in serverless mode (meaning you pay only for usage), this is still a service mostly beneficial for bigger companies that can leverage its capabilities and see value in centralizing the management of APIs. As Azure API Management is much more complicated in terms of administration and proper design than developer-oriented services (such as Azure App Service or Azure Container Instances), the decision to provision it should involve consulting with other potential users.
It is difficult to determine when deployment of Azure API Management seems like a good idea (because numbers will be different for each company), but we can materialize some general guidelines helpful when making a choice, as follows:
- If there are several APIs in design/already deployed, it seems like a good idea to connect to them through a single proxy.
- Instead of authenticating each service, it may be beneficial to implement it in a single place and just pass requests through the service.
- When working on inventory for a company, putting all the APIs into Azure API Management will improve the discoverability of services.
- Deploying Azure API Management sooner rather than later will also help in potential migration and ensure that all teams can start using its features from the very beginning.
Initially, Azure API Management may look like an overhead, but in many scenarios, it will bring benefits right from the start. The approach is like using reservations in Azure for things such as virtual machines (VMs)—while you should use them from the very beginning, many people avoid them until they have several machines under their command, thus losing the opportunity to start saving money from day one.
Using Azure API Management also affects the way an API is designed from a code point of view. Normally, we should consider a way to inject additional functionalities for each request coming to our API. Those functionalities are sometimes quite complex and are what increase the technical debt of each service’s code base and enforce development teams to maintain them. If a proxy is introduced to handle such logic, each service focuses on the business value it brings without additional responsibilities.
Ultimately, we end up with a healthier ecosystem—each component has its own responsibilities and we do not reinvent the wheel. Let’s now check how Azure API Management is deployed and how we can deploy a custom policy handling all requests.
Basics of Azure API Management policies with examples
In this section, we will focus on provisioning our own Azure API Management instance with a policy deployed. Before we start on the practical aspects, let’s define what a policy is.
As Azure API Management acts as a proxy for each request, it can apply various checks and enforcements for them. In other words, if we want to verify the contents of a request, validate it, block it, or apply a rate limit, a policy is exactly what we need.
Note
Azure API Management allows for the deployment of both in-built and custom policies. In-built policies can also be changed to speed up the deployment of custom ones.
Policy schema
Each policy has a fixed schema that we can extend based on desired logic, as illustrated in the following code snippet:
<policies>
  <inbound>
    <!—- logic applied for incoming requests -->
  </inbound>
  <backend>
    <!—- logic applied before passing a request downstream -->
  </backend>
  <outbound>
    <!—- logic applied for each response -->
  </outbound>
  <on-error>
    <!—- handling errors -->
  </on-error>
</policies>
As you can see, a policy is a simple Extensible Markup Language (XML) document where we can put the logic for both inbound and outbound communication. Depending on the direction of the communication, a policy will be applied for different actors, as follows:
- When using a <inbound> block, we are handling incoming traffic directly.
- When using a <backend> block, we apply logic after the <inbound> block is evaluated.
- When using a <outbound> block, we operate on data sent by the API itself.
There is also a <on-error> block, which is helpful when we want to handle any errors that may happen in other blocks.
What we can do inside a policy depends on the function used. For example, if we want to add a header to a request, we can use a <set-header> policy, like this:
<policies>
    <inbound>
        <base />
        <set-header name=”my-custom-header” exists-action=”override”>
            <value>My custom value</value>
      </set-header>
    </inbound>
</policies>
This simple policy will add a my-custom-header header to each request reaching our backend. Another example would be some validation policy that checks whether a request contains a header with a valid value. To do that, we can use a <check-header> policy, like so:
<policies>
    <inbound>
        <base />
        <check-header name=”Authorization” failed-check-httpcode=”401” failed-check-error-message=”Not authorized” ignore-case=”false”>
          <value>my-super-secret-code</value>
       </check-header>
    </inbound>
</policies>
The preceding example policy checks whether a request contains an Authorization header and whether it has a my-super-secret code value. If the check fails, HTTP 401 is returned. Now, let’s check how policies are configured inside the service.
Provisioning the Azure API Management service
Azure API Management is provisioned in the same manner as other Azure services. To do that using the Azure portal, you can use the + Create a resource button and search for API Management, as illustrated in the following screenshot. Then, just click the Create button to see a wizard appear:

Figure 21.1 – Selecting Azure API Management in Azure Marketplace
Provisioning an instance of Azure API Management is not difficult, but it requires a few steps to complete. The first thing needed is configuring the basics of the service, as follows:

Figure 21.2 – Configuring the basics
The Basics tab asks for some standard information such as subscription, resource group, and instance name. We need to also enter the organization name and email address of an administrator. Those values should reflect the actual owner of Azure API Management. If you are creating an instance just for prototyping, you can enter any value here. For all other scenarios, make sure that those values are correct.
An important choice here is the pricing tier. Azure API Management offers five different tiers to choose from, as follows:
- Developer
- Basic
- Standard
- Premium
- Consumption
Each tier offers different features and service-level agreements (SLAs), so the actual choice depends on the purpose of the provisioned instance.
Note
The Developer tier for Azure API Management offers no SLA. It is a great choice for testing but should not be used for production scenarios.
All pricing tiers apart from Consumption are priced based on the time a service is deployed. The Consumption tier offers pricing in a pay-as-you-go model, meaning it scales with usage. Its scaling capabilities are also different as an instance deployed using that pricing tier scales automatically, depending on incoming traffic.
While Azure API Management offers some additional configuration options (such as integration with Azure Application Insights, virtual network (VNet) integration, and automated managed identity creation), we will skip these in this chapter and go directly to the Review + Create tab for a final check. Once the check is complete, click on the Create button to start provisioning your instance. This may take a while, so be patient—in some cases, it may take up to 2 hours!
Tip
While the Consumption tier may be tempting, before choosing it, make sure you have checked all the differences between it and fixed pricing. Besides scaling differences, the Consumption tier is considered shared, meaning it lacks isolation capabilities offered by other tiers.
Once your instance is successfully provisioned, we can configure our first policy. To do so, we need to access the APIs tab within an instance of Azure API Management, as illustrated in the following screenshot:
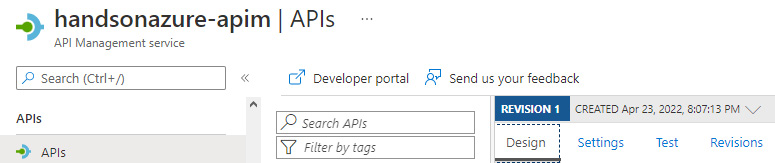
Figure 21.3 – Accessing the APIs tab
Inside that tab, you will have an option to import a new API or access an Echo API, which is a predefined API created with each new Azure API Management instance. When you click on Echo API, you will get access to its configuration view, as illustrated in the following screenshot:

Figure 21.4 – Echo API configuration view
As you can see, here, we can configure things such as available operations, API specifications, and policies for both inbound and outbound communication. This is the place where our policies can be configured.
Note
Each API in Azure API Management is defined by its schema. While changes can be done mostly via the user interface (UI), under the hood APIs use a strict specification that can be altered at any moment.
If you click on the + Add policy button for inbound processing, you will see a screen where we can select a policy for incoming requests. Let’s set up a policy that will add a header when a request is processed. To do that, use the Set headers policy from the available list, as illustrated in the following screenshot:
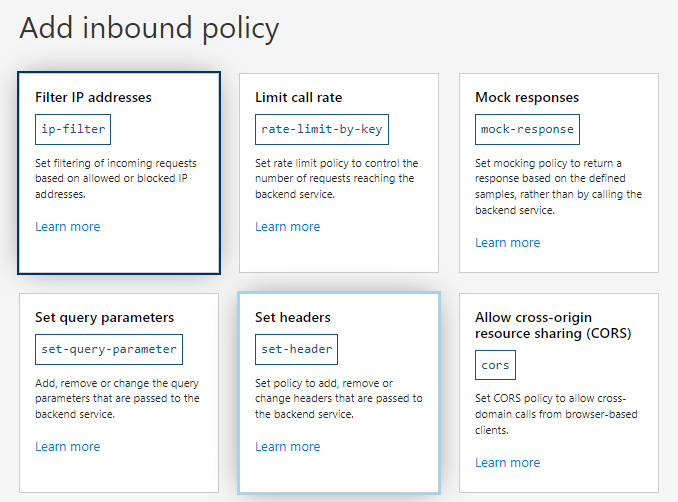
Figure 21.5 – Selecting a policy
The described policy allows you to either add, change, or remove a header for an incoming request. This is helpful—for example—when each request must be decorated with an additional header, but you do not want to do that on an application level. The reason for that is simple—such operations can be done centrally as they are required by central teams handling things such as logging and monitoring. Doing that on an application level is possible but is often difficult as in most scenarios, changing an application’s code requires a new release. What is more, adding such a header only after a request reaches the application could be useless as most of the traces are lost.
The following screenshot demonstrates how to add a policy in the Azure API Management service:
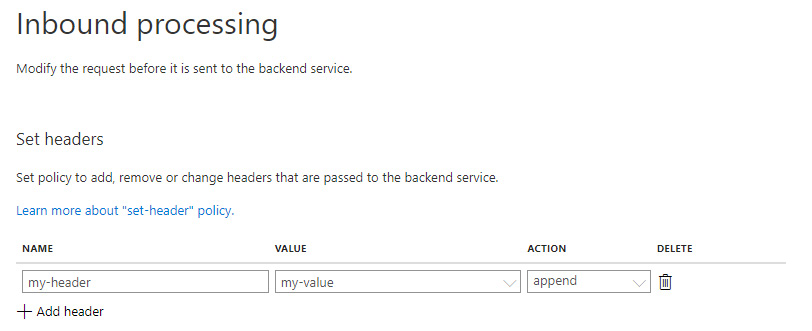
Figure 21.6 – Adding a policy in Azure API Management
You can add many policies for various operations if needed and combine them depending on your needs. There is a full reference of policies that are available for the service—you can find this in the Further reading section for this chapter.
Let’s now see what automated management of Azure API Management looks like.
Automated management of the service
Azure API Management is a service that, in many scenarios, requires manual intervention to add a new API, product, or policy. However, certain activities can be automated and ease management tasks when managing the service.
To manage your instance and perform automation tasks, you need access to proper operations through an interface that can be used in a script or application code. Fortunately, Azure API Management offers access to its API via PowerShell commands. For example, if you want to create a user, you can use the following commands:
$context = New-AzApiManagementContext -ResourceGroupName “resource-group” -ServiceName “name-of-your-instance”
$user = New-AzApiManagementUser -Context $context -FirstName “first-name” -LastName “last-name” -Password “password” -State “Active” -Note “custom-note” -Email “user-email”
As you can see, to perform any operation on your instance of the service, you need a context object. A context object is obtained via the New-AzApiManagementContext command, which requires both the name of your instance of Azure API Management and its resource group. Another example command that we could use imports an API, as illustrated in the following code snippet:
$context = New-AzApiManagementContext -ResourceGroupName “resource-group” -ServiceName “name-of-your-instance”
$api = Import-AzApiManagementApi -Context $context -SpecificationUrl “swagger-url” -SpecificationFormat Swagger -Path “api-path”
The preceding command imports an API schema written using the Swagger format. There are also additional options available such as Web Application Description Language (WADL) or OpenAPI, so you can adjust the command depending on your needs. If you wish to use them, you need to change the value of the SpecificationFormat parameter, as follows:
- Use Wadl for WADL.
- Use Swagger if you have your API specification prepared in the Swagger format.
- Use OpenApi if the specification you use is OpenAPI.
Additionally, you can decide whether a specification will be fetched from a local file or a remotely available Uniform Resource Locator (URL). To do this, you must select either the SpecificationPath or SpecificationUrl parameter, which are described in more detail here:
- SpecificationPath is used to point to a local file.
- SpecificationUrl is helpful when an API is already present on a web server.
Either way, your API will be imported if all parameters are entered correctly.
Note
When using SpecificationPath, your API is not required to be available. This allows you to configure it upfront before the code is deployed to a web server.
We talked a little bit about managing Azure API Management using Azure PowerShell but we must still understand how to run those commands. As the service does not offer inbuilt ways to automate operations, another hosting option for those scripts must be considered. As the only requirement here is access to PowerShell, there are several possibilities to select from, such as the following:
- You can run those scripts manually from your computer.
- Scripts can be hosted on a VM and run with a task scheduler.
- You can create a Docker image and then run containers using any container-hosting platform (this could be Kubernetes, Azure Container Instances, or Docker Compose).
- You can run Azure functions written in PowerShell and use them to execute mentioned commands.
As you can see, there is a variety of different options available—everything depends on actual requirements and technical needs. You can also consider using Azure Automation (which is not covered in this book) as a managed platform for running automation tasks related to your infrastructure. See the Further reading section for a commands reference and a better picture of what is possible with that PowerShell module.
Summary
In this chapter, we covered Azure API Management as a proxy service that can act as a discovery service and entry point for APIs developed by your organization. We learned some fundamental concepts and browsed some policies that can be used to control how a request is handled and passed to configured backends.
This chapter starts the last part of the book, where we discuss multiple options for traffic management, routing, load balancing, and controlling ingress. Make sure to check the next two chapters for a whole picture of those services in relation to platform-as-a-service (PaaS) components.
Questions
Here are some questions to test your knowledge of the important topics covered in this chapter:
- Which available specifications for an API in Azure API Management can you import?
- Which component in Azure API Management is responsible for handling incoming requests?
- Can you add a policy for outbound communication?
- Which tool is used to automate management tasks for Azure API Management?
- Can you remove a header using a policy in Azure API Management?
- Can you implement throttling using Azure API Management?
Further reading
For more information, refer to the following sources:
- API Management PowerShell reference: https://docs.microsoft.com/en-us/powershell/module/az.apimanagement
- Self-hosted gateway feature: https://docs.microsoft.com/en-us/azure/api-management/self-hosted-gateway-overview
- VNet integration: https://docs.microsoft.com/en-us/azure/api-management/virtual-network-concepts?tabs=stv2
- Policies overview: https://docs.microsoft.com/en-us/azure/api-management/set-edit-policies?tabs=form
- Azure Automation: https://docs.microsoft.com/en-us/azure/automation/overview